Finding the Right Zucchini Seeds

Over the years, I’ve had a number of people write me about my zucchini posts, especially the one entitled, Making Use of Those Oversized Zucchinis. A few people have pointed out that their particular kind of zucchini didn’t work well for chips. It’s true. You can’t use certain types of zucchini for chips. Especially bad are the yellow crooked neck squash that turn hard unless you pick them exceptionally small. The common straight zucchini works quite well, but you must ensure the skin is still soft enough before you make chips. If you can easy stick a fingernail through the skin, you’re probably fine—no matter how big the zucchini is physically (and bigger really is better).

The kind of zucchini I like best is the Lebanese Summer Squash. My previous posts had pointed to a place where you could get the seeds for this type of zucchini, but unfortunately, even though the link still works, the site shows that the seeds are constantly out of stock. The new link in this post will help you find the seeds you need to get started. Unlike many kinds of zucchini, this particular plant grows quickly and you still have time to get your seeds planted. You don’t have to start them in the house—just plant them in the ground and make sure you keep them watered.

Zucchini chips are a healthy alternative to the kinds of chips you get in the store and they’re absolutely delicious. Of course, you can make other sorts of chips too, something I discuss in Making Dehydrated Chips. Let me know if you have any questions about making them at [email protected].


How to Butcher a Pumpkin…

When I was growing up, it was my uncles’ job to wield a big knife and peel the raw pumpkin so that my mom could bake pumpkin pie and make filling for canning. Watching one of “the boys” handle the knives while trying to carve away the skin of a raw pumpkin was usually a little scary and sometimes hilarious. It all depended on who was careful and who was just cutting up! When I moved into a home of my own, I had to learn a different way to separate skin from the flesh of a pumpkin because I am married to a man who loves pie, made from scratch, and he likes his pumpkin made that way as well.

Besides, it’s very cheap and easy to do. So here’s how to butcher a pumpkin in seven steps:

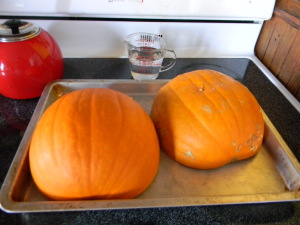
  1. Be sure that your pumpkin will fit inside the shallow baking sheet that you are going to be using. It doesn’t matter if both halves fit but you want to have the edges of the pumpkin completely inside the baking pan. Choosing the right sized pumpkin for this process is very important.

    Cut Side down in shallow baking sheet

    Be sure that the edges of the pumpkin are inside the pan.
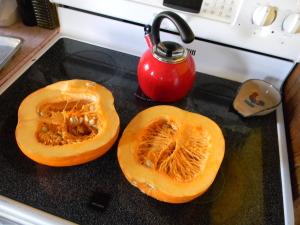
  2. Cut your pumpkin in half.

    Raw Pumpkin halves
    Raw Pumpkin Halves
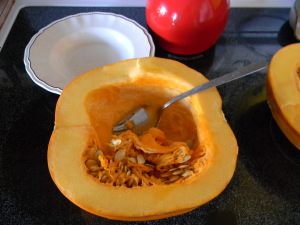
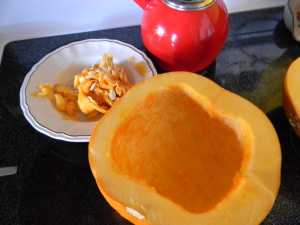
  3. Carefully scoop out the seeds with a spoon. If you have kids that want to help, this is a great chance to include them—handling the guts and seeds is really fun (and gross)! The seeds can be washed and baked with seasoning for an added treat.

    Scooping out the seeds
    Scoop out the seeds with a spoon
    Save the seeds for roasting later!
    Save the seeds for roasting later!
  4. Flip the pumpkins cut side down and place them onto a shallow baking sheet with a lip all the way around the pan. I used an Air-bake pan because it is double layered and gives improved stability while loading and unloading the heavy pumpkin from the hot oven.

    Cut Side down in shallow baking sheet
    Place Pumpkins Cut Side Down
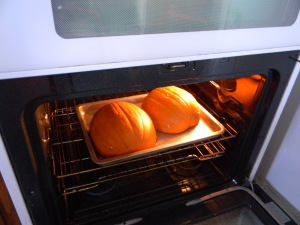
  5. Add a small amount of water to the baking sheet. Just enough to cover the surface of the pan about 1/4 inch deep. The water will boil and steam the pumpkin inside while the oven is baking it from the outside.
    Pumpkins in 350 F oven
    Pumpkins in 350 F oven
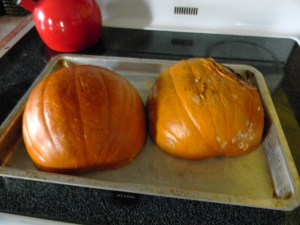
  6. Bake in a 350F oven until you can pierce the skin of the pumpkin with a fork. If you want the pumpkin to be more puree-like bake it longer. You may need to carefully add water while the pan is in the oven, but bake the pumpkin until it is as soft as you want it to be. The halves may collapse just a little bit as the insides get soft.
    Fork tender is done enough for chunky pumpkin
    Fork Tender is done enough for chunky pumpkin
  7. Finally, let the whole thing cool down. When it is cool enough to handle, peel the skin from the flesh and discard the skin. Then you can use it however you like. My last experiment was a simple blend of fresh apple chunks, some pumpkin chunks and curry powder to taste. No sugar and no recipe. I just mixed up what I had and popped it back into the oven to soften the apples. It was delicious!

This method of processing pumpkin is economical, healthy and easy. There are absolutely no additives or preservatives so the only thing that you will taste is pumpkin. It also works for winter squashes of all kinds.

So, if you decided NOT to carve your pumpkin for Halloween, consider Butchering and Eating It! You’ll be glad you did!

If you have any pumpkin tips or stories, I would love to hear from you! Please respond to this blog or email John at [email protected].

Herbal Harvest 2014

Every year I dry the herbs found in the herb garden for use during the winter months. You can see the technique used in the Drying Herbs post. I’m still using my American Harvest dehydrator to get the job done. However, since the time I wrote that original post, I’ve found a way to improve the potency of the resulting dried herbs. Each layer now has a solid sheet on the bottom. The solid sheet is supposedly designed for fruit leathers and for drying other liquids. The reduction in air flow means that the drying process takes longer, but it also means that fewer of the oils (and other useful elements) found in the herbs are wafted away by the air flow. As a compromise, you can always use the screens instead. The screens keep small particles from falling through, but they also reduce the air flow that robs your herbs of their flavor. The most important issue when drying herbs is to ensure you check their status often and keep the temperature at 95 degrees Fahrenheit (35 degrees C). A higher setting will cause the oils in the herbs to dry out and make your herbs less effective as a result.

I’m also finding that keeping the herbs as whole as possible for storage prolongs their life. You can’t store the herbs very well without crumbling them a little, but keeping the leaves as large as possible appears to help retain the oils. Crumble the leaves or even grind the herb to powder immediately before you use it to maximize the flavor. The less you process the herb, the longer it’ll store.

This year’s herb garden didn’t do well in some areas, but it did exceptionally well in others. The lime, orange, and chocolate mints were all quite potent this year. I tried a few cups of tea to see how they’d brew and I ended up using less than normal. My personal favorite is the lime mint. The chocolate mint is suitable for use in tea, cooking, and jellies—lime and orange mints are characteristically used for tea.

Herb potency varies from year-to-year based on environmental factors, so it’s essential to consider potency as part of using the herbs. I’m thinking about trying to come up with some sort of rating system that I can put right on the package before I store the herb so I have some idea of how much to use later. As a contrast to these three mints, the grapefruit mint hardly tasted like mint at all. Given that it has proven hard to grow, I’m thinking about using the space for another kind of herb.

Sage also had a wonderful year this year. The plants grew fairly large and are robust in flavor. I grew both golden pineapple and common sage. The golden pineapple sage has larger leaves and a stronger taste. It also takes a lot longer to dry than the common sage. In most years, it appears that the common sage actually produces more output, but this year the golden pineapple sage was the winner.

The thyme and rosemary were disappointing this year, but still usable. I actually have three kinds of thyme: lime, lemon, and common (also known as English thyme). Of the three kinds, the lime has the strongest taste when used fresh, but the common works best for cooking. I find that the lemon has a subtle flavor, but can be hard to grow. Unfortunately, I didn’t get any lemon thyme this year, but I did get enough of the other two to make up for it. The only kind of rosemary I can grow is common rosemary. I’m thinking about trying again with some other varieties next year, but the rosemary definitely doesn’t overwinter here in Wisconsin (as contrasted to thyme, which overwinters just fine).

I’ve talked about lovage before (see the Loving that Lovage! post for details). This year I ended up with a whole pint of seeds that I’ll use for canning and for dishes like cole slaw. It was also a decent year for leaves that will end up in soups and other kinds of cooking where a strong celery flavor is desirable.

Weather, soil, and overall care of your herb garden all determine what kind of crop you get each year. Working with herbs can be quite fussy, but also quite rewarding. The quality of herb you get from your own garden will always exceed anything you buy in the store, so the effort is worth it when you want the best results from cooking. Let me know about your herb experiences at [email protected].


In Praise of the Humble Potato

You say Po-TAE-to and I say Po-TA-to.

Kennebec. Pontiac. Norland Red.

Burbank. Russet. Yukon Gold.

Even the names are beautiful, humble and poetic.

So useful. So nutritious. So versatile.  So comfortable and comforting.

Just in case you’re wondering, all Russet potatoes are Burbanks, but not all Burbank potatoes are russet. The Russet Burbank is described as a natural genetic variant of the Burbank potato. It has a russet-colored skin that visually identifies this potato type. The Russet is the world’s predominant potato used in food processing, so you have probably seen a lot of them and eaten even more.

I grew up in a meat and potatoes household. Although my mom grew a garden full of a wide variety of vegetables, my dad really only believed that there were 4 kinds of vegetables worth eating. Those were corn, peas, beans and potatoes.   As a result, most of our meals were created with those basics but there was always plenty! If we didn’t have enough production of potatoes from the garden, my dad would stop by a roadside stand in the fall and buy a bag of 100 pounds for about $4. That would last us through the winter and into the early spring.   In the fall, potatoes are at their least expensive and best quality compared to any other time of year. Buying them in bulk and storing them is as good an investment now as it was when my dad was doing it in the 60’s.

Storing potatoes is one of the earliest self-sufficiency skills I learned. We always lived in an old house with an unfinished cellar. We would put the potatoes down in the basement in a barrel and just go to collect what we needed when it was time to make supper. Once in awhile we would come in contact with a slimy potato that had to be tossed out. We were warned that we should always bring up anything that had been in contact with the bad potato so they could be used right away. As kids, the science wasn’t explained to us. It was just the rule. Now that I understand the science, it’s still a rule that I live by.

Here are some rules for successful potato storage:

  • Choose a potato variety that is appropriate for storage.  My favorite is Kennebec.  Some like Russet.  There are others.  The grocer or garden center should be able to tell you which potatoes are going to be good for storing.  You can also go online to find the attributes for most vegetables.
  • Raw potatoes should not be washed before storing. Remove the big chunks if you have been digging during a wet season.  However, a powdery coating of dry soil toughens the skin and helps them stay dry longer in storage.
  • Check all potatoes over for spade cuts or bad spots. If there are soft spots, cut away the bad section and use only the good one or discard the whole potato.
  • Do NOT store anything with a bad spot or spading fork cut.
  • After sorting, store the unwashed raw potatoes in any place that is dry, cool (but not cold) and dark. Exposure to sunlight will cause the skin to go green, get bitter and can cause illness if you eat a large quantity.
  • Frequently check your stored potatoes for any that have developed soft spots and discard them immediately when you find them.
  • Wash and dry any potatoes that are in contact with a bad one during storage.  Keep it apart so it can be used soon.

With smaller houses and less storage space, it is still possible to find good storage for potatoes. One way is to store them in milk crates in a pantry, cool closet or heated garage alongside an outer wall. If the area has a window, drape a heavy cloth over the whole stack. With the coolness  of the wall, the airflow created by the construction of the milk crates and the dark provided by the cloth, it works beautifully. As the potatoes at the top are used, take the crates out to store and start on the crate below it.

Also, if you have a rarely used, cool bedroom; a layer of crunched up paper under potatoes in an under-the-bed container is the perfect place for storing them. Winter squash and pumpkins can be stored there also!  The main idea is to keep them dry, dark and cool but not frozen.

Another favorite way to store potatoes is simply to put your pressure canner into play.  

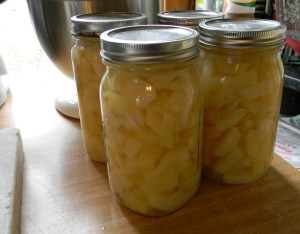
As with other vegetables, canning potatoes is a great way to control the salt level and quality of the food as well as customizing the cut of the finished product.

Quart Jars of White Potatoes cut into cubes
Fast Food at its Finest!
  • For best results, the potatoes should be washed and peeled before cutting into your favorite shapes – slices, cubes, shreds or small whole potatoes.
  • A mandolin is a useful tool when cutting potatoes into thin, even slices. Be very careful when using a mandolin because it has an extremely sharp edge. 
  • A French fry cutter is great for making cubes. Simply put the potato through the cutter and then cut the ‘fries’ into chunks. This cuts the potatoes into really nice sized cubes. 
  • Always follow the instructions for canning that came along with your pressure canner. 
  • Do NOT try to pressure can anything completely absent of salt.  A little salt is absolutely necessary for successful canning.

Once the potatoes are processed and cooled they are ready to eat! You can rinse them, cold and use them in potato salads. You can microwave them to have them warm. You can mash them with garlic and butter. You can drain them, dry them and fry them with your favorite seasonings for fantastic hash browns. In a pinch, you could eat them straight from the jar! 

The potato is the workhorse of the pantry. It is low in saturated fat and sugar.  It has no cholesterol or sodium unless you add it. It is also high in potassium and vitamin C as well as very high in vitamin B6, the vitamin that helps to improve moods. 

If you have stories or recipes using potatoes, I would love to hear from you. Please share them by adding your comment to this post or contacting John at [email protected].


A Little Pressure

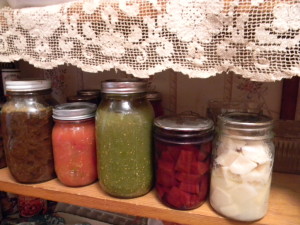
From Left to Right:  Beef, Carrots, Green Salsa, Beets, Potatoes All canned using a pressure Canner
From Left to Right: Beef, Carrots, Green Salsa, Beets, Potatoes
All canned using a pressure Canner

As I was growing up, I helped in the  kitchen quite a bit, especially during canning season.   We had several big blue (water bath) canners that were used for pints and quarts of all kinds of tomato products as well as jams and jellies.  I never saw my mom use a pressure canner.  One day I asked her—why? It turned out that before I  was born, she and her mother  were working with a pressure canner.  They went into the other room for something and forgot to check on it until they heard the pressure value and gasket blow off.  A jar had broken inside and the vegetables had clogged the pressure  valve. The content of canner spewed into the air, all over the kitchen!  Seeing this chaos—and cleaning up the mess afterward—convinced my mom never to can anything under pressure while there were kids around, just in case.

So it wasn’t until I was a young wife that I convinced my Aunt Betty to teach me about pressure canning.  After doing some research, we went together and bought a pretty expensive “All-American” brand  canner.

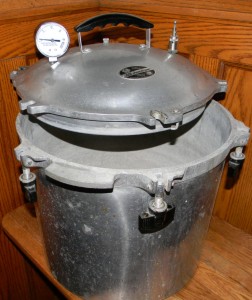
With a new pressure gauge and careful storing, this 30+  canner is still going strong.
With a new pressure gauge and careful storing, this 30+ canner is still going strong.

It has a metal to metal construction with 6 turn-screws to hold the lid in place.  It is extremely safe.  For the amount of food that I process, it was a wonderful investment.  I think of my Aunt Betty every time I use it.

Here are some safety tips to use if you decide to dive  into the world of pressure canning.

  • READ THE INSTRUCTIONS CAREFULLY.
  • Familiarize yourself with the equipment to make sure that you know exactly how it works before using it to process food.  Be sure you know how much water is needed (a metal yardstick works well to measure the depth of the water) and how many jars should go in a batch.
  • Follow the recipe exactly, at least the first time you are making something new.  The herbs and spices used during the canning process develop as the product cools and is stored.  After opening it, you can decide whether you want to change the recipe for next year’s harvest.
  • Invest in good equipment and treat it with respect.  You don’t necessarily need new equipment.  Garage sales and thrift stores often have sturdy equipment for sale.  Watch for breaks, holes, scorch marks or cracks in the metal.  These are sure signs that the canner has been used for something other than its original purpose.
  • Replace the rubber seals regularly, if your canner uses them.
  • Replace the pressure valve if it is showing any sign of wear. It is important that this part of the canner be accurate.
  • Stay in the kitchen while the pot is cooking. In this case, a watched pot is a good thing. The canner will build up to pressure.  The stove must be adjusted to keep it at the right  pressure throughout the whole canning time.  If the pressure is under the required amount—the food won’t cook correctly.  If the pressure goes over—there is risk of breaking jars and messes in the kitchen.
  • FOLLOW THE INSTRUCTIONS for cooling down the canner.  Remember there are glass jars inside and they are very fragile in this state.
  • Do NOT open the canner until the pressure has naturally gone down to zero, according to the pressure gauge.  This part of the process cannot be hurried.
  • Remove the jars carefully and finish them according to the recipe.  Putting a towel on your table  or counter will keep the area drier and reduce the risk of the jars bumping together.
  • After the jars are cool, inspect them to make sure they have sealed properly.  If any fail to do so, put it in your refrigerator to use right away.
  • LABEL jars with contents and the year, before putting it into your pantry,

All in all, pressure canning is a great way to store your harvest,  You have control of exactly what is in your food.  Many recipes can be adapted for special diets. And, the jars  look so pretty in your pantry! If you have stories about your pressure canning experiences or any questions, please share them by adding your comment to this post or contacting John at [email protected].


Taking Inventory of the Larder

There is fresh fallen snow outside my window as I write this and more on the way. In fact, it doesn’t look like gardening season out there at all. It’s a bit past the middle of winter, but spring is a long way off. However, this is the time of the year that Rebecca and I start thinking about the garden—mainly because our mailbox is bristling with seed catalogs. Of course, the seed catalogs end up in the house and we now have stacks of them in the living room, dining room, family room, bathroom, and even in our bedroom. We could possibly start our own catalog company by simply redistributing all the catalogs that are coming from various seed companies in the mail.

Inside each catalog we see beautiful presentations of various vegetables and fruits. Given the time of year and the fact that our root cellar is becoming a bit empty, the idea of having fresh vegetables is quite appealing. Yes, canned and frozen foods will keep us quite happy and well fed, but there is nothing like picking that first asparagus spear (the first vegetable of the season) and preparing it for dinner. So, gazing fondly at the vegetables in the catalogs becomes the stuff of dreams for the upcoming season.

However, before we can order anything, we need to know what the larder lacks. This means doing an inventory. Doing an inventory is no small undertaking. If we simply needed to create a list of items to grow, the inventory would be simple enough, but that’s not the end (nor even the beginning) of the task.

As part of the inventory, we take down every jar, examine it for potential problems (such as a broken seal or rust on the lid that will eventually result in a broken seal). After that, we wash and dry the jar (remarking it if necessary). The jars are then repacked to ensure that the oldest stock is in the front. What all this work accomplishes is to ensure that what is on the shelf is actually edible and usable. The shelves can become disorganized during the winter months, so it’s essential to reorganize them so that any count we perform is accurate.

During the process of working with the jars, we’ll begin to notice that some items are lacking. For example, this year we noted that there aren’t any beets left—not even the pickled variety (a favorite of mine). The pickled okra is also gone. However, we have a surprisingly strong supply of corn in various sized jars (for specific needs), so we probably won’t grow corn this year. I also found several jars of a wonderful blueberry compote Rebecca made for me. I had thought them gone when they were simply hiding behind some dill pickles.

A well-stocked larder is a wonderful thing. You can go to bed at night knowing that you won’t go hungry—something far too many people in the world can’t say. It also provides you with high quality food of precisely the type you want. However, in order to maintain the larder, you must inventory it at least once a year (twice is better) and make sure that what you think you have is actually what you do have. Let me know if you have any questions about the inventory process at [email protected].


Determining the Amount of Shelving You Need

I never anticipated receiving quite so many e-mails about larder shelving (including a few comments about the quaintness of the term). When determining the amount of larder shelving you need, you must consider the kinds of storage you use. We group our storage into four areas:

  • Ready Storage: Used to hold food short term. It includes the refrigerator, kitchen cabinets, and under worktable storage (five gallon buckets).
  • Deep Freeze: Used for moderate term food storage. Some foods don’t can well or they taste better when you freeze them. We have two freezers (one small and one large) for freezing fruit, vegetables, and meat items. Because we vacuum pack our foods, we store some items up to two years. The freezers are kept at 0 or less to ensure the food is thoroughly frozen. Each summer, before we begin storing the harvest, we take everything out of the freezers and use everything that has gotten old in some way (we sometimes put old food in the compost where it turns into dirt that will be used for new food).
  • Larder: Used for long term canned storage of food. Many items will last up to five years in the larder because of the canning techniques we use. Every spring every can is cleaned and inspected to ensure it remains safe. The larder is organized to present the oldest items up front so they’re used first.
  • Root Cellar: Used for winter fresh storage. As the name implies, we use our root cellar to store roots. However, we also use this area to store apples, pears, and squash. The root cellar sees use from September to around April each year. It’s never used during the summer months, mainly because our root cellar isn’t damp or cool enough during that time and the food would spoil.

It’s essential that you determine how each area will ultimately work into your food storage strategy. If you decide to expand your storage area by using an unused cabinet, make sure it is cleaned and sanitized well. Especially the kitchen cabinets ought to be thoroughly cleaned. If your cabinets are broken or needs refinishing, you can consider looking for cabinet refinishing companies in fairfax va (or where it is more local to you). Determining how large to make the larder then becomes a matter of portions. If you want to be fully self-sufficient, you need to decide where the food will come from for your meals in a general sense.

Let’s look at a specific example. We drink a 6 ounce glass of juice with breakfast four days a week on average. That’s a total of 6 ounces per glass * 2 people * 4 days a week * 52 weeks a year or 2,496 ounces per year. We follow a two year plan for juice because it’s easy to obtain from a number of sources, so that’s a total of 4,992 ounces for the two years. All of our juice is canned, so all of that juice has to be stored in the larder. Juice is canned in quart jars, so we need 156 jars (at 32 ounces per jar) to store that much juice. From last week’s post you know that each shelf segment can hold 42 quart jars, so we need 3.7 shelf segments for juice.

To fill out the remainder of breakfast, we usually have a grain product of some type. In addition, some meals include breakfast meat and/or eggs. Along with juice, we also drink milk and coffee. All of these items come from ready storage, so you don’t need to consider them in creating your larder.

Lunch is our main meal of the day. Normally we have meat four days a week. Most of the meat comes from the freezer. However, on busy days, we used canned meat from the larder. The canned meat is computed a bit differently. We normally can the smallest chickens and one chicken produces two quarts of canned meat. Each quart contains four pieces: half a breast, wing, leg, and thigh (see Cutting Up a Chicken for details). One quart serves as a main meal and a snack when eaten directly or as two main meals when eaten as part of a salad or casserole. Normally we process eight chickens at a time and the first two processing sessions produce the canned chicken, so there are 32 quarts of canned chicken produced each year, that require 0.8 shelf segments. We produce 1 ½ years worth of canned chicken each year for two years (and take off the third year), so the maximum shelf space used at the end of year 2 is 1.6 shelf segments.

Along with our meat, we normally have two kinds of vegetables, some of which come from the larder, but can also come from ready storage, the root cellar, or the freezer. This is where you need to keep records on how you use your various food storage areas. About 70 percent of our vegetables come from the larder. We eat one quart of vegetables when there is meat included in the meal and one and a half quarts on our vegetarian days. Vegetables are generally stored in pints, but there are times when we store vegetables in quarts as well. Because vegetables tend to have longer cycles between good yields we follow a three year plan. The calculation for vegetables becomes ((1 quart a day * 4 days) + (1.5 quarts a day * 3 days)) * 52 weeks a year * 3 years * .70 percentage stored in larder or 928 quarts or 22.1 shelf segments.

Our afternoon snack usually includes fruit, a grain product, and a dairy product. The fruit is the only item that comes from the larder. It can also come from ready storage, freezer, or root cellar. Our fruit portion is normally 1 pint per day when taken from the larder. Because fruit production can be incredibly unpredictable, we follow a four year plan. About 30 percent of our fruit comes from the larder. This means the calculation for fruit is 1 pint per day * 365 days a year * 4 years * .30 percentage stored in the larder or 5.2 shelf segments.

The evening snack can come from a variety of sources, but we normally have something quite small. This is the time of day we’ll have ice cream, leftover canned meats, fruit, cookies, or something else small such a dried fruit/vegetable slices (see Making Dehydrated Chips for details). I normally don’t include this snack in the calculations, but your eating habits might be different and you might need to include it. The new shelving does include space for four 5 gallon buckets worth of dried fruits and vegetables that don’t appear as part of the calculations that come later in this post.

We also make our own condiments, salsas, jellies, and other items that take up 3 shelf segments. Again, you need to consider your eating habits and make decisions based on those habits.

Now it’s time to add everything up to see how much space is required. Our total shelf segment usage (a shelf segment consists of 42 quarts or 84 pints) is 3.7 for juice, 1.6 for meat, 22.1 for vegetables, 5.2 for fruit, and 3 for condiments or a total of 35.6 shelf segments. Our two larder shelving units currently provide 39 shelf segments (not including the 5 gallon bucket/canning equipment storage in the new shelving unit). The remaining shelf segments are used for organizational purposes and for empty jars.

The calculations for determining how much shelf space you need can seem daunting, but if you address one meal at a time as I’ve done in this post, you should find it possible to do. What you need to do is focus on that meal and the portions you typically eat during that meal. Let me know if you have any additional questions on this topic at [email protected].


Building Larder Shelving

Creating a place to store your canned goods is an essential part of making self-sufficiency work. In Fun is Where You Find It! (Part 3) you see one view of the larder shelving we use to store our canned goods in the basement. The shelving has to be built to withstand the weight of the canned goods without sagging. In addition, you want to be able to support part of someone’s weight when they need to regain their footing. If you are looking for supplies to help with your building project, you may want to visit a trade supplier website similar to Tradefix Direct, where you may be able to find the supplies you need for your building needs.

In order to create our shelving, I played with some wood and actually weighted it down to see when it would sag. I then used those assumptions to start designing the shelving and to feed the numbers into the Sagulator. The maximum amount of sag you should be willing to tolerate is 0.01 inch per foot. You need an engineering margin to ensure the shelves will hold up.

Of course, the problem is getting the numbers the Sagulator requires. A typical quart jar of canned goods filled with a liquid weighs 3 pounds. If you make the shelves 24 inches deep using three 1 × 8 boards and create spans of 25 inches, you can store 42 jars per span for a total weight of 126 pounds. Using #2 Douglas fir, you get a sag of 0.01 inch. You must consider the kind of wood that you’re using as part of your calculation and keep refining the measurements until you obtain a setup that works.

You also need to consider the shelf spacing. It’s important to allow finger spacing between the shelves so that someone can reach all the way into the back to retrieve a jar without problem. After a lot of experimentation, I came up with the following shelf spacing:

  • 8 inches for quart jars stacked one high
  • 10 inches for pint jars stacked two high
  • 16 ¾ inches for 5 gallon buckets and canning equipment

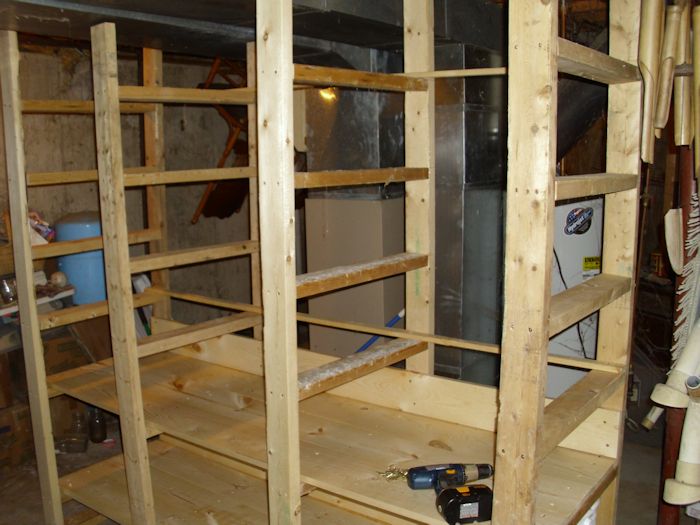
To create our new larder shelving, I started with four 2 × 4 supports tied into the ceiling joists. You absolutely don’t want the shelves falling on you, so make sure you use sturdy screws. I relied on 5-inch heavy decking screws that went completely through both the 2 × 4 support and the joist as shown here.

LarderShelving01

Make sure you use at least two sturdy screws to hold each framing member for the shelves for each shelf you create. My shelving ended up being 75 inches long, 24 inches deep, and 84 inches high. The shelving arrangement includes one shelf for five gallon buckets, two shelves for quart jars, and three shelves for pint jars as shown here.

LarderShelving02

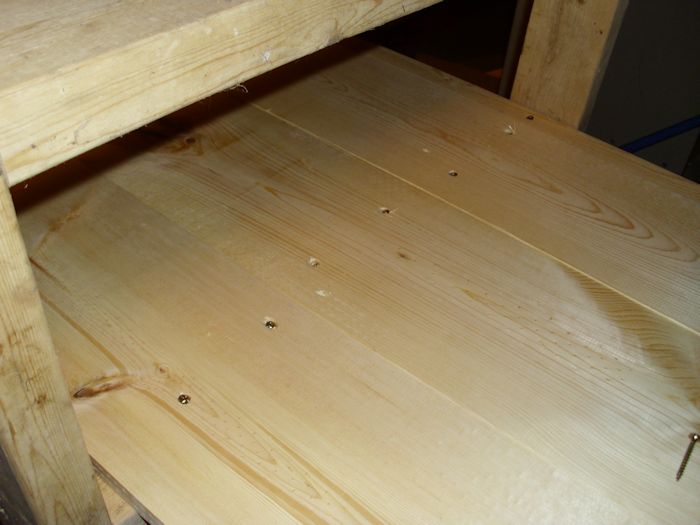
Make absolutely certain you keep everything square and level as you build because any deviation will lower the amount of weight the shelving can carry. Each shelf should be tied into every framing member with at least two screws. In this case, that means eight screws per board or 24 screws for each shelf (because there are three 1 × 8 boards used for each shelf).

Because of the shelf heights, you’ll find that you have to insert the screws at an angle. Actually, this is a good way to add the shelving anyway because the screws gain greater purchase in the wood. However, make sure you alternate the direction you screw the screws so that you don’t end up racking the shelving (making it out of square or level). Of course, you may be able to insert the screws at a better angle if you had access to the best crossover ladder that you can find. My friend was telling me about them once, as he is required to use them whilst he is working in a warehouse. They can help you to reach things at a certain height, as well as keeping you safe at the same time, as otherwise, you could face some serious injuries. Even though the ladder is a good idea in this scenario, I think they are primarily used for things at a greater height. So, adjusting is key. Here is how your screw pattern should look.

LarderShelving03

In this case, the first and third shelves have screws coming in from the right, while the second (center) shelf has them coming in from the left. In the next section, I reversed the direction so that the first and second shelves came in from the left, while the second shelf came in from the right. Alternating directions like this helps make the shelves stronger.

Every shelf should also have a backer board to keep the canned goods from simply falling out the back of the shelf. In this case, I used 1 × 6 boards secured with two screws in each section. The backer boards also provide added strength to the entire unit.

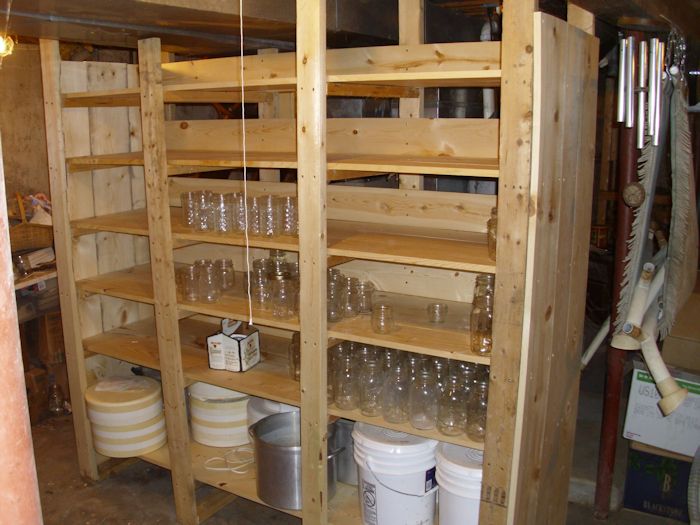
Finally, to keep things from sliding out of either side and to also provide places to put hooks for items we wish to hang, I added end pieces. These end pieces are made from two 1 × 10 and one 1 × 8 boards. Here is how the shelving looked after I finished it (with some items already in place).

LarderShelving04

When building shelving, make sure you take time to ensure that the shelving will actually hold the items you want to put on it. The essential issue is to control sag so that the shelving doesn’t fail in the long term. Let me know your thoughts about larder shelving at [email protected].

Making Dehydrated Chips

Rebecca dehydrates several kinds of chips for us to eat during the winter months. I talked about the technique used to create zucchini chips in the Making Use of Those Oversized Zucchinis post. The techniques in that post also work well for vegetables such as eggplant, which has a slight peppery taste when dehydrated. We have found that the American (globe) and Italian eggplants work best for the purpose—the thinner varieties, such as the Japanese eggplant, tend to get tough. There are a lot of different kinds of eggplants, so make sure you choose a variety that will dehydrate well.

Along with eggplant, Rebecca has made dehydrated potato chips for us and I’m sure will try other vegetables as time permits. The same technique used for zucchinis works just find for any globular vegetable that has a moderate level of moisture. You want to be sure that the chips are crispy dry when finished to ensure they have the maximum storage time and have a satisfying crisp feel when chewed. Try to get the chips as evenly sliced as possible. Rebecca used a mandoline for the purpose. I particularly like the Kitchenaid model that she has because it includes a guard to keep her fingers safe and some attachments for additional cutting methods, such as julienne.

It’s also possible to make fruit chips. For example, if you use an apple peeler, you can create spiral cut apples. Cut through the spiral (top to bottom) and you end up with individual apple slices that you can dry as chips. The basic technique for drying apples is the same as zucchini, but there are a few things to consider.

Rebecca dehydrates apples using two flavorings. Of course, the sugar cinnamon combination is a must have selection. Last year she tried using cheese powder on some apples and we liked it so much that it has become the second favorite. The cheese powder makes the apple chips taste like an apple pie with a slice of cheddar on it. In both cases, you must alter the zucchini technique a little to obtain usable results.

The first difference is that you absolutely can’t use a dehydrator with the motor on the bottom. The fruit chips will produce copious amounts of liquid that will get into the motor and cause the premature death of your dehydrator. When drying apples and other fruit, use only a dehydrator with a top mounted motor so that the liquid won’t cause problems. In fact, we highly recommend placing the entire dehydrator on a tray, just to make sure that any liquid that leaks out doesn’t make a mess.

The second difference is that you don’t dip the chips as you might do with vegetable chips. Dust the top of the fruit with the flavoring of your choice. Using this approach makes the resulting product more enjoyable because it isn’t overly sweet (or sometimes bitter). It also reduces the amount of liquid the chips produce as they dry. You get just as much flavor by lightly dusting the top as you would by dipping the fruit, but at a significantly reduced cost. When the fruit produces copious liquid, the extra flavoring you used ends up in the tray anyway, so there is no point in overindulging.

The third difference is that fruit chips tend to a be little flexible when completely dry. They won’t dry crispy like vegetable chips will. Think more along the lines of dried fruit or a fruit leather. So far we haven’t noticed any difference in longevity. The fruit chips will most definitely last a year when kept in an appropriate container.

A number of people have asked how we store our chips to keep them fresh. We use five-gallon-food-grade-buckets with tear tab lids. Make absolutely certain you use food grade buckets because buckets made with other sorts of plastic could contaminate your food. These are the same buckets used by your local restaurant for everything from pickles to potato salad. In order to get the lids off, you must have a bucket lid wrench. Trying to get the lid off otherwise will be difficult to say the least. Even with the wrench, you must work carefully around the lid top to get it off. These buckets seal extremely tight and they provide great storage even in a basement or other less than ideal setting.

Dehydrated food in the form of chips makes for ready, delicious, and nutritious snacks. None of our chips has the slightest amount of oil or preservatives in them. We’ve tested this technique for up to two years with great results. The two biggest considerations are that you must make absolutely certain that the chips are completely dry and that you seal them in an airtight container, such as the five-gallon-buckets we use. Using this approach is also good for the planet because you don’t use any electricity to keep the food usable. Once the food is dehydrated, you simply open the bucket, grab what you want, and eat.

What sorts of vegetables and fruits do you think you might try to store using this approach? Is this an approach that you find appealing? Let me know your thoughts at [email protected].


In Praise of Dried Beans

One of the more amazing vegetables in the garden is the green bean. Green beans typically take little work to grow, produce well, and don’t appear to have many problems (with the exception of mold in wet years). We grow the bush variety because they don’t require a trellis. You can eat green beans in all sorts of ways—raw by themselves, cooked, in salads, and even fried. What most people don’t realize is that the uses of green beans don’t end there. You can also use green beans dried. Simply let the green bean stay on the plant until the shell is completely dry (usually after a few frosts).

Dried beans have a significant advantage over other items you grow. Unlike most items, they require no preparation. You can simply pick them, put them in a bucket, put a lid on the bucket, and then stuff it in a cool, dry place. That’s it! The beans will stay good almost indefinitely. I just finished shelling the last of our dried beans from last year. There was no deterioration of the bean whatsoever. Rebecca will use them in baked beans, soups, and in salads. Dried beans are also quite high in nutrients, making them a great food value. For example, if you make them into baked beans, a single serving supplies 28 percent of your daily requirement of iron.

Before I get e-mail about the relative merits of other vegetables, yes, you can store root vegetables such as potatoes in your basement without doing anything special to them. In addition, winter squash also lasts quite well in the basement without any special preparation. However, in both cases you face the problem of having to use the items by February or (in a good year) March. The winter squash tends to start rotting by that time and the potatoes start to get soft in preparation for sprouting. Dried beans appear to have no such limitation.

Of course, the big thing is to ensure that the bean really is dried. We keep the beans on the plants until late fall after a few frosts have killed the plant completely. The beans should rattle within the shells when shaken. The outside should be a nice tan color in most cases and should feel quite dry. The shells will also be a bit on the hard side, rather than soft as a green shell will be.

Don’t worry if you see a bit of discoloration on the shell. That’s normal. If you see a little discoloration, shell a bean or two to see for yourself that the beans inside are shiny and that the skin is intact. Even if the bean is a little dirty, it’s acceptable to use as long as the skin is intact.

The one thing you must do before using beans you dry yourself is to wash them. The beans do pick up a few contaminants during the drying process. You don’t use soap and water. Just place the beans in a colander and rinse thoroughly. Make sure you move the bean around and get all of the dirt off. When you see that the water is coming out of the colander without any dirt, the beans are probably clean.

The bean is one of those items with a nearly unlimited shelf life that’s both nutritious and delicious. The fact that you can use them green or dry, raw or cooked, makes them exceptionally versatile. Even a small garden has space for some of these marvelous plants. Let me know your thoughts about beans (both green and dried) at [email protected].