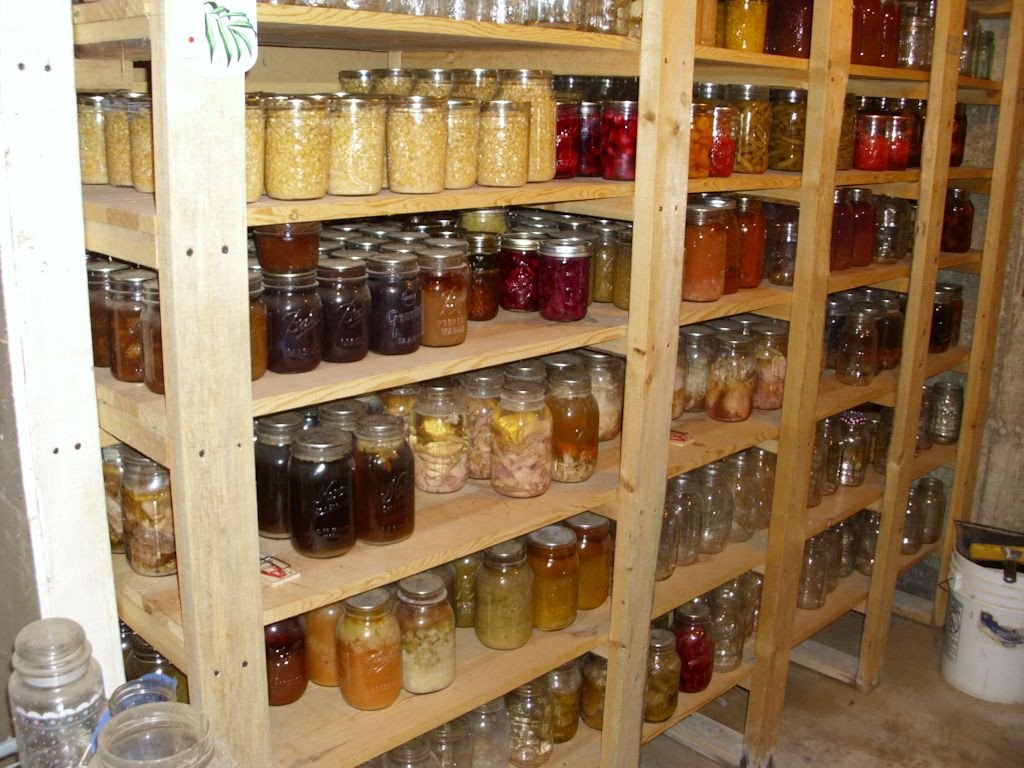
Making Soup

One of the things I do during the winter months is make soup. However, I don’t make just a small amount of soup in a small pot, in a small way. Years ago I bought a large restaurant-quality aluminum soup pot that weighs a ton and holds at least four gallons of soup. Making soup in large batches seems to produce a much better result and the large, thick, heavy soup pot works so well that nothing seems to burn in it. Well, I guess if I tried really hard it would burn, but I don’t try really hard.

Most of my soups start out with meat of some sort (beef, pork, chicken, venison, or lamb), but I normally use soup bones, lots of them. Sometimes I use a whole chicken, a large one. No matter what kind of meat I use, I start out with at least five pounds of it, sometimes more. I start the cooking early in the morning and cook the meat very slowly (never ever boiling it), scooping off the blood that rises to the surface and adding spices and salt afterward. I favor using more spices than salt. In fact, I just barely add salt to taste. I use spices that you normally wouldn’t think of in my soups such as, cinnamon, nutmeg, and cloves, which helps me keep salt to a minimum. You don’t add a lot of these spices, the effect is meant to be subtle. In some cases, such as with beef, I use pickling spice (but make sure to remove the tea ball containing the pickling spice after no more than 20 minutes or it gets bitter). Favorites with chicken include sage, rosemary, and thyme. Sometimes I add orange or lemon peel. A common addition are onions and I sometimes add a bit of fresh garlic (minced fine) as well.

I like my soup to be really nutritious, so I add plenty of vegetables. Most of my soups contain corn, carrots, and potatoes. However, I don’t stop there. The soup I made the other day also contains turnips, Holiday Soup Mix, and celery. I’ve been known to add things like green beans, kohlrabi, rutabagas, turnips, and all sorts of other odd assorted vegetables. In fact, if something in the larder or freezer is getting a bit old, it goes into the soup pot. The point is that the soup is far from plain. It contains good nutritional value from a wide variety of wholesome vegetables.

In addition to all of the vegetables, I sometimes add mushrooms. As with the vegetables, I normally get a better quality mushroom, not those canned kind. My personal favorites are baby portabella, shiitake, and oyster mushrooms, but I’ve used others as well. Even a good quality button mushroom can be a nice addition. I’ve never had much success using morels in soup. Besides, morels were meant for cooking in butter and garlic, with a bit of salt.

To top my soup off I usually add pearled barley. Using pearled barley gives the soup that finishing touch, a kind of nutty flavor that you find in only the best soups. As an alternative, I sometimes use half and half wild and brown rice. I generally don’t add noodles to my soup; they fall apart quickly, don’t have much nutritional value, and tend not to freeze or can well.

Speaking of freezing and canning, there is no way one person can eat four plus gallons of soup before it goes bad and that’s the point. I either can or freeze the excess soup for later. Soups that are a little more broth get canned in one quart containers, while robust soups get frozen in one gallon bags. A word of advice, don’t overfill your gallon bag. I put three quarts of soup at most in my gallon bag and sometimes less depending on the soup. Lay the bags flat in the freezer as they freeze and you’ll find that your bags of soup stack well. If I’m having a really busy time, I simply get out a quart or a bag of soup and I have a nutritious meal I don’t have to cook. Soup is comfort food. Let me know your thoughts about soup at [email protected].

Harvest Festival 2016

This has been an interesting year in the garden. In looking at the Harvest Festival 2015 post, I see a year that offered me what I would call the standard garden items. Not so this year. The problems began with a late frost that wiped out my grapes and pears. In fact, it nearly wiped out my apples as well, but I learned a curious lesson with the fruit this year because of the apples. All the outer apple trees had no fruit, but those in the center of the orchard did have some fruit. In other words, the trees on the outside protected those on the inside. I didn’t get a lot of fruit this year, but it isn’t a big deal because my larder is setup to provide multiple years’ worth of any particular item. The lesson I learned was not to prune too heavily when the weather is uncertain (as it was this year). In fact, the reason the apples survived as they did was because I didn’t have time to prune them much at all.

The garden also behaved quite oddly this year due to the weather. The Wisconsin winter was semi-mild this year without nearly as much snow as normal, so different bugs survived than normal. In addition, the weather was either hot or cold, without a lot of in between this summer. It has also been the fourth wettest summer on record. All these changes produced prodigious amounts of some insects that I don’t normally see and the vegetables didn’t produce as expected.

As an example of odd behavior, I normally have a hard time growing cauliflower. This year I grew huge cauliflower and one plant is attempting to grow a second head, which is something that never happens here. On the other hand, broccoli, a plant that always does well, didn’t even produce a head this year. All I got were some spikes that didn’t taste good (they were quite bitter). The rabbits didn’t even like them all that well. The cauliflower is usually plagued by all sorts of insects, but this year there was nary a bug to be seen. The point is that you need to grow a variety of vegetables because you can’t assume that old standbys will always produce as expected.

Two other examples of odd behavior are okra (which normally grows acceptably, but not great) and peppers (which often produce too well for their own good). This year I’m literally drowning in beautiful okra that gets pretty large without ever getting tough, but the peppers are literally rotting on the plant before they get large enough to pick. I’m not talking about a few peppers in just one location in the garden either—every pepper plant completely failed this year.

Location can be important and planting in multiple locations can help you get a crop even if other people are having problems (and I didn’t talk to a single gardener this year who didn’t have problems of one sort or another). One example in my case were potatoes. I planted six different varieties in six completely different locations in the garden. Five of those locations ended up not producing much of value. A combination of insects destroyed the plants and tubers. All I got for my efforts were rotting corpses where the potatoes should have been. The last area, with Pontiac Red potatoes, out produced any potato I’ve ever grown. The smallest potato I took out of this patch was a half pound and the largest was 1 ¼ pounds. I didn’t even find any of the usual smallish potatoes that I love to add to soup. The potatoes were incredibly crisp and flavorful. The odd thing is that this patch was in an area of the garden that doesn’t usually grow potatoes very well.

A few of my garden plantings didn’t seem to mind the weather or the bugs in the least. My peas did well, as did my carrots. I grew the carnival carrots again because the colors are so delightful and even canned, they come out multiple colors of orange, which dresses up the shelves. I also grew of mix of yellow wax and green beans this year. The two beans work well together canned. They have a nicer appearance than just yellow or just green beans in a can. However, because the two beans have slightly different tastes, you also get more flavorful meals out of the combination.

I still stand by the statement I made long ago when starting this blog, every year is both a good and a bad year. Because I planted a wide range of vegetables and ensured I didn’t plant all the vegetables in a single location in the garden, I ended up with more than enough vegetables to can or freeze. No, I didn’t get all of the vegetables that I had hoped to get, but I definitely won’t starve either. My larder is quite full at this point. Let me know your thoughts on ensuring a garden has a significant variety of items in it to ensure success at [email protected].


Early Season Canning

I’ve already been canning this season. A lot of people hear this claim and wonder just what it is that I’m canning. The first food I started canning is soup. I get the ingredients from my freezers. Anything that’s starting to get a bit old is fair game. I also save the larger bones from various meats, especially when I have the meat processed by someone else. The meat and vegetables made into soup can quite well and last a lot longer than they would in the freezer. Nothing is quite so nice on a cold winter’s day than hot soup. I usually get two or three servings out of each quart that I can (sometimes four if I add enough additional items). Given the cold winters here in Wisconsin, I can go through a lot of soup.

Once I can the soup, the freezers are less full, so it’s time to defrost them. It’s essential to defrost, clean, and reorganize your freezers every year. Doing so lets you create an inventory of what you have in stock so that you have a better idea of what you need to grow. In addition, you don’t want to keep items so long that they become unpalatable and visually unappealing. Freezer burned food is completely safe to eat, but you may not want to eat it. Some of the ways in which you can prevent freezer burn is to vacuum pack your food and to ensure you rotate it out before it sits in the freezer too long. In some cases, when food is mildly freezer burned, I’ll make it up into pet food (my animals don’t seem to mind as long as the food is prepared to their liking). However, it’s better to use the food up before anything actually does happen to it.

So far I’ve made 14 quarts of chicken soup and another 14 quarts of venison stew. Canning soup means using a pressure canner. Make sure you follow the instructions in a resource such as the Ball Blue Book and the book that comes with your pressure canner. Read Considering the Dangers of Outdated Canning Information for details on keeping yourself safe when using the Ball Blue Book.

It’s also time to can early garden items. For example, when canned properly, rhubarb makes a highly nutritious fruit dish that I eat directly from the jar. You can also make it into pie filling. So far, I’ve made up 7 quarts of plain rhubarb and 7 quarts of spiced rhubarb, both of which will be quite tasty this upcoming winter. Fortunately, you can use hot water bath canning techniques with rhubarb and other high acid foods.

In some cases, you need to mix and match items. The frozen green and wax beans in my freezer weren’t getting any younger, so I used them to make up four bean salad. Actually, it’s supposed to be three bean salad, but some of my recipes called for Lima beans, while others called for kidney beans. I decided to use both, hence four bean soup. I used up all the remaining beans and garnered 16 pints of four bean salad on my larger shelf. Doing so also used up the cans of kidney and Lima beans in my cabinets.

Finally, pickled asparagus can be quite a treat in the middle of winter. So far, I’ve only made up 8 pints of pickled asparagus, but I’ll make up more. I’ll also be freezing some asparagus for fresh use later in the year. In short, canning season has started—time to get going! Let me know about your current canning project at [email protected].


Advantages of Making Your Own Extracts and Tinctures

It might be easy to initially dismiss someone who makes their own extracts and tinctures, but knowing how to make your own is an important skill. I commonly make many of my own extracts and tinctures because the products I create offer these benefits:

  • Cost: Even though you can get fake vanilla at a low cost, the flavor just isn’t the same as the real thing and buying the real thing is incredibly expensive. For example, buying the beans and making your own vanilla is significantly less expensive than buying it from someone else.
  • Customization: I don’t just make vanilla with vodka or some other relatively pure alcohol. Vanilla made with a moderately priced brandy or rum has a unique taste that is fuller than anything you could ever buy in the store. Sometimes adding vanilla to flavored alcohol, such as Grand Marnier, produces some amazing results.
  • Strength: It’s possible to make your extract or tincture to any strength desired. This feature means that your recipes end up tasting as you expect them to, rather than lack the pizzazz that you’d get with a store purchased product.
  • Characteristics: Many of the tinctures and extracts that you obtain from the store, even when pure, rely on the least expensive source of flavor. However, when making your own product, you can choose ingredients with specific characteristics. For example, the three kinds of vanilla bean you can commonly obtain are: Madagascar (traditional), Tahitian (a fruity flavor), and African/Ugandan (bold smoky flavor). Other sources are likewise robust. For example, a mint extract can combine the best characteristics of several kinds of mints.

Creating your own extract or tincture isn’t hard. The goal is to use some sort of solvent, normally an alcohol product, to extract the essential oils from an herb or spice. To create the extract or tincture, place the product you want to use, such as vanilla, into a glass jar. Fill the jar with the solvent, such as vodka, place the covered jar in a cool, dark place, and then wait. Just in case you’re wondering about the difference between an extract and a tincture:

  • Extract: A solvent containing the essential oils of an herb or spice. The solvents can include glycerine, vinegar, alcohol, and water. The product can be heated to induce more rapid extraction of the oils from the herb or spice (with some subsequent loss of strength). The herb or spice isn’t normally macerated. You can use some extracts the same day you start them (such as when steaming mint to make mint jelly).
  • Tincture: An extract that is always made with alcohol and no other solvent. The extracted item is normally macerated for maximum penetration. Tinctures are typically stronger than extracts and require more time to make.

Making your own extracts and tinctures is a lot of fun and experimenting with different formulations can produce surprising results. Most importantly, you know precisely what your extract or tincture contains, unlike the products you obtain from the store. Let me know your thoughts on making extracts and tinctures at [email protected].


Time to Check the Larder

The seed catalogs begin to arrive in the mail and you look upon them as a bit of pure heaven—the announcement that spring is on the way. Your eyes nearly pop out as you see the multicolored carrots, juicy tomatoes, and fragrant herbs. The new kinds of fruit trees immediately attract your attention, and what about that amazing new berry bush that will pack your freezer with sumptuous berries? You go into a mix of information and appetite overload and you consider just how those new offerings will satiate your cravings for all things fresh. However, before you go into a swoon over the latest delights, consider the fact that you probably don’t need them all. Your larder is craving things too! The items you’ve used up have created gaps in the deliciousness that your larder can provide during the winter months when fresh simply isn’t an option.

Of course, everyone loves to experiment. After all, that’s how I found kabocha squash this past summer—that delectable mix of sweet and savory that will likely find its way into a pie this upcoming fall. Had I known then what I know now, I would have planted more and canned the extra as an alternative to using pumpkin for pies. Lesson learned, more kabocha squash will find their way into the mix this year, alongside the butternut and acorn squash I love so well.

Back to the larder though. You probably don’t have any idea of where the holes are right now and you really do need to find out. That’s why you need to perform an inventory of your larder. The inventory will tell you about the items you need most. This year I’ve decided to try canning three bean salad, which means growing green, yellow wax, and kidney beans. However, I already have enough green beans in quarts in the larder, so I won’t make a big planting of green beans.

Your larder inventory should include more than a simple accounting. As you go through your larder, you should also perform these tasks:

  • Ensure all of the canned goods are still sealed
  • Wipe the jars down to remove the dust
  • Verify all of the oldest products are in the front
  • Make a list of products that are more than five years old so you can use them up
  • Place all the empty jars in one area
  • Sort the jars by type (both size and the kind of lid used)

Taking these extra steps will help you get a better handle on your larder. You should have a good idea of what your larder contains at all times and the only way to achieve that goal is to actually look at the containers. Let me know your thoughts about larder management at [email protected].


Predicting Processed Rabbit Weight

One of the issues that faces someone who raises meat rabbits is how to predict the dressed or processed weight of the rabbit based on the live weight. After all, you can’t add more weight after the fact. First of all, you need to weigh the rabbit before you feed it, rather than after. Using the before feeding weight seems to provide more predictable results. I’ve found that rabbits can be picky eaters at times, so using this baseline ensures I’m not weighing different amounts of ingested food. Couple the before feeding weigh-in with a same time of day feeding time to ensure you get predictable results. (I also feed right before sundown because rabbits are nocturnal and will feed better at night.) However, there is always some variance, so you need to expect some range in the dressed weight of the rabbit.

Younger rabbits tend to dress out at a higher percentage of their live weight. Most people wait at least eight weeks before attempting to process rabbits. However, these younger rabbits are also considerably smaller than a more mature rabbit. Waiting until thirteen to fifteen weeks often produces a nicer rabbit even if the live weight to processed weight ratio is smaller.

What you feed the rabbit will also make a difference in the ratio because some types of food tend to produce more fat, than lean meat. Adding corn or other grains to the feed will cause the rabbit to be more tender and grow faster, but at a lower ratio and with more inner fat (the fat that isn’t removed with the skin). When you feed anything other than alfalfa pellets, you change the texture of the rabbit and its fat content, and therefore the ratio of live weight to processed weight. For example, feeding the rabbit grass will tend to make it leaner.

The kind of rabbit can also make a big difference. A New Zealand rabbit may only provide a ratio of 55% live weight to processed weight, while a Dutch can provide a ratio as high as 60%. Mixed breed rabbits increase the uncertainty of yield, but do provide advantages in genetic diversity, which can improve the taste of the meat and reduce the need to use medications that pure bred rabbits could require. In short, you need to consider the trade-offs of various decisions you make during the entire process.

In general, you can expect a ratio as low as 50% for a mixed breed rabbit and somewhere around 65% for a Californian/New Zealand mix. However, you must take all sorts of other factors into consideration as previously mentioned. To help me calculate the processed weight better, I started to keep records of live weight to processed weight ratios, ensure I fed the rabbits the same diet, and kept my stock as close as possible to the same mix. Even so, I find that each processing session provides slightly different ratios. Let me know about your live weight to processed weight insights at [email protected].


Colorful Carrots

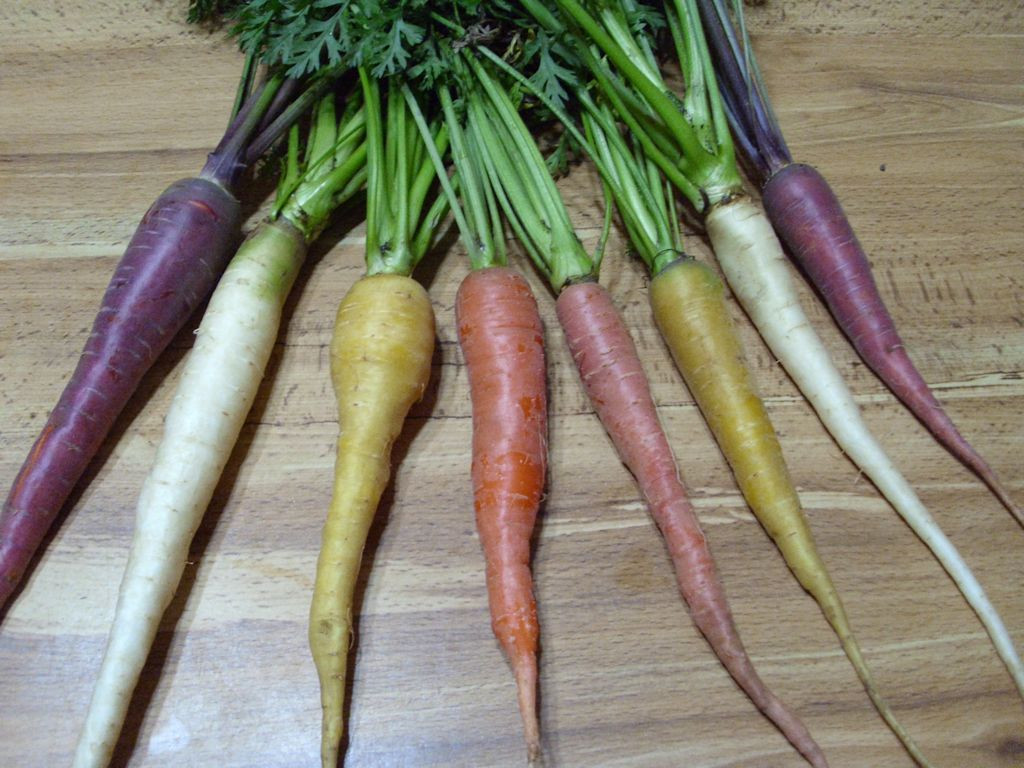
The carrots go by many different names, but the main idea is that they’re quite colorful. I have now tried two different kinds, Carnival and Rainbow. Both kinds produced yellow, orange, red, and purple carrots. The Carnival variety pictured below also produced white and, oddly enough, one green carrot. I’m pretty sure the green carrot was due to some oddity in the seeds (or possibly it was introduced to sunlight in some manner). They both produced tasty carrots where the color definitely affected carrot taste. Of the two packages, I obtained the largest carrots from the Rainbow packet, but a single season doesn’t truly provide enough testing time to say that this would always be the case. I may simply have had an exceptional year. I plan to buy one packet of each sometime and plant them in the same area of the garden in the same year so I can perform side-by-side comparisons.

Colorful carrots make for exceptional meals.
A Colorful Array of Carrots

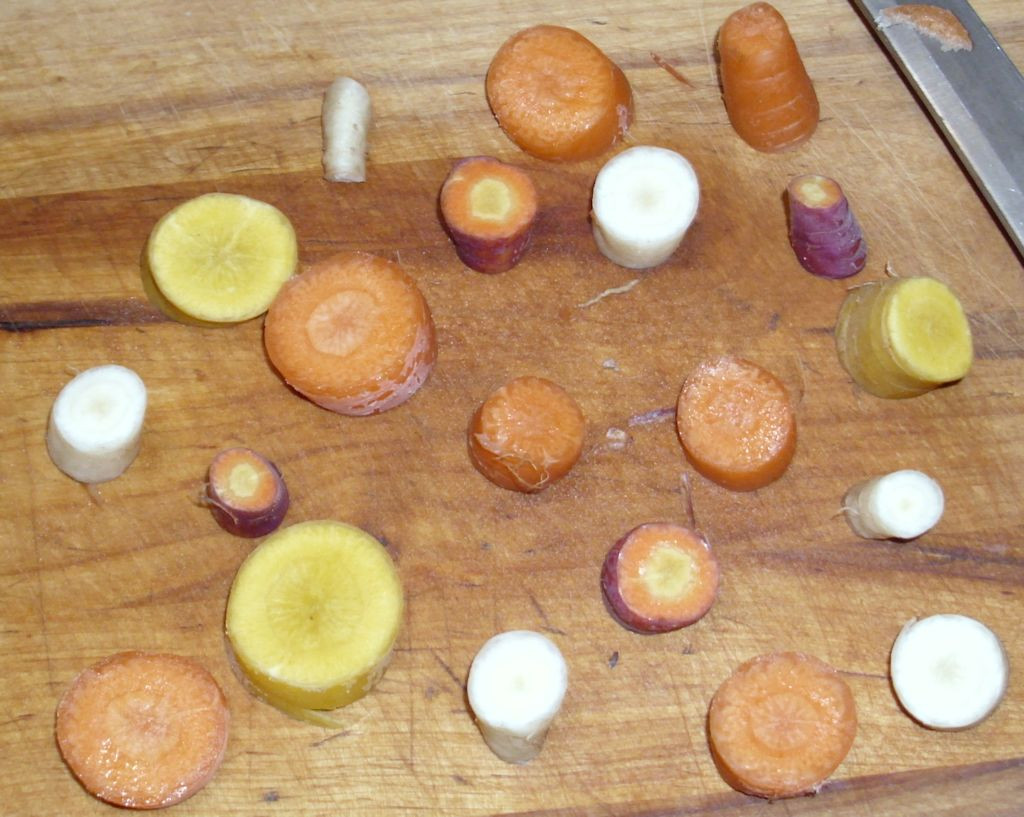
The carrots weren’t just colored on the outside. Cutting the carrots showed that the white, yellow, and orange carrots were the same color all the way through. The red carrots were red on the outside and orange in the inside. The purple carrots proved the most interesting, with bands of purple, orange, and yellow. Eating the carrots raw proved to be a real joy because you got different flavors with each bite and adding a dip (such as ranch or blue cheese dressing) simply added to the variety.

Growing colorful carrots means seeing color both inside and out.
Carrots Can Vary in Color Inside and Out

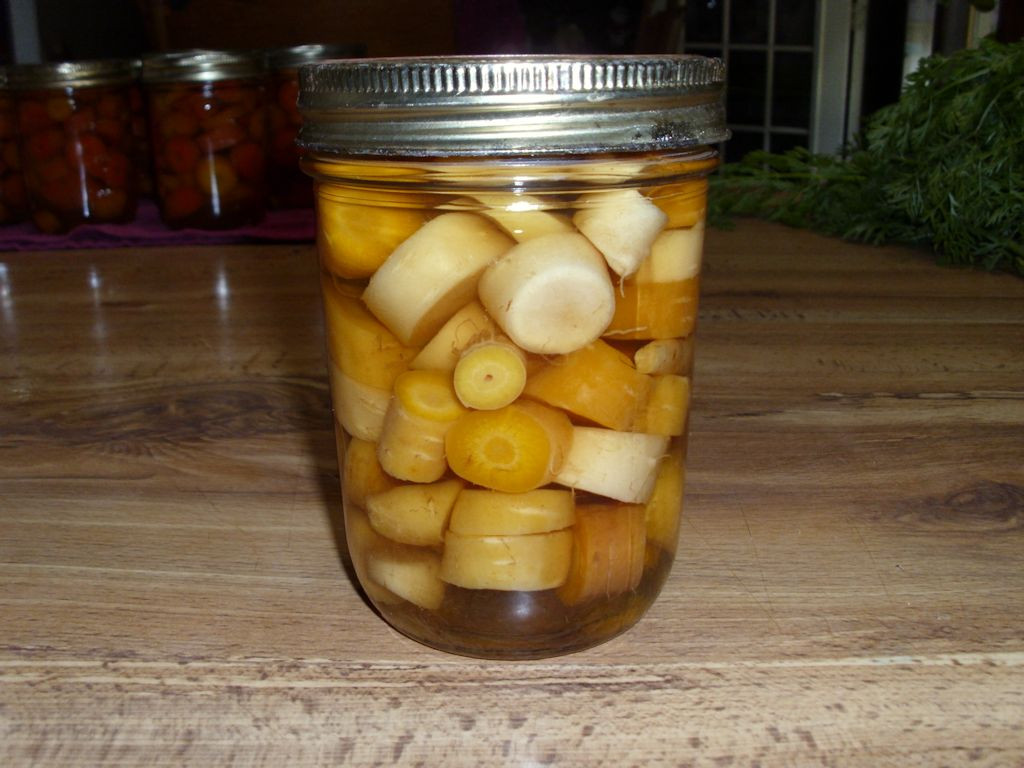
Cooking the carrots will change the color of the red and purple carrots to a dark orange. The white carrots do take on an orange cast, but you can still tell they were originally white. The same holds for the yellow carrots—they grow a bit more orange, but are most definitely remain lighter than the orange carrots. Therefore, even when cooked, you end up with a colorful meal, but not quite as colorful as the raw carrots. The colorful carrots even can well. The taste differences between carrots tends to fade a little when cooked and even more when canned. I can still tell the difference between these carrots when canned and other, pure orange, carrots.

Even the canned version of the carrots are colorful.
Canned Carrots Retain Some Color Differences

Unlike many multi-colored vegetable choices, getting multi-color carrots will provide you with enjoyment throughout the year. I now have some colorful choices for a variety of uses this winter. Let me know your thoughts about colorful vegetable choices at [email protected].


When Brown Sugar Isn’t Brown

This post has been updated to include links to some of the resources I used during writing. A few readers rightfully took me to task for not including any resources. Thanks for keeping me honest!


A reader recently queried me about a post I made some time ago entitled, Replacing Salt and Sugar with Herbs, Spices, Color, and Texture. In this post I talk about methods you can use to reduce your salt and sugar consumption. I’ve gone a lot further since then in reducing my salt and sugar content. Of course, you need a little of each item in your diet. Whether you need to add either item to your food is a matter of personal taste, but you can usually get enough of booth just by eating a balanced diet. Salt is an absolute in many respects. Yes, you can eat sea salt and get some other minerals with your salt, but basically, salt is salt. However, sugar is different. When viewing sugar, you need to consider both the kind of sugar and the amount that the sugar is processed. It’s the latter item that is the topic of this post. Most notably, brown sugar.

Like most people, I look for ways to save money at the store. So, for a while I was buying just any old brown sugar-the least expensive I could find. However, I’ve taken to actually reading labels. This is only something that I’ve decided to do recently though. Reading the labels of a product is actually a lot easier when you can clearly see its ingredients and any other important information you may need to decipher whether you should purchase it or not. My friend thought that it was because the manufacturer had enlisted the help of a Paul Leibinger inkjet printer. He told me that Leibinger manufactures high quality inkjet coding and inkjet marking systems for industrial labeling of products and packing, which can help companies to clearly mark their products with things like the batch number and best before date – which is information that could help benefit us in our purchases. It has definitely helped me with deciding which sugar to buy. When you review the list of ingredients for most brands of inexpensive brands of brown sugar, you see sugar and molasses as the ingredients. What this really means is that the vendor has highly processed the sugar, making it into white sugar, and then colored it brown using molasses. What you’re getting is a processed product, not a rawer form of sugar. What you really want to see on the label is one ingredient, brown sugar.

The reason for this post is that actual brown sugar is different from white sugar mixed with molasses. Creating a rawer form of the sugar makes a difference in its texture and how it bakes. Yet, most of the material I’ve read online seems to assume that every kind of brown sugar out there is simply white sugar mixed with molasses. The less expensive forms of brown sugar are moister and tend to taste just a bit caramelized. In addition, what you may be getting is beet sugar, not cane sugar, when you buy the less expensive brands. The less expensive brown sugars may not even be brown all the way through the crystal, which tends to change the result you get.

As to whether there are any health benefits to using real brown sugar, I’ve read a few bits of research that seem to indicate that the real brown sugar has a few extra minerals. However, if you’re diabetic, you still need to take the same precautions with brown sugar that you take with white sugar (or any other sugar). The main differences that you’ll notice is that the items you make with real brown sugar will tend to taste better and your baked goods will come out better. The important thing is to make an informed choice. Choose to read product labels before you purchase items in the store and then take a little time to research what these ingredients are all about. Let me know your thoughts about real brown sugar versus white sugar sprayed with molasses at [email protected].


Harvest Festival 2015

Harvest Festival is one of my favorite holidays of the year. What, you haven’t heard of Harvest Festival? Well, it happens each year sometime during September. The date isn’t precise because you just can’t hold Mother Nature to a specific time to make the majority of the fruits and vegetables ripe. That said, the harvest does happen every year and it’s a time to celebrate, even though it also means hard work. I’ve presented Harvest Festival in the past:

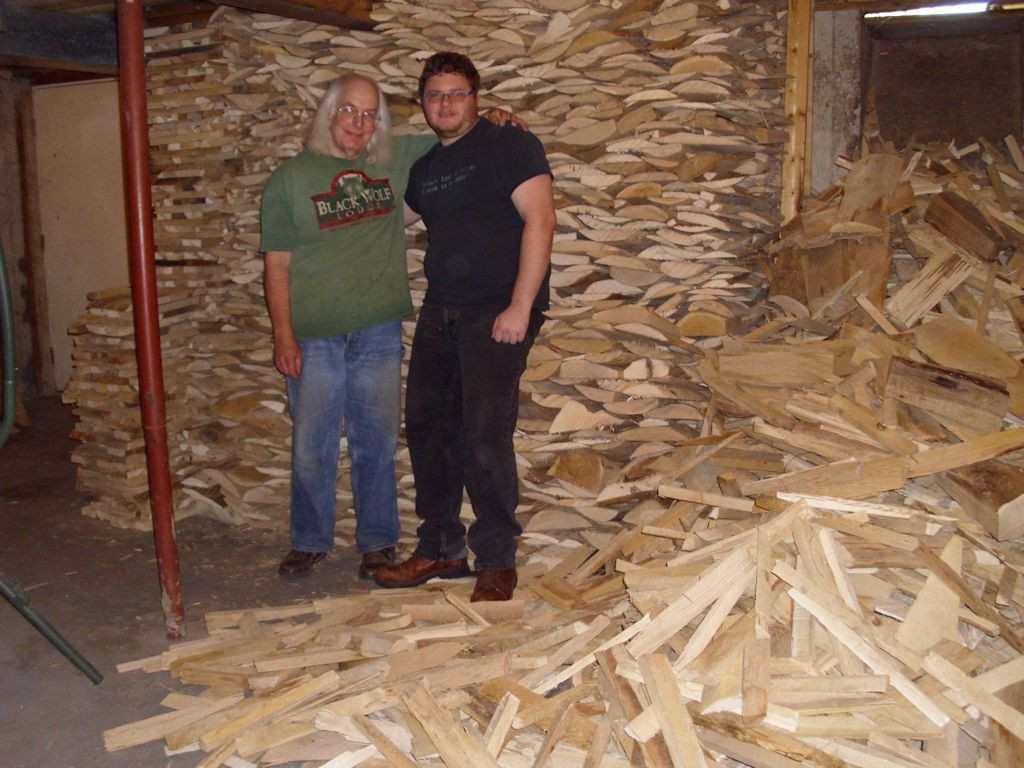
What made this Harvest Festival different is that I did the majority of the work on my own. There was lots to do, of course, and I plan to talk about some of the things I did in future posts. This year the Harvest Festival included getting some of my wood for the winter into the basement. My friend Braden helped me get the wood down there—it’s a big job even for two people. I now have five cords down there and two cords outside. Seven cords will take me through most winters, but I’ll cut another cord just in case things get extra cold. The wood you see in the picture is mostly slab wood, with about a cord of logs underneath.

John and Braden standing next to a huge pile of wood.
Getting the firewood stacked in the basement was a big job.

This year the apples ended up as chips for the most part. I also saved some for eating. The larder already has all applesauce, juice, pie filling, and odd assorted other apple products I could use. The remaining apples ended up with friends. I did make up pickled crab apples this year and did they ever turn out nice. I also made a crab apple vinaigrette salad dressing and canned it. The result is quite nice. For once, my pears let me down. The weather just wasn’t conducive to having a good pear crop. I did get enough pears for eating and a few for sharing as well.

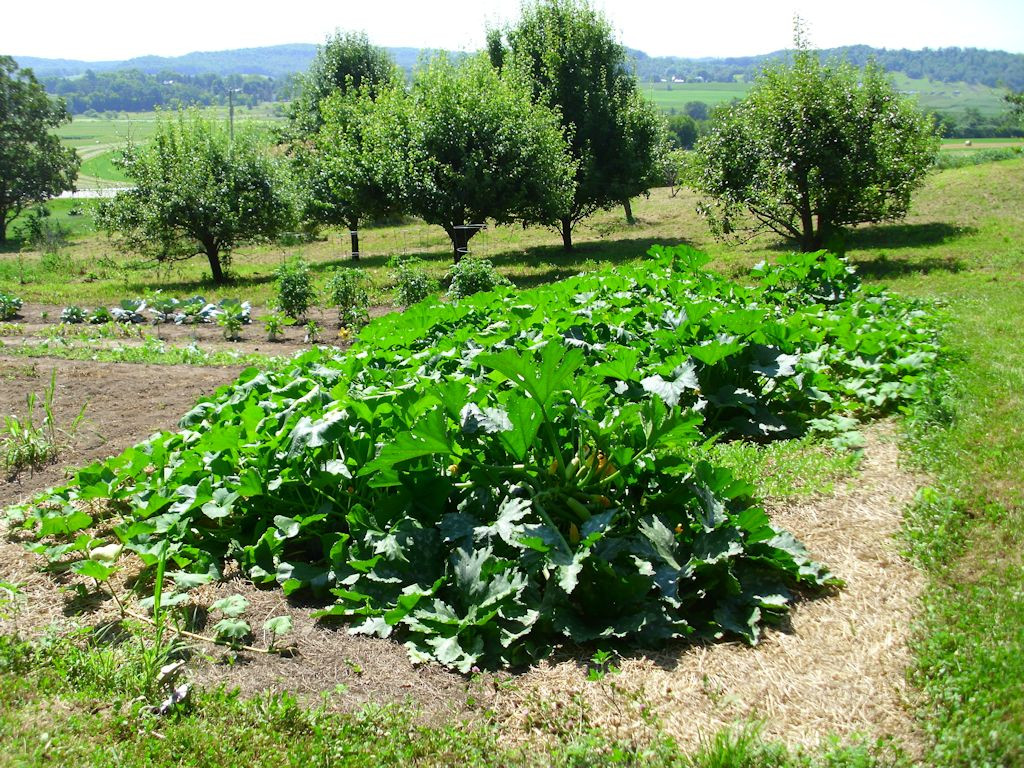
Every year is good for something though and it was a banner squash year. The squash vines grew everywhere. At one point, the squash was chest high on me—I’ve never seen it grow like that.


A largish squash patch with chest high squash plants.
The squash grew like crazy this year!

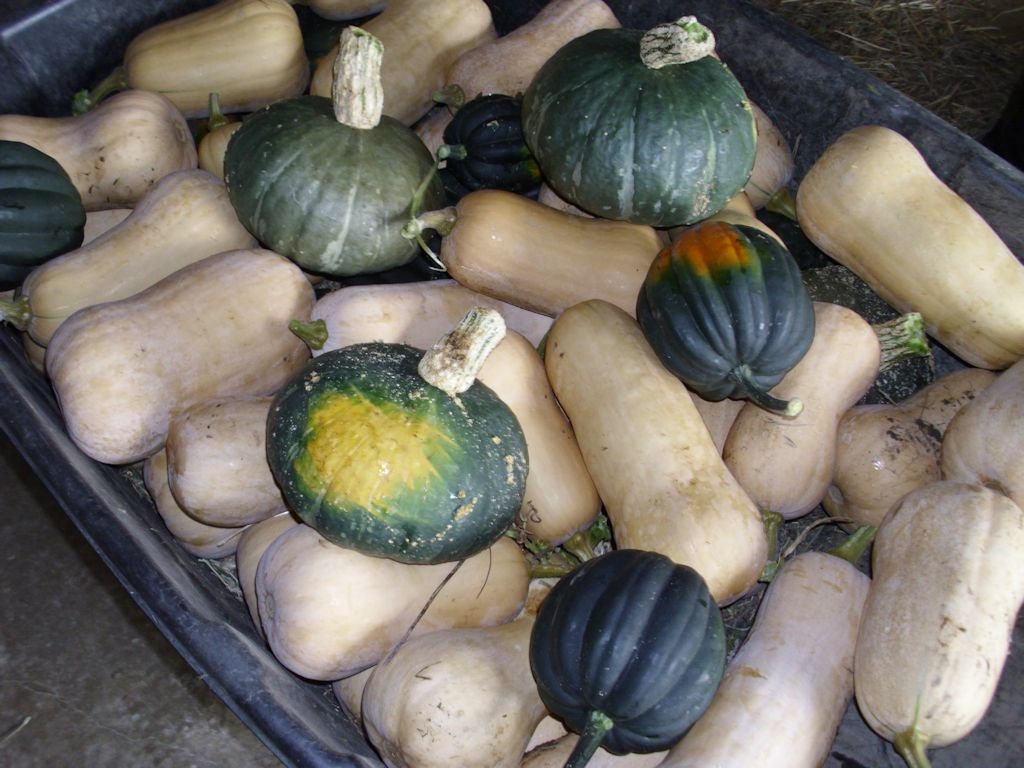
The picture shows the squash about mid-summer. By the end of the summer they had grown into the garden (overwhelming the tomatoes) and into the grass. The squash also grew larger than normal. I ended up with a total of 700 pounds worth of squash (much of which has been preserved or distributed to friends). Here is some of the squash I harvested this year.


The squash patch produced three kinds of squash in abundance this year.
A cart full of squash.

The largish looking round green squash (one of which has a yellow patch on it) are a Japanese variety, the kabocha squash. So far, I’m finding that they’re a bit drier and sweeter than any of my other squash. I think I could make a really good pie with one and they’ll definitely work for cookies. Unlike most winter squash, you can eat the skin of a kabocha squash, making it a lot easier to prepare and it produces less waste. Given that I received these squash by accident, I plan to save some of the seeds for next year. The squash I was supposed to get was a buttercup squash. The two look similar, but are most definitely different (especially when it comes to the longer shelf life of the kabocha).

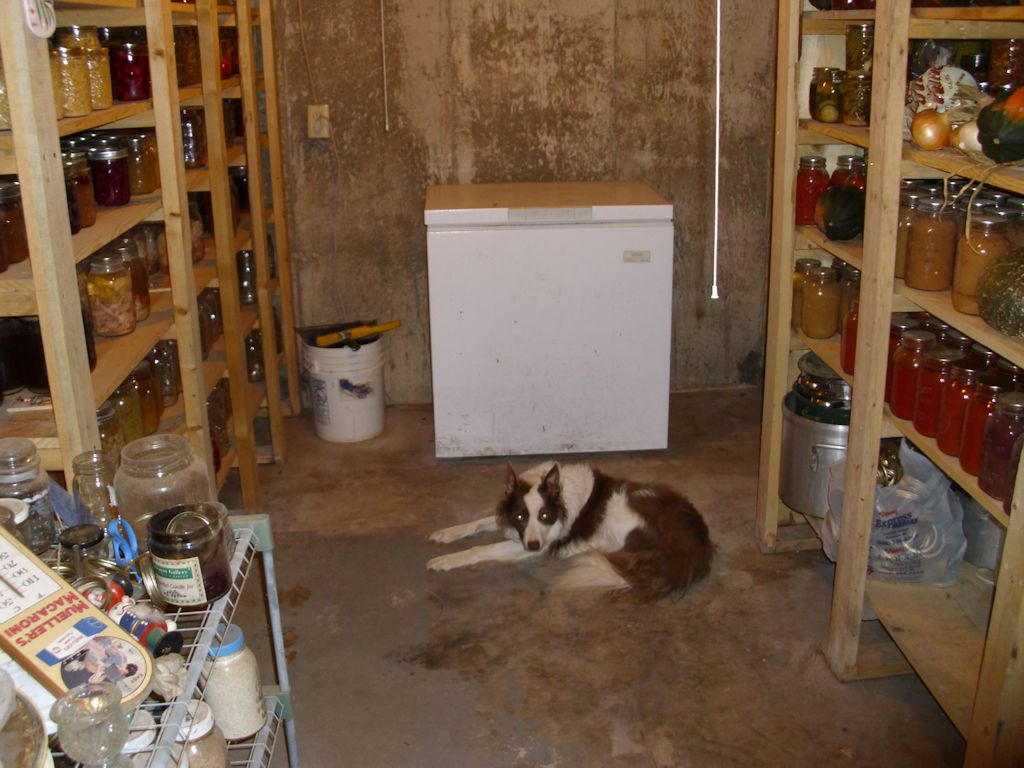
Canning season was busy this year. I’ve started filling in all the holes in the larder. For one thing, I was completely out of spaghetti sauce. Even though making homemade spaghetti sauce is time consuming, it’s definitely worth the effort because the result tastes so much better than what you get from the store. I also made a truly decadent toka plum and grape preserve and grape and pear juice. I’ve done hot water bath canning by myself before, but this was the first year I did pressure canning on my own. Let me just say that it all comes down to following the directions and not getting distracted. My two larder shelves are looking quite nice now (with Shelby on guard duty).


The larder contains two shelving units and a freezer.
A view of the larder from the front.

The right shelving unit contains mostly fruit products of various sorts and condiments. Yes, I even make my own ketchup and mustard. Of course, some of the squash also appear on the shelves, along with my cooking equipment and supplies. Let’s just say there isn’t a lot of room to spare.


Fruit products dominate the right shelving unit.

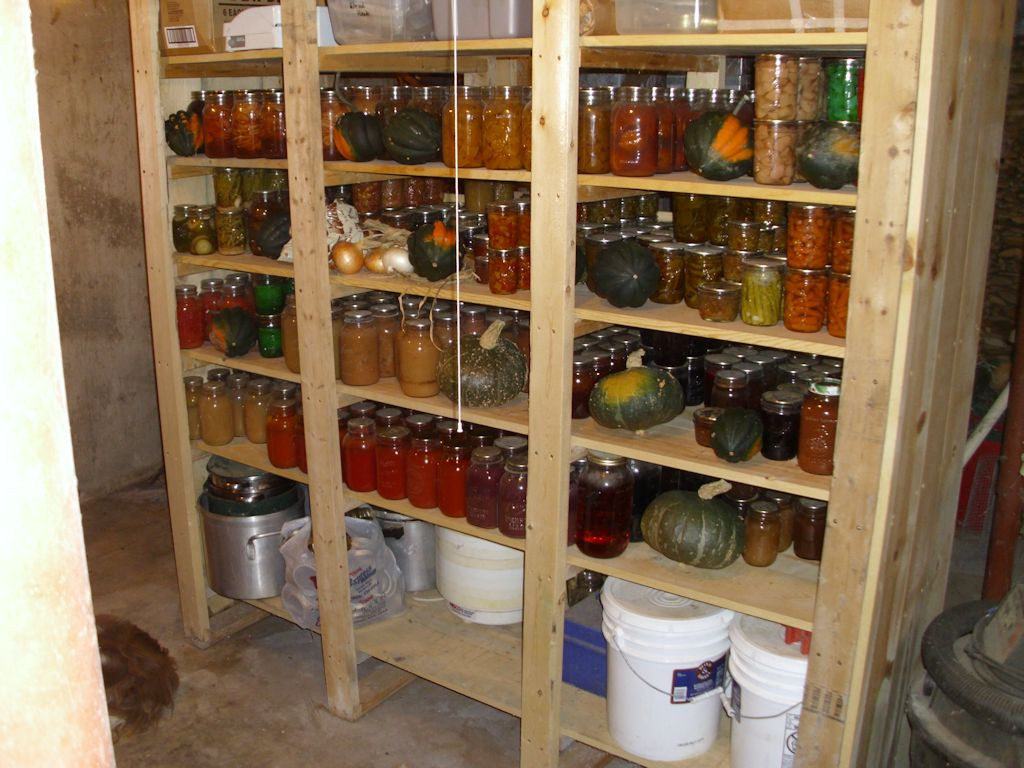
The left shelving unit contains mostly vegetables and meats. In years past I’ve canned venison, pork, and chicken. This year I thought I might try canning some rabbit as well. Canning the meat means that it’s already cooked and ready to eat whenever I need it. The meat isn’t susceptible to power outages and it lasts a lot longer than meat stored in the freezer. Even though canning meat can be time consuming and potentially dangerous when done incorrectly, I’ve never had any problem doing so.


The left shelving unit contains mostly vegetables and meats.

Harvest Festival 2015 has been a huge success. The point is that I have a large variety of different foods to eat this winter, which will make it easier to maintain my weight and keep myself healthy. I had a great deal of fun getting everything ready. There was the usual music, special drinks, and reminiscing about times past. What makes your harvest preparations joyful? Let me know at [email protected].


Freezing Cabbage

Cabbage is one of those items that’s hard to store for the winter months. I know of some people who wrap the cabbage up in newspaper and then store it in their root cellar. In order to make this approach work, you need a cool root cellar-around 40 degrees (or lower) is best. The cabbage can last up to five months when stored this way if the storage meets all the required conditions.

Another way to store cabbage is to pressure can it. I’ve saved the secondary cabbages that come up after you cut off the primary cabbage this way. You can prepare and store the cabbage whole in most cases and it comes out reasonably well. The minute you have to cut the cabbage up, pressure canning starts to lose its appeal because the cabbage gets quite soft (sometimes downright mushy).

It’s also possible to preserve cabbage as sauerkraut-an approach that I highly recommend. Nothing quite matches the taste of homemade sauerkraut. Certainly, nothing you buy in the store will match the fermentation approach that most homemade sauerkraut relies on. Unfortunately, you can only eat so much sauerkraut in a year, even if you love the stuff.


Freezing cabbage is another alternative, but one that is also fraught with problems. Freezing any food can be problematic if it hasn’t been prepared correctly. In order to combat this, people could always consider visiting PreparedCooks.com to learn about freezing foods. They have blog posts on a number of different foods that can be frozen, so people could learn from that. Personally, I’ve eaten more than my fair share of truly horrid cabbage that has been frozen. If you don’t prepare it right, the mush that you get out of the freezer will not only look unappealing, it’ll taste quite bitter. In fact, about the only thing you can do with it is put it in the compost-it really is quite bad. After years of experimentation, I have come up with a way to freeze cabbage that does produce a palatable result. You can defrost the cabbage made this way and use it for anything that required cooked cabbage-the cabbage will still lack the crispness of fresh, so coleslaw is out of the question. Here are the steps I follow.

  1. Clean the cabbage carefully, removing any damaged leaves.
  2. Cut the cabbage in four to six parts of about a pound each. Don’t cut the cabbage too small. Cut the cabbage in such a way that each piece is still attached to the core. Don’t remove the core.
  3. Heat a pot of water to boiling. Add 2 tablespoons of salt and 1/4 cup of vinegar to the solution. The salt and vinegar improve the taste of the final product by keeping minerals from adhering to the cabbage.
  4. Blanch the cabbage for 2 minutes (timing is critical).
  5. Immediately cool the cabbage with copious amounts of cold water and ice.
  6. Place the cabbage on clean, white towels to dry. Pat or otherwise handle the cabbage as little as possible, but try to get as much of the water off of the cabbage as is possible.
  7. Freeze the cabbage overnight. Don’t wrap it. Separate pieces from each other using waxed paper or aluminum foil (the foil works better, but is a lot more expensive).
  8. The next morning, place the cabbage in the smallest possible freezer bag or, better still, use a vacuum packer such as the Food Saver to store it. Less air is better. When using a vacuum packer, use the lowest possible setting to avoid damaging the cabbage. Using the 8″ rolls works best because you can make the bags as large as needed.

If you’re able to vacuum pack the cabbage, it can last a minimum of a year in the freezer. In fact, you can often keep it in the freezer longer without any sign of frost damage, but longer storage may reduce the quality of the cabbage and affect the nutrients you get from it. Let me know if you have any questions about this technique at [email protected].