Debugging a CodeBlocks Application with Command Line Arguments

This is an update of a post that originally appeared on November 1, 2011.

Most application environments provide a means of setting command line arguments and CodeBlocks is no exception. The example shown in Listing 6-12 on page 167 of C++ All-In-One for Dummies, 4th Edition requires that you set command line arguments in order to see anything but the barest output from the debugger. This post discusses the requirements for setting command line arguments for debugging purposes.

Let’s begin with the example without any configuration. Every application has one command line argument—the path and application executable name. To see this argument, change the line that currently reads for (int index=1; index < argc; index++) to read for (int index=0; index < argc; index++) instead (setting index=1 causes the program not to show the first argument). So, now when you run the example shown in Listing 6-12 you’ll see the path and executable name as a minimum, as shown here.

The first argument passed to an application is the application executable name and path.
The first argument passed to an application.

If you run this example, you may see a different path, but the command line executable should be the same. The point is that you see at least one argument as output. However, most people will want to test their applications using more than one argument. In order to do this, you must pass command line arguments to the application. Start by changing the code back to its original form where index=1. The following steps tell how to perform add command line arguments.

  1. Choose Project | Set Program’s Arguments. You’ll see the Select Target dialog box shown here.
    Change the command line arguments for the debug or release versions.
  2. Select Debug as the target, as shown in the figure.
  3. Type the arguments you want to use, such as Hello World I Love You!, in the Program Arguments field and click OK. The IDE is now set to provide command line arguments to the application when you’re using the specified target, which is Debug in this case.

When you run the application after adding the command line argument, you should see them in the output like this:

The output shows addition of the command line arguments.

Testing for command line arguments in a CodeBlocks application consists of telling the IDE what to pass in the Select Target dialog box. Let me know if you have any questions about this process at [email protected].

An Update on the RunAs Command


This is an update of a post that originally appeared on 
May 14, 2014.

Recently I wrote the Simulating Users with the RunAs Command post that describes how to use the RunAs command to perform tasks that the user’s account can’t normally perform. (The basics of using the RunAs command appear in Windows Command-Line Administration Instant Reference.) A number of you have written to tell me that there is a problem with using the RunAs command with built-in commands—those that appear as part of CMD.EXE. For example, when you try the following command:

RunAs /User:Administrator "md \Temp"

you are asked for the Administrator password as normal. After you supply the password, you get two error messages:

RUNAS ERROR: Unable to run - md \Temp
2: The system cannot find the file specified.

In fact, you find that built-in commands as a whole won’t work as anticipated. One way to overcome this problem is to place the commands in a batch file and then run the batch file as an administrator. This solution works fine when you plan to execute the command regularly. However, it’s not optimal when you plan to execute the command just once or twice. In this case, you must execute a copy of the command processor and use it to execute the command as shown here:

RunAs /User:Administrator "cmd /c \"md \Temp""

This command looks pretty convoluted, but it’s straightforward if you take it apart a little at a time. At the heart of everything is the md \Temp part of the command. In order to make this a separate command, you must enclose it in double quotes. Remember to escape the double quote that appears within the command string by using a backslash (as in \").

To execute the command processor, you simply type cmd. However, you want the command processor to start, execute the command, and then terminate, so you also add the /c command line switch. The command processor string is also enclosed within double quotes to make it appear as a single command to RunAs.

Make sure you use forward slashes and backslashes as needed. Using the wrong slash will make the command fail.

The RunAs command can now proceed as you normally use it. In this case, the command only includes the username. You can also include the password, when necessary. Let me know if you find this workaround helpful at [email protected].

Simulating Users with the RunAs Command

This is an update of a post that originally appeared on April 26, 2011.

One of the problems with writing applications, administering any network, or understanding system issues is to ensure that you see things from the user’s perspective. It doesn’t matter what your forte might be (programmer, administrator, DBA, manager, or the like), getting the user view of things is essential or your efforts are doomed to failure. Of course, this means seeing what the user sees. Anyone can run an application at the administrator level with good success, but the user level is another story because the user might not have access to resources or rights to perform tasks correctly.

Most knowledgeable users know that you can simulate an administrator by right clicking the application and choosing Run As Administrator from the context menu. In fact, if you Shift+Right Click the application, you’ll see an entry for Run As A Different User on the context menu that allows you to start the application as any user on the system. However, the GUI has limitations, including an inability to use this approach for batch testing of an application. In addition, this approach uses the RunAs command defaults, such as loading the user’s profile, which could cause the application to react differently than it does on the user’s system because it can’t find the resources it needs on your system.

A more practical approach is to use the RunAs command directly to get the job done. You can see some basic coverage of this command on page 480 of Windows Command-Line Administration Instant Reference. To gain a basic appreciation of how the user views things, simply type RunAs /User:UserName Command and press Enter (where UserName is the user’s fully qualified logon name including domain and Command is the command you wish to test). For example, if you want to see how Notepad works for user John, you’d type RunAs /User:John Notepad and press Enter. At this point, the RunAs command will ask for the user’s password. You’ll need to ask the user to enter it for you, but at that point, you can work with the application precisely as the user works with it.

Note that I highly recommend that you create test user accounts with the rights that real users have, rather than use a real user’s account for testing. Otherwise, if something goes wrong (and it usually does), you’ve damaged a real user’s account. Make sure you follow all of the usual policies to create this test user account and that you have as many test user accounts as needed to meet your organization’s needs.

Of course, many commands require that you provide command line arguments. In order to use command line arguments, you must enclose the entire command in double quotes. For example, if you want to open a file named Output.TXT located in the C:\MyDocs folder using Notepad and see it in precisely the same way that the user sees it, you’d type RunAs /User:John “Notepad C:\MyDocs\Output.TXT” and press Enter.

In some cases, you need to test the application using the users credentials, but find that the user’s profile gets in the way. The user’s system probably isn’t set up the same as your system, so you need your profile so that the system can find things on your machine and not on the user’s machine. In this case, you add the /NoProfile command line switch to use your profile. It’s a good idea to try the command with the user’s profile first, just to get things as close as you can to what the user sees. The default is to load the user’s profile, so you don’t have to do anything special to obtain this effect.

An entire group of users might experience a problem with an application. In this case, you don’t necessarily want to test with a particular user’s account, but with a specific trust level. You can see the trust levels setup on your system by typing RunAs /ShowTrustLevels and pressing Enter. To run an application using a trust level, use the /TrustLevel command line switch. For example, to open Output.TXT as a basic user, you’d type RunAs /TrustLevel:0x20000 “Notepad C:\MyDocs\Output.TXT” and press Enter. The basic trust levels are:

  • 0x40000 – System
  • 0x30000 – Administrator
  • 0x20000 – Basic User
  • 0x10000 – Untrusted User

Many people are experiencing problems using the /ShowTrustLevels and /TrustLevel command line switches with newer versions of Windows. The consensus seems to be that Microsoft has changed things with the introduction of UAC and that you’ll need to work with the new Elevation Power Toys to get the job done. You may also want to review the article PowerToys running with administrator permissions because it provides some insights that may be helpful in this case as well. I’d be interested in hearing about people’s experiences. Contact me at [email protected].

Using the Set Command to Your Advantage

This is an update of a post that originally appeared on February 24, 2014.

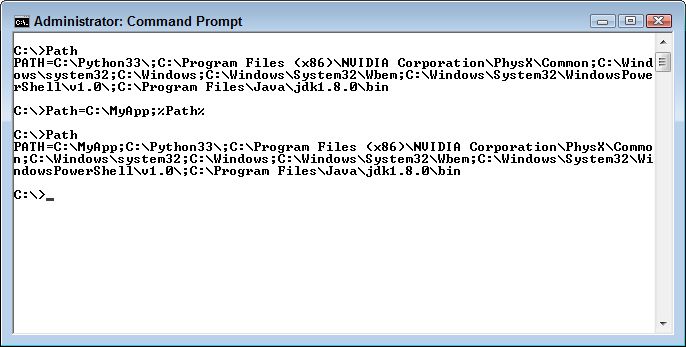
A short while ago, I created a post about the Windows path. A number of people wrote me about that post with questions. Yes, you can use the technique for setting the Path environment variable to set any other environment variable. The Windows Environment Variables dialog box works for any environment variable—including those used by language environments such as Java, JavaScript, and Python. Windows doesn’t actually care what sort of environment variable you create using the method that I discuss in that post. The environment variable will appear in every new command prompt window you create for either a single user or all users of a particular system, depending on how you create the environment variable.

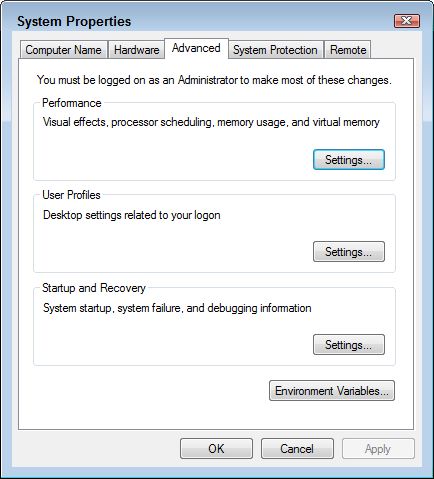
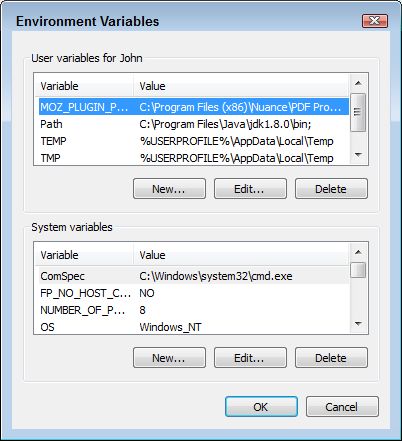
A few of you took me to task for not mentioning the Set command. This particular command appears in Microsoft Windows Command Line Administration Instant Reference. It’s a useful command because you can temporarily configure a command prompt session to support a new set of settings. When the session is ended, the settings are gone. Only those settings you create as part of Environment Variables window have any permanence. There are other tricks you can use, but using Set for temporary environment variables and the Environment Variables window for permanent environment variables are the two most common approaches.

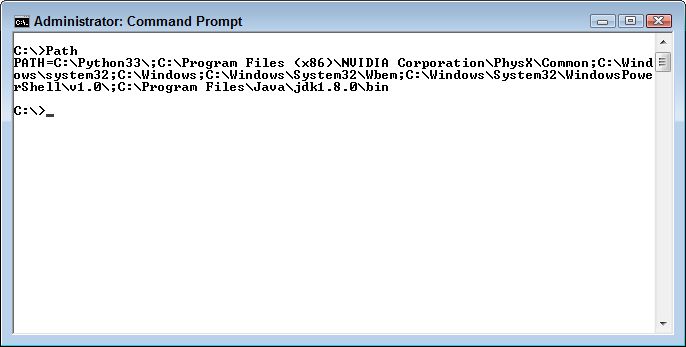
In order to see the current environment variables you simply type Set and press Enter at the command line. If you add a space and one or more letters, you see just the matching environment variables. For example, type Set U and press Enter to see all of the environment variables that begin with the letter U.

To set an environment variable, you add the name of the variable, an equals sign (=), and the variable value. For example, to set the value of MyVariable to Hello, you type Set MyVariable=Hello and press Enter. To verify that MyVariable does indeed equal Hello, you type Set MyVariable and press Enter. The command prompt will display the value of MyVariable. When you’re done using MyVariable, you can type Set MyVariable= and press Enter. Notice the addition of the equals sign. If you ask for the value of MyVariable again, the command prompt will tell you it doesn’t exist.

Newer versions of the command prompt provide some additional functionality. For example, you might set MyVariable within a batch file and not know what value it should contain when you create the batch file. In this case, you can prompt the user to provide a value using the /P command line switch. For example, if you type Set /P MyVariable=Type a value for my variable: and press Enter, you’ll see a prompt to enter the variable value.

It’s also possible to perform math with Set using the /A command line switch. There is a whole list of standard math notations you can use. Type Set /? and press Enter to see them all. If you write application code at all, you’ll recognize the standard symbols. For example, if you want to increment the value of a variable each time something happens, you can use the += operator. Type Set /A MyVariable+=1 and press Enter to see how this works. The first time you make the call, MyVariable will equal 1. However, on each succeeding call, the value will increment by 1 (for values of 2, 3, and so on).

Environment variables support expansion and you can see this work using the Echo command. For example, if you type Echo %MyVariable%, you see the value of MyVariable.

However, you might not want the entire value of MyVariable. Newer versions of the command prompt support substrings. The variable name is followed by a :~, the beginning position, a comma, and the ending position. For example, if you place Hello World in MyVariable, and then type Echo %MyVariable:~0,5% and press Enter, you see Hello as the output, not Hello World. Adding a negative sign causes the expansion to occur from the end of the string. For example, if you type Echo %MyVariable:~-5% and press Enter, you see World as the output.

The Set command is a valuable addition to both the administrator’s and programmer’s toolkit because it lets you set environment variables temporarily. The Set command figures prominently in batch file processing and also provides configuration options for specific needs. Let me know about your environment variable questions as they pertain to my books at [email protected].

Adding a Location to the Windows Path

This is an update of a post that originally appeared on February 17, 2014.

A number of my books tell the reader to perform tasks at the command line. What this means is that the reader must have access to applications stored on the hard drive. Windows doesn’t track the location of every application. Instead, it relies on the Path environment variable to provide the potential locations of applications. If the application the reader needs doesn’t appear on the path, Windows won’t be able to find it. Windows will simply display an error message. So, it’s important that any applications you need to access for my books appear on the path if you need to access them from the command line.

You can always see the current path by typing Path at the command line and pressing Enter. What you’ll see is a listing of locations, each of which is separated by a semicolon as shown here (your path will differ from mine).

Using the Path command displays the current path.

In this case, Windows will begin looking for an application in the current folder. If it doesn’t find the application there, then it will look in C:\Python33\, then in C:\Program Files (x86)\NVIDIA Corporation\PhysX\Common, and so on down the list. Each potential location is separated from other locations using a semicolon as shown in the figure.

There are a number of ways to add a location to the Windows path. If you only need to add a path temporarily, you can simply extend the path by setting it to the new value, plus the old value. For example, if you want to add C:\MyApp to the path, you’d type Path=C:\MyApp;%Path% and press Enter. Notice that you must add a semicolon after C:\MyApp. Using %Path% appends the existing path after C:\MyApp. Here is how the result looks on screen.

Adding a path is a relatively simple process using the Path= command

Of course, there are times when you want to make the addition to the path permanent because you plan to access the associated application regularly. In this case, you must perform the task within Windows itself. The following steps tell you how.

1. Right click This Computer (or Computer) and choose Properties from the context menu or select Settings (or System in the Control Panel). You see the a Settings (System) window similar to the one shown here open (precisely what you see depends on which version of Windows you have, the figure shows Windows 10).

    The Settings window in Windows 10.

    2. Click Advanced System Settings. You see the Advanced tab of the System Properties dialog box shown here.

    The Advanced tab provides access to your permanent path in Windows.

    3. Click Environment Variables. You see the Environment Variables dialog box shown here. Notice that there are actually two sets of variables. The top set affects only the current user. So, if you plan to use the application, but don’t plan for others to use it, you’d make the Path environment variable change in the top field. The bottom set affects everyone who uses the computer. This is where you’d change the path if you want everyone to be able to use the application.

    There are paths that affect only the current user and those that affect the system as a whole.

    4. Locate the existing Path environment variable in the list of variables for either the personal or system environment variables and click Edit. If there is no existing Path environment variable, click New instead. You see a dialog box similar to the one shown here when working with Windows 10 (other versions of Windows will show a different dialog box, but the purpose is the same, to edit the path).

    Each path location appears on a separate line to make it easy to edit.

    When you open a new command prompt, you’ll see the new path in play. Changing the environment variable won’t change the path for any existing command prompt windows. Having the right path available when you want to perform the exercises in my books is important. Let me know if you have any questions about them at [email protected].


    Working at the Command Line

    I maintain statistics about each of my books. Lately, I’ve noticed a trend with my command line reference books. More people are sending me e-mail about Microsoft Windows Command Line Administration Instant Reference and Administering Windows Server 2008 Server Core. However, the questions are becoming more diverse and less technical. Rather than the targeted questions about administration needs, I’m getting what I think are probably power user questions as well. People see my blog posts about commands, such as FindStr, and they naturally want to know more.

    Someone recently wrote to ask me about what I thought the trends regarding the command line are. Based on my statistics, I would think that administrators are continuing to use the command line and more power users are rediscovering the command line. However, basing an opinion solely on book-related e-mail isn’t always the best idea and it certainly isn’t very scientific. Statistically, the e-mail is probably skewed to some extent because people aren’t speaking in general about their feelings—they have specific questions.

    So, today I come to you with a request. Could you either comment to this blog post or send me e-mail about how you use the command line, or whether you use it at all? Microsoft is doing everything it can to move people to PowerShell. You can do quite a lot with PowerShell, including writing scripts that are more robust than those you can write at the command line. In addition, there are sites, such as PowerShell.com, that cater to the needs of the PowerShell user.

    Even though it would seem at first like PowerShell is the future and the command line is passé, the command line has the advantage of simplicity and long term stability. In addition, there are still more resources available for the command line than there are for PowerShell. I generally use the command line for all my needs because I simply haven’t had a need for the additional resources that PowerShell provides. Let me know your thoughts about the command line and whether you generally see PowerShell as the required replacement for it at [email protected].


    Understanding the Maturing of the Command Line

    A number of people have asked me why I’ve written several different command line reference books. The answer is that each book serves a different market. Serving reader needs is a quest of mine. As reader needs change, I also change my books to better meet those needs. The command line may seem static, but reader needs have changed over the years because of the way in which the command line is perceived and the new commands added to it.

    The most popular of the set, Windows Command-Line Administration Instant Reference, provides the reader with quick access to the most commonly used commands. In addition, this book emphasize examples over documentation, so you see how to use a command, but don’t necessarily get every detail about it (only those that are used most often). This book is mainly designed to assist administrators. With this group in mind, the book also provides a good overview of batch files and scripting. The point is to provide something small that an administrator can easily carry around.

    A second command line reference, Administering Windows Server 2008 Server Core, is designed to meet the needs of those who use Microsoft’s Spartan Server Core operating system. The book includes a number of special features for this audience, such as instructions on getting hard to install software to work in this environment. This is also the only book that discusses how to use Mono to overcome .NET Framework limitations in this environment. Even though the title specifies Windows Server 2008 Server Core, the book has also been tested with Windows Server 2012 Server Core. The point of this book is to allow you to get all of the speed, reliability, and security benefits of Server Core installations without all of the hassle that most administrators face.

    My third command line reference, Windows Administration at the Command Line for Windows Vista, Windows 2003, Windows XP, and Windows 2000, serves the general needs of administrators and power users. This book is intended to help anyone use the command line more efficiently. It provides a little more hand holding and considerable more detail about all of the available commands than my other two books. This is also the only book that discusses PowerShell.

    The PowerShell portion of this third book has received a lot more attention as of late. Microsoft is making a much stronger emphasis on this new version of the command line, so I’m glad I included it in my book. One of the strong suites of this book is that it not only discusses documented commands, but many undocumented commands as well (with the appropriate caveats, of course).

    No matter which version of my command line reference you use, I’m always here to answer your questions about my books. How do you interact with the command line? Has PowerShell taken a more prominent role in the way you do your work? Let me know at [email protected].


    Limitations of the FindStr Utility

    Readers have noted that I use the FindStr utility quite often. This utility is documented in both Windows Command-Line Administration Instant Reference and Administering Windows Server 2008 Server Core (and also appears a host of my other books). At the time I wrote that documentation, I had no idea of how much comment this particular utility would generate. I’ve written a number of posts about it, including Accessing Sample Database Data (Part 3), Understanding Line-, Token-, and String-Based Command Line UtilitiesUsing the FindStr Utility to Locate Errors in Visual Studio, and Regular Expressions with FindStr. It might be possible that people think that this utility is infallible, but it most certainly has limits. Of course, the FindStr utility is line-based and I’ve already documented that limitation. However, it has other limitations as well.

    The most important limitation you must consider is how FindStr works. This utility works with raw files. So, you can use it to look inside executable files and locate those produced by a specific organization as long as the file contains unencrypted data. When an executable relies on obfuscation or other techniques to render the content less viewable by competitors, the strings that you normally locate using FindStr might become mangled as well—making them invisible to the utility. In practice, this particular problem rarely happens, but you need to be aware that it does happen and very likely will happen when the executable file’s creator has something to hide (think virus).

    Another problem is that FindStr can’t look inside archives or other processed data. For example, you can’t look inside a .ZIP file and hope to locate that missing file. You might initially think that there is a way around this problem by using the functionality provided in Windows 7 and newer versions of Windows to look inside archive files and treat them as folders. However, this functionality only exists within Windows Explorer. You can’t open a command prompt inside an archive file and use FindStr with it.

    Recently, a reader had written me about his Office installation. Previously, he had used FindStr to locate specific files based on their content—sometimes using content that wasn’t searchable in other ways. This feature suddenly stopped working and the reader wondered why. It turns out that .DOC files are raw, while .DOCX files are archives. Change the extension of a .DOCX file to .ZIP and you’ll suddenly find that your ZIP file utilities work great with it. Old Office files work well with FindStr—new files only work if you save them in .DOC format.

    Another reader wrote to ask about network drives. It seems that the reader was having a problem locating files on a network drive unless the drive was mapped. This actually isn’t a limitation, but you do have to think about what you want to do. Let’s say you’re looking for a series of .DOC files on the C drive (with a shared name of Drive C) of a server named WinServer in the WinWord folder that contain the word Java in them. The command would look like this: FindStr /m /s “Java” “\\WinServer\Drive C\WinWord\*.doc”. When using network drives, you must include the server name, the share name, the path, and the file specification as part of the command. Otherwise, FindStr won’t work. What I have found though is that FindStr works best with Windows servers. If you try to use it with another server type, you might experience problems because FindStr won’t know how to navigate the directory structure.

    There is a real limit on the length of your search string. Another reader wrote with this immense search string and wondered why FindStr was complaining about it. The utility appears to have a search string length limit of 127 characters (found through experimentation and not documented—your experience may differ). The workaround is to find a shorter search string or to perform multiple searches (refining the search by creating a more detailed file specification). If you can’t use either workaround, then you need to write an application using something like VBScript to perform the task.

    These are the questions that readers have asked most about. Of course, I want to hear your question about limitations as well. If you encounter some strange FindStr behavior that affects my book’s content in some way, please be sure to write at [email protected].


    Changes to the Start Command Functionality

    Sometimes a change command line command occurs and no one really notices for a while, except that there is some oddity in the way the command executes. This is how I recently figured out a change to the Start command. Some update Microsoft provided changed the way it worked, but I have no idea of which one.

    I have a batch file in the Startup folder that automatically loads all the sites I use in my favorite browser when I start my system in the morning. The old command looked like this:

    Start "C:\Program Files (x86)\Mozilla Firefox\Firefox" "http://antwrp.gsfc.nasa.gov/apod/"

    This command starts a copy of Firefox and loads Astronomy Picture of the Day (APOD) for me. The interesting thing is that the command continued to work, despite the change in the Start command functionality. What changed was the fact that the command window didn’t go away once the sites were all loaded. The command window would remain in place until I closed the browser. I’ve had a lot of other things to worry about, so all I did was minimize the command window and let it disappear after I had looked over my sites in the morning.

    Notice how the command is in quotes. This is a necessity because there are spaces in the command, so it won’t execute if you don’t place it in quotes. After some investigation, it turns out that the new behavior is treating the command as the Title argument for Start, rather than as the command. The Start command was opening the site based on the URL argument alone. Just why the command window wasn’t closing is something I haven’t figured out yet.

    Recently I decided it was time to work out the problems with the Start command because I wanted to use Chrome to load some sites (in addition to those loaded by Firefox) and Chrome wasn’t loading them. The sites were all loading in Firefox. So, I wandered over to TechNet to see what Microsoft has to say on the Start command and that’s when I noticed that the documentation had been updated on April 17, 2012—about the time I started experiencing my little problem (it does sometimes take forever for me to get the time needed to fix an issue).

    After thinking through the command for a little while and trying a few alternatives at the command line, I finally came up with a new command for the batch file. Here is the result:

    Start /D"C:\Program Files (x86)\Mozilla Firefox\" Firefox.exe "http://antwrp.gsfc.nasa.gov/apod/"

    The new version of the command uses the /D command line switch to specify the path to the command. There is nothing new about the /D command line switch—you simply didn’t need to use it in the past to get the desired result from the Start command. Notice that the command now includes the full executable name and extension. The argument appears after the command as before. Now the command executes properly and the command window closes after all the sites are loaded.

    Make sure you use this new information when working with either Administering Windows Server 2008 Server Core and Windows Command-Line Administration Instant Reference to ensure you get the desired results from the examples. Also let me know about any issues you encounter with commands in either book at [email protected].


    Exercise Care When Synching to External Time Sources

    I read with interest an article by Mary Jo Foley recently entitled, “Microsoft offers guidance on Windows Server Year 2000 time-rollback issue.” It seems that the time source at USNO.NAVY.MIL experienced a problem and rolled back the clocks on a number of servers to the year 2000 during the evening of November 19th. I wouldn’t have wanted to be one of the administrators who had to fix that problem, especially if there were time-sensitive processes running at the time. Can you imagine the effect on applications such as billing? Of course, the effects are devastating for time-sensitive server features such as Active Directory.

    If your organization has a single server that relies on a single time source for synching purposes, it probably isn’t possible to detect this sort of problem immediately, unless you have a human being observing the synching process. Given that administrators love automation, having someone physically sync the server won’t happen in most cases. However, good advice in this case is not to sync to the time server every day—sync only on days when someone will be there to monitor the servers. At least the administrator can quickly react to errant updates of the sort mentioned in the article.

    Larger installations with multiple servers could possibly set up multiple time servers and use an application to monitor them. When the servers are out of sync, the application can notify the administrator about the issue. It’s also possible to use the W32Tm utility to perform time monitoring or to compare the time settings of two systems using a strip chart.

    Actually, it’s a bad idea to sync to the time server at times when an administrator isn’t available to monitor the system, such as during the middle of the night or a holiday. The best option is to sync the server immediately before the staff arrives in the morning or immediately after they leave at night, when an administrator is available to quickly fix the problem. My personal preference is to include the W32Tm utility in a batch file that runs when I start my system in the morning. This batch file syncs all of the systems on the network at a time when I’m specifically watching to see the results. Both Administering Windows Server 2008 Server Core and Windows Command-Line Administration Instant Reference provide information on how to use this utility to perform a wide variety of time-related tasks.

    If you happened to be affected by this issue, make sure you read the Microsoft blog post entitled, “Fixing When Your Domain Traveled Back In Time, the Great System Time Rollback to the Year 2000.” Even if you have already fixed the problem, the information in the article is useful because it helps define the problem and provides some useful information for avoiding the problem in the future. The vast majority of servers affected by this problem have Windows 2003 installed without time jump protection enabled. I’d actually like to hear if someone has encountered something odd in this particular circumstance so that I get a better feel how this problem manifested itself in the real world.

    How do you work through time-related issues in your organization? Have you ever encountered a problem of this sort with your system? Let me know your thoughts at [email protected].