Making Soup

One of the things I do during the winter months is make soup. However, I don’t make just a small amount of soup in a small pot, in a small way. Years ago I bought a large restaurant-quality aluminum soup pot that weighs a ton and holds at least four gallons of soup. Making soup in large batches seems to produce a much better result and the large, thick, heavy soup pot works so well that nothing seems to burn in it. Well, I guess if I tried really hard it would burn, but I don’t try really hard.

Most of my soups start out with meat of some sort (beef, pork, chicken, venison, or lamb), but I normally use soup bones, lots of them. Sometimes I use a whole chicken, a large one. No matter what kind of meat I use, I start out with at least five pounds of it, sometimes more. I start the cooking early in the morning and cook the meat very slowly (never ever boiling it), scooping off the blood that rises to the surface and adding spices and salt afterward. I favor using more spices than salt. In fact, I just barely add salt to taste. I use spices that you normally wouldn’t think of in my soups such as, cinnamon, nutmeg, and cloves, which helps me keep salt to a minimum. You don’t add a lot of these spices, the effect is meant to be subtle. In some cases, such as with beef, I use pickling spice (but make sure to remove the tea ball containing the pickling spice after no more than 20 minutes or it gets bitter). Favorites with chicken include sage, rosemary, and thyme. Sometimes I add orange or lemon peel. A common addition are onions and I sometimes add a bit of fresh garlic (minced fine) as well.

I like my soup to be really nutritious, so I add plenty of vegetables. Most of my soups contain corn, carrots, and potatoes. However, I don’t stop there. The soup I made the other day also contains turnips, Holiday Soup Mix, and celery. I’ve been known to add things like green beans, kohlrabi, rutabagas, turnips, and all sorts of other odd assorted vegetables. In fact, if something in the larder or freezer is getting a bit old, it goes into the soup pot. The point is that the soup is far from plain. It contains good nutritional value from a wide variety of wholesome vegetables.

In addition to all of the vegetables, I sometimes add mushrooms. As with the vegetables, I normally get a better quality mushroom, not those canned kind. My personal favorites are baby portabella, shiitake, and oyster mushrooms, but I’ve used others as well. Even a good quality button mushroom can be a nice addition. I’ve never had much success using morels in soup. Besides, morels were meant for cooking in butter and garlic, with a bit of salt.

To top my soup off I usually add pearled barley. Using pearled barley gives the soup that finishing touch, a kind of nutty flavor that you find in only the best soups. As an alternative, I sometimes use half and half wild and brown rice. I generally don’t add noodles to my soup; they fall apart quickly, don’t have much nutritional value, and tend not to freeze or can well.

Speaking of freezing and canning, there is no way one person can eat four plus gallons of soup before it goes bad and that’s the point. I either can or freeze the excess soup for later. Soups that are a little more broth get canned in one quart containers, while robust soups get frozen in one gallon bags. A word of advice, don’t overfill your gallon bag. I put three quarts of soup at most in my gallon bag and sometimes less depending on the soup. Lay the bags flat in the freezer as they freeze and you’ll find that your bags of soup stack well. If I’m having a really busy time, I simply get out a quart or a bag of soup and I have a nutritious meal I don’t have to cook. Soup is comfort food. Let me know your thoughts about soup at [email protected].

Early Season Canning

I’ve already been canning this season. A lot of people hear this claim and wonder just what it is that I’m canning. The first food I started canning is soup. I get the ingredients from my freezers. Anything that’s starting to get a bit old is fair game. I also save the larger bones from various meats, especially when I have the meat processed by someone else. The meat and vegetables made into soup can quite well and last a lot longer than they would in the freezer. Nothing is quite so nice on a cold winter’s day than hot soup. I usually get two or three servings out of each quart that I can (sometimes four if I add enough additional items). Given the cold winters here in Wisconsin, I can go through a lot of soup.

Once I can the soup, the freezers are less full, so it’s time to defrost them. It’s essential to defrost, clean, and reorganize your freezers every year. Doing so lets you create an inventory of what you have in stock so that you have a better idea of what you need to grow. In addition, you don’t want to keep items so long that they become unpalatable and visually unappealing. Freezer burned food is completely safe to eat, but you may not want to eat it. Some of the ways in which you can prevent freezer burn is to vacuum pack your food and to ensure you rotate it out before it sits in the freezer too long. In some cases, when food is mildly freezer burned, I’ll make it up into pet food (my animals don’t seem to mind as long as the food is prepared to their liking). However, it’s better to use the food up before anything actually does happen to it.

So far I’ve made 14 quarts of chicken soup and another 14 quarts of venison stew. Canning soup means using a pressure canner. Make sure you follow the instructions in a resource such as the Ball Blue Book and the book that comes with your pressure canner. Read Considering the Dangers of Outdated Canning Information for details on keeping yourself safe when using the Ball Blue Book.

It’s also time to can early garden items. For example, when canned properly, rhubarb makes a highly nutritious fruit dish that I eat directly from the jar. You can also make it into pie filling. So far, I’ve made up 7 quarts of plain rhubarb and 7 quarts of spiced rhubarb, both of which will be quite tasty this upcoming winter. Fortunately, you can use hot water bath canning techniques with rhubarb and other high acid foods.

In some cases, you need to mix and match items. The frozen green and wax beans in my freezer weren’t getting any younger, so I used them to make up four bean salad. Actually, it’s supposed to be three bean salad, but some of my recipes called for Lima beans, while others called for kidney beans. I decided to use both, hence four bean soup. I used up all the remaining beans and garnered 16 pints of four bean salad on my larger shelf. Doing so also used up the cans of kidney and Lima beans in my cabinets.

Finally, pickled asparagus can be quite a treat in the middle of winter. So far, I’ve only made up 8 pints of pickled asparagus, but I’ll make up more. I’ll also be freezing some asparagus for fresh use later in the year. In short, canning season has started—time to get going! Let me know about your current canning project at [email protected].


Naturally Probiotic Foods (Part 2)

I was a bit surprised by the number of e-mails I received about Naturally Probiotic Foods. It seems that a lot of people are having the same problems as me with our highly processed foods today. One of the main questions I was asked is whether I feel that pasteurization is a bad thing to do. That’s a loaded question. Most food questions come with trade-offs. Pasteurization helps the milk last longer and kills potentially harmful bacteria. When you get raw milk, you must consume it within 7 to 10 days, which is a much shorter time than pasteurized milk. In addition, people with compromised immune systems aren’t good candidates for raw milk because bacteria that would never cause a problem in a healthy person could cause problems with someone who doesn’t have a fully functional immune system. The immune system is so important, so people without a fully functioning immune system should consider looking into different ways to increase immune function. There are supplements out there that could increase immune function, like lypo spheric vitamin c, for example. That sort of supplement should help people to increase the strength of their immune system, helping them to fight off any bacteria that could come from drinking raw milk. You must also know the farmer or store from which you get the milk. It’s way too easy for raw milk to contain substances that will make you sick. All this said, a lot of people the world over have drunk raw milk literally for centuries and we’re still here. There is a definite trade-off to consider though, so when getting raw milk, shop smart.


Many other items you buy are also pasteurized. For example, it’s entirely possible that the eggs you buy from the store are pasteurized to kill any bacteria on the surface of the egg. When you buy fresh eggs from a farmer or a store that provides such eggs, you do take a small chance of getting sick. The same can be said of any other unpasteurized product you buy. However, to be human is to risk getting sick and you can’t avoid all contact with bacteria. Society has become increasingly germophobic over the years and even that choice creates trade-offs. For example, it’s now thought that a lack of exposure to various germs and bacteria are actually causing problems with children in that they’re exhibiting symptoms like additional allergies. The point is that you must make a smart choice based on your own personal needs-I truly can’t tell anyone whether raw products, such as milk and eggs, are going to cause problems or will help with specific needs.

A number of people have asked what I think about homogenization. I know that when I was growing up, the milk I bought from the store would separate. It was possible to see cream at the top of the glass bottle at some point (often scooped off for coffee and so on). Today, milk doesn’t separate in most cases because of homogenization. Logic tells you that if the milk normally separates (breaks down) and now it doesn’t, that your body is probably going to have a harder time digesting it as well. A number of articles online bear out this fact. However, homogenized milk can cause other problems. For example, a number of sources claim that it can promote cancer. Because I’m not a researcher into this kind of information, I can’t verify these claims, but in reading the information, it does tend to make sense. Over-processing food has certain negative effects and you need to think about the pros and cons of buying it. I found other sites that state the contrary, that homogenization makes milk more digestible. My personal experience doesn’t bear this claim out. In drinking milk that is just pasteurized, I still experience fewer digestive problems than when the milk is also homogenized. However, I’m not you and you are the one who needs to make the required test.

A number of people also asked about alternatives, such as goat’s milk. I personally love goat’s milk as long as it’s cold and not over five days old. After that magic five day mark, the goat’s milk develops a “goaty” taste, some people call it a musky taste. Theoretically, goat’s milk (at least) is more digestible than cow’s milk. At least, that’s the case for me. I can drink goat’s milk without using Lactaid (or a similar product). Again, you need to know the source of your goat or sheep milk in order to be certain that it’s safe to drink. Unlike cow’s milk, goat’s milk actually freezes really well, so when I’m drinking goat’s milk, I keep only enough in the refrigerator for three days and freeze the rest.

Raw foods, those that haven’t been processed, can contain natural probiotics that make them easier to digest. This may, in turn, help the immune system work to its best level in combination with Quantum Health supplemental support. Humans have been consuming these foods for centuries without a problem and our bodies are naturally attuned to them. However, processing does have benefits and you truly can’t ignore these benefits. For me, I find that the raw foods work best because of the probiotics they contain. Your experience is likely to be different from mine. Keep those e-mails coming to [email protected].

Naturally Probiotic Foods

As I’m getting older, I’m finding it helps to have a little assistance in digesting food. Given that I’m into self-sufficiency and tend to look for natural ways of accomplishing what I need to do, I started looking into probiotics, for example, something like mega sporebiotic. Probiotics can help with things like lactose intolerance, bloating, gas, and other unfortunate (and uncomfortable) digestive ills. Of course, you can get probiotic pills, but in reading the labels, I found that these pills vary greatly in quality and that the best pills tend to cost quite a bit. I also like to save money when I can, so I looked for an alternative. Situations like that are why finding things such as a free sample of Peptiva review can really help save time and stress on paying outright for the higher price tagged products, as you can give it a go and see if it works for you before committing your wallet.

Back on track though, before we look at probiotic foods, you need to know that certain foods host certain helpful bacteria and that a specific food may not help your specific problem. If you you truly need a blanket cure for your woes, then you need to get a high-quality probiotic pill that contains as many different kinds of helpful bacteria as possible.

The naturally probiotic food that most people know about is yogurt. Unfortunately, not just any yogurt will do. There are actually three kinds (or levels) of yogurt: the kind that doesn’t have any live culture (which is most of them), the kind with live culture (always marked on the label), and the kind that has added digestive aids added (usually only available at health food stores). The kind that most people get, the one without the live culture, doesn’t have any probiotic benefit and won’t help your digestion. The best option to get for the money conscious is a yogurt that is marked as having live culture. I currently have yogurt, instead of milk, with my breakfast cereal, and find that it has gone a long way toward solving certain digestive ills.

It turns out that sauerkraut, kimchi, and other fermented cabbage dishes have probiotic features. However, what you may not know is that heat kills the helpful bacteria that help with digestion. The only way to get the probiotic effect of sauerkraut, kimchi, or other fermented cabbage dishes is to eat them fresh (which means making them yourself). That jar you buy in the store isn’t actually fermented in the first place (they use vinegar to simulate fermentation) and it also has been canned, so it doesn’t contain any probiotics.

Fermentation is one of the keys in finding a natural probiotic food in many cases. For example, Japanese miso soup (made with fermented soybean paste) is also naturally probiotic. However, you’re again looking at getting the soup fresh. It’s important to note that many of these foods also contain antioxidants and tend to be high in B vitamins.

Some probiotics don’t actually survive the digestion process in some people without a carrier. You may find that the expensive probiotic pill you buy doesn’t do much because your digestive tract destroys the beneficial bacteria before they actually get to your intestines. If your probiotic pill doesn’t use an enteric coating, you may as well not take it Cheese is a helpful carrier food for probiotics. However, like many other foods, cheese comes with a caveatyou must find a cheese that is made with raw, not pasteurized, milk. Fermented cheeses commonly made with raw milk include Gouda and aged cheddar. Always check the label though to determine whether the cheese is made with raw milk (either goat or cow milk works fine).

If you want to gain the benefits of helpful bacteria and yeasts, then you should look at a beverage such as kefir. Like all of the other foods described in this post, you need to get kefir made from raw, not pasteurized milk. The kefir can act as a carrier to ensure that the helpful bacteria and yeasts survive the digestive tract. Ingesting helpful yeasts can help with a variety of problems, including certain allergies (which is part of the reason that I also use locally obtained honey for some as it contains yeasts and pollen that serve to keep allergies low). However, it can also be important to remember, if you haven’t undergone food intolerance testing to identify what foods you could be allergic to, using other foods and nutritional options to manage other allergies could be massively counterproductive when it comes to you trying to become your healthiest self.

Not all cooking techniques destroy probiotics. One such exception is sourdough bread. I wasn’t able to find a lot out about this particular option, except that it must be made with naturally occurring yeasts. In other words, you need a bread that relies on fermentation to obtain the effect as far as I’ve been able to determine from my research, but I’d love to hear from someone who has more details.

Buttermilk and acidophilus milk both have probiotics in them. In this case, someone adds the probiotics to the milk. Theoretically, the milk acts as a carrier for the probiotic to help it get past the digestive tract. My research hasn’t verified what sort of buttermilk you need at this point, nor have I been able to determine whether there are differences in acidophilus milk brands, so this is one of those options that you need to try to determine whether it works for you.

Brine pickles, those made in a crock and left to ferment, contain probiotics. Like other fermented vegetable products, you need to eat this one fresh and not canned. If your pickle recipe calls for vinegar, the result won’t contain any probiotic benefit. Brine pickles, like sauerkraut, rely on salt and water to start the fermentation process.

You can find a host of other food choices, such as tempeh, asparagus, Jerusalem artichokes, bananas, oatmeal, red wine, honey, maple syrup, and legumes that contain probiotic qualities. Each of these options will likely include different helpful bacteria that may or may not make it past your digestive tract. Unfortunately, there isn’t any way to know which foods will work best for you because everyone is different. Experimentation is the best way to determine which foods will work best. The big thing to remember is that these foods are less expensive than pills, generally provide some level of nutritional benefit, and can contain other healthful benefits in addition to their probiotic qualities. Let me know about your favorite probiotic foods at [email protected].

3D Printing – Fad or Practical Tool?

For a while, it seemed as if 3D printing would take the world by storm and that we’d all have 3D printers in our homes pumping out anything we needed. However, since my last article on the topic, 3D Printing Done Faster and Better, the number of articles about 3D technology have decreased noticeably. In fact, the trade press has been a lot quieter on the topic, which makes some people wonder whether 3D printing is actually a fad. The problem with much of the new technology that becomes available is that people initially think there are all sorts of uses for it, but then discover that those uses aren’t practical or that they’re too expensive, and they end up dropping the technology (rather than revise their vision).

You can still find some fanciful uses for 3D printers. For example, the Washington Post recently ran an article recently ran an article on how 3D printers can change the presentation of food. The idea is that you really can have the food presented in a manner that is both pleasing and unique. The idea is to make food in unusual shapes, sizes, and colors, so that it appeals to a larger group of people. However, the original vision was to combine ingredients to actually make the food—this application scales the idea down to a more practical level.

It also looks like 3D printing will see practical use for various higher end needs that aren’t quite professional, but are out of reach of the home owner. Think of printers like the da Vinci 1.0 Pro 3D as a middle ground for experimenters (see the ComputerWorld review). The price is out of reach for the general consumer, but definitely within the range for experimenters and early adapters. Again, the vision is scaled down, more practical, and infinitely more usable.

The military is also using 3D printers to perform practical tasks. Having been a sailor myself, I can tell you without reservation that I would have loved to have been able to print some of the items I needed. Waiting to get back to port before I could even order parts meant serious delays and downed equipment. Imagine having the ability to print a new drone or other needed items while out to sea, rather than waiting for a supply ship or in port visit.

Of course, the medical and other high end uses for 3D printing continue to evolve. For example, 3D printed hands are becoming ever more usable. Expect to see all sorts of new medical uses for 3D printing evolve because humans are notoriously difficult to fit. I envision a day when it becomes possible to print just about any body part needed in the right size, color, shape, and characteristics. New printing strategies may even make the use of organ replacement drugs a thing of the past.

The point is that 3D printing is expanding, growing better, becoming more practical, and still evolving. Yes, you might eventually have one in your own, but don’t expect it to happen anytime soon. Practical uses for 3D printing are becoming more common. Until 3D printing becomes a must have technology for industry, science, military, medical, and other industries, the price won’t come down enough for the home user. To answer my initial question, 3D printing is becoming more practical tool than an interesting new technology, which is why you hear a lot less about it today. Let me know your thoughts about 3D printing at [email protected].


Considering the Dangers of Outdated Canning Information

I am now the proud owner of not one, not two, but three copies of the Ball Blue Book. Of course, the first question anyone should ask is why I own so many copies, given that all three copies are in great shape. The problem is one of outdated information. Science is constantly finding out more about bacteria and the methods used to battle it, so working with old information is dangerous from a number of perspectives.

All of these issues affect how you can food. Consequently, it’s a good idea to keep your canning resources updated to ensure you stay safe. The point was driven home to me again last week when I went to check on the process for canning zucchini. My oldest Ball Blue Book had a perfectly usable recipe for the process. I also found recipes on several sites online, some of which included pictures that looked precisely like the process I had followed in the past. At least one resource talked about another book on my shelf, Putting Food By. However, I became suspicious when a third resource mentioned a potential issue with canning zucchini. Locating the USDA resource online provided the full story. It turns out that the USDA can’t determine a good processing time for zucchini because of the way the squash cooks. So, I froze my zucchini using the process found in all three copies of my Ball Blue Book (a process that hasn’t changed).

After spending some time researching this issue, I’ve come to the conclusion that I really need to recheck those old family recipes of mine to ensure they’re still safe. I also need to spend more time ensuring my resources, such as the Ball Blue Book, are updated regularly. Saving money by canning your own food loses its luster when a family member gets sick or possibly dies due to food contamination. Play it safe—throw that outdated book out and get the latest copy of any resources you use to ensure that you’re using the latest techniques. If in doubt, check additional resources such as the National Center for Home Food Preservation site for additional information or choose not to preserve the food in question. Let me know your thoughts on safe canning techniques at [email protected].


A New Type of Canner

There are many different ways to perform some tasks. Until recently, I thought that the only two ways to effectively hot water bath can were in the oven and on the stove top. I haven’t used the oven method for quite a number of years, partly because there is a chance that the jars won’t seal properly afterward and the opportunity for pathogens to enter the jars unwanted. The method I currently use is on top of the stove using a suitably large pot or a canner. In fact, it was this technique that caused me to write, Choosing an Appropriate Stove. It’s probably the method I’ll continue to use, but there are other options.

The proliferation of stoves with tops that aren’t suitable for heavy pots has companies like Ball scrambling, especially since there is a resurgence in interest about canning foods. You can’t really can safely on a glass top stove; although, some people do it successfully for the most part. The alternative is to have a separate device that’s designed to can away from the stove. After checking out a number of these devices, the only one that looks really interesting is the Ball FreshTech Electric Water Bath Canner. I’ve found a number of reviews about this particular device online, but the most comprehensive so far is a Washington Post article, Finally, an appliance that can help newbies and pros alike get canning.

The device does seem really convenient and would be great for someone with a bad back because the drain spout makes it easy to empty hot water from the canner without physically lifting it from the stove. I know the canner can get quite heavy, having lifted a number of them myself. Of course, the assertion that you normally lift canner, jars and all, is incorrect. You use a jar lifter to remove the jars from the canner first, then empty the hot water from the canner. Over the years I’ve seen people employ all sorts of weird methods to remove the jars and even try to lift the canner, jars and all. Believe me, using the jar lifter is much easier and safer.

The point of this new device is that you can make your own high acid canned goods and store them away. The food you get is much tastier and lacks the usual chemical soup of preservatives found in store bought foods. More importantly, you can save a considerable amount of money. However, I’m not quite sure whether you’d actually save enough to pay the price for this appliance unless you entered wholeheartedly into canning. Even then, it would take a while to pay the device off in terms of money saved at the store.

I haven’t personally used this device and therefore can’t actually recommend it to you. However, I present it as a viable alternative to those of you who have asked me about canning and then went away disappointed when I mentioned problems using a glass top stove. I’d love to hear from people who have used this device. Please contact me at [email protected].


Wood Stove Cleaning Day

It’s February and the wood stove has seen a lot of use this season. It’s easy to forget that the wood stove needs maintenance while you use it. I discussed annual and regular maintenance of a wood stove in my Care and Feeding of a Wood Stove post. However, a wood stove requires more maintenance to continue to work properly. A reader was asking me the other day just how much maintenance I recommend and that’s a really hard question to answer. It depends on how much you use your wood stove and what sort of wood you burn in it. You also need to consider the wood stove type and its age.

I actually do maintenance twice weekly during the heaviest usage portion of the season. During the twice weekly cleanup, I make sure the wood stove is completely out and empty the ashes. The ashes actually work quite well when spread on icy areas. The grit in the ash keeps you from slipping. It’s a bad idea to put the ashes where they could cause a fire, such as your compost heap, unless you’re absolutely certain that they’re out. Even then, you must exercise extreme care.

As part of my maintenance, I sweep down the outside of the wood stove using a foxtail broom. This includes the stove pipe and any other surfaces that could become encrusted with dirt, dust, or cobwebs. Not only does such cleaning enhance the appearance of your stove, but it can also help (slightly) with its efficiency and potentially reduce any fire hazard.

Cleaning any glass on the front doors is helpful. You can’t manage the fire as well if you can’t see it. I’ve tried a number of cleaners. Mr. Clean is my current choice. It seems to do a better job with the buildup on the glass. I know some people use the stuff to clean other glass around their homes, like the frameless shower doors in their bathrooms for instance. If someone else comes up with a good selection, please let me know (but please try Mr. Clean first for comparison purposes).

Chimney fires are something to avoid at all costs. Burning hardwoods that are completely dry help quite a lot. A little creosote can still build up through and you really do want to get rid of it. All the chimney sweep should find in your chimney is a little ash. To help keep things clean, I spray Anti-Creo-Soot into the stove once a week. Make sure you follow the instructions on the bottle precisely. If you don’t, you might find yourself dealing with an uncontrollable fire that could cost you a lot more than your home. If the fire doesn’t get that far, you may still have to deal with fire damage, requiring the aid of a fire restoration service similar to Service Master by Zaba (https://www.servicemasterbyzaba.com/fire-restoration) that may be able to help you with fire damage repair.

Keeping things clean will help you enjoy your wood stove longer and to use it safely. A few minutes spent cleaning your wood stove may save you a lot of grief later. Let me know about your cleaning tips at [email protected].

In Praise of the Humble Potato

You say Po-TAE-to and I say Po-TA-to.

Kennebec. Pontiac. Norland Red.

Burbank. Russet. Yukon Gold.

Even the names are beautiful, humble and poetic.

So useful. So nutritious. So versatile.  So comfortable and comforting.

Just in case you’re wondering, all Russet potatoes are Burbanks, but not all Burbank potatoes are russet. The Russet Burbank is described as a natural genetic variant of the Burbank potato. It has a russet-colored skin that visually identifies this potato type. The Russet is the world’s predominant potato used in food processing, so you have probably seen a lot of them and eaten even more.

I grew up in a meat and potatoes household. Although my mom grew a garden full of a wide variety of vegetables, my dad really only believed that there were 4 kinds of vegetables worth eating. Those were corn, peas, beans and potatoes.   As a result, most of our meals were created with those basics but there was always plenty! If we didn’t have enough production of potatoes from the garden, my dad would stop by a roadside stand in the fall and buy a bag of 100 pounds for about $4. That would last us through the winter and into the early spring.   In the fall, potatoes are at their least expensive and best quality compared to any other time of year. Buying them in bulk and storing them is as good an investment now as it was when my dad was doing it in the 60’s.

Storing potatoes is one of the earliest self-sufficiency skills I learned. We always lived in an old house with an unfinished cellar. We would put the potatoes down in the basement in a barrel and just go to collect what we needed when it was time to make supper. Once in awhile we would come in contact with a slimy potato that had to be tossed out. We were warned that we should always bring up anything that had been in contact with the bad potato so they could be used right away. As kids, the science wasn’t explained to us. It was just the rule. Now that I understand the science, it’s still a rule that I live by.

Here are some rules for successful potato storage:

  • Choose a potato variety that is appropriate for storage.  My favorite is Kennebec.  Some like Russet.  There are others.  The grocer or garden center should be able to tell you which potatoes are going to be good for storing.  You can also go online to find the attributes for most vegetables.
  • Raw potatoes should not be washed before storing. Remove the big chunks if you have been digging during a wet season.  However, a powdery coating of dry soil toughens the skin and helps them stay dry longer in storage.
  • Check all potatoes over for spade cuts or bad spots. If there are soft spots, cut away the bad section and use only the good one or discard the whole potato.
  • Do NOT store anything with a bad spot or spading fork cut.
  • After sorting, store the unwashed raw potatoes in any place that is dry, cool (but not cold) and dark. Exposure to sunlight will cause the skin to go green, get bitter and can cause illness if you eat a large quantity.
  • Frequently check your stored potatoes for any that have developed soft spots and discard them immediately when you find them.
  • Wash and dry any potatoes that are in contact with a bad one during storage.  Keep it apart so it can be used soon.

With smaller houses and less storage space, it is still possible to find good storage for potatoes. One way is to store them in milk crates in a pantry, cool closet or heated garage alongside an outer wall. If the area has a window, drape a heavy cloth over the whole stack. With the coolness  of the wall, the airflow created by the construction of the milk crates and the dark provided by the cloth, it works beautifully. As the potatoes at the top are used, take the crates out to store and start on the crate below it.

Also, if you have a rarely used, cool bedroom; a layer of crunched up paper under potatoes in an under-the-bed container is the perfect place for storing them. Winter squash and pumpkins can be stored there also!  The main idea is to keep them dry, dark and cool but not frozen.

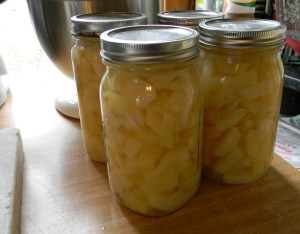
Another favorite way to store potatoes is simply to put your pressure canner into play.  

As with other vegetables, canning potatoes is a great way to control the salt level and quality of the food as well as customizing the cut of the finished product.

Quart Jars of White Potatoes cut into cubes
Fast Food at its Finest!

  • For best results, the potatoes should be washed and peeled before cutting into your favorite shapes – slices, cubes, shreds or small whole potatoes.
  • A mandolin is a useful tool when cutting potatoes into thin, even slices. Be very careful when using a mandolin because it has an extremely sharp edge. 
  • A French fry cutter is great for making cubes. Simply put the potato through the cutter and then cut the ‘fries’ into chunks. This cuts the potatoes into really nice sized cubes. 
  • Always follow the instructions for canning that came along with your pressure canner. 
  • Do NOT try to pressure can anything completely absent of salt.  A little salt is absolutely necessary for successful canning.

Once the potatoes are processed and cooled they are ready to eat! You can rinse them, cold and use them in potato salads. You can microwave them to have them warm. You can mash them with garlic and butter. You can drain them, dry them and fry them with your favorite seasonings for fantastic hash browns. In a pinch, you could eat them straight from the jar! 

The potato is the workhorse of the pantry. It is low in saturated fat and sugar.  It has no cholesterol or sodium unless you add it. It is also high in potassium and vitamin C as well as very high in vitamin B6, the vitamin that helps to improve moods. 

If you have stories or recipes using potatoes, I would love to hear from you. Please share them by adding your comment to this post or contacting John at [email protected].


Necessity is the Mother of Invention

My mother was a good, old-fashioned home cook.  She also never learned to drive.  Since we lived in the country much of the time, she knew how to make do with the ingredients and tools that were already on hand.

If she didn’t have spaghetti on hand, she would use flat noodles with Marinara, meat and cheese.  She flattened out chicken breasts with a frying pan (and worked off some frustration with her kids, I think).  A favorite recipe in our house is still a Chili Sauce that uses apples as well as tomatoes for a sweet and spicy addition to ground beef.  Mom usually had a pot of soup on the stove made out of oxtails, ham bones, turkey carcasses or whatever meat she had on hand.  (As kids, she didn’t dare tell us what was in the soup.  We only knew that it was good!)  She graduated eventually to be become restaurant cook but she still did her best work without the fancy gadgets that have become standard in many modern kitchens.

I don’t have my mother’s skills when it comes to cooking, but I have learned her respect for good, simple tools.

  • Knives should be kept sharp and safe.  A magnetic strip on the wall above the counter will keep metal knives safe, dry and conveniently at hand. These magnetic strips can be picked up at most hardware stores as they are commonly used for tool benches.
  • A good variety of large spoons, ladles and spatulas is a must.  Many can be picked up very reasonably at thrift stores or garage sales.  Watch for brand name items at a bargain.
  • Multiple cutting boards mean less chance of cross contamination.  Sterilize cutting boards regularly.
  • Old tools don’t need to be tossed out just because there is a new version, unless it is broken.  If there is room to store them, multiples can make prep work more fun!  It can become a contest between siblings or a chance to sit and visit with your spouse.  “Show and tell” works especially well with kids when they have their own tool that won’t be taken away if they are “too slow”.

Here are also a few favorite adaptations learned along the way:

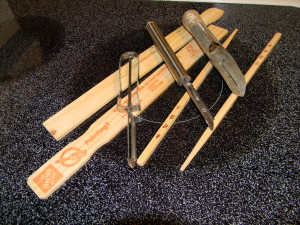
  • Keep a clean pair of paint stirring sticks in the kitchen drawer.  When rolling out cookie dough, position the stir stick so that they raise the rolling pin and ensure the same thickness cookie with each cut. When the thickness is uniform, the cookies will bake evenly and you won’t end up with doughy middles and crispy edges.  If the paint stirrer gets grungy, toss it out and head to the hardware store.

    Paint Stirrers, Chopsticks and a Variety of Apple Peelers.  I am ready for making gingerbread Christmas Ornaments.
    Paint Stirrers, Chopsticks and a Variety of Apple Peelers. I am ready for making Gingerbread Christmas Ornaments!
  • A pair of chopsticks is a great way to poke nice round holes into the tops of gingerbread (and other) cookies so they can be hung with a ribbon.
  • A 10 or 12 inch Fry Pan lid can be used as a “giant” cookie cutter for pie dough. It will create a perfectly round piece of dough for the top crust.  This will give a neat edge to turn when finishing the top crust.

As you can tell, good tools are an inexpensive way to make cooking fun, social and sustainable.  If you have other tips and or adaptations that you have tried in the kitchen, I would love to hear from you.  Please share them by adding your comment to this post or contacting John at [email protected].