How to Butcher a Pumpkin…

When I was growing up, it was my uncles’ job to wield a big knife and peel the raw pumpkin so that my mom could bake pumpkin pie and make filling for canning. Watching one of “the boys” handle the knives while trying to carve away the skin of a raw pumpkin was usually a little scary and sometimes hilarious. It all depended on who was careful and who was just cutting up! When I moved into a home of my own, I had to learn a different way to separate skin from the flesh of a pumpkin because I am married to a man who loves pie, made from scratch, and he likes his pumpkin made that way as well.

Besides, it’s very cheap and easy to do. So here’s how to butcher a pumpkin in seven steps:

  1. Be sure that your pumpkin will fit inside the shallow baking sheet that you are going to be using. It doesn’t matter if both halves fit but you want to have the edges of the pumpkin completely inside the baking pan. Choosing the right sized pumpkin for this process is very important.
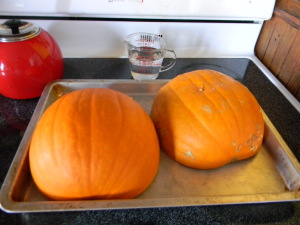
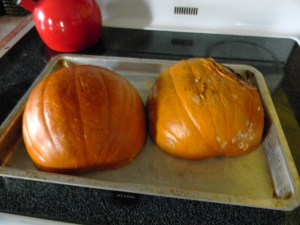
    Cut Side down in shallow baking sheet

    Be sure that the edges of the pumpkin are inside the pan.
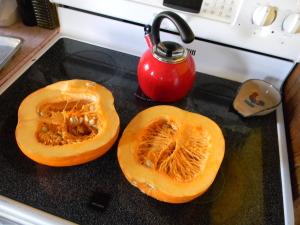
  2. Cut your pumpkin in half.

    Raw Pumpkin halves
    Raw Pumpkin Halves
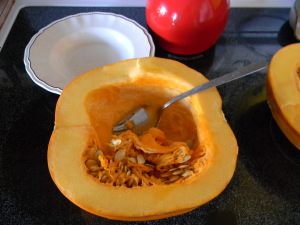
  3. Carefully scoop out the seeds with a spoon. If you have kids that want to help, this is a great chance to include them—handling the guts and seeds is really fun (and gross)! The seeds can be washed and baked with seasoning for an added treat.

    Scooping out the seeds
    Scoop out the seeds with a spoon
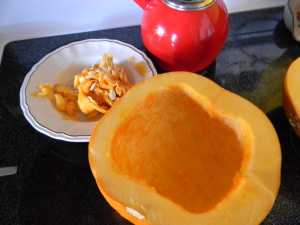
    Save the seeds for roasting later!
    Save the seeds for roasting later!
  4. Flip the pumpkins cut side down and place them onto a shallow baking sheet with a lip all the way around the pan. I used an Air-bake pan because it is double layered and gives improved stability while loading and unloading the heavy pumpkin from the hot oven.

    Cut Side down in shallow baking sheet
    Place Pumpkins Cut Side Down
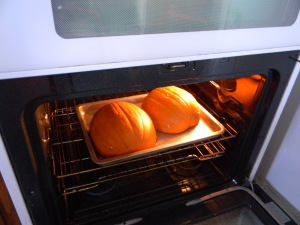
  5. Add a small amount of water to the baking sheet. Just enough to cover the surface of the pan about 1/4 inch deep. The water will boil and steam the pumpkin inside while the oven is baking it from the outside.
    Pumpkins in 350 F oven
    Pumpkins in 350 F oven
  6. Bake in a 350F oven until you can pierce the skin of the pumpkin with a fork. If you want the pumpkin to be more puree-like bake it longer. You may need to carefully add water while the pan is in the oven, but bake the pumpkin until it is as soft as you want it to be. The halves may collapse just a little bit as the insides get soft.
    Fork tender is done enough for chunky pumpkin
    Fork Tender is done enough for chunky pumpkin
  7. Finally, let the whole thing cool down. When it is cool enough to handle, peel the skin from the flesh and discard the skin. Then you can use it however you like. My last experiment was a simple blend of fresh apple chunks, some pumpkin chunks and curry powder to taste. No sugar and no recipe. I just mixed up what I had and popped it back into the oven to soften the apples. It was delicious!

This method of processing pumpkin is economical, healthy and easy. There are absolutely no additives or preservatives so the only thing that you will taste is pumpkin. It also works for winter squashes of all kinds.

So, if you decided NOT to carve your pumpkin for Halloween, consider Butchering and Eating It! You’ll be glad you did!

If you have any pumpkin tips or stories, I would love to hear from you! Please respond to this blog or email John at [email protected].

Get Fluffy!

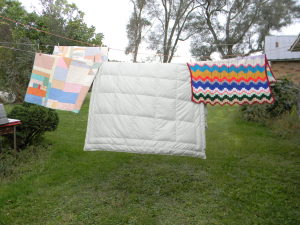
Quilt, Comforter and Afgan

A Quilt, a Comforter and an Afghan meet on the clothesline…

When I was a kid, October was the month for the “Autumn Airing of the Quilts”. My best friend’s mother had a wide range of quilts and comforters, many of which had been passed down for generations. On a sunny Saturday afternoon we would take them all out of their storage chests. Then we would repair any damage. If they smelled musty, we would wash the bedding and let it dry in the fresh air. Anything that was brightly colored was carefully monitored so that it could be taken off the clothesline just as soon as it was dry so it wouldn’t fade in the sunshine. After that was done, all of the beds in the house were made up with winter sheets, clean blankets and these heirloom quilts and comforters.

As a result, comfort came home!

As it is with anything that you want to last, proper storage and care is necessary for bedding. In order to provide proper care, it is important to know what you have. Knitted and crocheted items are called afghans and require a different type of care than quilts and comforters. Comforters, quilts and blankets are made from fabric like a repurposed t shirt, as well as other materials that make the comfort level very high. My personal favorite being a Minky Fleece blanket. I think that they’re relatively popular, so it’s very likely that you have seen this before on beds, or by people who like to use a weighted blanket to help give them that sense of security that they’re struggling to find elsewhere. But simply knowing what fabric these items are made out of will do wonders for you in the long run. It’s also important to know when washing these bedding items. Additionally, whilst they’re being washed, it might be worth finding another set of bedding to put on the bed. My friend’s mother used to get her bedding from Target, so it might be worth looking online to see what bedding they have. There are also coupons available on this page here, so make sure to use those discounts if they apply. Now, let’s get washing our current bedding.


  • When the item is made of fabric there are several ways it could be made:
    • A quilt is made of pieces of fabric sewn together in a pattern with a top, middle and bottom layer sandwiched together and then sewn.
    • A comforter is made by sewing two sheets of fabric together and filling the inside with something fluffy often feathers or down.
    • A blanket is a single layer, traditionally cotton or wool and in modern times, microfibers.
  • Ask yourself: Is the item supposed to be fuzzy,smooth or satiny? Different fabrics require different treatment to keep them in the best condition through the years.
  • Were these given to you from someone as an heirloom or is it simply a hand-me-down? Heirlooms command much more respect and warrant special attention due to the emotional attachment that comes along with it.

Here are some considerations for airing your own comforters, quilts and blankets.

  • Check over the bedding carefully and mend any seams before attempting to clean the items. Remember the quote from Poor Richard’s Almanac “A stitch in time saves nine”? It is certainly true when it comes to mending bedding.
  • Be certain of the material that the item is made from. Wool must be cleaned differently than cotton. Microfiber can be treated differently than sateen. Look for fabric tags. If there are care instructions, follow them carefully for best results.
  • Be careful with bedding if anyone in the home has pollen allergies. While bedding is outside on a line, the pollen and pollutants from the surrounding countryside can settle on it. If there are allergies in your household, you may choose to tumble your bedding in a drier instead of airing it on a line.
  • Do not crowd bedding in the drier. For a large comforter it is worth the time and money to take it to a laundromat to use large capacity machines. If you decide to dry your bedding in a home machine, add small items to create movement in the dryer. Be sure that the items are completely dry before folding or storing to prevent mildew.
  • Filled comforters, with down or manmade materials inside, should always be tumbled dry. For fluffiness, add a couple of tennis balls or similar item (I wash and use my dog toys) in the drier. A comforter is warmer when fluffy, because the down captures and holds warm air inside the layers.

It will soon be blustery and frigid outside. Although it takes time to make sure that your bedding is cleaned, mended and ready for winter, the investment will keep you warm and snuggly all winter long!

If you have any stories about your experiences with quilts or comforters, or pictures to share, I would love to hear from you! Please add a comment to this post or contact John at [email protected].

Herbal Harvest 2014

Every year I dry the herbs found in the herb garden for use during the winter months. You can see the technique used in the Drying Herbs post. I’m still using my American Harvest dehydrator to get the job done. However, since the time I wrote that original post, I’ve found a way to improve the potency of the resulting dried herbs. Each layer now has a solid sheet on the bottom. The solid sheet is supposedly designed for fruit leathers and for drying other liquids. The reduction in air flow means that the drying process takes longer, but it also means that fewer of the oils (and other useful elements) found in the herbs are wafted away by the air flow. As a compromise, you can always use the screens instead. The screens keep small particles from falling through, but they also reduce the air flow that robs your herbs of their flavor. The most important issue when drying herbs is to ensure you check their status often and keep the temperature at 95 degrees Fahrenheit (35 degrees C). A higher setting will cause the oils in the herbs to dry out and make your herbs less effective as a result.

I’m also finding that keeping the herbs as whole as possible for storage prolongs their life. You can’t store the herbs very well without crumbling them a little, but keeping the leaves as large as possible appears to help retain the oils. Crumble the leaves or even grind the herb to powder immediately before you use it to maximize the flavor. The less you process the herb, the longer it’ll store.

This year’s herb garden didn’t do well in some areas, but it did exceptionally well in others. The lime, orange, and chocolate mints were all quite potent this year. I tried a few cups of tea to see how they’d brew and I ended up using less than normal. My personal favorite is the lime mint. The chocolate mint is suitable for use in tea, cooking, and jellies—lime and orange mints are characteristically used for tea.

Herb potency varies from year-to-year based on environmental factors, so it’s essential to consider potency as part of using the herbs. I’m thinking about trying to come up with some sort of rating system that I can put right on the package before I store the herb so I have some idea of how much to use later. As a contrast to these three mints, the grapefruit mint hardly tasted like mint at all. Given that it has proven hard to grow, I’m thinking about using the space for another kind of herb.

Sage also had a wonderful year this year. The plants grew fairly large and are robust in flavor. I grew both golden pineapple and common sage. The golden pineapple sage has larger leaves and a stronger taste. It also takes a lot longer to dry than the common sage. In most years, it appears that the common sage actually produces more output, but this year the golden pineapple sage was the winner.

The thyme and rosemary were disappointing this year, but still usable. I actually have three kinds of thyme: lime, lemon, and common (also known as English thyme). Of the three kinds, the lime has the strongest taste when used fresh, but the common works best for cooking. I find that the lemon has a subtle flavor, but can be hard to grow. Unfortunately, I didn’t get any lemon thyme this year, but I did get enough of the other two to make up for it. The only kind of rosemary I can grow is common rosemary. I’m thinking about trying again with some other varieties next year, but the rosemary definitely doesn’t overwinter here in Wisconsin (as contrasted to thyme, which overwinters just fine).

I’ve talked about lovage before (see the Loving that Lovage! post for details). This year I ended up with a whole pint of seeds that I’ll use for canning and for dishes like cole slaw. It was also a decent year for leaves that will end up in soups and other kinds of cooking where a strong celery flavor is desirable.

Weather, soil, and overall care of your herb garden all determine what kind of crop you get each year. Working with herbs can be quite fussy, but also quite rewarding. The quality of herb you get from your own garden will always exceed anything you buy in the store, so the effort is worth it when you want the best results from cooking. Let me know about your herb experiences at [email protected].


Getting Wood for Winter

It’s that time of year again-time to get the wood ready for winter. Of course, cutting, splitting, and stacking wood warms you twice: once when you do it and again when you burn it. With our weather being so beautiful, I really did get quite warm over the last couple of weeks getting my wood ready. It is definitely easier if you use quality wood axes, though, and now the piles are finally finished. I have a little over two cords of wood outside and four cords in the basement. I’ll eventually bring the outside stack up to three cords.

As I mentioned in The Many Appearances of Firewood, I use three different cuts of wood for my pile: slab, log, and disk. Each kind of wood has its own advantages. For example, it’s extremely easy to get slab wood started as long as it isn’t wet. In addition, I buy slab wood, rather than cut it, so the slab wood is less work because I only have to stack it. Logs, the traditional firewood, are easy to stack and burn at a moderate rate, which makes them a good option for maintaining a fire. Using disks has the advantage of a slow, long lasting burn of larger pieces without having to split them. I generally put a disk in the wood stove before I start it up in the morning to keep the fire burning at a nearly even temperature. Larger disks are hard to add later, but you can easily add smaller disks to a wood stove.

Of course, there is the question of what precisely a cord is. A full cord is always 4 feet deep, 4 feet high, and 8 feet long (128 cubic feet). I generally cut my logs 2 feet long, so my cords are usually some combination of dimensions that add up to 128 cubic feet. For example, my outside stack is 2 feet deep, 4.5 feet high (actually, a little higher), and 14 feet long. The stack in my basement is 2 feet deep, 8 feet high, and 8 feet long. Any set of dimensions that adds up to 128 cubit feet is one cord. Purists will insist on the standard measurement, but really, the wood doesn’t care how its organized.

Ask specific questions when you buy wood. Some sellers will try to tell you that they’re selling you a cord of wood when you’re really getting a face cord, which doesn’t have a precise size. Most face cords are one-third to one-half the size of a full cord. The pieces of wood are sometimes only 16 inches long to accommodate smaller wood stoves and fireplaces. You need to ask how much you’re getting when comparing prices between sellers. If a seller won’t tell you how much wood is in a load, it’s probably a good idea to go somewhere else.

Beware of the fluffy load. Someone will drive up with what looks like a full load of wood, but the wood is ill stacked with a lot of air gaps in it. A poorly stacked load won’t contain as much wood as you might think it will. Another trick that some wood cutters use is to include a lot of smaller pieces that tend to add air gaps and don’t burn very well. You can obtain your own kindling with relative easy, so look for sellers who provide larger pieces of wood in a well-stacked form so that you know the amount you’re actually getting.

When I cut wood, I know precisely what kind I’m getting. This year I’ll be burning a combination of American oak and white elm. There is a little maple and black locust mixed in, but the majority of the wood is oak and elm. The wood you get determines how much heat you get. After you find out what kind of wood you’re getting for your stove, make sure you consult a wood heating chart. A load of wood with great burning characteristics may actually be a better deal, even if it costs more, because you get more heat from it. As an example, let’s say that one seller offers you a cord of white oak at $120, while another seller offers you a cord of birch at $100. The white oak is a better deal because it only costs $4.124 per million BTU (120 / 29.1 million BTU), compared to $4.808 per million BTU for the birch (100 / 20.8 million BTU). You also want to verify that the wood is actually dry (some people will try to sell you green wood, which won’t burn well).

Some people neglect to factor in the amount of smoke and ash that the wood creates. Of the two, the amount of smoke is the most important factor because you have to call a chimney sweep if your chimney gets clogged by wood that produces too much smoke. This kind of hassle often leads people to make the decision to have central heating installed, from a site similar to this one, rather than having to buy and chop firewood. However, I think a wood-burning stove creates a kind of homely atmosphere you can’t replace with a heating system. The ash is an annoyance, but you can always clean the ash out of the wood stove as needed. Even so, getting wood that produces less ash means less ash for you to clean up later. Let me know your thoughts about getting your winter wood supply together at [email protected].

Warm Apple Cake


When I came home tonight, there was a warm apple cake
Home made, with mixed nuts, that my lover just baked.
How did he know that I would need such a treat
To finish the day with such comfort and sweet?

He had gone off to bed but had left me a note
With a sweet little message that he personally wrote.
As I toddle my way to my own warm repose
Such sweet dreams will I enjoy that no one else knows.

The sweetness of mind comes from knowing for sure
That the man that I married has the ultimate cure
For the trials and frustrations that are part of the day
When he shows me he loves me in this special small way.

So I came home tonight to a warm apple cake.
I will sleep in such peace from the love that I take
Up to bed with me now. I will plan while I lie.
Cause I know that his favorite dessert is fresh PIE!

Copyright 2014, Pegg Conderman

 
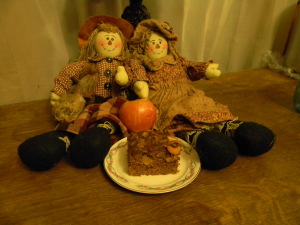
Warm Apples Cake 001

 The original recipe was found in a St. Mary’s Catholic Church cookbook from Muscatine, IA printed in 1988. 

My husband adapted it and I am sharing his version below (as he remembers it).

Fresh Apple Cake

Ingredients:

2 cups sugar and 1 cup butter or margarine. (Cream together)
2 eggs

In a separate bowl, blend or sift together:

2 teaspoons Baking Soda
1/2 teaspoon Salt
3 cups of flour
2 teaspoons of cinnamon
1/8 teaspoon of ginger
1/8 teaspoon of ground cloves
1/8 teaspoon nutmeg
1/8 teaspoon of allspice

Set aside and cool 1 cup of coffee

Dice 4 cups of fresh apples into small chunks and set aside with a little lemon juice on them. 

Topping:

1/2 cup of any kind of nuts mixed with 3 Tablespoons of sugar and a pinch of each spice used in the batter.

Instructions: 

Beat the sugar and butter until they are very creamy. Add eggs and blend well. 

Alternately add the cold coffee and the dry ingredients to the bowl, mixing them between additions. Be careful not to overbeat the batter, because this cake batter will be naturally lumpy. 

Drain moisture from the apples. Fold them into the batter. Pour into  13×9 cake pan that has been coated with grease (or Pam) and flour. 

Bake at 350 F for 50 to 60 minutes. Check for doneness by inserting a toothpick into the center  of the cake until it comes out clean.

This recipe is best served to a loved one while it is still warm with a little ice cream or whipped cream. And it is also great cold for breakfast, like Pizza!


Prepare Your Plants for Winter

Ready or not! Here it comes! Winter is on its way! If you live in the Midwest, it is time to winterize your house and stock up your pantry. It is also time to bring in any plants that were taken outside for the summer. There was a radio talk show host in the late 90’s who had a rant titled, “Houseplants are HOUSEplants! They are supposed to stay in the house!” But for those of us who have sentimental plants that are precious but large, taking the plant outside is a necessity in the summer. Those with greenhouses, the Winter period also brings with it darkness so it may be worth considering the benefits of a light deprivation greenhouse tarp for year-round growing.

A peace lily in a white plastic pot sitting next to a window.
Peace Lily

If you are in the habit of taking houseplants out for the summer, here are the best ways to assure that you don’t bring problems back into your house along with your plants:

  • Spray the plant for any insects that are common to the plant as a preventive measure. Relocating a plant to the warmth of your home will encourage insect survival.
    • Be sure that any houseplant spray you use will kill insect eggs. If it doesn’t kill the eggs, plan to spray 3 times at two week intervals.
    • Be safe by making sure that the plant you are spraying is listed on the label. Many plants are killed because they were sprayed with a chemical that was not safe for them.

If you want to use less chemical and have more effect, place the houseplant inside a trash bag while it is outside for spraying. Carefully spray the chemical into the bag. Quickly seal the bag with the plant and chemical inside. Leave it alone for 24 hours away from direct sunlight. After 24 hours, open the bag and air out the plant for about an hour. Then bring your treated plant in the house. This system can also be used inside.

    • Be careful to keep all chemicals away from pets or children.
  • Trim away any dead or dying leaves. The plant will continue to try to support any weak leaves. Removing them helps reduce insect and disease possibilities as both attack dying tissue.
  • Give your plant as much light as you can when you first bring it inside. Plants like the moringa tree still need 6+ hours of sunlight a day, even during winter. As the plant adjusts to the new light source, you can slowly move it to its final location. This may mean that you will be moving your plants around inside a couple of times but your plant will be happier in the long run. If your plant has only one location that it will fit inside your home, consider using grow lights to help your plant make the adjustment from summer home to winter home. (You don’t have to do anything fancy, you can actually get grow lights that will fit in a standard light fixture.)
  • Pay attention. With houseplants it is very important to pay attention to them. Insect and disease problems often start slowly but spread quickly and if you are paying attention, the problem leaves can be removed and the problem remedied before it affects the whole plant.

Growing and caring for plants is a very satisfying way to pass the winter. Transitioning your plants from their summer home to their winter location is easy, but takes some finesse. If you really need to have blooms through the winter, search out paperwhite bulbs, zygocactus (also called Christmas Cactus) or amaryllis. For easy greens choose spider plants, peace lily, or Norfolk Island pine. Whether they are Aunt Violet’s African violets or a new and exotic species that you discovered at the local greenhouse, plants are great company and worth the attention.

If you have any thoughts about bringing in plants for the winter or stories about the plants that you have inherited that have been part of your family, please add a comment to this post or contact John at [email protected].

Baby, It’s Gonna Get Cold!

It’s only September and yet the thermometer has dipped into the 30’s. Since we live in a big old farmhouse with lots of character, we have consciously changed it as little as possible. We only make changes if we absolutely need to. For example, a few years ago our roof was leaking in multiple places and if we let it continue, we would face much bigger issues like structural damage. So, we look at the best roofing companies Winston Salem had to offer and picked the company that was able to maintain the farmhouse’s character. And in a perfect world, we would have all of the original storm windows. But unfortunately, we don’t live in a perfect world. We have a mixture of old wooden storms, some aluminum and a couple of windows that have been missing the storm for years. But we have learned how to button up this old fashioned house using some old techniques and developing a couple of new ones by trial and error.

  • First and thankfully, a previous owner had the foresight to completely surround the framing of the house with insulation from the attic to the basement. That addition is key to keeping any house warm during the Wisconsin winters. There are several ways to insulate the walls in all price ranges. Many of them can be done by a do-it-yourself enthusiast.
  • The next most important thing that can be done to keep the drafts out of an old home are tight windows. A previous owner installed aluminum double hung windows. We check them over every year (washing them when possible) to make sure that there is a tight seal. If the caulking has hardened or fallen away, we replace it. There are also some of the original wood framed storm windows that we check over every year-re-caulking as necessary. We put the storm in the window and go inside with a candle to check for any draft. If there are drafts or the window feels loose, we fill it in with rope putty.
  • For windows that have the storm completely missing, we use the plastic window kits. In order to be effective, they are best installed on a calm, warm day so that the adhesive is tacky enough to stick well. For any window that is going to be subject to lots of wind, it is a good idea to install plastic on the inside and outside as well. Follow the directions for the window product.
  • Lastly, the simplest thing to do to help the house be warmer in the winter is is the same as when our ancestors did it. Open the shades during the day! Capture the solar energy inside on sunny days, then close the drapes at dark and hold the heat in!

Another item that must be attended to before the winter sets in is making sure that your furnace is in good working order. It is a good idea to leave this to the expert. Your favorite carrier furnace repair guy can come out and inspect it to check it doesn’t need anything doing to it. If it does, he can fix it for you! There may be a charge for the service but compared to an emergency call in the dead of winter; or worse yet a fire call, it is well worth the price! You may want to find a furnace repair company sooner rather than later as the winter is one of the busiest periods for a heating company and they can get booked up very quickly.

  • Smoke detectors need their batteries changed twice a year. Utilizing the biennial time change date will help jog your memory. If your smoke detectors are old (anything over ten years), it may be time to replace the whole unit rather than just the batteries. Regardless of whether you repair your current smoke detector, or decide to get a new one altogether, it is really important that you implement the relevant changes. You may find this piece of information interesting if you are thinking about either options and how professional electricians can resolve the problem for you. But why is this so essential? Because it could help to save you, your family, and your home in the event of an emergency. You just need to consider both the options so you can do what is best for you. (However, if you want to test your smoke detector, use a spray tester, rather than the smoke from a match or candle, because the smoke can actually cause the detector to fail.)
  • CO (carbon monoxide) detectors are inexpensive and useful tools that have been proven to save lives.
  • Outlets are often a source of secret heat loss. Insulating liners are available that can be installed behind the outlet cover that can help keep these sneaky heat thieves from creating cold spots in the room.

Some people dread the fall, knowing that it is the precursor to winter. Others, like me, revel in the beauty of the fall colors and the smell of the crisp leaves. I thank the good Lord for the reminder (and the time) to prepare for the cold season. Good planning and good preparation leads to a great party! So this winter, prepare for Old Man Winter and Party On!

If you have tips for preparing for the fall preparation I would love to hear from you! Please respond here or send an email to John at [email protected].

In Praise of the Humble Potato

You say Po-TAE-to and I say Po-TA-to.

Kennebec. Pontiac. Norland Red.

Burbank. Russet. Yukon Gold.

Even the names are beautiful, humble and poetic.

So useful. So nutritious. So versatile.  So comfortable and comforting.

Just in case you’re wondering, all Russet potatoes are Burbanks, but not all Burbank potatoes are russet. The Russet Burbank is described as a natural genetic variant of the Burbank potato. It has a russet-colored skin that visually identifies this potato type. The Russet is the world’s predominant potato used in food processing, so you have probably seen a lot of them and eaten even more.

I grew up in a meat and potatoes household. Although my mom grew a garden full of a wide variety of vegetables, my dad really only believed that there were 4 kinds of vegetables worth eating. Those were corn, peas, beans and potatoes.   As a result, most of our meals were created with those basics but there was always plenty! If we didn’t have enough production of potatoes from the garden, my dad would stop by a roadside stand in the fall and buy a bag of 100 pounds for about $4. That would last us through the winter and into the early spring.   In the fall, potatoes are at their least expensive and best quality compared to any other time of year. Buying them in bulk and storing them is as good an investment now as it was when my dad was doing it in the 60’s.

Storing potatoes is one of the earliest self-sufficiency skills I learned. We always lived in an old house with an unfinished cellar. We would put the potatoes down in the basement in a barrel and just go to collect what we needed when it was time to make supper. Once in awhile we would come in contact with a slimy potato that had to be tossed out. We were warned that we should always bring up anything that had been in contact with the bad potato so they could be used right away. As kids, the science wasn’t explained to us. It was just the rule. Now that I understand the science, it’s still a rule that I live by.

Here are some rules for successful potato storage:

  • Choose a potato variety that is appropriate for storage.  My favorite is Kennebec.  Some like Russet.  There are others.  The grocer or garden center should be able to tell you which potatoes are going to be good for storing.  You can also go online to find the attributes for most vegetables.
  • Raw potatoes should not be washed before storing. Remove the big chunks if you have been digging during a wet season.  However, a powdery coating of dry soil toughens the skin and helps them stay dry longer in storage.
  • Check all potatoes over for spade cuts or bad spots. If there are soft spots, cut away the bad section and use only the good one or discard the whole potato.
  • Do NOT store anything with a bad spot or spading fork cut.
  • After sorting, store the unwashed raw potatoes in any place that is dry, cool (but not cold) and dark. Exposure to sunlight will cause the skin to go green, get bitter and can cause illness if you eat a large quantity.
  • Frequently check your stored potatoes for any that have developed soft spots and discard them immediately when you find them.
  • Wash and dry any potatoes that are in contact with a bad one during storage.  Keep it apart so it can be used soon.

With smaller houses and less storage space, it is still possible to find good storage for potatoes. One way is to store them in milk crates in a pantry, cool closet or heated garage alongside an outer wall. If the area has a window, drape a heavy cloth over the whole stack. With the coolness  of the wall, the airflow created by the construction of the milk crates and the dark provided by the cloth, it works beautifully. As the potatoes at the top are used, take the crates out to store and start on the crate below it.

Also, if you have a rarely used, cool bedroom; a layer of crunched up paper under potatoes in an under-the-bed container is the perfect place for storing them. Winter squash and pumpkins can be stored there also!  The main idea is to keep them dry, dark and cool but not frozen.

Another favorite way to store potatoes is simply to put your pressure canner into play.  

As with other vegetables, canning potatoes is a great way to control the salt level and quality of the food as well as customizing the cut of the finished product.

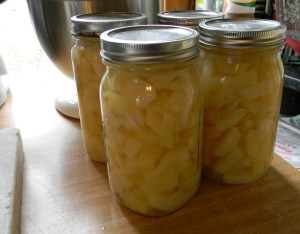
Quart Jars of White Potatoes cut into cubes
Fast Food at its Finest!
  • For best results, the potatoes should be washed and peeled before cutting into your favorite shapes – slices, cubes, shreds or small whole potatoes.
  • A mandolin is a useful tool when cutting potatoes into thin, even slices. Be very careful when using a mandolin because it has an extremely sharp edge. 
  • A French fry cutter is great for making cubes. Simply put the potato through the cutter and then cut the ‘fries’ into chunks. This cuts the potatoes into really nice sized cubes. 
  • Always follow the instructions for canning that came along with your pressure canner. 
  • Do NOT try to pressure can anything completely absent of salt.  A little salt is absolutely necessary for successful canning.

Once the potatoes are processed and cooled they are ready to eat! You can rinse them, cold and use them in potato salads. You can microwave them to have them warm. You can mash them with garlic and butter. You can drain them, dry them and fry them with your favorite seasonings for fantastic hash browns. In a pinch, you could eat them straight from the jar! 

The potato is the workhorse of the pantry. It is low in saturated fat and sugar.  It has no cholesterol or sodium unless you add it. It is also high in potassium and vitamin C as well as very high in vitamin B6, the vitamin that helps to improve moods. 

If you have stories or recipes using potatoes, I would love to hear from you. Please share them by adding your comment to this post or contacting John at [email protected].


Rhythms of Fall

It’s the beginning of fall here in Wisconsin—my favorite time of the year. Everything is getting that tired look to it and the evening temperatures are beginning to dive a little more often into the 50s and 60s. The leaves are starting to change just a little. Soon I’ll be up in the woods cutting up dead trees for winter. It’s not nearly cool enough for the first fire yet, but that will come too. Soon I’ll have the smell of woodsmoke permeating the house as I enjoy the cool fall evenings in front of my wood stove.

Last week I began picking my grapes and apples. Both have produced abundantly this year. In fact, just one cane produced a little over 40 pounds of grapes. The apples are smaller than normal, but plentiful, weighing the trees down. The pears this year suffered from a lack of activity from helpful insects and an overwhelming quantity of the harmful variety. The point is that it’s a time for picking things and preserving them for the winter. There is a certain feeling that comes over you as you begin to bring things into the house and see the larder shelves swell with all you’ve produced. Most of the fruit will go into juice this year, which means my Victorio Strainer will work overtime.

As part of my fall preparations, I’m starting to dry the herbs that have grown all summer. My herb garden is a little limited this year because the weather just didn’t cooperate as much as it could have. Still, I have plenty of celery (actually lovage) seed to use, along with the dried leaves. The rosemary, two kinds of sage, and two kinds of thyme have all done well (though the rosemary is not quite as robust as I would have liked, it’s quite flavorful). The dehydrator is up and running now, helping me preserve the herbs I need for cooking this winter.

Of course, the herb garden produces more than just herbs for cooking—it also produces a robust number of items for tea. Right now I four kinds of mint growing: lime, lemon, chocolate, and spearmint. The first three are definitely used for drinking teas only because their subtle flavors are lost in other sorts of uses. The spearmint is used for tea, cooking, and mint jelly—that essential add-on for lamb meat. Rebecca actually had eight different kinds of mint growing at one time, but they have gotten mixed together over the years or were hit especially hard by this last winter. The herb garden will need some focused attention this upcoming spring to get it back into shape.

In some respects, the combination of a hard winter, a late spring, and a cool summer conspired to make this year less productive than most. It’s the reason that you really do need a three-year plan for stocking your larder to ensure that you have enough food for those years that are a little less plentiful. Fortunately, my larder has an abundant supply of everything needed to sustain life (and quite a large number of things we made purely for pleasure as well).

There are some fall-specific things that I’ll eventually take care of. You already know about the work part of it, but there is time for pleasure too. For example, I’ll take time for my usual picnic at Wildcat Mountain after the fall color begins to peak. So, how are your fall plans shaping up? Let me know at [email protected].


Necessity is the Mother of Invention

My mother was a good, old-fashioned home cook.  She also never learned to drive.  Since we lived in the country much of the time, she knew how to make do with the ingredients and tools that were already on hand.

If she didn’t have spaghetti on hand, she would use flat noodles with Marinara, meat and cheese.  She flattened out chicken breasts with a frying pan (and worked off some frustration with her kids, I think).  A favorite recipe in our house is still a Chili Sauce that uses apples as well as tomatoes for a sweet and spicy addition to ground beef.  Mom usually had a pot of soup on the stove made out of oxtails, ham bones, turkey carcasses or whatever meat she had on hand.  (As kids, she didn’t dare tell us what was in the soup.  We only knew that it was good!)  She graduated eventually to be become restaurant cook but she still did her best work without the fancy gadgets that have become standard in many modern kitchens.

I don’t have my mother’s skills when it comes to cooking, but I have learned her respect for good, simple tools.

  • Knives should be kept sharp and safe.  A magnetic strip on the wall above the counter will keep metal knives safe, dry and conveniently at hand. These magnetic strips can be picked up at most hardware stores as they are commonly used for tool benches.
  • A good variety of large spoons, ladles and spatulas is a must.  Many can be picked up very reasonably at thrift stores or garage sales.  Watch for brand name items at a bargain.
  • Multiple cutting boards mean less chance of cross contamination.  Sterilize cutting boards regularly.
  • Old tools don’t need to be tossed out just because there is a new version, unless it is broken.  If there is room to store them, multiples can make prep work more fun!  It can become a contest between siblings or a chance to sit and visit with your spouse.  “Show and tell” works especially well with kids when they have their own tool that won’t be taken away if they are “too slow”.

Here are also a few favorite adaptations learned along the way:

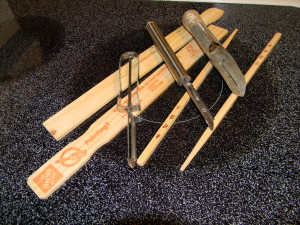
  • Keep a clean pair of paint stirring sticks in the kitchen drawer.  When rolling out cookie dough, position the stir stick so that they raise the rolling pin and ensure the same thickness cookie with each cut. When the thickness is uniform, the cookies will bake evenly and you won’t end up with doughy middles and crispy edges.  If the paint stirrer gets grungy, toss it out and head to the hardware store.

    Paint Stirrers, Chopsticks and a Variety of Apple Peelers.  I am ready for making gingerbread Christmas Ornaments.
    Paint Stirrers, Chopsticks and a Variety of Apple Peelers. I am ready for making Gingerbread Christmas Ornaments!
  • A pair of chopsticks is a great way to poke nice round holes into the tops of gingerbread (and other) cookies so they can be hung with a ribbon.
  • A 10 or 12 inch Fry Pan lid can be used as a “giant” cookie cutter for pie dough. It will create a perfectly round piece of dough for the top crust.  This will give a neat edge to turn when finishing the top crust.

As you can tell, good tools are an inexpensive way to make cooking fun, social and sustainable.  If you have other tips and or adaptations that you have tried in the kitchen, I would love to hear from you.  Please share them by adding your comment to this post or contacting John at [email protected].