Obtaining Command Line Help

Both Administering Windows Server 2008 Server Core and it’s more diminutive counterpart, Windows Command-Line Administration Instant Reference, are reference manuals that tell how to use the command line to perform specific tasks. The first book is more complete, in that it contains many uncommon commands and utilities. The second book is designed to provide more hands-on help by supplying a significant number of actual usage examples. In both cases, you get a significant amount of help about the commands. As long as you have one of these two books by your side, you’re in great shape for knowing how to use the commands at the command line. Unfortunately, the reality is that most of us don’t stuff a library full of books in our back pocket. Even with an e-Reader, such as the Kindle, you can be sure of having the device available every time you need it. So, how do you get at least some quick help when there aren’t any resources available?

The first thing to remember is that you can get at least some useful information for any command or utility by using the /? or -? command line switches (some commands and utilities are peculiar in that they require either the /? or the -? command line switch, while many will allow you to use either). For example, when you want to discover how to use the Dir command, you type Dir /? and press Enter. Here’s typical output when using the /? command line switch.

GettingHelp01

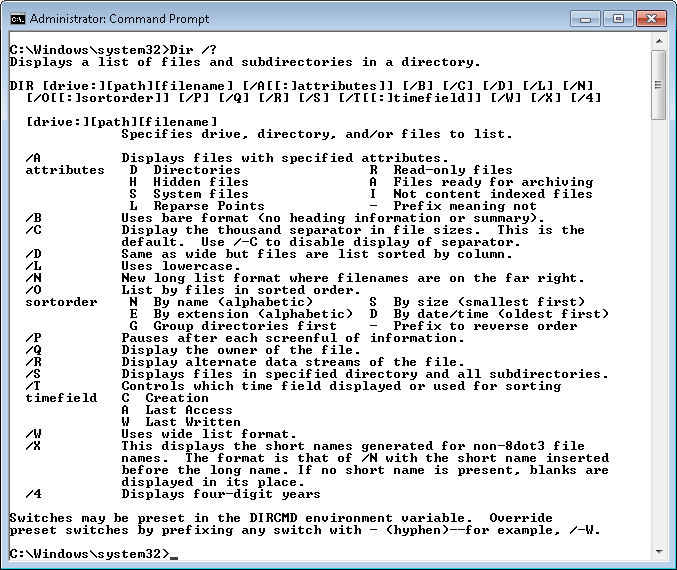
This help screen is also typical in showing what you get. Help normally includes a short description of the command, the command line syntax, and a short description of each of the command line switches. You may also see usage examples for more complex commands. In rare cases, the help screen will provide an URL for additional help.

Some commands and utilities are complex enough that they require several help screens. For example, if you type WMIC /? and press Enter, you’ll see a list of help topics, not help of the sort provided for the Dir command. Let’s say you want to know more about the CPU topic. So, now you type WMIC CPU /? and press Enter. The help looks a little more normal now, but still isn’t very complete because you need to choose a subcommand. Perhaps you want just a list of CPUs on a system, so you request information about the List subcommand by typing WMIC CPU List /? and pressing Enter. Wow, now you see a number of listing formats. This time you add a listing format by typing WMIC CPU List Brief /? and pressing Enter. It turns out that you can also discover information about command line switches used with the Brief format. The final level in this case is to type WMIC CPU List Brief /Translate /? and press Enter. The WMIC utility is unique in providing so many levels of help, but other complex commands and utilities, such as Net, do provide multilevel help.

No matter how many help screens you see, sometimes it isn’t enough to give you the help you need. That’s when you need to find your copy of my book to get additional information. Of course, a single book can do only so much—some complex commands and utilities may require still more information. Technet is a good place to start. For example, you can find an excellent article on WMIC at http://technet.microsoft.com/library/bb742610.aspx. Knowledge base articles also provide useful information, especially when it comes to issues that Microsoft has solved for a given command or utility. For example, the Knowledge Base contains an article entitled, “How to find computer serial number” that relies on WMIC. Finally, make sure you look at third party articles, such as the one entitled, “WMIC: the best command line tool you’ve never used.”

Many people complain about not being able to remember all of the commands and utilities, and this is a problem. After you use a command or utility often enough, you tend to remember it, but the memorization process can take time. Unfortunately, there isn’t any single quick method of finding every command or utility on a system. However, you should start by typing Help | More and pressing Enter. (Using the More command lets you see the information that a utility has to provide one screen at a time, rather than seeing the information scroll right past.) You’ll get a list of common commands like this one.

GettingHelp02

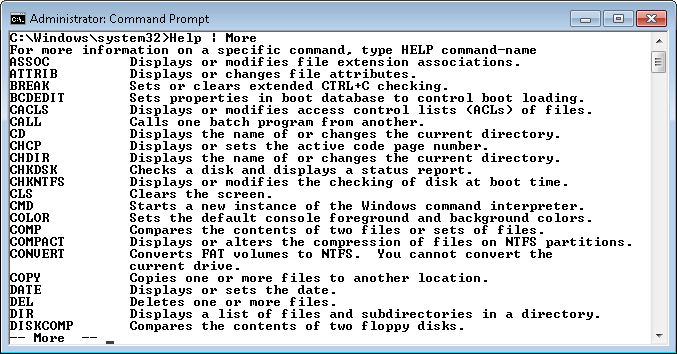
Not all of the commands appear on this list and none of the utilities do. Another way to obtain the information you need is to type Dir *.COM and press Enter in the \Windows\system32 directory. (You can type CD \Windows\System32 and press Enter to get to the appropriate directory.) Every directory entry you see is very likely a utility. However, many utilities are in .EXE form, so you also need to type Dir *.EXE | More and press Enter. You can eliminate files that contain more than eight letters in the filename from the list in most cases because command line utilities usually rely on the old 8.3 naming convention. Check filenames that look like they could be what you want by typing Filename /? and pressing Enter (where Filename is the name of the file you want to test). Useful command line utilities will generally display a help screen.

Now that you have a better idea of how to get command line help when you need it and where to obtain a list of useful commands and utilities, you should take some time to try it out for yourself. What techniques do you use to obtain the additional information you need at the command line? Let me know at [email protected].


CFLs for Free

If you haven’t heard about the Compact Fluorescent Light (CFL) by now, then you haven’t been paying much attention. They’re talked about on billboards, the television, radio, magazines, and in stores. In fact, it seems as if you can’t escape the CFL. Yet, many people are still buying the old incandescent bulbs created many years ago by Edison. Yes, incandescent bulbs were a marvel at the time, but today they’re costing you money.

A CFL is basically a fluorescent tube light put into a compact form. They consume considerably less energy than incandescent bulbs and last longer too. When I talk to people about CFLs, the biggest complaint I hear is that they cost so much money to buy. (The second biggest is that CFLs output harsh light or that the bulbs have a short life expectancy, neither of which is true any longer.) Of course, the expense is a legitimate complaint—one that I plan to address in this post.

Rebecca and I have switched our entire house to CFLs. When we first moved into our home, our average monthly bill was over $120.00 a month. Today, due to a number of energy saving techniques, we often get by for $50.00 a month despite a lot of price increases over the years. CFLs are a big part of that savings.

There are some tricks you can use to make the changeover a lot more palatable. Start by investing in high quality CFLs. Avoid the cheap Chinese knockoffsget a good bulb from GE or Sylvania, even though the initial cost is higher. Track the amount the bulb saves you each month. You can do that quite simply by checking your bill for a reduction or you can do things more scientifically. Keep a log of how long you use the bulb each day for a monththis represents the hours you use the bulb, then use this equation:

Savings = ((Bulb Watts / 1000) * Hours) * KWH Rate


Let’s say that you replace a 100 watt bulb with a CFL equivalent and you use the bulb for 4 hours each evening for a 30 day month. Your KWH rate (available from your electric bill) is $0.12. The new bulb takes only 26 watts. The original cost of using that bulb is:

((100 / 1000) * 120) * 0.12 or $1.44 per month


The cost of the new bulb is:

((26 / 1000) * 120) * 0.12 or $0.37 per month


Your savings are $1.07 per month from just that one bulb. OK, you can pocket that $1.07 and buy half a cup of coffee with it, or you can put it aside. In one year you’ll save enough money to buy a 12 pack of 100 watt CFL replacements for free (at least, you will if you shop smart). Now you can replace 12 incandescent bulbs and it won’t cost anything.

Here’s the payoff. Each of those replacements will also save on your electric bill. If you use each of those bulbs for the same amount of time each day, your savings increase to $13.91 each month, which means that you can buy the next package of CFLs in a month and end up with around $1.47 in change.

As you get new bulbs that haven’t cost you a penny because you would have spent that money on incandescent bulbs anyway, you can quickly replace all of those incandescent bulbs with CFLs that last longer, produce the same quality of light, and reduce your electric bill.

If you are interested in reducing your electric bill further, then you might want to consider using someone like the best electric companies in Texas, as sometimes changing providers can help reduce your electricity bill as well (although, the best thing that you can do is get things like new bulbs, to help you when it comes to energy savings).

Now you can move onto other things. Start with a programmable thermostat. You’ll find that it saves you money each month as well. If you use your CFL savings to buy the thermostat, it won’t cost you anything. You can extend this to weather stripping and all kinds of other energy saving additionseach of which provides a payoff—an incentive for using it.

It took us about 5 years to replace everything we could in our house that would readily provide a payoff and achieve that energy savings that I talked about earlier. Now, we’re pocketing that extra money. The cost savings will help keep our costs low (and in this economy, who can afford to turn away extra cash).

Eventually, we’ll look at other technologies to reduce our carbon footprint. There are many technologies now that we’ve looked at carefully that don’t actually put any money in your pocket. For example, we looked at windmill technology. By the time you pay for your own personal windmill, not to mention batteries, inverter, and other requirements, you’ll have to wait way too long for payback. Hopefully, this technology will improve with time. The same problem occurs with solar power and some other promising technologiesthey have no payoff right now (they don’t put money in your pocket).

The next technology that does look promising is solar heated hot water. Right now you still have to replace the system before you get a payoff (the longest lasting setup I could find is about five yearsnot long enough for payoff), but I think this is going to change in the near future. As the reliability of these systems improve and more people use them, but the cost will come down and there will be a payoff for those of us who have to be concerned about payoff.

There are also some changes we’ll make simply because we have to, even if there isn’t a payoff. For example, we’re going to have to replace our windows at some point. The old wooden windows are literally rotting in place. When we do make a replacement, we’ll look into buying a higher quality window that will at least partially pay back its installation cost in reduced energy costs. What I’ll try to do is balance the expected energy savings against the additional cost to find that magic point where I get a payback of a sort (the windows won’t ever pay for themselves, but the energy savings will ultimately make the windows less expensive than if I had bought cheaper windows).

Do you often find that the people selling energy saving devices miss the point? I find that the brochures stop short of telling people what the payoff is and how to obtain the devices without spending anything. There is usually some message about doing the planet some good and saving it for our children. These are certainly laudable goals, but the question that concerns me most is, “What’s in it for me?” In our case, it has turned out to be about $70.00 per monthwell worth the effort involved. Let me know your thoughts on using energy saving devices at [email protected].

Making Use of Those Oversized Zucchinis

You find it stashed beneath some leaves and it’s gargantuan—a zucchini that somehow missed your attention earlier. What do you do with this massive thing? Well, for one thing, you could eat it as normal. When you look at the nutritional benefits of the baby zucchini that most people eat, you might as well drink a glass of water for all the good it does you. The plant puts all its effort into the seeds, which aren’t developed at the time most people pick their zucchini. In fact, the seeds are simply packed with all kinds of good nutrition, including the highly sought Omega-3 and Omega-6 fatty acids. So, eating a larger zucchini has significant health benefits.

The secret is to learn when to pick your zucchini. We wait until they’re about 2 or 3 inches in diameter and the seeds are well developed, but you can still push a thumbnail through the skin. If you wait too long, the skin gets pretty tough. Yes, you can peel the skin off, but then you lose all of the wonderful fiber that zucchini can provide.

However, the subject of this post is to tell you about something interesting you can use those oversized zucchinis for. We use them to make a substitute for potato chips that provides some significant health benefits, yet taste absolutely amazing. Our technique isn’t completely healthy, but I’ll take them anytime over the store purchased chips. You begin by thinly slicing your Zucchini as shown here and placing them in a dehydrator.

Zucchini01

We sprinkle the tops of the zucchini with popcorn seasoning that we buy in bulk from a local store. The popcorn seasoning comes in four flavors: cheese, sour cream/onion, ranch, and bacon/onion. The cost for the product is extremely low when you buy in bulk quantities like this:

Zucchini02

A one pound container of the topping cost us $4.65 at the local bulk goods store. You don’t need to use a lot of the topping. Just a dusting will add a bit of wonderful flavor to the resulting chips as shown here:

Zucchini03

You can use any sort of zucchini to produce the chips. As you see, we have a variety in the dehydrator right now. However, our friends introduced us to the Clarinette Lebanese Squash, which has a light green exterior, and produces a superior chip. The chip retains its crispiness far longer and the zucchini itself is a better shape for chips in that it tends to grow bigger around in a shorter period without getting a hard skin.

To perform the drying, you set the dehydrator to 155º. Check the dehydrator every few hours. When the chips are crispy (in about six hours), the drying process is done. Rebecca packages the initial chips in resealable bags until she has enough, then she uses the Food Saver to store the chips in sealed bags that contain a little air to prevent chip breakage. Normally, she makes me two five-gallon containers of chips for the winter (along with two more five-gallon containers of apple chips that I’ll describe later). Here’s the preliminary result:

Zucchini04

We’ve never had any of our chips go bad. They should last at least a year if you seal them properly. So, what is your favorite alternative way to use zucchini? Let me know at [email protected].


An Update On Special Needs Device Hacking

I previously posted an entry entitled Security and the Special Needs Person where I described current hacking attempts against special needs devices by security researchers. In that post, I opined that there was probably some better use of the researcher’s time. Rather than give hackers new and wonderful ways to attack the human race, why not find ways to develop secure software that would discourage attempts in the first place? Unfortunately, it seems as if the security researchers are simply determined to keep chewing on this topic until someone gets hurt or killed. I never even considered this topic in my book, “Accessibility for Everybody: Understanding the Section 508 Accessibility Requirements” because it wasn’t an issue at the time of publication, but it certainly is now.

Now there is a ComputerWorld article that talks about wearable devices used to jam the signals of hackers trying to attack those with special needs devices. What do we do next—encase people in a Faraday cage so no one can bother them? I did find the paper referenced in the article, “They Can Hear Your Heartbeats: Non-Invasive Security for Implantable Medical Devices” interesting, but must ask why such measures even necessary. If security researchers would wait until someone actually thinks of an attack before they came up with a remedy, perhaps no one would come up with the attack.

The basis of the shielding technology mentioned in the ComputerWorld article is naive. Supposedly, the shield lets the doctor gain access to the medical device without allowing the hacker access. Unfortunately, if the doctor has access, so does the hacker. Someone will find a way to overcome this security measure, probably a security researcher, and another shield will have to be created that deflects the new attack. The point is that if they want the devices to be truly safe, then they shouldn’t send out a radio signal at all.

The government is involved now too. Reps. Anna G. Eshoo (D-CA) and Edward J. Markey (D-MA), senior members on the House Energy and Commerce Committee, have decided to task the the Government Accountability Office (GAO) with contacting the Federal Communications Commission (FCC) about rules regarding the safety and security of implantable medical devices. I can only hope that the outcome will be laws that make it illegal to even perform research on these devices, but more likely, the efforts will result in yet more bureaucracy and red tape.

There are a number of issues that concern me about the whole idea of people wearing radio transmitters and receivers full time. For one thing, there doesn’t seem to be any research on the long term effects of wearing such devices. (I did find research papers such as, “In-Body RF Communications and the Future of Healthcare” that describe the hardware requirements for transmission, but research on what RF will do to the human body when used in this way seems sadly lacking.) These devices could cause cancer or other diseases. Fortunately, the World Health Organization (WHO) does seem to be involved in a little research on the topic and you can read about it in their article entitled, “What are electromagnetic fields?“.

In addition, now that the person has to wear a jammer to protect the implantable medical device, there is a significant chance of creating interference. Is there a chance that the wearer could create unfortunate situations where the device intended to protect them actually causes harm? The papers I’ve read don’t appear to address this issue. However, given my personal experiences with electromagnetic interference (EMI), it seems quite likely that the combination of implantable medical device and jammer will almost certainly cause problems.

In summary, we have implanted medical devices that use radio signals to make it more convenient for the doctor to monitor the patient and possibly improve the patient’s health as a result. So far, so good. However, the decision to provide this feature seems shortsighted when you consider that security researchers just couldn’t leave well enough alone and had to find a way for hackers to exploit the devices. Then, there doesn’t seem to be any research on the long term negative effects of these devices on the patient or on the jammer that now seems necessary to protect the patient’s health. Is the potential for a positive outcome really worth all of the negatives? Let me know at [email protected].

Every Year is a Good and a Bad Year

It’s easy to become discouraged in the garden sometimes. During the early spring you plant everything that you’ll hope will grow and produce plentifully. By August, you know which plants will fair the best and which didn’t survive at all. This year has been especially tough because I ended up getting gallbladder surgery first, and then, because we do everything together, Rebecca ended up getting gallbladder surgery as well. So, with both of us on our backs, our garden had a true test of being weed-bound. Unfortunately, that means that some plants didn’t live at all and some won’t produce well. Our corn was nice and tall, right before the wind blew it over. Many of our peas succumbed to the weeds.

Still, it’s a good year in many respects and that’s the aspect I choose to focus on. Good years fill larders with interesting vegetables and fruits. Apparently, this is a bean year. We planted the normal amount of green beans and Lima beans. However, the plants decided to grow twice as tall and twice as wide as normal. We’re now inundated with green beans and will soon have a bumper crop of Lima beans as well.

GardenEnough01

Not every year is a good year for every vegetable. In my Dealing with Overabundance post, I discussed how some years produce so much that you can hardly fathom what to do with it all. Last year and the year before were horrible blight-filled years for tomatoes. This year isn’t just good, it’s amazing. Our tomatoes have never looked quite this good.

GardenEnough02

Those are the same diminutive plants I wrote about in Mulching Your Garden. They’re over five feet tall now and loaded with so many tomatoes that we’re going to try pickling some green tomatoes this year. (Remember to try different preservation techniques whenever you can to discover new ways of dealing with overabundance.) The plants have obviously overgrown the tomato cages and are threatening the other plants in that plot. Unlike previous years, there is absolutely no sign of blight, even at the bottom of the plants (which are usually brown by now). Sometimes in this case it is better to buy things like new mulching heads for skid steers so we can effectively clean up the area for a more serious overgrowing problem.

Many of our plants are late, but will most definitely produce. The egg plants and okra are of sufficient size that we’ll get the normal amount from them, or perhaps just a bit more than usual. As in most years, the egg plants are constantly under attack from flea beetles, but the lacing of their leaves hasn’t reduce their vigor much and we expect the normal crop from them.

GardenEnough03

The beets and kohlrabi look good this year as well. We fully expect to harvest enough to replenish our larder and even provide a little extra for next year. So, many plants are producing enough that we’ll most definitely not starve. It’s best to avoid focusing on the lack of corn this winter in the larder or the fact that there won’t be much in the way of broccoli (we will have an abundance of Brussels sprouts though).

It’s important to remember diversity in gardening. Don’t plant just one or two items-plant a variety of items so that at least a few of them produce well. This is our year for tomatoes and beans. Next year might be a corn year or the year of the mutant squash (we’ve had one of those lately and are still eating squash from that year). Each year is a good year for something, and an equally bad year for something else.

There is actually a health benefit to all of this. If every year produced copious quantities of whatever you planted, there would be no incentive to try something new. Gardens force people to moderate what they eat and to try new things. As someone once said, “Variety is the spice of life!” So, what has grown well for you this year? Let me know at [email protected]

The Wonders of Queen Anne’s Lace

Sometimes, the best herb or edible plant is the one you didn’t plant. Nature provides a number of edible plants that grow naturally where you live. I’ve shared about the berries that grow in our woods before. There are blackcaps, blackberries, gooseberries, wild grapes, wild plums, and choke cherries available to anyone who wants to pick them in the woods. You can also find any number of usable mushrooms and other useful plants out there. However, the wild grass area also has abundance to offer. One of the most useful plants is Queen Anne’s Lace, also known as wild carrot.

QueenAnnesLace01

It’s quite possible that you’ve passed this plant by in the past because it normally grows in with the rest of the weeds. The large taproot is edible. However, you don’t want to dig it up mid-summer. It’s better to dig up a second year plant early in the spring or a first year plant late in the fall. Wait until the plant is dormant or you’ll end up with something that’s akin to shoe leather without much value. Older plants develop a woody interior (xylem) that’s most definitely unpalatable.

Some people actually use a tea made from the root for a number of medicinal purposes. When the root is used for medicinal reasons, the common wisdom is to dig it up in July, which is the same time the plant flowers in profusion.

Wild carrot is an ancestor of the modern cultivated carrot, but they’re different plants. In other words, it would require a lot of work to change Queen Anne’s Lace into anything resembling a domesticated plant and you should focus on the usefulness of the wild plant instead.

One of the most delightful uses of Queen Anne’s Lace is to make jelly from the flowers. You must pick a lot of fresh flowersthe more the better. I normally provide Rebecca with at least two shopping bags full of flowers to make jelly and it takes quite a while to obtain that many flowers, but the effort is most definitely worth it. The Queen Anne’s Lace flower looks like this.

QueenAnnesLace02

In some cases, the center of the flower will contain a purple floret, but I’ve found that the purple floret is somewhat rare. Before you go out and pick a bunch of flowers that look just like this one though, be aware that many flowers have precisely the same coloration and similar appearance. For example, the hemlock flower and fool’s parsley are easy to confuse with this flower. Fortunately, it’s easy to avoid the mistake. Hemlock and fool’s parsley both tend to grow in wetter areas, while Queen Anne’s Lace prefers a drier spot to grow. In addition, Queen Anne’s Lace has a distinctive carrot leaf like the one shown here (the photograph is courtesy of my friend William Bridges):

OLYMPUS DIGITAL CAMERA

When picking Queen Anne’s Lace, look for the flower in July, check the flowers carefully, and verify that the leaves are correct. If necessarily dig a plant up to ensure you’re getting the right one. The root will have a distinctive carrot aroma. If you take these four precautions, you won’t ever have any trouble.

There is conflicting information about the use of the leaves. I’ve never personally eaten the leaves and based on the conflicting information, I’d recommend not eating them. Here’s the Queen Anne’s Lace jelly recipe (courtesy of Rebecca).

Queen Anne’s Lace Jelly

2 qts Flower Heads, Rinsed
  Boiling Water to Cover
2 Lemons, Juiced
2 packets Certo
6 cups Sugar
Dash Cinnamon or Nutmeg

Infuse flowers in boiling water for 4 to 5 hours. Strain the result to obtain 5 cups of liquid. Add lemon juice, sugar, and spices. Bring the mixture to a boil. Add Certo. Bring to a full boil for 1 minute. Prepare the jelly according to the instructions on the Certo package. Can using a boiling water bath for 10 minutes.

The jelly has a subtle taste. It really is hard to describe, but think of something with an almost honey-like taste, but a bit of spiciness too. Add some tea and an English muffin, and you have a wonderful breakfast. The jelly ends up with a wonderful amber appearance.

QueenAnnesLace04

So, what are your favorite wild plants? Do you use them regularly? Let me know at [email protected].

Protecting Your Investment

Many people disregard the benefit of having good working animals. We currently have two dogs and three cats. Every one of them has work to do. Over the years I’ve found that working animals actually live longer and lead happier lives. It seems that everyone benefits from having work to keep them happy.

The two dogs work during the evening hours. We’re out and about enough during the daylight hours that we’ve never had a problem with the wildlife during the day. It’s at night that the wildlife comes out and causes us woe. So the dogs work all night and sleep all day. One of us takes them to work each evening and brings them into the house early each morning.

Shelby earns her keep by guarding the chickens. Everyone likes a chicken dinner. The way we have the chicken tractors constructed keeps hawks at bay. However, weasels and racoons will dig under the chicken tractors to get inside if they can’t get in any other way. The hardware cloth will delay them, but not permanently bar them. Weasels are the worst of the lot. They’ll make a small incision in the chicken’s neck, drain it of blood, and then move onto the next chicken without touching the meat of the one it has just killed. What a waste! We’ve had problems with other wildlife getting into the chicken tractors as wellI’m pretty sure a fox got into the chicken tractors at least once.

Shelby

Shelby also helps catch any chickens that get out of the chicken tractors. She’ll carefully move them toward me. I can usually catch the chicken without any problem and put it back inside. We chose a border collie because of the herding instinct.

Reese guards the apple orchard. We have two orchardsone for apples and another for everything else (pears, plums, and cherries). For some reason, none of the wildlife bothers the other orchard, but they absolutely love our apples. One season I had a wonderful harvest when I went to bedthe next morning I got up to find stems, which was all that the deer left behind after eating every apple. Rebecca says that there is still a dark cloud hanging over the orchard from the unfortunate language I used to express my discomfort with the deer’s choice of delicacy. Since we’ve had a dog out there, no one has touched the apples (or at least, not enough to matter). We chose a beagle/rat terrier mix for the no nonsense attitude toward guarding territory. Besides, she doesn’t dig (at least, not often) and she cuddles nicely in the winter.

Reese

During the late fall and most of the winter months, we store goods in the basement. It acts as our root cellar. There are usually some apples, potatoes, and squash down there. Given that the basement keeps at a nice 40 degrees, things last quite a while. We eat the last squash sometime in March in most years, along with the last of the potatoes (the apples never last past the holidays). Mice just love root cellars. Given a chance, they’ll bore through squash just enough to ruin it. Apples and potatoes make wonderful treats as well.

Two of our cats, Bubba and Smucker, patrol the root cellar. We don’t stick them down there at any given time. They ask to go down for a while, then they ask to come back up. It’s a nice arrangement for everyone. Since we’ve had Bubba and Smucker patrolling the root cellar, there hasn’t been any damage to our goods from mice. Sure, we could have used traps, but cats work significantly better.

SmuckerandBubba

Sugar Plum is Rebecca’s cuddle cat. Her main job is to keep Rebecca happy. During the daytime, that means staying with Rebecca in the kitchen or wherever else Rebecca might be at the time. It’s an important job.

All of our “kids” know how to do some simple tricks. The dogs each have their own way of asking for their breakfast and they play a mean game of fetch. They’re also trained to perform the usual commandssit, lay down, kennel, and quiet. The cats can also perform tricks. In this case, Sugar Plum is sitting up to ask for a treat.

SugarPlum

Having animals is an important part of self-sufficiency. Without these work animals, we’d never be able to hold onto the investment we’ve made. How do you work with your animals? Let me know at [email protected].


Drying Herbs

This is the time of year when Rebecca starts drying the herbs that have been growing since early spring. Most of them have gotten quite tall. I’ll discuss one of my favorites in this post, lime mint, but she’s working on a host of other herbs as well. Of course, the drying process starts by picking the herbs. She started with a relatively large bunch of lime mint like this:

DryHerbs01

In order to dry herbs, you need some means of drying them. Some people use their ovens, which can sometimes damage the herbs. It’s possible to dry the herbs in the sun, assuming you have a nice place to do it and the temperatures are high enough. We use an American Harvest dehydrator like the one shown here.

DryHerbs02

It’s such a handy device that we own three of them and sometimes all three of them are in use drying various items. Rebecca makes vegetable chips and apple chips for me to use as snacks (among other items). She has also made venison jerky for me using one of these devices. Two of our dehydrators have the top mounted heater and fan, while the third is bottom mounted. When it comes to drying herbs, there really isn’t any advantage over using one or the other.

In order to dry the herbs, the leaves are stripped from the stem and then placed in a fairly shallow pile in the dehydrator trays. It’s perfectly acceptable to put the younger tops in whole, but you don’t want the really stiff stems in with the rest of the herbs. Here’s how a typical tray will look.

DryHerbs03

After you’ve finished filling trays with the herbs, you’ll need to set the dehydrator for 105 degrees. It takes about 6 hours to dry the herbs. During that time, you’re treated to the most exotic smells. The entire house was filled with the smell of fresh mint this morningit’s indescribable. The stack of herbs you saw earlier filled nine trays like this:

DryHerbs04

You’ll want to take the lid off from time-to-time to check the herbs (don’t do it any more than about once an hour). About halfway through the process, you’ll want to rearrange the trays, placing the bottom ones year the top (and vice versa) to ensure the herbs dry evenly. The herbs will look like this about halfway through the process.

DryHerbs05

When the herbs are completely dry, they’ll be a dark green. They’ll also crumble quite easily. Don’t be too shocked by the amount of herb you get for the initial investment. Here’s the completed lime mint from that entire bunch that you saw earlier (about 1/3 of a quart).

DryHerbs06

There is nothing quite so nice as home dried herbs. You’ll use quite a bit less of them than the herbs you get from the store. Rebecca places any extra herbs in a sealable bag, uses a Food Saver to vacuum seal the bag, and then places it in the freezer. This approach keeps the herbs extra fresh. Growing and preserving your own herbs makes for amazing meals and drinks (think herbal teas of your own design). Wouldn’t it be nice to be nice to be able to use your own herbs whenever you wanted? Let me know what you think at [email protected].


Security and the Special Needs Person

I’ve written quite a bit about special needs requirements. In my view, everyone who lives long enough will have a special need sometime in their life. In fact, unless you’re incredibly lucky, you probably have some special need right now. It may not be a significant special need (even eyeglasses are a special need), but even small special needs often require another person’s help to fix.

Accessibility, the study of ways to accommodate special needs, is something that should interest everyoneespecially anyone who has technical skills required to make better accessibility aids a reality. It was therefore with great sadness that I read an eWeek article this weekend describing how one researcher used his talents to discover whether it was possible to kill someone by hacking into the device they require to live. Why would someone waste their time and effort doing such a terrible thing? I shook my head in disbelief.

There is a certain truth to the idea that the devices we use to maintain health today, such as insulin pumps, are lacking in security. After all, they are very much like any other Supervisory Control And Data Acquisition (SCADA) device, such as a car, from a software perspective and people are constantly trying to find ways to break into cars. However, cars are not peoplecars are easily replaced devices used for transport. If someone breaks into my car and steals it, I’m sad about it to be sure, but I’m still alive to report the crime to the police. If someone hacks into my pacemaker and causes it to malfunction, I’m just as dead as if they had shot me. In fact, shooting me would probably be far less cruel.

I know that there is a place for security professionals in the software industry, but I’ve become increasingly concerned that they’re focused too much on breaking things and not enough on making them work properly. If these professionals spent their time making software more secure in the first place and giving the bad guys fewer ideas of interesting things to try, then perhaps the software industry wouldn’t be rife with security problems now. Unfortunately, it’s always easier to destroy, than to create. Certainly, this sort of negative research gives the security professionals something to talk about even though it potentially destroys someone’s life in the process.

I’d like to say that this kind of behavior will diminish in the future, but history says otherwise. Unless laws are put in place to make such research illegal, well meaning security professionals will continue dabbling in matters that would be best left alone until someone dies (and even then the legal system will be slow in reacting to a significant problem). I doubt very much that time spent hacking into special needs devices to see just how much damage one can do helps anyone. What is your thought on the matter? Does this sort of research benefit anyone? Let me know what you think at [email protected].

Understanding the Connection Between Application Output and ErrorLevel

Many readers have a disconnect between application output and the ErrorLevel variable found in batch files. I’ve received more than a few e-mails where readers don’t quite understand the whole concept behind the ErrorLevel variable. They think it actually signifies some sort of mystical operating system derived error, when it isn’t anything of the sort.

A large part of the problem is that those readers who commonly work with batch files aren’t developers and many developers don’t work with batch files. In fact, even though many administrators are moving back to command line utilities because working with the GUI is time consuming and inefficient, many developers have decided to eschew the console application in favor of GUIs with fancier user interfaces.

Another problem is that ErrorLevel is inappropriately named. It should really be named ApplicationOutput. I’m sure that at one time the intention truly was to convey some sort of error information, but even Microsoft uses ErrorLevel for other purposes.

Let’s take a practical look at the whole concept of ErrorLevel beginning with a simple C# application to generate the codes. When working with C#, you’ll find that the output is now called an ExitCode as shown here.

using System;
using System.Collections.Generic;
using System.Linq;
using System.Text;
 
namespace GenerateOutput
{
    class ExitCode
    {
        static void Main(string[] args)
        {
            // Create a variable to hold the exit
            // value.
            Int32 Value;
 
            // Make sure there is a variable provided as input.
            if (args.Count() > 0)
            {
 
                // Determine whether the input is actually a number.
                if (Int32.TryParse(args[0], out Value))
 
                    // If it is, then exit using that number.
                    Environment.Exit(Value);
                else
 
                    // Otherwise, exit with an error value of -2.
                    Environment.Exit(-2);
            }
            else
 
                // Exit with an error value of -1
                Environment.Exit(-1);
        }
    }
}

The only purpose of this application is to generate exit codes given certain circumstances. The first check determines whether the user has supplied any sort of input at all. If not, if the user simply types GenerateOutput without any arguments at all, then the application exits with a value of -1 to indicate an error. Likewise, if the user types something other than a number, such as GenerateOutput Hello, the application exits with a value of -2 to indicate a different sort of error. Only when the user supplies a number does the application exit with a numeric value.

The batch file used to test this application is equally simple. All it does is call GenerateOutput with the value (if any) that the user provides to the batch file, TestOutput.bat. Here’s the batch file code.

@Echo Off
 
REM Run the application.
GenerateOutput %1
 
REM Most application output are status indicators.
If ERRORLEVEL 2 GOTO HighOutput
 
REM You can perform specific actions for a specific status.
If ERRORLEVEL 1 GOTO ValueOne
 
REM Applications can also provide a success indicator.
If ERRORLEVEL 0 GOTO Success
 
REM Errors are normally negative numbers, but can be anything.
If ERRORLEVEL -1 GOTO Error1
If ERRORLEVEL -2 GOTO Error2
 
:HighOutput
ECHO The value you provided is higher than 1.
GOTO End
 
:ValueOne
ECHO You provided an input of precisely 1.
GOTO End
 
:Success
ECHO An output value of 0 indicates success!
GOTO End
 
REM Here is the beginning of the various messages.
:Error1
ECHO You must supply a number as an argument!
GOTO End
 
:Error2
ECHO You must supply a number and not text or special characters!
GOTO End
 
REM Here is the ending point.
:End

As you can see, the tests check for errors, success messages, and non-error application output. Any combination of console application and batch file can do the same thing provided the developer and administrator get together to work out the details or the developer at least documents the exit codes.

The process is the same each time. Test for an ErrorLevel value, then go to the label specified, execute the directions, and then go to the end of the batch file. The ErrorLevel values must appear in order from greatest to least in order to work correctly. Here is some test output from this test application and batch file pair.

ErrorLevel01

The point of this exercise is to ensure that developer and administrator alike realize the importance of the exit code (ErrorLevel). The application should use it to provide some sort of status information that the administrator can then use to track how well the application works in an automated setting. Let me know if you have any questions at [email protected].