Creating Links Between File Extensions and Batch Files

A couple of weeks ago I wrote a post entitled, “Adding Batch Files to the Windows Explorer New Context Menu” that describes how to create an entry on the New context menu for batch files. It’s a helpful way to create new batch files when you work with them regularly, as I do. Readers of both Administering Windows Server 2008 Server Core and Windows Command-Line Administration Instant Reference need this sort of information to work with batch files effectively. It wasn’t long afterward that a reader asked me about creating links between file extensions and batch files. For example, it might be necessary to use a batch file to launch certain applications that require more information than double clicking can provide.

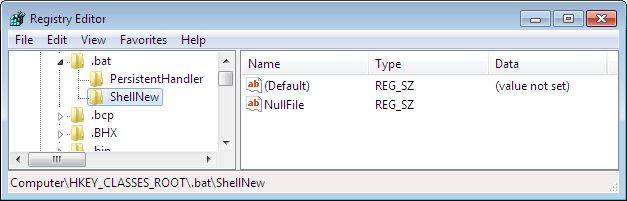
This example is going to be extremely simple, but the principle that it demonstrates will work for every sort of file extension that you can think about. Fortunately, you don’t even need to use the Registry Editor (RegEdit) to make this change as you did when modifying the New menu. The example uses this simple batch file named ViewIt.BAT.

@Echo Processing %1
@Type %1 | More
@Pause

Notice that the batch file contains a %1 entry that accepts the filename and path the Windows sends to it. You only receive this single piece of information from Windows, but that should be enough for many situations. All you need to do then is create a reasonably smart batch file to perform whatever processing is necessary before interacting with the file. This batch file will interact with text (.TXT extension) files. However, the same steps work with any other file extension. In addition, this isn’t a one-time assignment—you can assign as many batch files as desired to a single file extension. Use these steps to make the assignment (I’m assuming you have already created the batch file).

  1. Right-click any text file in Windows Explorer and choose Open With from the context menu.
  2. Click Choose Default Program from the list of options. You see the Open With dialog box shown here.
    Link01
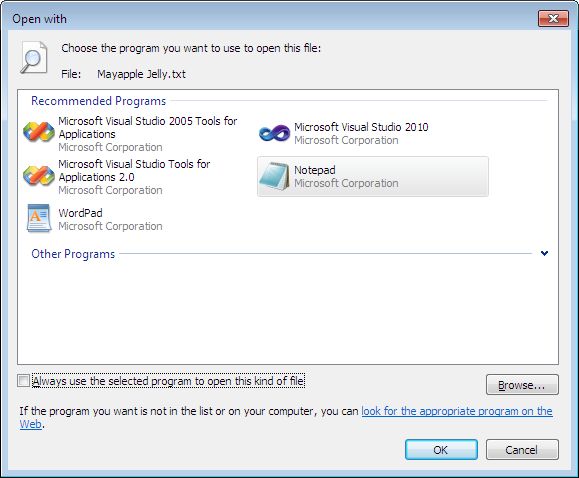
  3. Clear the Always Use the Select Program to Open this Kind of File option.
  4. Click Browse. You see the Open With dialog box.
  5. Locate and highlight the batch file you want to use to interact with the text file (or any other file for that matter) and click Open. You see the batch file added to the Open With dialog box.
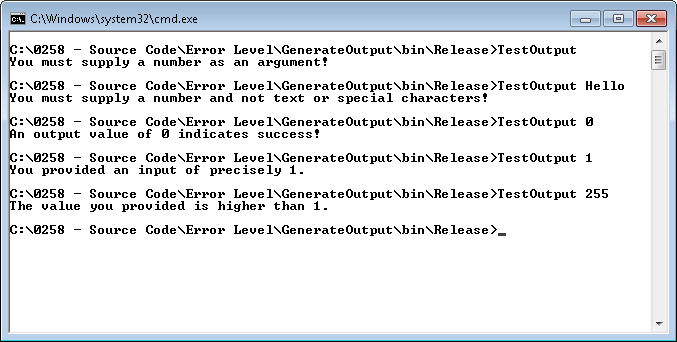
  6. Click OK. You see the batch file executed on the selected file as shown here.
    Link02

At this point, you can right-click any file that has the appropriate extension and choose the batch file from the Open With menu. The batch file will receive the full path to the file as shown in this example. It can use the information as needed to configure the environment and perform other tasks, including user interaction. Let me know your thoughts on linking file extensions to batch files at [email protected].


Adding Batch Files to the Windows Explorer New Context Menu

Administrators are always looking for ways to perform tasks faster. Most administrators have little time to spare, so I don’t blame them for looking for new techniques. One of the ways in which administrators gain a little extra time is to automate tasks using batch files. Both Administering Windows Server 2008 Server Core and Windows Command-Line Administration Instant Reference provide significant information about creating and using batch files to make tasks simpler. However, a number of readers have asked how to make creating the batch files faster by adding batch files to the Windows Explorer New context menu. That’s the menu that appears when you right click in Windows Explorer. It contains items such as .TXT files by default, but not .BAT (batch) files.

Being able to right click anywhere you’re working and creating a batch file would be helpful. Actually, the technique in this post will work for any sort of file you want to add to that menu, not just batch files, but the steps are specific to batch files.


  1. Open the Registry editor by typing RegEdit in the Search Programs and Files field of the Start Menu and clicking on the RegEdit entry at the top of the list.
  2. Right click the HKEY_CLASSES_ROOT\.bat key and choose New | Key from the context menu. You’ll see a new key added to the left pane.
  3. Type ShellNew and press Enter.
  4. Right click the new ShellNew key and choose New | String Value from the context menu. You’ll see a new string value added to the right pane.
  5. Type NullFile and press Enter. Your Registry Editor display should look like the one shown here.
    NewBatchFile01

At this point, you should be able to access the new entry in Windows Explorer. Right click anywhere in Windows Explorer and choose the New context menu. You should see the Windows Batch File entry shown here:

NewBatchFile02

Selecting this entry will create a blank batch file for you in the location you selected. All you need to do is open the file and begin editing it. What other sorts of time saving methods do you find helpful in working with batch files? Let me know at [email protected].


Understanding the Connection Between Application Output and ErrorLevel

Many readers have a disconnect between application output and the ErrorLevel variable found in batch files. I’ve received more than a few e-mails where readers don’t quite understand the whole concept behind the ErrorLevel variable. They think it actually signifies some sort of mystical operating system derived error, when it isn’t anything of the sort.

A large part of the problem is that those readers who commonly work with batch files aren’t developers and many developers don’t work with batch files. In fact, even though many administrators are moving back to command line utilities because working with the GUI is time consuming and inefficient, many developers have decided to eschew the console application in favor of GUIs with fancier user interfaces.

Another problem is that ErrorLevel is inappropriately named. It should really be named ApplicationOutput. I’m sure that at one time the intention truly was to convey some sort of error information, but even Microsoft uses ErrorLevel for other purposes.

Let’s take a practical look at the whole concept of ErrorLevel beginning with a simple C# application to generate the codes. When working with C#, you’ll find that the output is now called an ExitCode as shown here.

using System;
using System.Collections.Generic;
using System.Linq;
using System.Text;
 
namespace GenerateOutput
{
    class ExitCode
    {
        static void Main(string[] args)
        {
            // Create a variable to hold the exit
            // value.
            Int32 Value;
 
            // Make sure there is a variable provided as input.
            if (args.Count() > 0)
            {
 
                // Determine whether the input is actually a number.
                if (Int32.TryParse(args[0], out Value))
 
                    // If it is, then exit using that number.
                    Environment.Exit(Value);
                else
 
                    // Otherwise, exit with an error value of -2.
                    Environment.Exit(-2);
            }
            else
 
                // Exit with an error value of -1
                Environment.Exit(-1);
        }
    }
}

The only purpose of this application is to generate exit codes given certain circumstances. The first check determines whether the user has supplied any sort of input at all. If not, if the user simply types GenerateOutput without any arguments at all, then the application exits with a value of -1 to indicate an error. Likewise, if the user types something other than a number, such as GenerateOutput Hello, the application exits with a value of -2 to indicate a different sort of error. Only when the user supplies a number does the application exit with a numeric value.

The batch file used to test this application is equally simple. All it does is call GenerateOutput with the value (if any) that the user provides to the batch file, TestOutput.bat. Here’s the batch file code.

@Echo Off
 
REM Run the application.
GenerateOutput %1
 
REM Most application output are status indicators.
If ERRORLEVEL 2 GOTO HighOutput
 
REM You can perform specific actions for a specific status.
If ERRORLEVEL 1 GOTO ValueOne
 
REM Applications can also provide a success indicator.
If ERRORLEVEL 0 GOTO Success
 
REM Errors are normally negative numbers, but can be anything.
If ERRORLEVEL -1 GOTO Error1
If ERRORLEVEL -2 GOTO Error2
 
:HighOutput
ECHO The value you provided is higher than 1.
GOTO End
 
:ValueOne
ECHO You provided an input of precisely 1.
GOTO End
 
:Success
ECHO An output value of 0 indicates success!
GOTO End
 
REM Here is the beginning of the various messages.
:Error1
ECHO You must supply a number as an argument!
GOTO End
 
:Error2
ECHO You must supply a number and not text or special characters!
GOTO End
 
REM Here is the ending point.
:End

As you can see, the tests check for errors, success messages, and non-error application output. Any combination of console application and batch file can do the same thing provided the developer and administrator get together to work out the details or the developer at least documents the exit codes.

The process is the same each time. Test for an ErrorLevel value, then go to the label specified, execute the directions, and then go to the end of the batch file. The ErrorLevel values must appear in order from greatest to least in order to work correctly. Here is some test output from this test application and batch file pair.

ErrorLevel01

The point of this exercise is to ensure that developer and administrator alike realize the importance of the exit code (ErrorLevel). The application should use it to provide some sort of status information that the administrator can then use to track how well the application works in an automated setting. Let me know if you have any questions at [email protected].


Automating Your Configuration with a Daily Batch

Batch files are still an important part of your system, especially if you find that you need to perform certain configuration tasks every day. Both Administering Windows Server 2008 Server Core and Windows Command-Line Administration Instant Reference discuss batch files, but this post is about a practical example of a batch file in daily use.

My system has a daily batch file. It runs every morning when I start the system up. (To save electricity, I do turn off my system every night and find that things also run better because I do.) The main reason for using a daily batch file is to configure my system so I don’t end up performing the same repetitive tasks every day. I tell the computer what to do and it performs the required configuration for me. After I get my cup of coffee, my system is ready to go—fully configured for my use.

The daily batch file appears as an entry in the Startup folder on my system. Placing the file in the Startup folder means that it runs automatically, but that I can also easily disable the batch file should I wish to do so. Use these instructions to add a daily batch file to your Startup folder:


  1. Choose Start > All Programs. You see a list of entries including Startup.
  2. Right click Startup and choose Open from the context menu. (Unless you want everyone to use the same automatic batch file, you don’t want to choose Open All Users.) You see a copy of Windows Explorer open for the Startup folder.
  3. Right click anywhere in the right Windows Explorer pane and choose New > Text Document from the context menu. Windows will create a new text document named New Text Document.txthowever, only the New Text Document part of the filename is highlighted.
  4. Highlight the entire filename and type Daily Tasks.bat. Make absolutely certain that you also overwrite the .txt part of the filenameDaily Tasks.bat.txt won’t do anything for you.
  5. Press Enter. You see a Rename dialog box that asks whether you’re sure that you want to change the extension of the file.
  6. Click Yes. Windows renames the file.

Of course, the file is empty at this point. Right click Daily Tasks.bat and choose Edit from the context menu. Windows will open a copy of Notepad with the empty batch file loaded. At this point, you can start typing commands for Windows to execute automatically when you start up in the morning. It’s possible to execute many commands directlyespecially those that are meant to execute at the command line, such as W32Tm /Resync, which forces an update of the system clock. Other commands require that you use the Start command to execute them. For example, you might want to tell Firefox to automatically open the Astronomy Picture of the Day site using this command:


Start “C:\Program Files\Mozilla Firefox\Firefox” http://antwrp.gsfc.nasa.gov/apod/

<font<> <font<>The Start command starts Firefox in this case. It passes the URL you provide to Firefox as a command line parameter. Obviously, the application must support command line parameters for this technique to work. More applications than you might think do support command line parameters (many undocumented), so a little research can provide a lot in automation.

Any command that you can execute in any other batch file is also available when you’re starting Windows. There is one special consideration. You’ll likely find that executing one command immediately after another causes timing problems when Windows is initially starting. For example, if you try to open several Web sites, you’ll find that Windows actually misses opening a few unless you provide some sort of wait period between commands. Fortunately, the Choice command fulfills this task perfectly. For example, the following command provides a 15 second delay that you can insert between commands:


@CHOICE /C:N /N /T:15 /D:N


Using this command the user won’t even be aware of the delay. The @ symbol makes the Choice command invisible. The /C command line switch provides the available choices (which consists solely of N in this case). The /N command line switch hides the list of choices from view. You create the actual timeout value using the /T command line switch, which is set for 15 seconds in this example. However, the /D command line switch actuates the delay by automatically choosing N after the 15 seconds. In short, this entire command line is a wait statement.

If you want your batch to run more or less invisibly, make sure you start it with an @Echo Off command. Otherwise, every command appears in the window. It’s helpful to check for errors when you first put the batch file together and when you make changes. Adding an @Pause at the end of the batch file keeps the command window visible so you can check for errors.

After you finish the batch file, you can execute it as you would any other batch file. The only difference in this situation is that this batch file executes automatically each day because it resides in the Startup folder. When you need to make changes to this file you can choose Start > All Programs > Startup, then right click Daily Tasks.bat, and choose Edit from the context menu. The file will open in Notepad for you.

This is one of the more interesting and useful ways to employ batch files. What are your favorite batch processing techniques? Let me know at [email protected].


Delimiters and Batch Files

The example on page 402 of Windows Command-Line Administration Instant Reference produces the correct result. You see the result of passing various bits of information between two batch files. However, as someone wrote to me recently, the output from the Batch2.BAT file isn’t the result you might expect. Instead of showing the entire %PATH% environment variable, you see just the first part of this environment variable as shown here.

BatchFile01

The reason you only see C:\Program as the environment variable output is the fact that %PATH% contains delimiters. There are a number of characters that the command prompt uses as delimiters, separators between elements in a single string. My testing shows that the space, tab, and semi-colon are three characters that always act as delimiters within a batch file. Of course, delimiters are extremely useful when you want to use one string to hold multiple elements for processing, but they can also cause interesting results, such as in this case where only part of the %PATH% environment variable appears in the output.

Of course, you’re probably asking how to obtain the entire environment variable as output. A simple change to Batch1.BAT makes this possible as shown here.

@ECHO OFF
Call Batch2.BAT
Call Batch2.BAT Passed %1 "%PATH%"
ECHO In Batch 1
GOTO :EOF
ECHO Goodbye

Notice that %PATH% now appears within double quotes. This change tells the command processor not to process the information within the %PATH% environment variable as separate entities. With this change you see the following output.

BatchFile02

Now you’re seeing the entire environment variable in the output. It’s important to note this difference in processing strategies when creating batch files of your own. What other batch file quirks have you encountered. Let me know at [email protected].