Chicken Fledging

The chicks are fast becoming pullets. No, they won’t become hens for quite a while yet. People get the idea that chicks become hens immediately, but they go through a pullet stage first. A pullet is a chick that lays smallish eggs and hasn’t moulted for the first time yet. A chick becomes a pullet at between 16 and 24 weeks of age. My chicks are currently 17 weeks old, but they’re of a “heavy” variety, which means that they get larger than most hens do and require more time to grow to size. It will likely be closer to the 24 week end of things before I see the first pullet eggs from them.

However, the first signs that they will soon become pullets are all there. For example, their feathers and wings are now strong enough so they can fly to the top of the run fence and walk along it with relative ease. I saw a couple of them outside the run the other day—calling to their buddies who are still on the inside. Most important of all, they can get back into the run when trouble arrives. It won’t be long and they’ll be walking around outside the run on a regular basis, becoming free range birds. These fledged birds now have the ability to defend themselves a little, run from trouble to some extent, and get into all sorts of trouble.

Another sign that they’re becoming pullets is that their combs and wattles are becoming fuller. They’re also making hen-like sounds now. They still don’t quite talk the talk, but they soon will. The beeping phase that happens between being a chick and being a pullet is coming to an end.

The most important sign is that the pelvis bones are starting to separate. You can check the pelvis bones by holding the chick in your arms with it’s back facing toward you. Calm the bird and give it a good place for its feet so it doesn’t kick. Place your hand on its rear and you’ll feel three prominent bones. These bones will separate when the bird is ready to starting laying eggs.

Pullets like to lay their first eggs in privacy, so expect to see the first eggs late in the day or even when you open the coop first thing in the morning. It’s important to check for eggs more often when your pullets start laying to keep egg eating at bay. Once the pullets begin to lay, I’ll go out every two hours during the day to check the nest box. A pullet can also be quite fussy about her surroundings, so make sure you change the hay in the nest box relatively often. Let me know your thoughts about pullets at [email protected].


Fun is Where You Find It! (Part 2)

One of my more popular previous posts is Fun is Where You Find It! In this post, I suggested that family crafting can provide a source of cheap entertainment. Finding crafting activities that the entire family can enjoy is productive from a number of perspectives, not the least of which is promoting communication between family members. Of course, not every activity has to be craft related. Every year Rebecca and I put together a number of jigsaw puzzles. They’re inexpensive, require a few hours to complete as a minimum, and also promote communication. We discuss all sorts of things while putting our puzzles together.

One of the complaints about jigsaw puzzles is that they’re boring. In order to make the jigsaw puzzle interesting, it has to have a twist. Some have jigsaws with a theme or find a way to make their family pictures into puzzles. A simple Google search for ‘Turn Picture into puzzle‘ reveals a whole host of options, but for us, we liked our twist to come with a theme. The glow in the dark puzzle offered such a twist, but it was probably more complex than the average family would want to do and the subject matter was along the lines of a Gothic image that many people would dislike (it was of several women walking through a medieval forest at night to a party of some sort). Families will also want to avoid the double-sided and 3D puzzles because they can prove difficult to complete. Some of the jigsaw puzzles we’ve done are quite exotic. We put one together that glows in the dark and some are works of art that we’ve displayed for weeks on the dining room table before begrudgingly packing it away. A few have been oddly shaped or had other special features. In a few cases, we’ve even discussed using Mod Podge to preserve our treasure for all time, but have never quite made it to that point. Should we ever decide to do so, we could easily frame our treasure for everyone to see. Given the number of puzzles we do though, it’s unlikely that any particular puzzle will prove so spectacular that we’ll actually go this extra step.

However, a puzzle we just completed could prove interesting to quite a few people, Murder at Bedford Manor. You put the puzzle together, read an associated booklet that contains the basic story, and then look at the completed puzzle for clues as to who committed the murder.

The puzzle took about 22 hours for two people to complete and solving the murder required another 3 hours, for a total of 25 hours of fun for the low cost of $26.00. Where else can you entertain two people for 25 hours at a little over $1.00 an hour? We actually worked on a 1,000 piece version of the puzzle, but the 500 piece version will probably work better with a family that has younger children with shorter attention spans. The point is that you need not spend vast sums to have funa good time can be had for just a few dollars, which is perfect for the self-sufficient family on a budget. What is your favorite jigsaw puzzle? Let me know at [email protected].


Making Brussels Sprouts Palatable

Rebecca and I grow a large assortment of vegetables. There are many reasons to grow a variety of vegetables, but you can distill them down into several important areas:


  • A balanced diet requires diversity because each vegetable has something different to offer.
  • Each grown year comes with different challenges and you can’t be assured that a particular vegetable will grow well in a given year.
  • Local nurseries will offer different choices in a given year, so unless you start absolutely every vegetable in your own greenhouse, you’re reliant on what the greenhouses have to offer.
  • Biodiversity ensures that your garden’s soil won’t be able to concentrate any particular pathogen.
  • Crop rotation is known to help garden soil by keeping any particular element from becoming depleted.

There are likely other reasons for growing a large variety of vegetables, but this list will suffice for the purpose of this post. I eat every vegetable we grow. In fact, I’ve never had a problem eating vegetables, having had insistent parents when I grew up who ensured I developed a taste for everythingeverything thing that is except Brussels sprouts. No matter how hard I tried, I just couldn’t convince myself that the little cabbages were good tasting. As a child, I’d swallow them whole to avoid tasting them at all (since eating them wasn’t an option).

Imagine my surprise then, when I got married and found that the one vegetable that my wife loved best was Brussels sprouts. Given a chance, she probably would have eaten them at every meal, leaving me wondering what to do next. So, I embarked on a quest to make the Brussels sprout more palatable while begging my wife’s indulgence in eating them only occasionally until I found a solution.

A good part of overcoming any vegetable dislike is to find a way to prepare them. Simply boiling Brussels sprouts in water and serving them with a bit of butter preserved the bitter taste all too well. My first discovery was that boiling Brussels sprouts (or any other vegetable for that matter) is simply a bad idea. Simmering tends to reduce the bitterness. I also discovered that lemon juice and garlic salt make the bitterness of many vegetables appear considerably less. So, here is my first Brussels sprouts recipe that made the vegetable at least sort of palatable.


Plain Brussels Sprouts


3 tsp

Garlic Salt

1/2 cup

Lemon Juice

3 tsp

Butter

2 cups

Brussels Sprouts

1/2 cup

Parmesan Cheese


Just
barely cover Brussels sprouts with water. Add lemon juice, garlic salt, and
butter. Simmer Brussels sprouts slowly until tender (don’t boil them). Remove
from heat and dish out into a bowl. Let cool for about 5 minutes. Coat top with
parmesan cheese. Serves 4.

Later I discovered that the method used to grow Brussels sprouts makes a huge difference. Most people pick them during the hot summer months. We found that by letting the Brussels sprouts continue to grow until late fall and only picking them after the second frost, that the Brussels sprouts were not only much larger, but also considerably sweeter. Since that time, we’ve found a few other vegetables that benefit (or at least survive) a light frost, including broccoli. (Most vegetables don’t like frost, so this technique does come with risks.) The combination of the new growing technique and my recipe made Brussels sprouts a somewhat regular visitor to the table, much to the happiness of my wife (who had waited patiently for many years for the day to arrive).

Recently I experimented with a new Brussels sprouts recipe that makes them taste even better. In fact, I’ll go so far as to say, I like them enough to eat them more often now. Here’s the fancier Brussels sprouts recipe.


Fancy Brussels Sprouts


1/2 tsp

Lemon Peel

3/4 tsp

Corriander

2 tsp

Garlic Salt

1/2 cup

Pomegranate Balsamic Vinegar

1/2 cup

Water

2 tsp

Butter

1/4 cup

Parmesan Cheese

2 cups

Brussels Spouts


Mix
the water, lemon peel, coriander, garlic salt, pomegranate balsamic vinegar,
and butter together in a pot. Bring the mixture near a boil, but not a full
boil. Add Brussels sprouts. Reduce heat to a simmer. Simmer Brussels sprouts
until tender. Remove from heat and dish out into a bowl. Let cool for about 5
minutes. Coat top with parmesan cheese. Serves 4.

Now you know my secret methods for dealing with Brussels sprouts. However, there are some important lessons here for the self-sufficient grower. First, make sure you pick your vegetables at the optimal time because timing is everything when it comes to taste. Second, the manner in which you choose to cook a vegetable is important. Taking time to make your vegetables taste good is an essential part of learning to like them. Let me know about your vegetables eating experiences at [email protected].

Mulching Your Garden

Mulching is an extremely important part of maintaining your garden. Even if you don’t have time to mulch everything or have items that don’t mulch well (such as carrots and beets), anything you can mulch should be mulched. Using mulch has the following benefits:

  • Reduces the need to water
  • Keeps weed at bay
  • Reduces the pathogens that can splash up from the ground onto vegetables
  • Adds nutrients to the soil
  • Helps worms stay nearer to the surface where they benefit the garden
  • Lessens the chance of extreme temperatures damaging vegetables

There are many theories on the proper technique for mulching. This post doesn’t compare them because the bottom line is that any sort of mulching is better than none at all. If you find a technique that works for you, by all means, use it. My technique works well for me because I can get the materials at a very low cost.

Our mulching begins by laying down two sheets of non-advertisement newspaper. There are some things you should consider about the newspaper you use. First, make sure the newsprint is printed with soy or a similar non-toxic ink. Second, never use the glossy advertisements. Even if they aren’t printed with toxic chemicals (they often are), the glossy paper tends to repel water and takes a very long time to break down. Third, make sure the paper is large enough to overlap.

Make sure the newspaper does overlap by about an inch or so as you lay it down. Otherwise, the weeds will immediately spring up through any gaps. In the past, we’ve doused the newspaper in water before laying it down, but it works just as well dry as long as it isn’t windy.

Lay hay or dried grass on top of the newspaper. Make sure the grass is absolutely dry–brown is best. If you want to use this second technique, let your grass get a little long, let the newly mown grass dry a day or two, use a rake to move it about, and then let it dry for several more days before you rake it up to use it as mulch. We allow a full 2-inches of grass or hay on top of the newspaper. Here’s what our small garden looks like with mulch in place.

Mulch01

My uncle supplied us with some square bails of hay. They work quite nicely for mulch. The hay had been rained on, which ruined it for animal fodder. You may be able to find a farmer in your area who has some ruined or third cutting hay that you can buy for a pittance. Notice how the hay covers very square inch of the garden.

There is one addition trick you must employ. The mulch absolutely can’t touch the plants. For example, look at this tomato plant:

Mulch02

The newspaper and hay end in a small circle around the base of the plant. If the mulch touches the plant, it will cause the stem to rot and you’ll lose the plant. Rebecca and I didn’t know about this little problem during our first few years and we lost quite a few plants to mildew or rot.

The small spacing we allowed still provides all of the benefits of mulching. Tomatoes are especially prone to black spots. When it rains, the rain hits the soil, picks up pathogens, and splashes these pathogens onto the tomatoes. The mulch keeps the rain from splashing. The tomatoes can still get spotted from other sources, but it’s less likely.

As I mentioned previously, some vegetables don’t lend themselves to mulching very easily. For example, both carrots and beets are planted so closely as to make it impossible to mulch between the plants. You can mulch around the area in which the carrots and beets are growing though. Potatoes are planted further apart, so they mulch just fine. In fact, unless you plan to take time to hill your potatoes, mulching them is essential to prevent the potatoes from turning green (we don’t hill our potatoesit’s much easier to lift the mulch and the end of the season and almost pick them up off the surface).

Some mulching depends on the season. For example, bush green beans mulch fine during a hot and dry summer. They’re prone to mildew during a cool, wet summer. You need to allow a little more distance between the mulch and the bush green beans (or any other bush-style bean for that matter) to allow air flow. Pole green beans and peas don’t require this spacing because the majority of the plant is on a pole or a fence.

There are a lot of interesting ways to mulch a garden. For example, some people use cardboard for the task, while others use bark. The chocolate smell of cocoa hulls is quite enticing (assuming you can afford the high cost). Some materials provide properties that our hay mulching technique doesn’t provide. However, you have to be careful in choosing a material because some materials, such as bark, will actually leach important nutrients out of the soil (using bark can leach all of the nitrogen and also make the soil acidic). We actually do use bark for our blueberries and grapes because they require an acid soil, but we never use bark in the garden. Let me know your thoughts on mulching at [email protected].

Cherry Tree Woes

Cherry trees can be incredibly hard to raise, as I’m learning over the years. We originally planted four Northstar cherry trees on our property. The description of the tree seemed perfectit only grows 6′ to 10′ tall, produces copious amounts of tart cherries, and is quite hardy.

Unfortunately, it also has an open structure that Yellow Bellied Sap Suckers find absolutely irresistible (yes, they really do exist). We ended up with neat rows of little holes in the trunk of each of the cherry trees. Because the birds alternated between the wild cherries in our woods and our cherry trees, our Northstar cherries eventually ended up with a disease called bacterial canker. The sappy ooze emitted by the wounds attracted all sorts of other pests. Eventually, the bacterial canker girdled the trunk and killed our Northstar cherries (well, all except one that simply refuses to die, so we let it stay there, but it has yet to produce cherries and it never has grown more than a few feet tall).

We decided to try again with a cherry that the Yellow Bellied Sap Sucker might find less inviting. This time we chose the Mesabi cherry and planted four more trees. The tight branch structure did keep the birds at bay. In fact, the trees produced 53½ pounds of cherries in 2009. However, late last year we noticed that the leaves were turning yellow in mid-summer and that the fruit yield was very low. This year we won’t receive any fruit from our cherries because they’re essentially dead, as shown here.

Cherries01

There are still some leaves on this tree, but it isn’t nearly as full as it should be and it won’t recover. All four trees have a virus they received from an insect (type unknown). There are a number of indicators. The most noticeable is that the tree has almost no leaves, yet, there isn’t anything obviously wrong such as bacterial canker. The leaves the trees do have are yellowish with darker green around the veins, as if the leaves aren’t receiving enough nourishment.

A more telling symptom is something called flux. The tree is leaking small amounts of sap (not the copious amounts as with bacterial canker). This sap is turning black as bacteria attacks it as shown here.

Cherries02

That blackish spot (circled in red) would be very easy to miss. (Each tree has many of these little black spots.) In fact, I didn’t know what I was looking at. A master gardener friend of mine pointed it out. The ants don’t miss opportunities like this though. The trees are loaded with themall looking for a free meal of sap.

The trees are actually dying from the inside out. There is a wound on one of the trees where you can see the inside of the tree literally rotting as shown here.

Cherries03

Notice how the edge of the wound has lifted upit isn’t curled tight against the wood of the tree. This indicates that the tree is trying to heal itself, but that the new growth has nothing to stick to. The new growth should be tight against the wood.

I’ll be cutting the four trees down sometime soon, drying the wood out, and using it to smoke various meats. It would be a shame to use such nice wood in the wood stove. The trees definitely won’t go to waste.

Unfortunately, I can’t plant new cherry trees in the same spot (or in the location where the other cherry trees were). In both cases, the trees have left their diseases in the ground. If I plant new trees in these locations, they’ll immediately become infected. Consequently, I’ll be looking for a new type of cherry (or cherries) and a completely different location next year. One major lesson I’ve learned is that trees of the prunus genus require significantly more care than either apples or pears.

This spot will be taken over by butternut trees next year.  We don’t have any butternut trees in our woods (they can grow in the wild), so the addition of nut trees will be nice. I know that our woods do contain hickory nuts and plan to gather as many as I can this next fall (as soon as I identify precisely where the trees are located). What are your favorite sorts of nuts and fruits? Let me know at [email protected].


Garden Structures

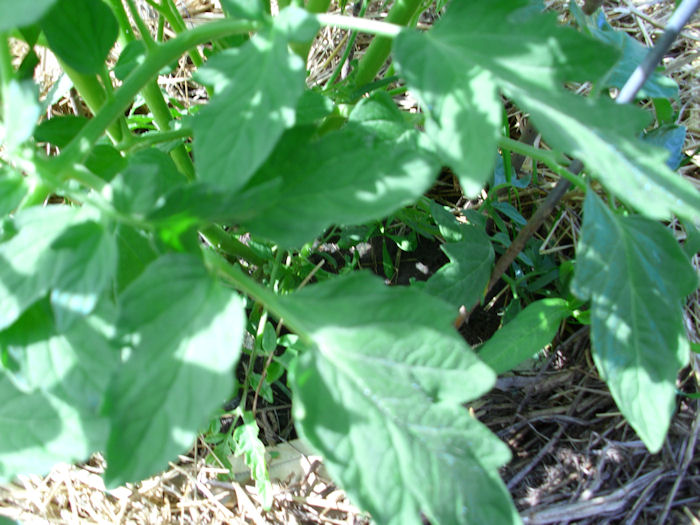
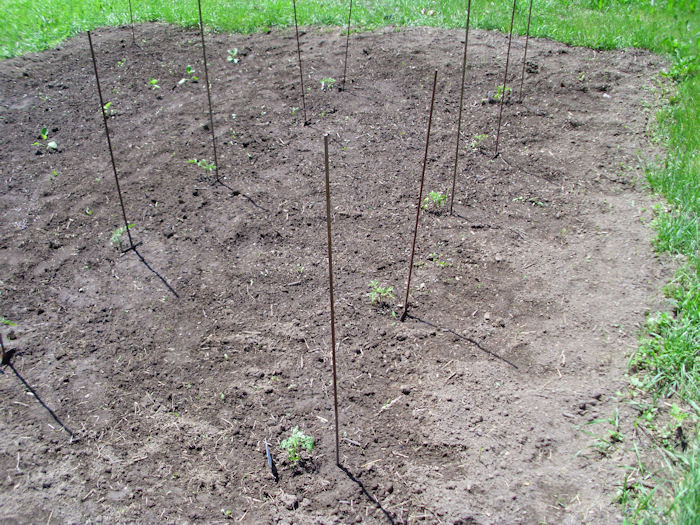
Rebecca and I have managed to get the garden planted for the year. The contents of the garden vary each year to accommodate our personal tastes and also to ensure the larder remains full of good things to eat. One of the big things we wanted to do this year was install a new fence potentially made from aluminum. We are yet to do this but we have learned all about this and more from Illinois Fence Company. So, this year, the small garden (20′ × 20′) contains tomatoes, okra, and eggplants. Our tomato crop is a bit smaller this year at only twelve plants in the main garden (we also have two plants in the salad garden).

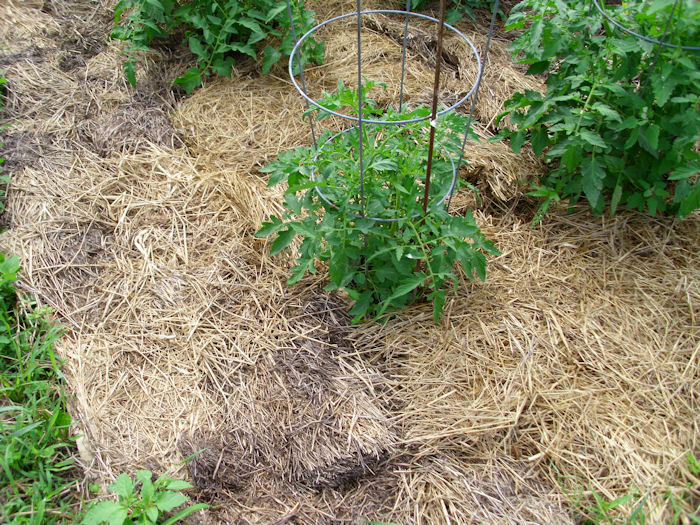
Like many people, we use cages to hold our tomatoes. However, the somewhat strong winds in our area have a habit of knocking the tomato cages over and damaging the vines long before they’re through for the season. To prevent this from happening, I came up with a technique for enhancing the survivability of the cage setup using electric fence posts. Electric fence posts come in a number of formswe prefer the 48″ metal variety that comes with a triangle of metal at the bottom. You push them into the ground with your foot and they hold relatively well for smaller loads. Each tomato cage requires one fence post as shown here:

TomatoStakes01

Place the posts so that they’ll oppose movement by the wind, so that little triangle at the bottom has the best chance of holding when the wind is high. The next step is to get the tomato cages in place. Put the upper ring (or third ring on a four-ring tomato cage) on the outside of the post and the second ring on the inside of the post so that the post is threaded through the tomato cage. Use cable ties to secure both rings to the post as shown here:

TomatoStakes02

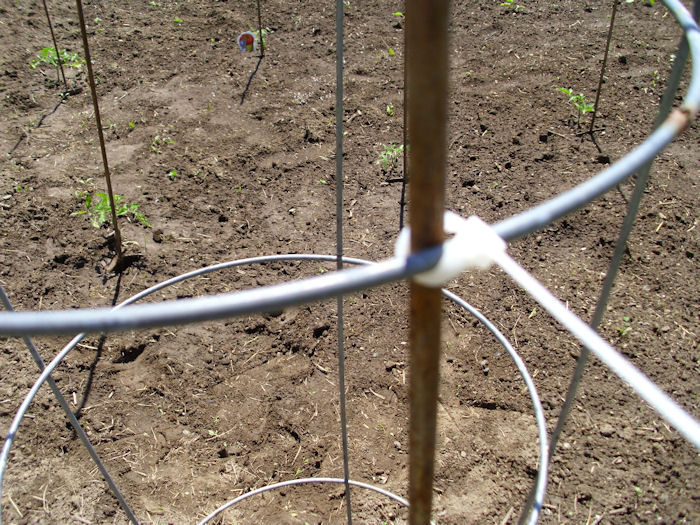
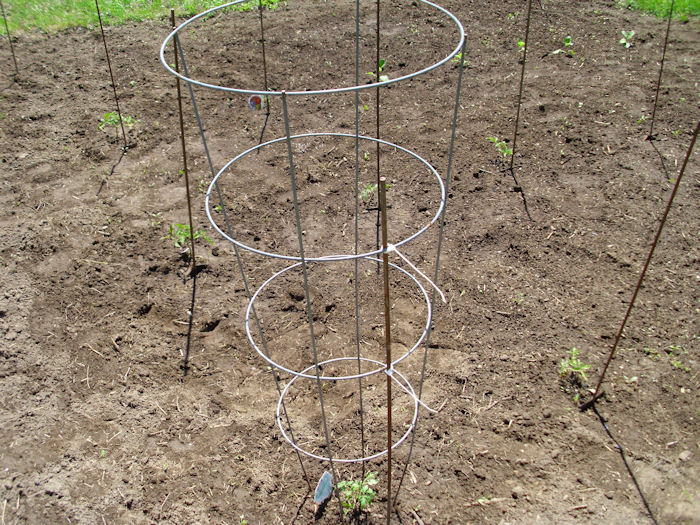
You can clip off the excess cable tie using a side cutter pliers. The combination of tomato cage and electric fence post normally keeps everything in place, even in high winds. The completed setup looks like this:

TomatoStakes03

The main garden (60′ × 80′) contains a wealth of vegetables and fruit this year. Of course, you saw some of the permanent bed items in the Early Spring – The Garden and Orchard post. In addition to those items, the main garden now contains potatoes, summer squash, winter squash, snap peas, standard peas, lima beans, green beans, broccoli, cauliflower, brussels sprouts, carrots, sweet peppers, sweetcorn, asparagus, and comphrey. Later in the season we’ll probably plant beets and perhaps a few other short growth time items.

We get bush varieties of vegetables when we can because they require significantly less setup than the vine varieties. However, peas are one of the vegetables for which there aren’t any suitable bush varieties, so we need to erect a fence for them to grow on. The one mistake I made in getting fencing material is that our fence is only 30″ highthe peas really need something taller (upwards of 5′). However, we just let the vines grow over the top and things work out acceptably.

The fence has to be movable from year-to-year to allow for rotation. In addition, we don’t grow peas every year, so sometimes the little fence is used for something else (such as cucumbers) and sometimes not at all. In order to grow the quantities we need, the fence is 50′ long.

The weight of the produce demands that we use something a little more sturdy that electric fence posts to hold the fence up at the ends, so this project requires T-posts, which are considerably heavier than electric fence posts (and more expensive too). In addition, you need a T-post driver/puller to work with this type of post. If you have good chest strength, you can get by with a much less expensive T-post driver and pull the posts out by wiggling and then pulling them out at the end of the year.

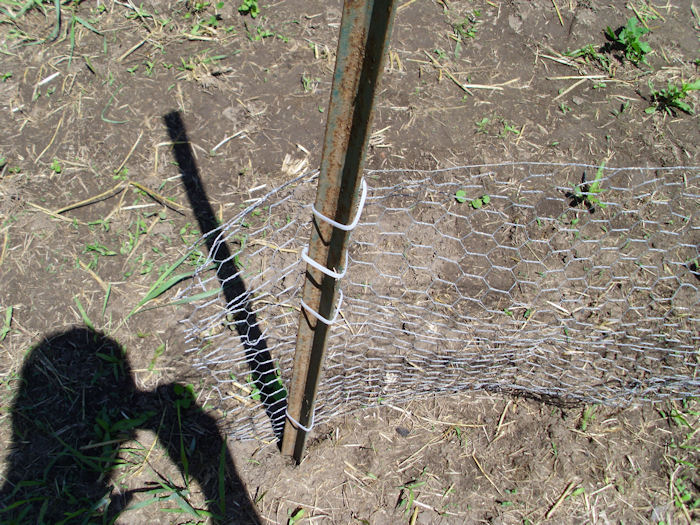
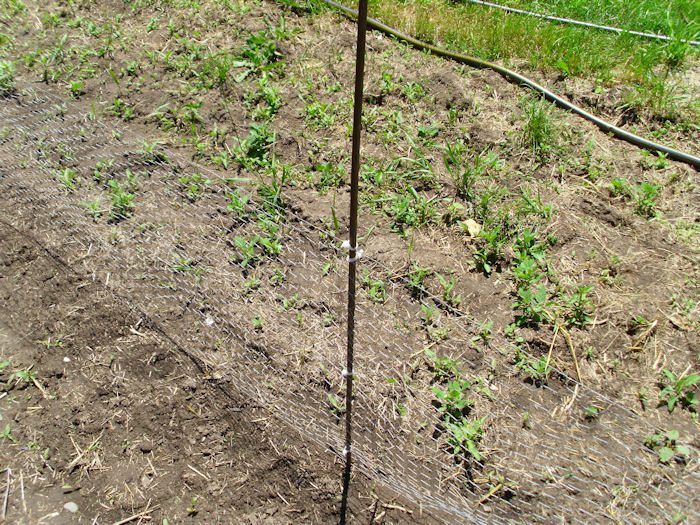
We used chicken wire as fencing material. It’s inexpensive, lasts an incredibly long time if you take it down each year (ours is 12 years old now and no sign of rust at all), and the small openings are perfect for peas and cucumbers to grow on. You begin by driving a T-post into the ground and then attaching one end of the fence to it using cable ties as shown here. There are other materials that also act as a maintenance free solution but we like to use the chicken wire as the veggies can climb it, giving it a dual purpose.

PeaPost01

Make sure you use enough cable ties and that the cable ties are of the heavier variety available in garden stores. Use the fencing to help define the location of the second T-post. Drive the T-post into the ground, pull the fencing as taut as possible (using one or two helpers), and temporarily attach it to the T-post.

At this point, you can add electric fence posts every four or five feet. Begin at one end and work toward the other end. Always pull the fence taut, using a helper to make it possible to attach the fence using cable ties. Use four cable ties minimum and make sure you use a double cable tie at the top (one cable tie slightly lower than the other) to keep the fence from sagging too much as the peas or cucumbers grow as shown here:

PeaPost02

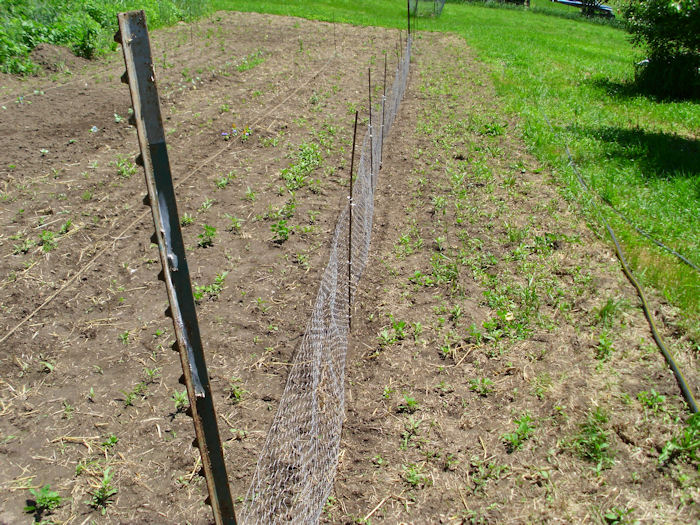
Eventually, you’ll get to the other end of the row. At this point, you can reattach the fencing the T-post, if needed, to remove any slack. Your fencing won’t be completely straight, but it’ll look nice and provide good structure for the peas. Here’s my completed fence:

PeaPost03

Of course, the garden is far from complete. We’re weeding between the rows now and will then add mulch. More on these tasks in another blog post. In the meantime, let me know if you have any questions at [email protected].

Health Benefits of Self-Sufficiency (Part 2)

One of my earliest posts on self-sufficiency touted the health benefits of this form of living. I most definitely stand by that postanything you can do to improve your health is good. In the time since I wrote that post, I’ve gotten critical illness insurance quotes, looked into any illnesses common in my family, improved my diet even more, had more frequent doctor check-ups and lost still more weight – and I now control my diabetes using diet alone. In fact, I no longer take any sort of medication to manage health issues. I’m still not out of the woodsnor is my wife. We both know that we have further to go if we want this lifestyle to produce the desired results. However, it’s nice to see the progress that we’ve made. We’re intending to have the condition of our health regularly checked over by services that can be provided by Southwest Care or a similar health clinic to ensure we are always progressing in the right direction.

Some people are under the wrongful assumption, however, that simply changing diet, losing weight, and living healthier will undo the wrongs of the past. My situation is a case in point. Losing weight has actually caused a health problem in my case and I recently had to have my gallbladder removed to solve the problem. Many sites tell you that rapid weight loss will cause the formation of gallstones, but this isn’t quite true. Every medical professional I’ve talked with has told me outright that any weight loss greater than 50 pounds can result in gallstones. If you’re diabetic, the gallstones are especially troublesome because they can cause problems with the pancreasan organ already overextended by diabetes. Certainly, my 4 pound per month average weight loss isn’t rapid and well within the recommended guidelines. My take on all this is that there is no free lunchif you’ve abused your body you’re going to pay a price for it.

However, in the grand scheme of things, losing a gallbladder is certainly preferable to the problems I’d experience if I remained at my former weight. Diabetics have all kinds of increased health risks, including loss of eyesight, heart troubles, kidney damage, and nerve damage. Getting my weight and diabetes under control was the right thing to do, even if it cost me a gallbladder to do it. You can easily live without a gallbladder, but you can’t live without a heart and life is far less liveable without eyes. In fact, if you’re living a healthy lifestyle, you’re unlikely to even notice that the gallbladder is gone once you get over the surgery.

What bothers me in all this is that the medical profession is lax about telling anyone the potential consequences of a seemingly healthy decision. Perhaps the thought is that any discussion of anything negative will only discourage people so that even fewer will take a positive course of action. Everything you do has a consequence, so it’s best to be informed. I hadn’t gotten very far along my current path when I discovered this potentially negative side effects of weight loss, but I had to conduct my own research to obtain the information. Of course, that’s my recommendation to you as well. You need to go into any health-related decision with eyes open. In my case, I made an informed decision and realized early there were risks.

So, what does this all have to do with self-sufficiency? Getting rid of the medications, learning to eat right, exercising nearly every dayall of these goals are part of being self-sufficient. As part of my self-sufficient lifestyle I’ll maintain more of my muscle mass far later in life (my 78 year old uncle can still lift 100 pound bags of feed), but I’ll pay for that ability with additional joint wear, so I imagine that I’ll need hip and/or knee surgery at some point. A self-sufficient lifestyle isn’t for everyone, perhaps you prefer the gym or simply a walk in the park, but getting healthier is a benefit to everythingmost importantly yourself. I encourage you though to research your decisions and make the best decisions you can, realizing that there are always risks that you’ll have to deal with as part of that decision. How are your healthier living goals progressing? Let me know at [email protected].