Spring Chicks

I’m still getting up to speed after Rebecca’s loss, so I chose not to raise meat chickens this year. However, my egg customers definitely want more eggs. Over time, my coop has lost a few hens and it never was up to full capacity. I currently have six hens in there and they just can’t keep up with demand. As a result, I’ve purchased eight new laying chickens to add to my coup. You can see them here:

Eight chicks will make the coop fuller.
New Layers for the Coop

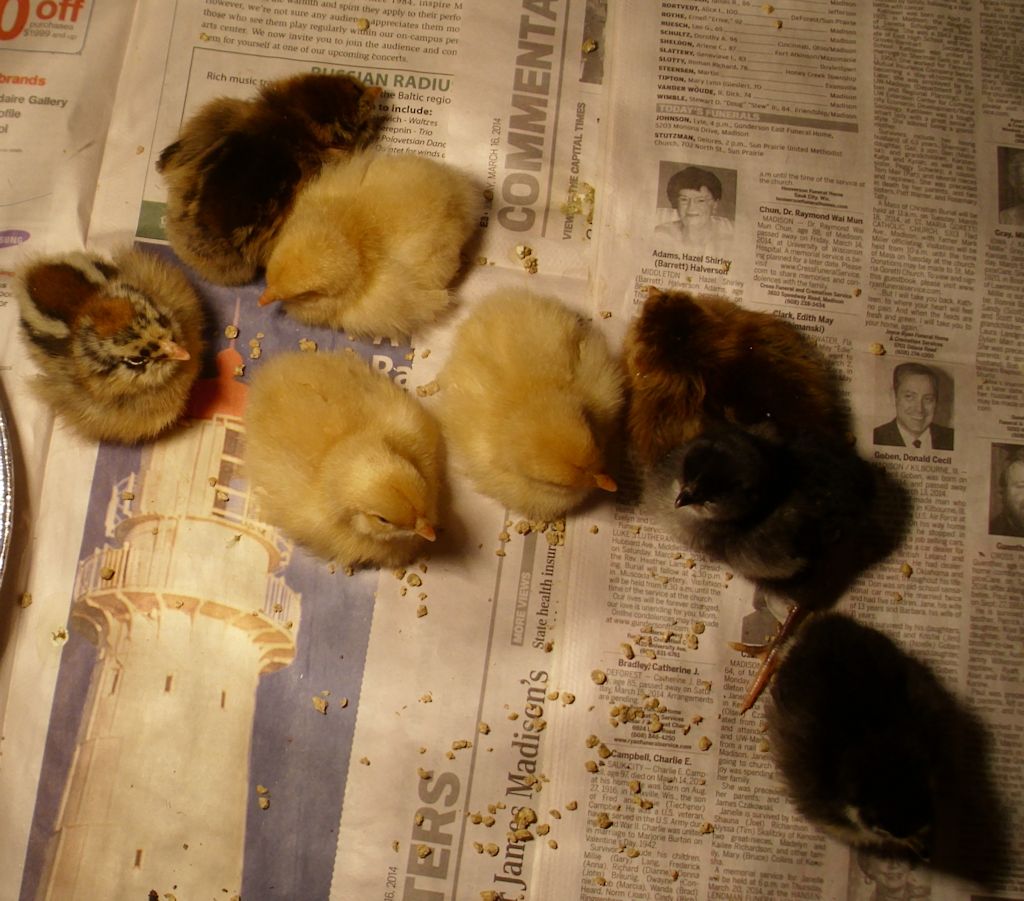
The eight new chicks include three Americaunas (multicolored brown in the picture), three Buff Orpingtons (light brown/yellow), and two Barred Plymouth Rocks (black with gray bellies). I’ve had good success with Americaunas in the past. They lay eggs three or four times per week, the eggs are usually large to jumbo, and I’ve only had one get broody on me once. Of all my chickens, the Americaunas are actually the friendliest and seem to demand the most attention.

The Buff Orpingtons are the most consistent winter layer in my coop. I have had them get broody on a regular basis, but they make up for their vacations from laying by laying more eggs when they do. The size range of the eggs from this chicken goes from medium all the way up to a super jumbo that pegs my egg scale. Although they don’t demand attention, the Buff Orpingtons are quite friendly and get along with the other chickens really well.

The Barred Plymouth Rocks are a new addition. I wasn’t happy with the Delaware hens I purchased. They do lay regularly and the eggs are quite pretty (the only speckled eggs I get). In addition, they seem to be the least likely to have problems during the winter months and they lay almost as often as the Buff Orpingtons do. They also tend to waste less food and eat less as well. However, the eggs tend to be a bit smallish and range toward medium. The Delaware hens also tend to get a bit rowdy with the other hens and the worst part is that they tend to be egg eaters. After talking with a number of other people, I decided to give the Barred Plymouth Rock a try.

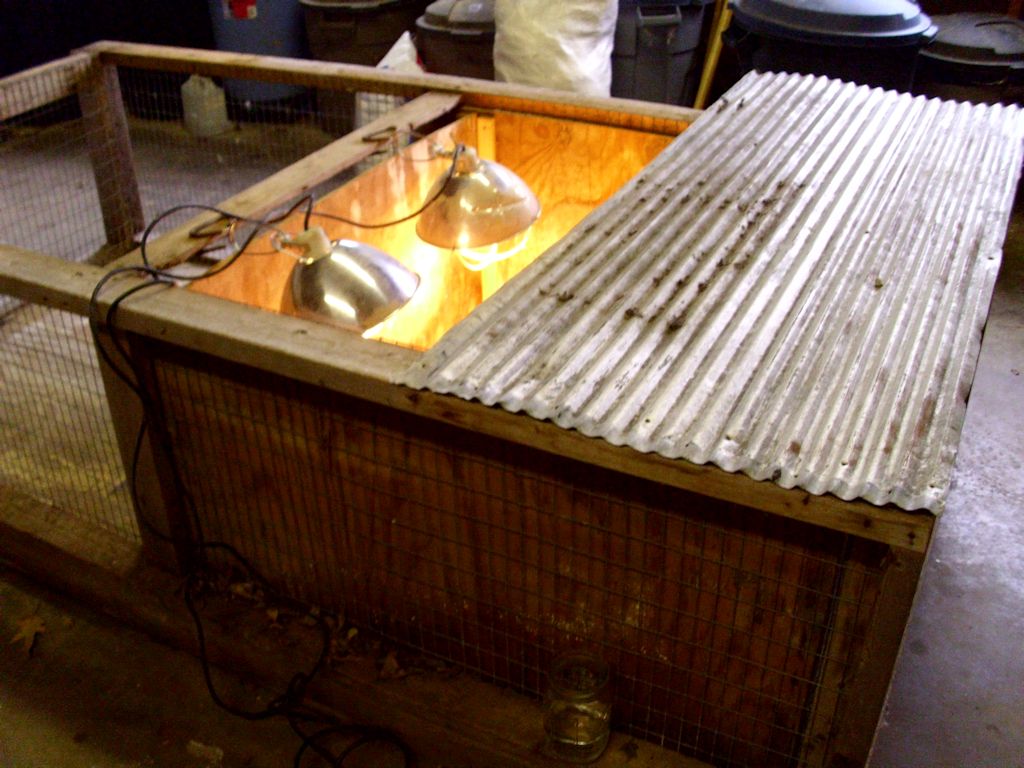
Because I don’t have meat chickens this time, I had to set the brooder box up a little differently. There are only eight little chicks in a great big box so I set both of the heat lamps at one end of the brooder box. I also placed a metal cover over the other end to help keep the heat in better. The new arrangement is working fine—the chicks are staying quite warm and cozy despite the lack of companions (normally 75 of them).

Brooder Box with Heat Lamps and Cover

The big thing I’m watching for now is that the chicks continue to remain active and don’t show any signs of being cold. Of course, that means getting up at night as well. At this point, I’m getting up two or three times during the night hours to check on them and I also check on them regularly during the day hours.

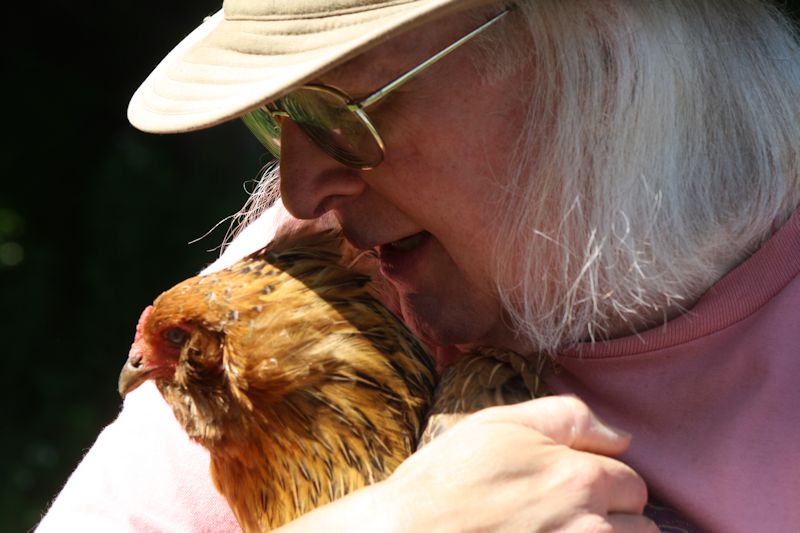
Handling your chicks at this point is a good idea. Don’t hold them for long because you don’t want them to get cold or to have other problems that come with a bit too much attention. You do want to pick each chick up every day so they get used to being handled. Make sure you talk with your chicks as well so they get used to the sound of your voice. Tame chickens are most definitely easier to care for and a real delight as companions when you work in the yard. Let me know your thoughts about laying hen chicks at [email protected].


Fun is Where You Find It (Part 7)

The Fun is Where You Find It series of posts is one of the more popular series I’ve created because they all talk about fun things you can do for little or no cost. Of course, the problem that most people are facing right now is some sort of Seasonal Affective Disorder (SAD) mixed with negative feelings about the weather and a general letdown from the holidays. Fortunately, there are a lot of fixes for these issues—all of which hinge on focusing on anything else.

I use a lot of laugh therapy to get past this time of year. Generally speaking, laugh therapy is all about getting a good laugh in every day. You can get the laugh any way that works for you, but I’ll read something funny, view funny videos, or talk with a friend who knows good jokes (not the lame sort that I usually tell). There are even books about laugh therapy if you have problems figuring out how to get a good laugh on your own.

This past Sunday I decided to approach the problem from another angle. I have a number of items that need to be used up, so I decided to use them for a picnic. No, the picnic isn’t outside in the cold. Instead, I put together potato salad, fruit salad, fried chicken, chips, and drinks. I laid a blanket out on the floor in front of my wood stove (which is standing in for the hot summer sun) and watched a summery movie. The whole thing cost me about $5.00, so were not talking a major entertainment expense for several hours of fun.

Of course, the question is whether my little experiment worked. Overall, I felt pretty happy afterward—it was a lot of fun and I plan to do it again. Doing something completely different, something outside the range of normal winter activities, helped me get past some of the usual problems associated with winter by thinking about summer and picnics instead. A lot of the time, how we approach life and what we think about controls our mood, so thinking about summer and picnics in winter is possibly every bit as good as the laugh therapy I normally use. At least, it gives me another alternative.

What sorts of amazing things are you doing to fight the winter blahs? Do you think you might ever try a winter picnic to chase the blues away? Let me know your thoughts about winter fun at [email protected].


Expressions of Gratitude

As this year ends, I realize just how much has happened and how much I’ve grown as a person. The turmoil actually began when my wife became ill over six years ago, but intensified when she died in April. Since that time I’ve had to answer a lot of questions about my life and how it would change without Rebecca in it. Some answers are coming, some are still unknown, and a few have been satisfied. The most important question I had is whether my friends would be there to support me during this trying time and they’ve been more than up to the challenge. It’s good to have people you can rely upon to help keep the blog posts written, the books and articles in process, and the new fields of endeavor in progress. It would be impossible for me to name everything my friends have done for me and I wouldn’t even try. All I can do is express my extreme gratitude for them and hope they know how much they mean to me.

I’ve talked many times about how self-sufficiency is more about trying to do things on your own in as much as possible, but then realizing that no one can make it completely alone. Self-sufficiency can and does go wrong when people think that it means living like a hermit away from all human contact. Yes, I’m self-sufficient in many ways, but I’m also smart enough to know that I depend on others for help when needed. Getting that help is one thing—ensuring they know how much their help means is quite another. Expressing gratitude, even for the seemingly simple things, is an essential part of the self-sufficiency experience. It’s not possible to go wrong when you’re grateful for the help you receive.

As this year ends, I hope that you’re truly grateful for all of the small ways in which people have helped you this last year and every year to come. More importantly, I hope that you’ll actually take the time to thank your helpers in person, through a phone call, or by sending them a card (or possibly all three). The people you can count on, those few true friends in your life, are more important than anything else here on earth.

With this in mind, I also want to take time in this post to thank all my readers.  Every purchase you’ve made has helped keep me in business so that I can continue helping others. Every question you’ve asked has helped me produce better materials. The gracious contributions of my beta readers have been appreciated most of all. Goodbye to the old year; happy new year one and all!


Self-sufficiency Gone Wrong

I get a lot of reader e-mail and I read absolutely every one of them. I also get a lot of e-mail from friends and family who love to challenge me with interesting bits of information. I love it all! This past week I received an e-mail from one of my correspondents with a link to an article entitled, “The age of loneliness is killing us.” It actually talks about an issue that readers have asked me about in the past-the meaning of the term, self-sufficiency. Some people confuse this term with independence. The problem is that self-sufficiency has nothing to do with either independence or dependence. The terms aren’t actually relevant to each other.

You’ve seen from any number of posts that I practice self-sufficiency in grand style. However, my self-sufficiency ensures there is wood for the fire, food in the larder, clothing to wear, and a roof over my head. It ensures that my animals are all well-fed, happy, and productive. Everyone has work to do in my household, even Sugar Plum (my cat), whose main goal in life appears to be stealing my dog Reese’s bed. Practicing self-sufficiency has improved my health, made me happier, and increased my productivity.

I’m far from lonely especially after I’m visited by my favourite London escort. I counted today and I rely on no less than 40 animals and people to make my self-sufficiency work (the list is likely far larger). Including the animals is necessary because each has an active role to perform in my self-sufficiency. I could list off the jobs each animal and person performs, but I think the point is that I’m incredibly dependent on others to be self-sufficient. In fact, it’s always been that way. There are dependencies that must be maintained in order to create a happy and productive life. To say that I’m dependent on certain people is simply to say that I’m human and have deficiencies that others meet-it doesn’t make me any less of a person to admit this fact. Rather, it demonstrates an understanding of how things work and makes me a better person as a result.

The biggest reason for this particular post is to put into words precisely what I mean by self-sufficiency. I don’t want anyone out there to ever use self-sufficiency as an excuse to be lonely or to feel excluded. Far from it. Most people who are self-sufficient are fully engaged with the animals and people that surround them. In fact, it’s the animals part of the equation that sets us apart. I recently provided a post entitled, “Hugging Your Animals” and a number of people wrote to ask whether I actually do that. Well, yes I do. My animals are a big part of my self-sufficiency and I’m quite dependent on them.

Our society’s ever growing fear of depending on others is a problem. It creates loneliness, decreases productivity, makes us less efficient, and most definitely makes us less happy. Creating relationships does involve risks. Someone really could say they don’t like you or decide they really can’t tolerate how you do something. Rejection, arguments, and upsets of all sorts are the risks we encounter with dependency, but the benefits are ever so much greater. Take time to hug someone today and tell them how much you appreciate them. Let them know you don’t mind being dependent on them and that you hope they’ll depend on you too. Send me your questions about self-sufficiency and being dependent on others to [email protected].


It’s All About Choice

Whether to come or go,
Or to ignore the flow,
It’s all about choice.

Whether to love or hate,
Or to neglect others’ fate,
It’s all about choice.

Whether to produce or loaf,
Or to work as an oaf,
It’s all about choice.

Whether to succeed or fail,
Or to determine to rail,
It’s all about choice.

Whether to think or react,
Or to simply accept fact,
It’s all about choice.

The choices you make,
Affect the path you take,
Through life’s long journey hard.

But you have the voice,
In defining your choice,
And determining which path to regard.

Copyright 2014, John Paul Mueller


Hugging Your Animals

Hugs are the universal communication medium for most animals. It may surprise you to discover that I hug all my animals on a regular basis. The reasons for hugging my animals are many, but from the animal’s perspective, it’s a matter of knowing that I’m OK—that I’m not going to hurt them. To keep an animal tame and workable, you need to respect its need for contact with you. Often, people have problems working with their animals because the needed relationship simply isn’t there. Here’s a picture of me hugging one of my chickens, Daisy.

Daisy is an American chicken that loves to be hugged by John.
Daisy the Americana Chicken
Picture Courtesy of Micah Schlobohm

The chickens are actually quite interesting because they curtsey to attract attention and tell me that they want to be picked up. The curtsey is kind of a half bow where they spread their wings slightly as if lifting out a dress. The point is that the hens really do want (and need their hugs).

The rabbits also need hugs and have a different way of demonstrating the need. One of my rabbits, Twilight, will sit on her hind legs and raise her front legs in greeting when I open the cage in the morning. If I don’t pick her up and pet her, she stomps her back feet when I leave to show that she’s really quite unhappy. It doesn’t have to be a long hug, just as long as I tell her that she’s special in her own way.

My two dogs, Reese and Shelby, want their hugs first thing in the morning, when I let them in from going outside. Each dog has her own way of getting petted. Shelby is quite dignified about the whole thing and sits patiently waiting until I pet her. A little nuzzle often tells me that her patience is running out. Reese is quite crazy and runs about in circles until I invite her over for a hug. Of course, it’s not enough to simply pet her back, she wants her belly petted as well.

Every morning Sugar Plum wakes me up by meowing at me and patting my face. If that doesn’t work, she gets Smucker involved (he stomps all over me). Failing that, the two cats get the dogs stirred up. All that howling, baying, and barking is impossible to ignore. Obviously, Sugar Plum wants to be paid for her efforts, and her hug is a required part of the payment. Smucker usually comes in after breakfast, sits on my shoulder for a while, and then sort of slides down into my lap for his hug.

Of course, the hugs don’t just help the animals. Hugs come with serious health benefits for humans too. I’ve noted that my mood improves after my hugs each day. The results are measurable too. Taking my blood pressure before and after a hug shows that it goes down every time. Lower blood pressure and heart rate will help me stay healthy and all it takes is a simple hug.

Some people might question whether my animals really do require hugs, or whether I’m anthropomorphizing natural behaviors that mean something else. At one time, I might have thought that animals really didn’t need the hugs—that their behaviors really did mean something quite different, but time has taught me that they need love too and a hug is one of the best ways to give it to them. Let me know your thoughts on hugging your animals (or hugs in general) at [email protected].

Appreciating the Value of Microclimates

There is probably something odd about your house and you might not be aware of it. In fact, there was something odd about my house and it took me a while to discover it. Houses create microclimates in the right conditions. Such is the case with my house. The thermometer on the back porch is often warmer in the fall months than the thermometer on the front porch. Given there is no sunlight hitting the back porch, the only explanation I originally came up with was that one thermometer was off. However, moving the thermometers around proved this assumption wrong. The temperature really was higher in the back where the sun didn’t hit. What I was seeing is the effect of a microclimate.

The temperature differential isn’t very large. On a really good day, it can be up to five degrees. It also doesn’t last indefinitely—the differential between front and back temperatures eventually evens out. The microclimate is formed by a combination of the house and the overhanging trees. It’s almost as if there is a kind of blanket over that area so that it stays cool longer in the summer and warm longer in the fall. The rate of temperature change is slower, which creates a condition favorable to certain kinds of growth.

An interesting part of the microclimate is that I just finished picking the last tomato, radish, and green pepper from my container garden on the 23rd. Yes, there had been several frosts before this time, but the microclimate kept the temperature at the back of the house just warm enough to prevent these container vegetables from freezing until this major frost. Everything in the main garden and the areas outside this little microclimate had died out for the winter long ago. So, microclimates can help you continue producing vegetables long after everyone else has stopped picking for the year.

The microclimate is also the reason that I think herbs do so well behind the house. Instead of suffering the extremes they would encounter in other areas of my property, the herbs are treated to a more or less constant temperature that makes them grow well. The constant temperature also reduces stress, so I have fewer pests and it seems to intensify the flavor of the herbs. In short, microclimates can improve whatever you’re growing as well as allow it to grown longer.

A lot of people have microclimates available to them, so they could grow items far into the fall. Good candidates are items that have a longer growing period after pollination (such as green peppers and tomatoes) and items that don’t require pollination (such as radishes). The items also need to be able to grow in a container so that you can move them as needed. To find these microclimates around your house, use thermometers to measure the temperature at a specific height above ground. Make sure every thermometer is at the same height or you won’t get a true reading. You may be surprised at what you find.

The best place to find a microclimate is an area that is sheltered somewhat like the area between my house and the woods. Look for overhanging trees. You could also check south facing areas of the house where the sun can provide a heating effect in the fall months to extend your growing season. Appreciating the value of your microclimates is one way to get more out of your investment in plants. Let me know about your microclimate experiences at [email protected].

How to Butcher a Pumpkin…

When I was growing up, it was my uncles’ job to wield a big knife and peel the raw pumpkin so that my mom could bake pumpkin pie and make filling for canning. Watching one of “the boys” handle the knives while trying to carve away the skin of a raw pumpkin was usually a little scary and sometimes hilarious. It all depended on who was careful and who was just cutting up! When I moved into a home of my own, I had to learn a different way to separate skin from the flesh of a pumpkin because I am married to a man who loves pie, made from scratch, and he likes his pumpkin made that way as well.

Besides, it’s very cheap and easy to do. So here’s how to butcher a pumpkin in seven steps:

  1. Be sure that your pumpkin will fit inside the shallow baking sheet that you are going to be using. It doesn’t matter if both halves fit but you want to have the edges of the pumpkin completely inside the baking pan. Choosing the right sized pumpkin for this process is very important.

    Cut Side down in shallow baking sheet

    Be sure that the edges of the pumpkin are inside the pan.
  2. Cut your pumpkin in half.

    Raw Pumpkin halves
    Raw Pumpkin Halves
  3. Carefully scoop out the seeds with a spoon. If you have kids that want to help, this is a great chance to include them—handling the guts and seeds is really fun (and gross)! The seeds can be washed and baked with seasoning for an added treat.

    Scooping out the seeds
    Scoop out the seeds with a spoon
    Save the seeds for roasting later!
    Save the seeds for roasting later!
  4. Flip the pumpkins cut side down and place them onto a shallow baking sheet with a lip all the way around the pan. I used an Air-bake pan because it is double layered and gives improved stability while loading and unloading the heavy pumpkin from the hot oven.

    Cut Side down in shallow baking sheet
    Place Pumpkins Cut Side Down
  5. Add a small amount of water to the baking sheet. Just enough to cover the surface of the pan about 1/4 inch deep. The water will boil and steam the pumpkin inside while the oven is baking it from the outside.
    Pumpkins in 350 F oven
    Pumpkins in 350 F oven
  6. Bake in a 350F oven until you can pierce the skin of the pumpkin with a fork. If you want the pumpkin to be more puree-like bake it longer. You may need to carefully add water while the pan is in the oven, but bake the pumpkin until it is as soft as you want it to be. The halves may collapse just a little bit as the insides get soft.
    Fork tender is done enough for chunky pumpkin
    Fork Tender is done enough for chunky pumpkin
  7. Finally, let the whole thing cool down. When it is cool enough to handle, peel the skin from the flesh and discard the skin. Then you can use it however you like. My last experiment was a simple blend of fresh apple chunks, some pumpkin chunks and curry powder to taste. No sugar and no recipe. I just mixed up what I had and popped it back into the oven to soften the apples. It was delicious!

This method of processing pumpkin is economical, healthy and easy. There are absolutely no additives or preservatives so the only thing that you will taste is pumpkin. It also works for winter squashes of all kinds.

So, if you decided NOT to carve your pumpkin for Halloween, consider Butchering and Eating It! You’ll be glad you did!

If you have any pumpkin tips or stories, I would love to hear from you! Please respond to this blog or email John at [email protected].

Get Fluffy!

Quilt, Comforter and Afgan

A Quilt, a Comforter and an Afghan meet on the clothesline…

When I was a kid, October was the month for the “Autumn Airing of the Quilts”. My best friend’s mother had a wide range of quilts and comforters, many of which had been passed down for generations. On a sunny Saturday afternoon we would take them all out of their storage chests. Then we would repair any damage. If they smelled musty, we would wash the bedding and let it dry in the fresh air. Anything that was brightly colored was carefully monitored so that it could be taken off the clothesline just as soon as it was dry so it wouldn’t fade in the sunshine. After that was done, all of the beds in the house were made up with winter sheets, clean blankets and these heirloom quilts and comforters.

As a result, comfort came home!

As it is with anything that you want to last, proper storage and care is necessary for bedding. In order to provide proper care, it is important to know what you have. Knitted and crocheted items are called afghans and require a different type of care than quilts and comforters. Comforters, quilts and blankets are made from fabric like a repurposed t shirt, as well as other materials that make the comfort level very high. My personal favorite being a Minky Fleece blanket. I think that they’re relatively popular, so it’s very likely that you have seen this before on beds, or by people who like to use a weighted blanket to help give them that sense of security that they’re struggling to find elsewhere. But simply knowing what fabric these items are made out of will do wonders for you in the long run. It’s also important to know when washing these bedding items. Additionally, whilst they’re being washed, it might be worth finding another set of bedding to put on the bed. My friend’s mother used to get her bedding from Target, so it might be worth looking online to see what bedding they have. There are also coupons available on this page here, so make sure to use those discounts if they apply. Now, let’s get washing our current bedding.


  • When the item is made of fabric there are several ways it could be made:
    • A quilt is made of pieces of fabric sewn together in a pattern with a top, middle and bottom layer sandwiched together and then sewn.
    • A comforter is made by sewing two sheets of fabric together and filling the inside with something fluffy often feathers or down.
    • A blanket is a single layer, traditionally cotton or wool and in modern times, microfibers.
  • Ask yourself: Is the item supposed to be fuzzy,smooth or satiny? Different fabrics require different treatment to keep them in the best condition through the years.
  • Were these given to you from someone as an heirloom or is it simply a hand-me-down? Heirlooms command much more respect and warrant special attention due to the emotional attachment that comes along with it.

Here are some considerations for airing your own comforters, quilts and blankets.

  • Check over the bedding carefully and mend any seams before attempting to clean the items. Remember the quote from Poor Richard’s Almanac “A stitch in time saves nine”? It is certainly true when it comes to mending bedding.
  • Be certain of the material that the item is made from. Wool must be cleaned differently than cotton. Microfiber can be treated differently than sateen. Look for fabric tags. If there are care instructions, follow them carefully for best results.
  • Be careful with bedding if anyone in the home has pollen allergies. While bedding is outside on a line, the pollen and pollutants from the surrounding countryside can settle on it. If there are allergies in your household, you may choose to tumble your bedding in a drier instead of airing it on a line.
  • Do not crowd bedding in the drier. For a large comforter it is worth the time and money to take it to a laundromat to use large capacity machines. If you decide to dry your bedding in a home machine, add small items to create movement in the dryer. Be sure that the items are completely dry before folding or storing to prevent mildew.
  • Filled comforters, with down or manmade materials inside, should always be tumbled dry. For fluffiness, add a couple of tennis balls or similar item (I wash and use my dog toys) in the drier. A comforter is warmer when fluffy, because the down captures and holds warm air inside the layers.

It will soon be blustery and frigid outside. Although it takes time to make sure that your bedding is cleaned, mended and ready for winter, the investment will keep you warm and snuggly all winter long!

If you have any stories about your experiences with quilts or comforters, or pictures to share, I would love to hear from you! Please add a comment to this post or contact John at [email protected].

Prepare Your Plants for Winter

Ready or not! Here it comes! Winter is on its way! If you live in the Midwest, it is time to winterize your house and stock up your pantry. It is also time to bring in any plants that were taken outside for the summer. There was a radio talk show host in the late 90’s who had a rant titled, “Houseplants are HOUSEplants! They are supposed to stay in the house!” But for those of us who have sentimental plants that are precious but large, taking the plant outside is a necessity in the summer. Those with greenhouses, the Winter period also brings with it darkness so it may be worth considering the benefits of a light deprivation greenhouse tarp for year-round growing.

A peace lily in a white plastic pot sitting next to a window.
Peace Lily

If you are in the habit of taking houseplants out for the summer, here are the best ways to assure that you don’t bring problems back into your house along with your plants:

  • Spray the plant for any insects that are common to the plant as a preventive measure. Relocating a plant to the warmth of your home will encourage insect survival.
    • Be sure that any houseplant spray you use will kill insect eggs. If it doesn’t kill the eggs, plan to spray 3 times at two week intervals.
    • Be safe by making sure that the plant you are spraying is listed on the label. Many plants are killed because they were sprayed with a chemical that was not safe for them.

If you want to use less chemical and have more effect, place the houseplant inside a trash bag while it is outside for spraying. Carefully spray the chemical into the bag. Quickly seal the bag with the plant and chemical inside. Leave it alone for 24 hours away from direct sunlight. After 24 hours, open the bag and air out the plant for about an hour. Then bring your treated plant in the house. This system can also be used inside.

    • Be careful to keep all chemicals away from pets or children.
  • Trim away any dead or dying leaves. The plant will continue to try to support any weak leaves. Removing them helps reduce insect and disease possibilities as both attack dying tissue.
  • Give your plant as much light as you can when you first bring it inside. Plants like the moringa tree still need 6+ hours of sunlight a day, even during winter. As the plant adjusts to the new light source, you can slowly move it to its final location. This may mean that you will be moving your plants around inside a couple of times but your plant will be happier in the long run. If your plant has only one location that it will fit inside your home, consider using grow lights to help your plant make the adjustment from summer home to winter home. (You don’t have to do anything fancy, you can actually get grow lights that will fit in a standard light fixture.)
  • Pay attention. With houseplants it is very important to pay attention to them. Insect and disease problems often start slowly but spread quickly and if you are paying attention, the problem leaves can be removed and the problem remedied before it affects the whole plant.

Growing and caring for plants is a very satisfying way to pass the winter. Transitioning your plants from their summer home to their winter location is easy, but takes some finesse. If you really need to have blooms through the winter, search out paperwhite bulbs, zygocactus (also called Christmas Cactus) or amaryllis. For easy greens choose spider plants, peace lily, or Norfolk Island pine. Whether they are Aunt Violet’s African violets or a new and exotic species that you discovered at the local greenhouse, plants are great company and worth the attention.

If you have any thoughts about bringing in plants for the winter or stories about the plants that you have inherited that have been part of your family, please add a comment to this post or contact John at [email protected].