Debugging a CodeBlocks Application with Command Line Arguments

This is an update of a post that originally appeared on November 1, 2011.

Most application environments provide a means of setting command line arguments and CodeBlocks is no exception. The example shown in Listing 6-12 on page 167 of C++ All-In-One for Dummies, 4th Edition requires that you set command line arguments in order to see anything but the barest output from the debugger. This post discusses the requirements for setting command line arguments for debugging purposes.

Let’s begin with the example without any configuration. Every application has one command line argument—the path and application executable name. To see this argument, change the line that currently reads for (int index=1; index < argc; index++) to read for (int index=0; index < argc; index++) instead (setting index=1 causes the program not to show the first argument). So, now when you run the example shown in Listing 6-12 you’ll see the path and executable name as a minimum, as shown here.

The first argument passed to an application is the application executable name and path.
The first argument passed to an application.

If you run this example, you may see a different path, but the command line executable should be the same. The point is that you see at least one argument as output. However, most people will want to test their applications using more than one argument. In order to do this, you must pass command line arguments to the application. Start by changing the code back to its original form where index=1. The following steps tell how to perform add command line arguments.

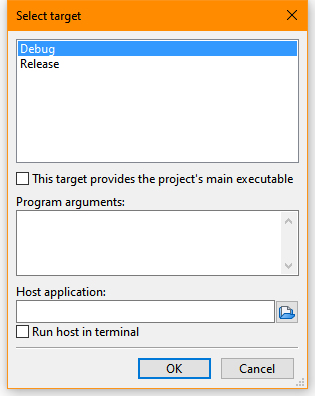
  1. Choose Project | Set Program’s Arguments. You’ll see the Select Target dialog box shown here.
    Change the command line arguments for the debug or release versions.
  2. Select Debug as the target, as shown in the figure.
  3. Type the arguments you want to use, such as Hello World I Love You!, in the Program Arguments field and click OK. The IDE is now set to provide command line arguments to the application when you’re using the specified target, which is Debug in this case.

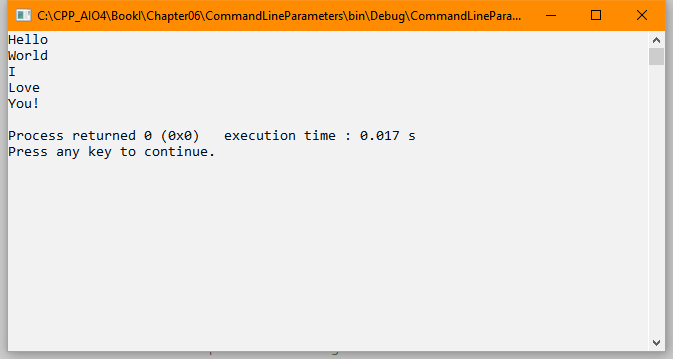
When you run the application after adding the command line argument, you should see them in the output like this:

The output shows addition of the command line arguments.

Testing for command line arguments in a CodeBlocks application consists of telling the IDE what to pass in the Select Target dialog box. Let me know if you have any questions about this process at [email protected].

Pausing the C++ Example Output

This is an update of a post that originally appeared on December 23, 2013.

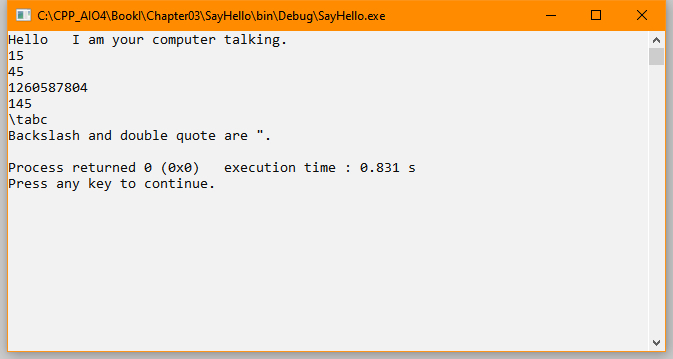
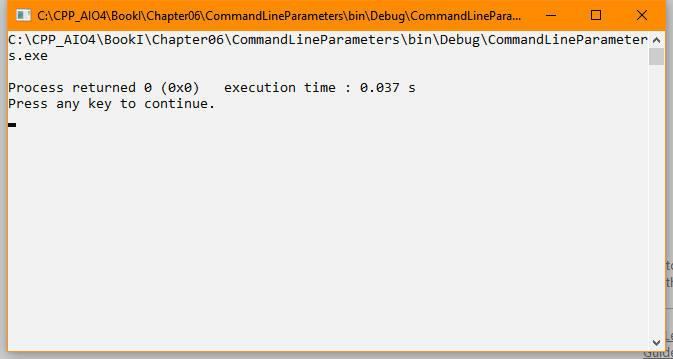
A number of readers have written to ask about running the example code in C++ All-In-One for Dummies, 4th Edition. The book shows that the examples pause so you can see the output, yet a few people experience problems getting the example to pause as shown in the book. Let’s take the first book example. When you run the example, you should see a command window similar to the one shown here open.

The paused output of a Code::Blocks example.

This is how the command window looks in Windows, but if you use some other operating system, you should see something similar. Notice that the output is paused. Pressing any key will cause the window to disappear and the example to end. The purpose of pausing the output is so that you can see the result.

There are two common reasons that people aren’t seeing the output pause. The most common reason is that the example is run in debug mode. Make sure you click Run or choose Build | Run to execute the example. If you click Debug/Continue or choose Debug | Start/Continue instead, the example will execute without pausing and you won’t see the output. Of course, you can always set a breakpoint to get the example to pause, but most people simply want to see the example output which means running the example, rather than debugging the example.

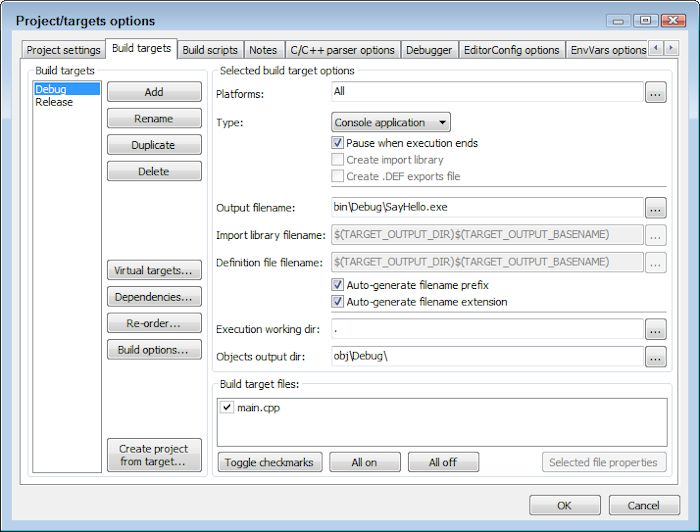
A less common cause is that the project environment is configured incorrectly. Normally the Code::Blocks environment automatically pauses when you run the example. However, it’s possible to set Code::Blocks not to pause. Some readers inadvertently change this setting while exploring the environment. In order to check this setting, choose Project | Properties to display the Project Targets/Options dialog box. Select the Build Targets tab and you see the dialog box shown here.

The Build Targets tab of the Project Properties dialog box contains a Pause When Execution Ends setting.
Changing the default Code::Blocks settings can cause the IDE not to pause the output.

Notice the Pause When Execution Ends option. If this option is cleared, the example won’t pause when you run it. Make sure this option is checked and click OK. The projects that come with the downloadable code all have this setting set up correctly.

Of course, there could always be other reasons why the examples aren’t pausing. Please let me know if you have any problems setting the example output. It’s essential that you be able to see the example output as you follow along in the book to understand how C++ works. Send your queries about this (or any other book-specific) topic to [email protected]. I always want to ensure you have the best possible experience when using my books.

Creating Sensible Error Trapping

This is an update of a post that originally appeared on May 23, 2011.

Errors in software happen. A file is missing on the hard drive or the user presses an unexpected key combination. There are errors of all shapes and sizes; expected and unexpected. The sources of errors are almost limitless. Some developers look at this vastness, become overwhelmed, and handle all errors the same way—by generating an ambiguous exception for absolutely every error that doesn’t help anyone solve anything. This is the worst case scenario that’s all too common in software today. I’ve talked with any number of people who have had to employ extreme effort just to figure the source of the exception out; many people simply give up and hope that someone has already discovered the source of the error.

At one time, error handling functionality in application development languages was so poor that it was possible to give the developer the benefit of a doubt. However, with the development tools that developers have at their disposal today, there is never a reason to provide an ambiguous “one size fits all” exception. For one thing, developers should make a distinction between the expected and the unexpected. Any expected error—a missing file for example—should be handled directly and specifically. If the application absolutely must have the file and can’t recreate it, then it should display a message saying which file is missing, where it is missing from, and possibly how to obtain another copy.

Even more than simply shoving the burden onto the user, however, modern applications have significantly more resources available for handling the error automatically. For example, it’s quite possible to use an Internet connection to access the vendor’s Web site and automatically download a missing application file. Except to tell the user what’s happening when the repair will take a few minutes, the application shouldn’t even bother the user with this particular kind of error—the repair should be automatic.

All of my essential programming books include at least mentions of error handling, debugging, exceptions, and other tasks associated with running code efficiently and smoothly. For example, Part IV of C++ All-In-One for Dummies, 4th Edition is devoted to the topic of debugging. Part V Chapter 3 of this same book talks about exceptions. If you’re a C# developer, C# 10.0 All-in-One for Dummies discusses exception handling in Book I Chapter 9. Book IV Chapter 2 discusses how to use the debugger to find errors. The point is that it’s essential to handle errors in your applications in a manner that makes sense to the users who rely on the application daily and the developers who maintain it.

Note that many of my newer books provide instructions for working with online IDEs, most especially Google Colab. These online IDEs rarely provide built-in debugging functionality, so then you need to resort to other means, such as those expressed in Debugging in Google Colab notebook.

Exceptional conditions do occur. However, even in these situations the developer must avoid the generic exception at all costs. If an application experiences an unexpected error and there isn’t any way to recover from it automatically, the user requires as much information as possible about the error in order to fix it. This means that the application should diagnose the problem as much as possible. Don’t tell the user that the application simply has to end—there is never a good reason to include this sort of message. Instead, tell the user that the application can’t locate a required resource and specify the resource in as much detail as possible. If possible, let the user fix the resource access problem and then retry access before you simply let the application die an ignoble death. Remember this! Any exception that your application displays means that you’ve failed as a developer to locate and repair the errors, so exceptions should be reserved for truly exceptional conditions.

Not everyone agrees with my approach to error trapping, but I have yet to hear a convincing argument to provide unreliable, non-specific error trapping in an application. Poor error trapping always translates into increased user dissatisfaction, increased support costs, and a reduction in profitability. Let me know your thoughts on the issue of creating a sensible error trapping strategy at [email protected].
Creating Useful Comments

This is an update of a post that originally appeared on November 21, 2011.

A major problem with most applications today is that they lack useful comments. It’s impossible for anyone to truly understand how an application works unless the developer provides comments at the time the code is written. In fact, this issue extends to the developer. A month after someone writes an application, it’s possible to forget the important details about it. In fact, for some of us, the interval between writing and forgetting is even shorter. Despite my best efforts and those of many other authors, many online examples lack any comments whatsoever, making them nearly useless to anyone who lacks time to run the application through a debugger to discover how it works.

Good application code comments help developers of all stripes in a number of ways. As a minimum, the comments you provide as part of your application code provides these benefits.

  • Debugging: It’s easier to debug an application that has good comments because the comments help the person performing the debugging understand how the developer envisioned the application working.
  • Updating: Anyone who has tried to update an application that lacks comments knows the pain of trying to figure out the best way to do it. Often, an update introduces new bugs because the person performing the update doesn’t understand how to interact with the original code.
  • Documentation: Modern IDEs often provide a means of automatically generating application documentation based on the developer comments. Good comments significantly reduce the work required to create documentation and sometimes eliminate it altogether.
  • Technique Description: You get a brainstorm in the middle of the night and try it in your code the next day. It works! Comments help you preserve the brainstorm that you won’t get back later no matter how hard you try. The technique you use today could also solve problems in future applications, but the technique may become unavailable unless you document it.
  • Problem Resolution: Code often takes a circuitous route to accomplish a task because the direct path will result in failure. Unless you document your reasons for using a less direct route, an update could cause problems by removing the safeguards you’ve provided.
  • Performance Tuning: Good comments help anyone tuning the application understand where performance changes could end up causing the application to run more slowly or not at all. A lot of performance improvements end up hurting the user, the data, or the application because the person tuning the application didn’t have proper comments for making the adjustments.

The need for good comments means creating a comment that has the substance required for someone to understand and use it. Unfortunately, it’s sometimes hard to determine what a good comment contains in the moment because you already know what the code does and how it does it. Consequently, having a guide as to what to write is helpful. When writing a comment, ask yourself these questions:

  • Who is affected by the code?
  • What is the code supposed to do?
  • When is the code supposed to perform this task?
  • Where does the code obtain resources needed to perform the task?
  • Why did the developer use a particular technique to write the code?
  • How does the code accomplish the task without causing problems with other applications or system resources?

There are many other questions you could ask yourself, but these six questions are a good start. You won’t answer every question for every last piece of code in the application because sometimes a question isn’t pertinent. As you work through your code and gain experience, start writing down questions you find yourself asking. Good answers to aggravating questions produce superior comments. Whenever you pull your hair out trying to figure out someone’s code, especially your own, remember that a comment could have saved you time, frustration, and effort. What is your take on comments? Let me know at [email protected].

Verifying Your Hand Typed Code

This is an update of a post that originally appeared on January 10, 2014.

I maintain statistics for each of my books that are based on reviews and reader e-mails (so those e-mails you send really are important). These statistics help me write better books in the future and also help me determine the sorts of topics I need to address in my blog. It turns out that one of the most commonly asked questions is why a reader’s hand typed code doesn’t work. Some readers simply ask the question without giving me any details at all, which makes the question impossible to answer. In some cases, the reader sends the hand typed code, expecting that I’ll take time to troubleshoot it. However, this isn’t a realistic request because it defeats the very purpose behind typing the code by hand. If I take the time to diagnose the problems in the code you typed, I’ll be the one to learn an interesting lesson, not you. If you learn better by doing—that is, by typing the code by hand and then running it, then you need to be the one to troubleshoot any problems with the resulting code.

My advice to readers is to use the downloadable source code when working through the book text. If you want to type the code by hand after that as part of your learning experience, at least you’ll know that the example works on your system and you’ll also understand how the example works well enough to troubleshoot any errors in your own code. However, you need to be the one to diagnose the errors. If nothing else, perform a character-by-character comparison of your code to the example code that you downloaded from the publisher’s site. Often, a reader will write back after I suggest this approach and mention that they had no idea that a particular special symbol or method of formatting content was important. These are the sorts of lessons that this kind of exercise provide.

Now, it has happened that the downloadable source code doesn’t always work on a particular user’s system. When the error is in the code or something I can determine about the coding environment, you can be certain that I’ll post information about it on my blog. This should be the first place you look for such information. Simply click on the book title in question under the Technical category. You’ll find a list of posts for that book. Always feel free to contact me about a book-specific question. I want to be sure you have a good learning experience.

There are some situations where a reader tries to run application code that won’t work on a particular system. My books provide information on the kind of system you should use, but I can’t always determine exceptions to the rule in advance. When I post system requirements, your system must meet those requirements because the examples are guaranteed to fail on lesser systems. If you encounter a situation where the downloadable code won’t run on your system, but none of the fixes I post for that code work and your system does meet the requirements, then please feel free to contact me. There are times where an example simply won’t run because you can’t use the required software or the system won’t support it for whatever reason.

The point of this post is that you need to work with the downloadable source code whenever possible. The downloadable source code has been tested by a number of people, usually on a range of systems, to ensure it will work on your system too. I understand that typing the code by hand is an important and viable way to learn, but you should reserve this method as the second learning tier—used after you have tried the downloadable source code. Please let me know if you have any questions or concerns at [email protected].

Entering Data in a Code::Blocks Window

Sometimes it isn’t very obvious how to enter data into a Code::Blocks window. One of the windows that seems to be causing problems for a number of readers is the Watches window. You open this window by choosing Debug | Debugging Windows | Watches. The purpose of this window is to let you view the content of variables in your application, which is an essential part of the debugging process. In order to view the variable (or other expression) content, you must enter it in the Watches window. Book III of C++ All-In-One Desk Reference For Dummies tells you all about debugging.

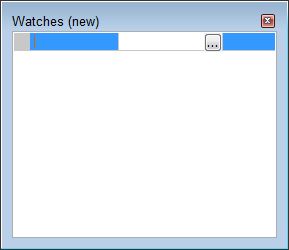
One technique for entering the variable is to select it in the editing window and the drag it to the Watches window. The variable will appear in the Watches window along with its value. However, this approach only works for variables and expressions that actually appear in your code. You might want to enter some other expression (or manually enter the variable, rather than drag and drop it). The Watches window consists of rows and columns as shown here.

WatchEntry01

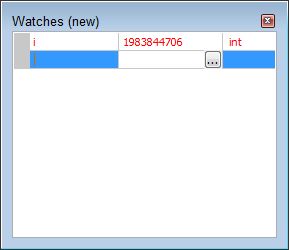
The name of the variable or the expression you want to view appears in the first column. To enter a new value into the Watches window, click directly in the first empty left column cell. The row will turn blue and you’ll see a red insertion point appear in the cell as shown in the screenshot. Now you can type the variable name or expression you want to work with and press Enter. Let’s say your variable is named i. It might look like this:

WatchEntry02

Notice that the row is now white because it isn’t selected. However, you can see the name of the variable, i, it’s value 1983844706, and it’s type int. The row is in red because the value of i has just changed (unchanged values appear in black so you can see them easier). As you debug your application, you can now watch the value of i for changes.

Sometimes it isn’t obvious how to enter information into Code::Blocks (or any other application for that matter). When that happens, the focus turns to the application, rather than the work you need to do, and the experience becomes frustrating. Let me know about your book-related Code::Blocks questions at [email protected] and I’ll do my best to answer them. Because I don’t have a direct connection to the vendor, my ability to answer other sorts of questions is limited.


Methods of Learning

More than a few readers write me about the best way to learn. Many of them are asking about the best way to learn how to become a programmer-a topic I discuss in my Becoming a Programmer post. However, more and more often, readers are asking me about learning in general. The fact is that I can point you to different techniques for learning, but I can’t determine what will work best for you. You’re the only person who can make that determination and you won’t know until you try a number of techniques. In a society ever more devoted to success at all costs, learning requires that you fail in order to make gains. When you fail, you learn what doesn’t work and possibly why it doesn’t work. So, trying various techniques is the only way to discover what works best for you and that process involves some level of failure. This is a philosophy that educational providers like Venture Lessons embody, interactive lessons that you can fail in will teach you so much more than lecturers.

I imagine that my answer frustrates a lot of people because they don’t want to fail at something, so they ask what works best for me. Mind you, what works for me probably won’t work for you. I personally learn best by working through examples written by other people. When it comes to programming, I rely on application examples written by other developers and scrutinize them intensely using the debugger so that I can see precisely how they work. Then I create applications of my own that use those techniques to ensure I actually do understand how things work. Likewise, I use examples from other woodworkers, gardeners, or other professionals as a basis for my own hands on learning experiences. In addition to these hands on techniques, I also read a large number of books and articles every year. Often, all I really need to learn a new technique, is a good explanation of it. I read books and magazines in every area that interests me-everything from application development and computer hardware to new gardening techniques and animal husbandry. In some cases, I also attend lectures and seminars to augment my learning, but given that lectures and seminars tend to be expensive, I focus on my primary means of learning new things whenever possible.

Don’t limit yourself to what I use though. There are many other ways of learning that are just as viable and just as important. The only requirements of learning is comprehension (the ability to understand what you’ve learned) and retention (the ability to remember what you have learned). How you achieve your goal is up to you. Here are a few other methods you might consider trying in addition to those that I commonly use.


  • Instructor Led Training: There is a good reason that children go to school. An instructor (teacher) can answer questions about a particular skill immediately and fully. The interactive communication that occurs helps the student learn faster and with fewer problems.
  • Tutorials: A tutorial is essentially a set of precisely written procedures meant to guide the student along a particular learning path. It’s a combination of reading and doing that helps someone develop a skill quickly.
  • Interactive Media: This is a newer form of the tutorial that relies on sight and sound to convey meaning. Interactive media includes animations and graphics that help a viewer visualize the content better. Hands on exercises included with the interactive media help the student know when a particular training goal is achieved.
  • Observation: The subtle art of observation isn’t mentioned very often anymore-probably because people are too busy or impatient to use it. I know that I’ve learned more than one new task though simply by watching someone else do it. Observing someone means watching and thinking about what they’re doing. You don’t necessarily ask any questions (and may annoy the person you’re observing when you do).
  • Experimentation: Of all of the methods used to learn, this method provides the highest gains when successful, but also incurs the greatest amount of failure. It’s a matter of asking a question, deciding on how best to answer that question, and then creating an environment in which to determine the answer. In order to ensure that the question is answered correctly, you often have to repeat the experiment a number of times in various environments. Experimenters often discover new knowledge or rediscover lost knowledge, but at the cost of failing a lot.
  • Cooperation: A cooperative learning environment is one in which two peers have part of an answer and choose to share their part with someone who has another part of the answer. The exchange benefits both parties because both now have two parts of the answer. Of course, a cooperative learning environment requires trust on the part of both people.
  • Dissection: When I was younger, I couldn’t be bothered to keep anything in one piece. I dissected everything in an attempt to discover how it worked. Often, that meant not putting the item back together because the dissection process is destructive. Even so, you’d be amazed at how many things you can learn by dissecting an object to see how it’s put together.


This list is incredibly short. Over the years I’ve seen people learn an amazing array of knowledge using all sorts of techniques that boggle the mind. In every case, the successful learner has experimented with various techniques until he or she finds the techniques that work best. These techniques won’t work best for someone else, but they work best for you. I encourage you to fail in order to learn. Don’t be afraid of trying something and then discovering it doesn’t work because that’s the only real way to learn anything. Let me know about your favorite learning technique at [email protected].