Robotics in Your Future

I’ve mentioned more than once that I’m intensely interested in accessibility in all its forms. In fact, in my view, one of the most important uses of computer systems is to make life easier for people with special needs. Eventually, we all experience a special need. If nothing else, age tends to rob us of mobility and the use of our senses, making some form of aid imperative.

Of course, most people are aware of robots. I read Asimov books such as, “I, Robot” with great interest as I grew up because like Asimov, I saw the huge potential of robots in a number of ventures. The first venture I became aware of was in industrial automationpainting cars I believe. Painting cars was only the beginning. Today, we couldn’t explore space successfully without robots, and the industry continues to grow, with companies like Google and Uber looking at self-driving cars. Many businesses are turning to industrial automated systems to aid with various parts of their companies, so it doesn’t seem as if they are going to stop anytime soon. If you are interested in learning more about industrial automation, click here.

All of these uses for robots are nice. However, the use that really piques my imagination is the use of robotic technology to help people in ways that we couldn’t even imagine just a few years ago. I’ve read with great interest about the use of exoskeletons for military personnel. Then, when the press started talking about the use of exoskeleton technology for the space program, I got really excited. However, a news story I read yesterday fulfills a promise for exoskeleton technology that I’ve always wanted to read about. In this case, a paralyzed student has been able to walk again. Amazing!

The technology still requires a lot of work, but I foresee a time when exoskeletons will make it possible for someone with just about any severe injury to lead a completely normal life. You won’t see someone who is struggling just to get by anymore; you’ll see someone who looks like absolutely everyone else. I can’t imagine a better use of technology to meet the needs of people who require it.

As with any technology, there are going to be abuses of this one. It’s unfortunate, but someone will find ways to use this technology in ways that actually hurt other humans or the person employing the technology. What good uses for this technology can you think about? What are the potential bad uses that come to mind? Let me know at [email protected].

Planting Asparagus – Part 1

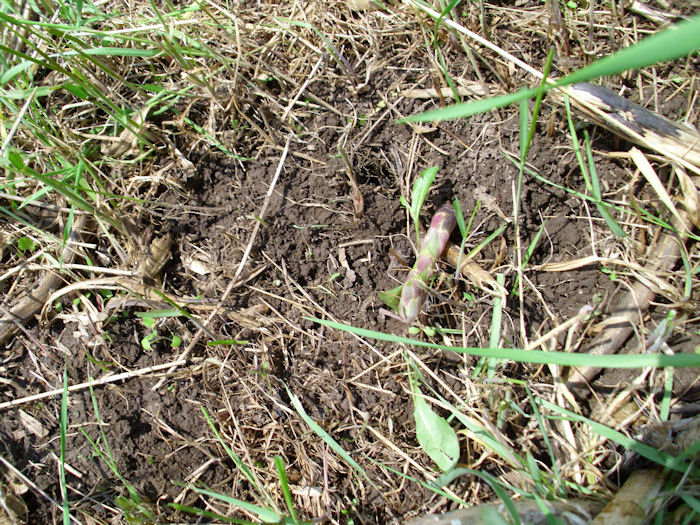
The asparagus is up in our garden now. You have to look carefully because it’s easy to miss the little spears when they first appear on the scene. Our bed seems to be a bit behind the others in the neighborhoodat least one of our neighbors reported seeing the asparagus poke up a week before we saw ours. Even so, this is usually the time of year that you begin to see the asparagus. Here is what the young asparagus typically looks like.

Asparagus01

You can see the asparagus spear about in the center of the picture. Over the last several years we’ve decided that we really need to plant more asparagus. Having just one row in the permanent bed isn’t sufficient to meet our needs. Yes, we have more than sufficient for meals in the spring, but there is nothing left to freeze for later useeven if the later use is sometime during the summer months.  So this spring we decided to plant some more asparagus.

You can plant asparagus seed, but we’ve never had very good luck with it. What we’ll get instead are two year old roots when we can or year old roots when we can’t. The roots come in a bundle of about twelve. The roots are attached to a crown. Make sure you pick a sunny spot for your asparagusit loves the sunlight. Here are three asparagus roots attached to a crown.

Asparagus02

In addition to the bunch of roots, you need a good spade. Most experts recommend planting asparagus in a mix of soil and compost. Because our soil is heavy with clay, we used pure compost from our compost heap. The best advice I can provide is to have your soil checked by your local testing facility (making sure to tell them precisely what you intend to plant) and then ask advice on how to proceed with your specific soil.

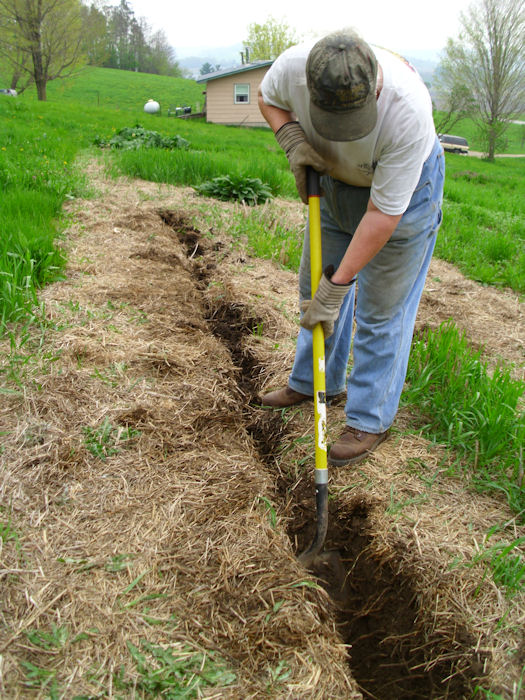
The procedure for planting roots of any age is the same. You begin by measuring out a trench that will allow two-feet for each root in your bunch. If you have a standard bunch, that means digging a trench 24-feet long. The trench is 16-inches deep and about 6-inches wide (the width of your spade is fine) as shown here.

Asparagus03

The mulch is important. We use hay mulch to help control weeds, keep the ground moist, and reduce the amount of erosion/filling that occurs when it rains. This is actually last year’s mulchwe’ll do some clean up and add new mulch for this year. Fill the bottom two-inches of the trench with loose compost and/or soil. Don’t pack it downkeep things loose. Splay the roots in the trench two-feet apart. Make sure the crown is pointing up as shown here.

Asparagus04

Carefully add eight more inches of compost and/or soil over the top of the roots. Of course, this leaves six-inches of that trench uncovered. What you’ll do is wait for the asparagus to come up. As the new asparagus grows, you’ll fill in the trench a little at a time until the trench is full. This step takes until mid-summer in most cases, but could take more time.

I’ll visit this topic again as the summer progresses. In the meantime, let me know if you have any questions at [email protected].

Wine Making – Day 10

At this point, your wine has been perking away for ten days. The number of bubbles you see is decreasing quite a bit. If you’re still seeing one bubble come from the air lock every ten to fifteen seconds, the wine is doing great. However, if the wine stopped bubbling before you reach this point, the batch is stuck and you need to follow the procedure in my Wine Making – Unsticking a Batch to fix it. Allow some extra time for the wine to ferment properly.

Normally, this is the time when you start your secondary fermentation. In order to do that, you rack the wine, which means using some type of tubing to siphon the wine out of the fermentation container into another sterilized container. Sterilize this second container completely using a one-step sterilizer designed for wine making. Never use a container that isn’t absolutely clean to store your wine.

You can use a second fermentation container, or do what I doempty the contents into a sterilized pan, sterilize the original container, and then use a funnel to pour the wine back into the container. The purpose of this activity is to get rid of the sediment that has accumulated at the bottom of the fermentation container and to stir the wine up so that the yeast can get to the remaining sugar.

You have several options when it comes to siphons. Some people use a racking cane (tube) to perform the taskothers use a siphon kit. I have a semi-rigid piece of tubing that came with my kit and it looks like this.

WineDay10_1

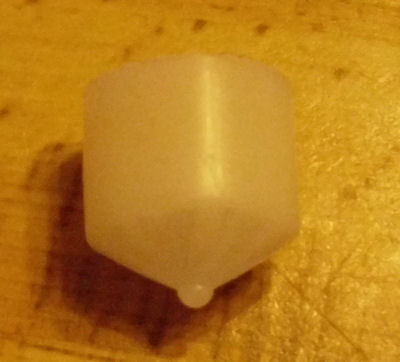
Notice the tip on the right side. This is a racking tip and it keeps the end of the cane out of the sediment. The flow is redirected upward so that you get as little as the sediment as possible from the fermentation container, yet maximize the amount of clear wine you get. Here is how the tip looks close up.

WineDay10_2
WineDay10_3

The end of the tip is angled so that you can move it right into the bottom of the container. Notice how the end of the tip grabs the tube, yet leaves space for the wine to flow through.

Never taste the wine at this point. It contains live yeast and you’ll get a bellyache for your efforts!

In short, Day 10 is basically a time to start clearing the wine and ensure you get the maximum value for your efforts. It may seem like a simple step, but it’s critical to the success of the wine. So, are there any questions about day ten? Let me know at [email protected].

Telnet Not Included

Every book I’ve written has required some hard decisions. Believe me, I think about every omission and addition at length, and then I think about them again. In many cases, I’ll ask my editors, especially my technical editor about it. In some cases, the beta readers for my book will get an e-mail about the topic as well. I made these sorts of decisions when writing Windows Command-Line Administration Instant Reference as well. So it was, after trying to wring everything I could out of every page in the book, I was faced with the unpleasant decision of having to leave Telnet out. It wasn’t an easy decision because I had included it in past tomes about the command line, such as “Administering Windows Server 2008 Server Core,” (see page 440 of that book) which also contains a wealth of other commands.

Readers have asked about the Telnet omission. I’ve been surprised to find that quite a number of people still use this utility and would have liked a more comprehensive discussion of it in my current book. There were a number of reasons for the omission. The most important at the time is that Telnet isn’t enabled by default anymore on Windows. You must install it as a separate item. In fact, you must also install the client on newer systems as shown here for Windows 7.

TelnetInstallation

So, why is everyone apparently making it difficult to use Telnet? Well, it turns out that Telnet has been implicated in more than a few security problems. Telnet was designed for a time when you could trust a connection. It doesn’t provide modern security features, such as encryption for the username and passwordit passes this information in the clear so anyone can grab it. In fact, a simple check on Microsoft’s Knowledge Base shows 1,430 hits for Telnet Security Issues (as of this writing). There are many non-Microsoft sites, such as this James Stephens blog entry, that detail the problems with Telnet as well. With pages at a premium, I decided the security issues surrounding Telnet were a good reason not to include it.

I’ve written a number of command line reference books. Each with a different audience in mind. In Windows Command-Line Administration Instant Reference I chose to provide support for administrators who need quick reference to actual commands, rather than simply a command reference. In addition, the page count of this book is smaller and the book itself is a smaller size to make it easy to carry around. The addition of examples and the reduction in size meant that I had to choose which commands to cover quite carefully. As described in another recent post, Techniques for Choosing a Technical Book, it’s important that the reader choose the book that meets their needs. In some cases, readers will be better served by the more complete list of commands provided by Administering Windows Server 2008 Server Core, which is an actual reference book.

Of course, I’m always looking for ways to improve my books to make the next edition better suited to meet your needs. If I receive enough e-mail about Telnet, I may very well included it in the next edition of Windows Command-Line Administration Instant Reference. So please keep those e-mails coming! If you’d really like to see Telnet included in my next book, contact me about it at [email protected].

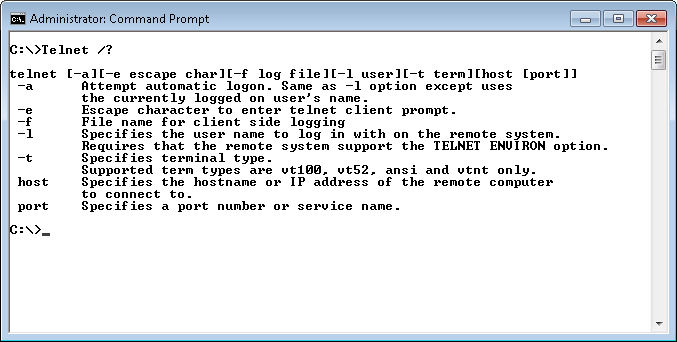
So, here’s the short story about Telnet. As with most command line utilities, you can obtain general help by typing Telnet /? and pressing Enter. You’ll see the help screen shown here:

TelnetHelp

Notice that I’m using an Administrator command prompt. You absolutely have to elevate privileges to use Telnet successfully in Windows 7. In addition, you’ll need to open a hole in your firewall for port 23 (unless the Telnet server you want to contact is at a different porta minimal, but helpful security precaution).

In order to connect to a server, you type Telnet <ServerName>, where ServerName is the name of the server you want to contact. For example, if you want to contact a server named WinServer, you type Telnet WinServer and press Enter. Once you enter Telnet, type ? and press Enter to get help for that session.

It’s important to note that Microsoft provides some Telnet-related commands that you should know about if you really need to use Telnet for administration tasks. For example, the Telnet Server is TlntSvr.exe and you can use the TlntAdmn utility to perform administration tasks. Let me know if you’d like some additional posts on this topic and I’ll be all too happy to pursue it further.


Wine Making – Unsticking a Batch

In my post, Wine Making – Day 1, I discuss how to start a batch of wine. If you followed that post, your wine has been perking away for several days now. In fact, tomorrow you’ll start to think about doing the Day 10 processing. Of course, this all assumes that everything has gone as planned. In most cases, it does, but there are situations where the wine can simply stop fermenting. The little plug inside the air lock may even float to the bottom. Even if it hasn’t, when the bubbles stop appearing every minute or two (the fermentation process slows as the yeast turns the sugar into alcohol) you know something is wrongyou have a stuck batch.

Don’t fret! Your efforts haven’t been wasted. I’ve never run into a situation where I wasn’t able to get the wine restarted with a little patience.

Start by placing your ear next to the container. If you can still hear some bubbles, you’re actually in great shape. In fact, spend a little more time looking for bubbles because the fermentation does slow considerably by day 10. If you don’t hear anything, you might have to work just a bit harder to get the batch restarted. In most cases, you’re just fine as long as you can still smell the yeast when you open air lock.

The first step is to ensure your wine containers are in a room where it’s warm enough to ferment. The lowest room temperature that has ever succeeded for me is 50 degrees Fahrenheit. You normally want the room temperature in the 70 degree range. Having the temperature too high is also unproductive. If you live in a warm climate and the air temperature is 95 degrees or higher, you’ll likely find that the yeast has a hard time continuing to work. Theoretically, the yeast will live just fine all the way up to 110 degrees in most cases, but most of us (yeast included) have a comfort zone.

The next step is to add a cup of sugar to the batch using the funnel. Add the sugar slowly. If you add it all at once and the yeast is still active, there is a tendency for the wine to bubble violently and create a mess by spilling out of the top of the container. After you add the sugar, use the handle of a slotted spoon to stir the sugar in (being careful to disturb the sediment at the bottom of the container as little as possible). Here’s what my slotted spoon looks like:

SlottedSpoon

The spoon is almost flat and it has a skinny handle. This spoon is perfect for working with the fermentation container opening. (I was lucky to find this sort of spoon in plastic, normally you see them as wooden spoons.)

Look at the batch and listen to it again.  If you see tiny bubbles and hear them when you listen to the container, you know that the batch has restarted. Close the airlock and let the wine continue to ferment.

However, you might find that the wine still hasn’t restarted. In this case, add 1 teaspoon of yeast nutrient to the batch and stir it in using the handle of the spoon. Listen again to see if you’ve been successful. In many cases, you’ll have to wait about five minutes to see any effectbe patient!

If the wine doesn’t restart after you add the nutrient, try adding some more wine yeast (I generally use Montrachet). The old yeast might still be alive, but there may not be enough left to restart the batch. Sprinkle the full amount required for the size batch you’re trying to create. Remember that one packet of yeast is normally good for around 5 gallons of wine. This time, put the airlock back in place and wait for fifteen minutes.

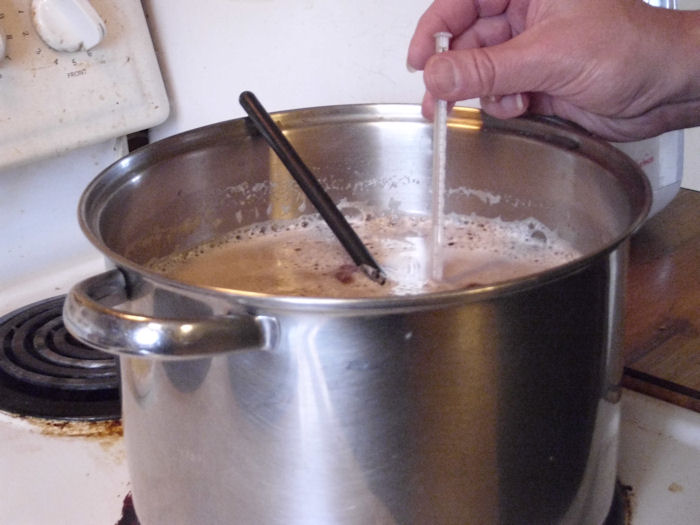
I’ve never had wine fail to restart by this point. If you supply sugar, nutrient, and yeast at the right temperature, then the wine should ferment just fine. However, the temperature can be a tricky part of the process. Take the wine’s temperature using your dairy thermometer. If the temperature is too low, place the container in a warmer location. Generally, it’s a bad idea to pour the contents out of the container and try to reheat it in another container on the stove. If you do have problems getting your wine restarted, we may be able to work out a solution. Let me know at [email protected].


Dealing with Digital Addiction

It may sound odd coming from a guy who has written 87 computer books and over 300 articles, but I think the world has a severe technology addiction that’s going to cause us significant woe at some point (assuming it hasn’t already). Obesity, people who think cable television is a basic necessity, the need to have a cell phone constantly attached to one’s ear, and all of the other negatives commonly associated with a digital addiction today are only the beginningthings will get worse. Don’t get me wrong, technology definitely has positive aspects and it has a role to fulfill in the modern world, but I think we’ve gone way too far (and I’m sure we’ll go further).

One of the best ways in which technology can help is to level the playing field for those with special needs. In fact, anyone who knows me knows that I have a very special place in my heart for those who have special needs and can be helped by technology used in a positive way. However, it’s often the technology developed for people with special needs that seems to hurt us the worst (think of the television remoteit mainly started as an accessibility aid).

I read a PC Magazine commentary by Lance Ulanoff this morning about digital addiction and a book that will help you with it. Most people don’t need a bookthey need a reason and a plan. You can’t combat anything that you’re not convinced you need to combat. Some people are incredibly happy being addicted to technologyI feel sad for them because they’re missing out. If you make your entire world revolve around technology, you’re likely missing out on real friends and relationships with family. You’re also missing out on a vast range of experiences that have nothing to do with technology. However, unless you see that you’re missing out on these things, nothing that I or anyone else says will convince you of anything. So, you need a reason to deal with a digital addition.

If you finally do come up with a good reason, you need a plan. When I gave up smoking years ago, I had to find a way to fill the vacuum. I immeditately went to a vape shop an bought a 18650 battery for my e-cigarette. I knew that smoking was very bad for my health and using an e-cig seemed like a much better option for me. It made quitting smoking much easier, I have to say. The same is true for people who drink in excess. Some choose to go to luxury alcohol rehab to help resolve it. This is a great way to overcome any addiction, but especially things like smoking, drugs and alcohol. Of course, if things are severe and you have a particularly strong addiction to alcohol or drugs, you may need to contact the team at Enterhealth for professional help. But on a smaller scale, replacing what you crave with something much healthier is a great way of going about it. My way of dealing with the addiction is probably uniqueI bought some running clothes and a new pair of shoes. Every time I wanted a cigarette, I went for a run instead. For about a month, I actually ended up sleeping on the couch in my running clothes because it was easier than having to get dressed to address an urge in the middle of the night. After about six months I found I had lost 20 pounds and that I felt extremely good. So, something positive came out of getting rid of those cigarettes.

My own technology addiction came sometime after I left the Navy. It seemed as if my wife couldn’t pry me out of my office under any circumstance and that I couldn’t enjoy any activity that didn’t somehow involve my computer. I was constantly worried about missing somethingthat some event would happen and I wouldn’t be available to deal with it. (If this sounds at all familiar, you likely have a digital addiction too.) I’m not quite sure when it snuck up on me, but it did. As with my cigarette addiction, once I realized I had a problem (my weight skyrocketed and I felt terrible), I came up with a plan to deal with it. I started including daily walks in my regimen, spent time with my wife playing board games, going to shows instead of watching television, went on picnics, started working with wood, and took time to enjoy events at the park. My mother-in-law helped by getting us an annual pass to the zoo. All of these things are part of the plan that fills the void so technology doesn’t rule my life.

The battle to contribute in a positive way to the world and yet not let technology rule my life is ongoing. You’ve seen my posts on self-sufficiencythat’s part of the plan. I don’t carry a cell phone, don’t worry about the messages in my inbox or on my answering machine, and think about things other than writing. Twice a year I shut everything offthe computer doesn’t exist for that time intervalmy wife and I get reacquainted. As a result, I’m happier and healthier than I have been in many years. If you find that you can’t leave the technology at home, unplug, and not feel any remorse about doing it, then you have a digital addiction and I encourage you to find both a reason and a plan for dealing with it. Let me know your thoughts about digital addiction at [email protected].

Wine Making – Day 1

This post is the start of a series showing my particular technique for making wine. There are probably more ways of making wine than you can imaginecertainly more than I’ve seen. The technique I use produces highly repeatable results in small quantities (suitable for the home enthusiast) in 31 days. I don’t use a two-stage fermentation technique, nor do I rely on whole fruits/vegetables as a source of juice. This technique relies on pure juice and is extremely simple, but it does produce some nice tasting wine. If you are not partial to the whole wine making process, you might want to check out some GraysOnline wine online so you can cut out the middleman, but wouldn’t it be fun to make it, order some anyway and compare them? Another plus… you get more wine!

Many foods are preserved using fermentation. For example, we also make sauerkraut, a kind of fermented food. Wine is probably one of the earliest forms for food preservation through fermentation. In this case, yeast (species Saccharomyces cerevisiae) consumes sugar found in juice to produce carbon dioxide and alcohol. It’s the alcohol that preserves the juice.

This form of preservation was probably found by accident in early history. It turns out that the yeast required to produce wine occurs naturally on some fruit such as grapes. When you see that light dusty coating on grapes growing on the vine, part of that dust is the yeast. If you wanted, you could simply crush the grapes and let nature take its course, which is how some people still make wine. Certainly, there is nothing wrong with this approach. However, naturally occurring yeasts don’t always produce the best results and sometimes you can end up with vinegar when the alcohol is oxidized by acetic acid bacteria, AAB, instead of being stabilized to produce wine.

In order to produce wine, and not vinegar, the modern technique is to kill the microbes by adding a campden tablet to the juice. Later this year, I’ll show some techniques for producing and preserving juice for wine making. For now, just assume that you have the amount of prepared juice required for the wine you want to make.

The first day of wine making is the most time consuming, so you can’t become a reverse wine snob super quickly. It can be worth picking up something else to drink in the interim period. I normally set aside three hours to perform the steps required to start two, one gallon, batches of wine that will eventually produce eight bottles. In most cases, I’ll create wine from two different juicesno need to be boring when you’re doing something creative .

To start the process, you gather all of your equipment and sterilize it using a one-step sterilizer designed for wine making. You need these basic pieces of equipment to make wine:

  • Mixing container capable of holding the amount of wine you want to make (one gallon in my case)
  • Four-cup measuring cup
  • Measuring spoons
  • Funnel (for pouring the wine mixture into the fermentation container)
  • Fermentation container
  • Air lock and adapter (you’ll see a picture of it later)
  • Dairy thermometer


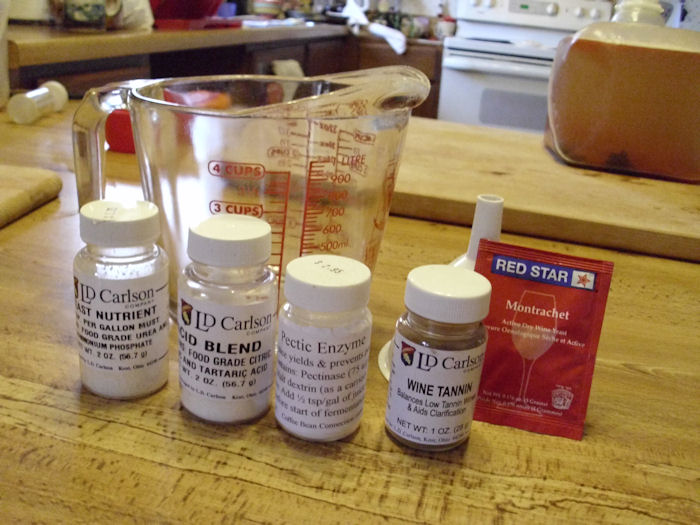
You want to gather all of the ingredients as well. The ingredients you use depend on the kind of wine you’re making, but generally you’ll need sugar (food for the yeast), yeast nutrient (helps the yeast to start growing), pectic enzyme (helps produce clear wine that lacks a pectic haze), and acid blend (improves the pH balance of the juice and the eventual taste of the wine). Some wines also require yeast energizer (works like yeast nutrient for some types of fruit) and tannin (helps the wine keep longer, promotes clearing, and improves taste).

Of course, the most important wine making ingredient is the yeast. I generally use a Montrachet wine yeast. It performs well in a wide temperature range, produces a somewhat drier wine (one that has less remaining sugar with a higher alcohol content), and tends not to stop working until the fermentation process is complete (a condition known as getting stuck). The yeast you choose makes a great deal of difference in the quality and taste of your wine. Never use bread yeast for wineit tends to produce a low alcohol result and the wine won’t clear properly. After all, the purpose of bread yeast is to produce lots of carbon dioxide for fluffy bread.

There are a lot of sources for recipes and I’ll eventually share some of mine, but each recipe produces different results, so you’ll have to play around to see what produces the result you like best. That’s part of the fun of making wine. If winemaking turns out not to be your thing, you may instead want to buy a bottle from the best wine store denver so you can get an excellent quality wine without the difficulty of doing it yourself. Here’s a picture of my winemaking ingredients:
WineDay1_1

After you have everything gathered, mix the ingredients in the mixing container to produce the must (the name of the wine mixture), but don’t add the yeast. The next step for me is to gently warm the must to the optimal temperature for the yeast (105 degrees for Montrachet). Keep mixing the ingredients to make absolutely certain they’re mixed completely. Measure the temperature carefullytoo cold and the yeast won’t start as quickly as it couldtoo hot and you’ll kill the yeast:

WineDay1_2

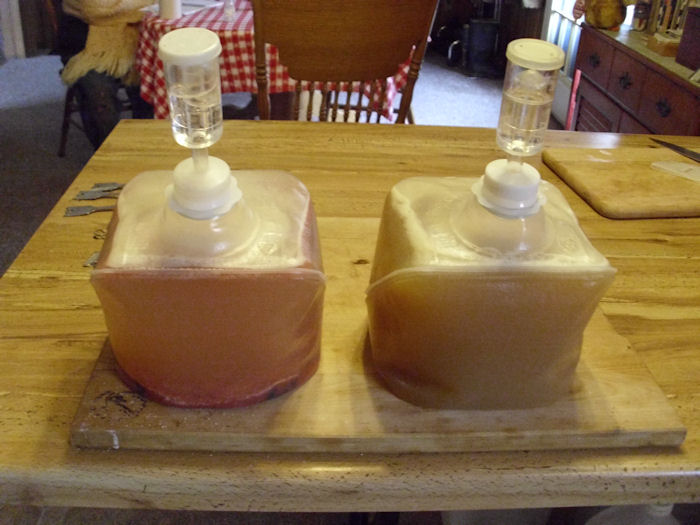
After the mixture is at the right temperature, pour it into the fermentation container. Sprinkle the yeast on top. Add water to the air lock and attach the air lock to the fermentation container as shown here:
WineDay1_3

In this case, you’re seeing tomato wine on the left (delicious with a stronger tasting cheese) and apple wine on the right (a wonderful desert wine). The tomato wine has raisins added to it for taste. I’m using one gallon cubi-containers originally obtained as part wine making kits purchased a long time ago. Buying a kit is one of the better ways to get all of the equipment you need to make wine, but you can easily purchase the components separately. Notice I also put my containers on a cutting board. That makes it easy for me to move my fermentation containers around to more evenly heated rooms or simply to get them out of the way.

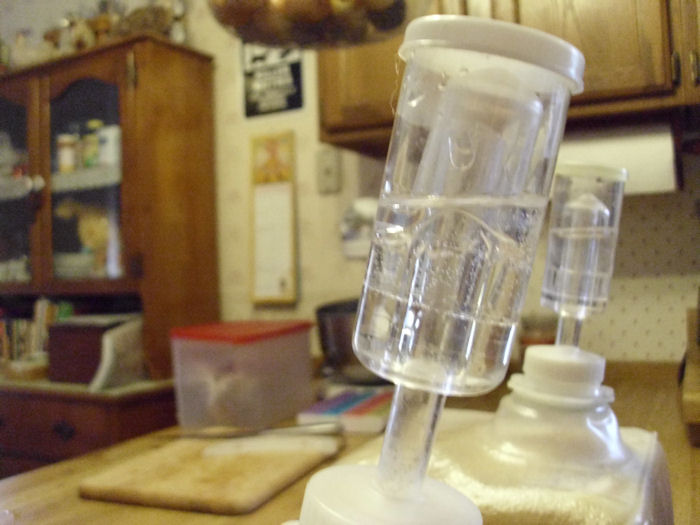
Keep an eye on your containers for a while. You want to be sure that the air locks are working properly to keep out foreign yeast and bacteria. Here’s a closeup of my air locks:
WineDay1_4

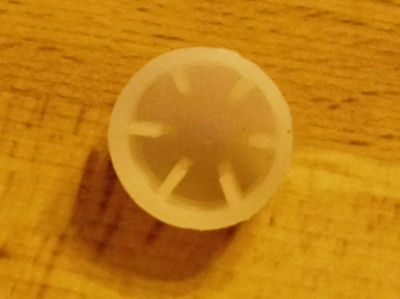
The one in the front is already in the right position. Carbon dioxide produced by the yeast has pushed the little cap up in the middle. In order to get out, the carbon dioxide will now need to go down through the water in the air trap and then out through holes in the top. In this way, the container maintains positive pressurekeeping out external sources of contamination. The air lock shown in the back isn’t in the right position yet because the yeast has just started working. Eventually, that cap will rise to the top as well. So, are there any questions about day one? Let me know at [email protected].

Fun is Where You Find It!

There are many aspects to the self-sufficient lifestyle. One aspect is that you don’t have a lot of money for entertainment. However, if you’re self-sufficient, you quickly find that the fun aspect of entertainment has nothing to do with cost. Rebecca and I often entertain ourselves for free (or at least, next to free). So it was this past Saturday as we prepared for Easter. Every year we decorate some eggs for ourselves. Last year we used bought a glitter kit from the store, which didn’t work out as well as we would have liked (the glitter ended up on everything), but did produce a nice result. (I definitely wouldn’t mind trying it again, but would probably do things a bit differently this time.)

This year we used a Paas tie-dye kit to create some colorful eggs that are far less messy and store well too. Our total cost was about $4.00, including the eggs and we ended up with a second set of dye pellets leftover. Perhaps we’ll dye some eggs using the extra pellets during vacation this summer. The tie-dye kit was a tiny bit messy, so I wouldn’t recommend it for younger kidsat least not if you don’t want everything, including the kids, dyed spectacular colors. Here are the results we achieved:

EasterEggs

As you can see, they’re quite fancy and looked nice displayed in egg cups on the table (the holder shown in the picture was used only for drying). To get this effect, you wrap a piece of material around the egg, place the egg in a special holder, and inject colors using a syringe type device into holes in the holder. It took between 2 and 3 hours for us to complete the task. During that time we had a lot of fun and laughs, especially when a set of colors would produce unexpected results. We found that you need to leave the egg in the holder for a few minutes after injecting the colors to obtain optimal results. The bottom line is that you can have a ton of fun for nearly nothing if you try. So, how do you have fun on a budget? Let me know at [email protected].

 

Using a Horizontal Web Site Layout

A friend recently wrote to me regarding an issue with Web site layout. Of course, I’ve dealt with Web design issues in a number of my booksmost notably C# Design and Development and Accessibility for Everybody: Understanding the Section 508 Accessibility Requirements. If you look at most Web sites today, they all have three serious problems:

  • The line length is too longforcing the eye to work extra hard to read the material because the eye loses track of the line and actually making it tiresome to review the material.
  • The page contains too much material, which makes it tiresome for anyone working with a screen reader to listen to all the material before finding the one bit of information actually required from the site.
  • The use of vertical scrolling is contrary to the historical use of horizontal scrolling. If you look at how people worked with scrolling in ages past, it was always horizontal, making it easier to read the material.

She even sent me two articles that describe the problem in greater detail. The first article is entitled, “Are Horizontal Website Layouts the Wave of the Future?” and points out that research shows that most people don’t even read the excess material on a Web site. If nothing else, the strong research showing that my efforts are being wasted would tend to make me rethink my design. The second article is entitled, “Horizontalism and Readability” and it places more emphasis on the historical approach to horizontal layout, rather than focus on modern research. I tend to prefer tested approaches to presenting information when I can get them (new ideas are fine for someone else to test).

Of course, a Web site is not the same as printed material. Trying to equate the two could very well be a mistake. Here is my take on how the mediums differ:

  • The method of presentation differs. You’re not relying on paper, you’re using a video screen of some sort and that does make a difference in how the reader perceives the material.
  • The environment differs. I don’t usually sit in my easy chair next to the fire when I read materials online. I’m normally in my office in a formal work environment.
  • The approach to reading differs. My paper reading environment is relaxed and long term. It’s nothing for me to spend an entire day reading a good book. My online reading is more like a sprintI find what I need quickly and never read for more than a half hour at a time.
  • The technology differs. When I read a book, I get print in one size. So, if the print is less than appealing or causes eye fatigue, I’m just stuck with it. My browser allows me to change the font size a Web site uses so I can make the print eye friendly. Although, I would still recommend wearing reading glasses if you find that you’re experiencing eye fatigue from staring at a computer screen, but life should be made easier if you can alter the font size. In fact, I can even use a CSS file to change the typeface and other features for some Web sites.

The obvious question now is whether the two environments differ enough that considerations normally made for paper don’t apply to Web sites. My thought is that creating Web sites with smaller amounts of material, eye friendly design, and shorter columns are all great ideas, but I’m not completely sold on the idea of horizontal scrolling. Of course, every person or business has their preference about how they want their website to look, and that’s fine. That is what makes everyone different. Some may decide to design it themselves, whilst others may decide to enlist the help and expertise of somewhere like Plenty of Pixels – Pasadena Website Design to incorporate everything they want to see on their website. As long as you have all the information you need to attract customers, that’s all that matters. But horizontal scrolling? That’s another story entirely. What is your take on this idea. Let me know at [email protected].

Easter Bunnies

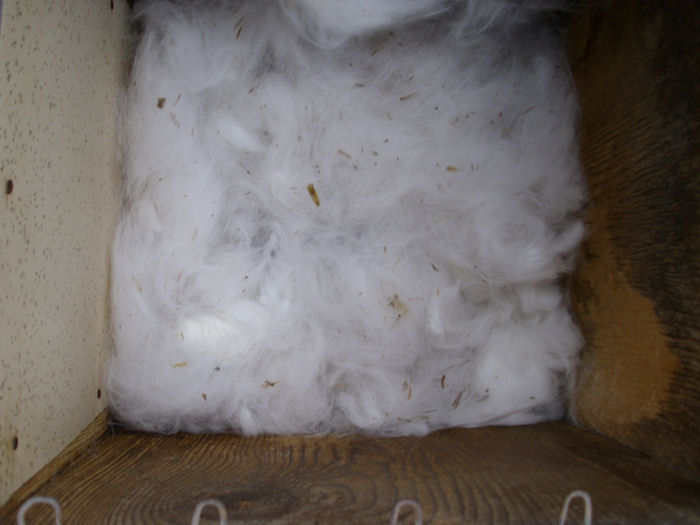
Spring heralds many things at our homestead. Of course, you’ve already seen the flowers, Early Spring – The Garden and Orchard, and budding trees. Today’s post is about our Easter bunnies. Because they require so little space, we raise rabbits. Each spring the does are bred and usually have their babies around spring. The gestation period for a rabbit is between 28 and 35 days, with 31 days being the average. We’ve found that our rabbits will often time the birth for a warmer dayjust how they know is a mystery to us, but the weatherman could probably take a few clues from them. The first clue we have that the does are about to have babies is that the does start pulling hair and fluffing it up in their nest box like this:

Rabbit01

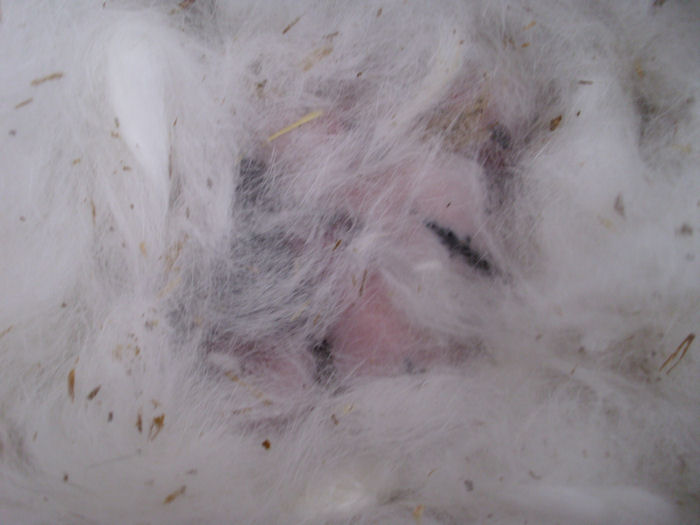
The doe usually has her babies within 24 hours of pulling her hair, but I’ve seen it take a little longer. We normally watch the nest box carefully after the hair pulling to try to determine when the babies are born. We’re extremely careful not to disturb the babies at all for several days after the birth. After that, we gently pull away a little of the hair using a stick (human scent will keep the mother from taking care of her babies). Here are the two day old babies of Rocky Raccoon (she has raccoon markings on her face):

Rabbit02

These babies were quite active and healthy, so they were a little hard to catch with the camera, but you can see them under all that hair. We were quite careful not to touch them or anything in the nest box. Afterward, we carefully covered them back up because they can take a chill pretty easily at this point.

Whether we get a look at all depends on mother bunny. If she looks at all concerned, we leave the babies completely alone. Some mothers will thump to show their displeasure at our peeping. Normally, they’ll let us take a look a bit later, usually within a few days. Happy Easter from the farm!