Sniffing Telnet Using Wireshark

In my previous post about Telnet entitled, “Using Telnet to Perform Tasks” you discovered how to use Telnet to work interactively. Now you have enough information to view some of the security issues with Telnet. It’s incredibly easy for someone to monitor your Telnet session. The only protection you have is firewalls and other security you might have in placeTelnet is completely open and offers nothing in the way of security. Lack of security is one of the reasons I didn’t cover this utility in the Windows Command-Line Administration Instant Reference.” (Telnet is covered from a command line perspective in Administering Windows Server 2008 Server Core.”) However, the lack of security isn’t a problem in some situations and many administrators prefer to use Telnet to manage some network hardware such as switches and routers. Consequently, the main emphasis of this post is building an awareness of the security issues behind using Telnet so that you can make a good decision about using it to meet your needs.

Before you can see the security issues for yourself, you need to download a utility to sniff packets on your network. This post will rely on a free utility named Wireshark because it does the job admirably and is supported on a number of platforms. Because I’m using the 64-bit version of Windows 7, I downloaded the 64-bit Windows installer for the 1.4.7 version of Wireshark. To make things simple, I performed a full install. Part of the Wireshark setup will also install WinPcap, so you don’t need to install this product separately. If you’re using some other version or configuration of Wireshark, your screen may not look precisely like mine.


Using a sniffer is somewhat dangerous and you need administrator privileges to do it. This post isn’t designed to make you an expert in protocol sniffing. In fact, this post is exceptionally simple and is designed only to make you aware of deficiencies in Telnet security. The nefarious individual who gains access to your network to sniff about will have significantly more skills and be able to learn considerably more than you’ll learn using the simple directions in this post.


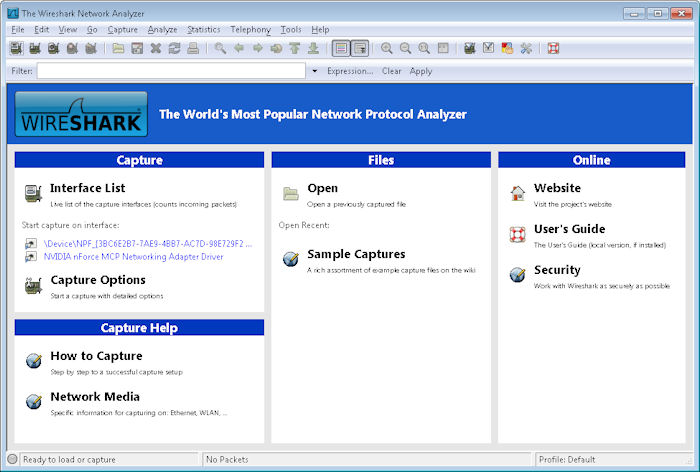
After you complete the installation, you’ll be able to start Wireshark. Choose Start > All Programs > Wireshark and you’ll see the initial Wireshark display shown here.

Wireshark01

Wireshark isn’t configured to work with Telnet at the outset, so you need to tell it what to sniff. Click Capture Options and you’ll see what looks like an incredibly complex Capture Options dialog box like the one shown here.

Wireshark02

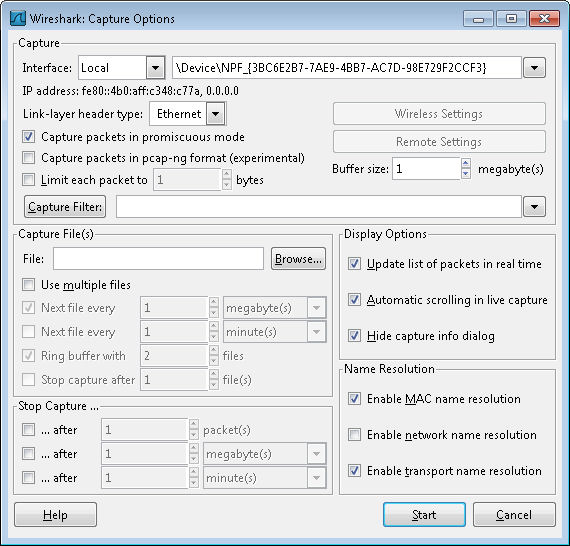
We’re not going to worry about the vast majority of these options. In fact, you only need to set two options to sniff out Telnet packets. Look first at the Interface field. Make sure it’s set to Local. Select your network adapter from the drop down list box. The network adapter will normally have a human readable name, not something odd as shown in the screenshot.

Next you need to tell Wireshark what to sniff on the interface you’ve selected. Click Capture Filter. Type Telnet in the Filter Name field and port 23 in the Filter String field. Click New. Your dialog box should look like the one shown here.

Wireshark03

Click OK. You’ll see the filter criterion entered in the Capture Filter field. More importantly, Wireshark is now configured to offer a Telnet filter anytime you need one. Click Start. The Wireshark display will change, but you won’t see anything on itthe display will be blank.

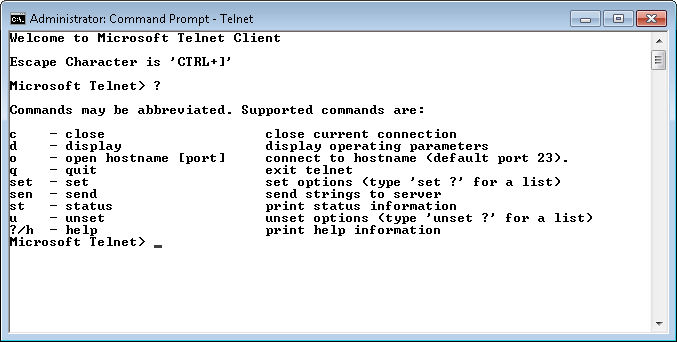
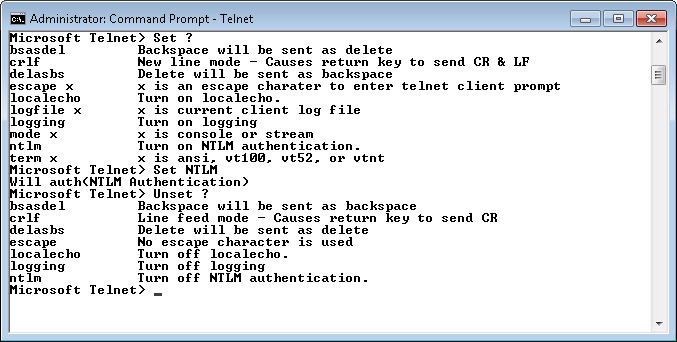
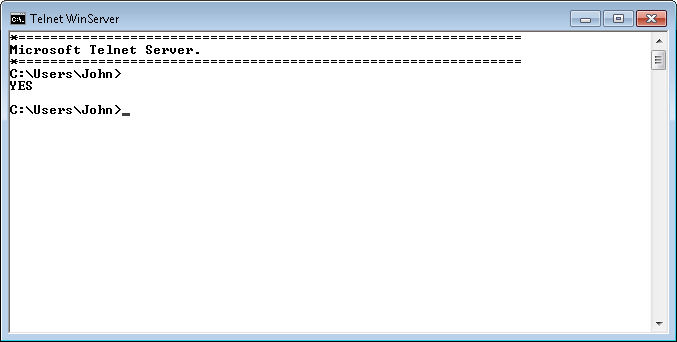
Open a command prompt and start a copy of Telnet in interactive mode. Make sure you open a command prompt with administrator privileges. The act of starting Telnet won’t create any packets as you can see in Wireshark. In fact, type ? and press Enter. You’ll see that Telnet is still perfectly safeit isn’t generating any packets.

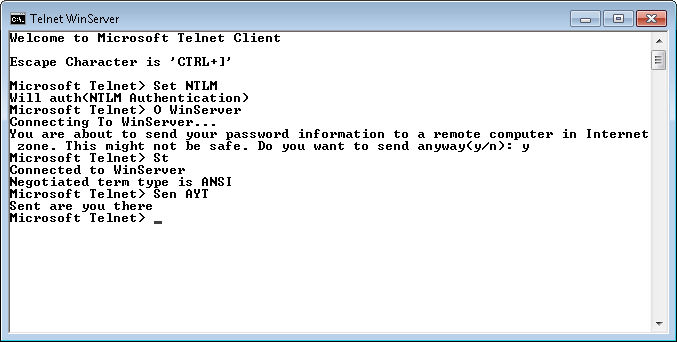
Use the Open command to open a connection to your server. Simply typing O ServerName and pressing Enter generates packets. You can see them in Wireshark like this:

Wireshark04

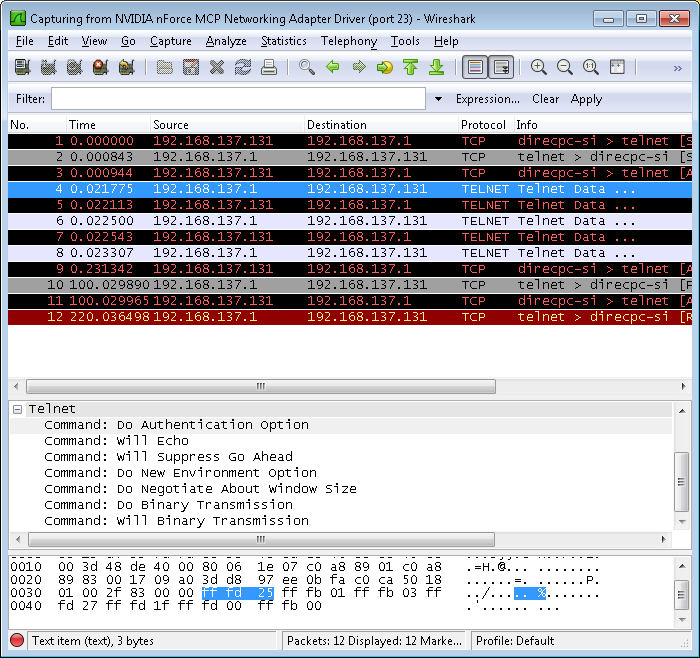
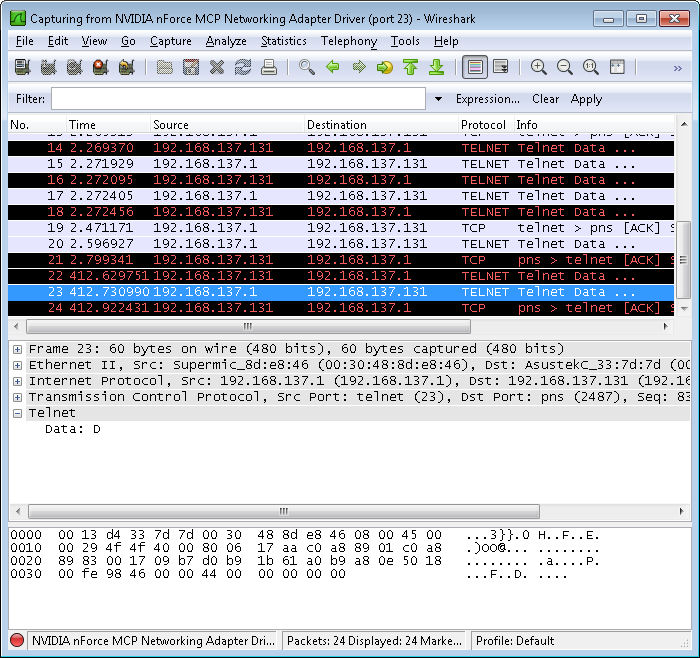
Notice that some of these entries are labeled Telnet Data. In addition, the Source and Destination columns tell you which direction the information is flowing (the client is 192.168.137.131 in this case). Click on the first of these entries and you’ll see that the middle panel contains some information about the Telnet Data. Open the Telnet entry and you’ll see some interesting information as shown in the figure. For example, the packet information tells the viewer that Telnet is set to use the authentication option.

Go back to the command prompt now. Type y and press Enter to send your password information to the server. Of course, one of the big questions you probably have is whether Telnet is exposing your username and password. Near the end of the packets, you’ll find one that contains an Suboption Begin: Authentication Option entry like the one shown here.

Wireshark05

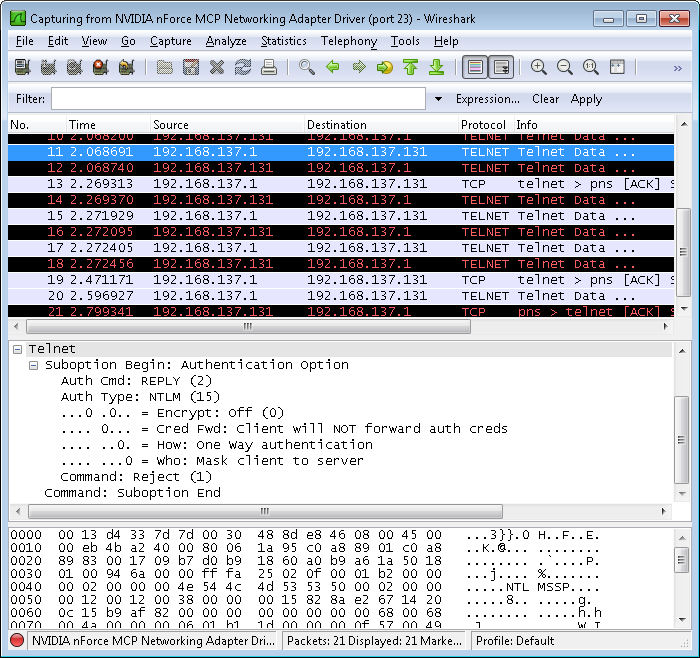
In this case, the option entry tells the server that the client won’t forward the authentication credentials. The option works because I’m already signed onto the server and the server already has my credentials. This is one of the items you’ll want to check for your own Telnet setup, however.

Unfortunately, this session isn’t safe by a long shot. Type just a single letter, a D, at the command prompt. You’ll find that typing this single letter generates a packet that you can see with Wireshark like the one shown here.

Wireshark06

In fact, you’ll find that every action on your part creates more packetseach of which is easily sniffed by anyone with Wireshark or any other application of the sort. Finish the command by typing ir and pressing Enter. You’ll see the expected response at the command line.

At this point, you can also see the response from the server in Wireshark. The text isn’t as readable because it contains all of the control characters normally used to format the text. However, here’s an example of the response as it appears on my system.

Wireshark07

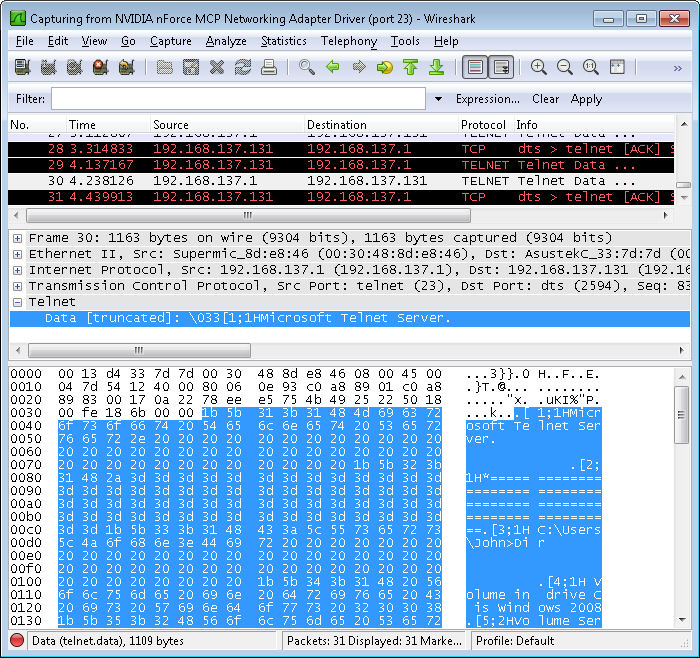
Look at this response carefully and you’ll see that anyone can learn precisely what you’re doing. If you have to enter passwords to perform a particular task, the viewer will get them too. Telnet isn’t a secure method to manage anythingyou need to provide a secure environment in which Telnet can run. This post only touches on the tip of the iceberg, of course. Let me know if you have any questions about it at [email protected].


Making Wine – Day 31

Welcome to Day 31the best day of the process . The previous post, Making Wine – Day 28, described how you can clear your wine. At this point, your wine should be clear. It may not be pristine, but you shouldn’t see more than a few particles here or there. If you see a bit of pectin haze, you probably won’t be able to clear it easily at this point and will need to amend your recipe to obtain better results in the future. However, if you’re seeing more than a few particles, wait a few additional days before bottling. If the particles don’t clear up in two or three more days, you might want to repeat the Day 28 processing. Professional wineries actually have a filtering system they use to improve the clarity of their winethe home wine maker has only time and technique to rely upon.

Assuming that your wine is clear, you’ll want to sterilize enough bottles to hold it. A single gallon container will normally provide four bottles of wine, plus a little leftover. These dregs are usually drinkable as long as you don’t pick up too much sediment, but you don’t want to bottle them. Choose good quality wine bottles. The type with the screw top don’t hold up well and you could even break the bottle during the corking process. Use the one-step sterilizer to wash the bottles and make sure you get any sediment out of the bottles. It helps to have a bottle brush designed specifically for wine bottles.

Before you can bottle your wine, you need to have a supply of corks and a corker. Many kits come with tasting corks that are absolutely worthless for storing your wine. These corks are probably good for three or four months worth of storage in optimal conditions and look like this:

WineDay31_1

What you want instead is an actual wine cork that looks like this:

WineDay31_2

You can find them in several sizes and in a number of materials. My personal preference is actual cork, but I know of many people who are able to use the plastic corks with good results. It’s essential to choose a cork that fits the bottle you usea #8 cork fits the standard bottle used by wineries and normally found in kits. You may have to use a different size if you choose to store your wine in a 1.5 liter bottle. The choice of cork determines the corker you use. Even a cheap floor corker (required to use anything larger than a #8 cork) will cost you a small fortune. That’s why I chose standard sized bottles, the #8 corks, and a Portuguese twin lever corker that looks like this one:

WineDay31_3

The problem with this corker is that it does require a fair amount of arm strength to use. Some people much prefer the Gilda compression hand corker, which is moderately priced and requires about half the strength, or a bench model corker, which is whopping expensive and requires even less strength to use. The kind of corker you get is also dependent on how many bottles you plan to cork. Since I only make 2 gallons at a time, I get by corking 8 bottles and using the corker that I do works fine.

A problem that many new wine makers encounter is overfilling the bottle. If you overfill the bottle, you’ll find it nearly impossible to cork. In addition, the cork won’t seat fully (making spoilage more likely). It’s even possible that you could crack the bottle; although, I’ve never personally had this happen. Use the racking technique described on Day 10 to fill the bottles right to the point where the neck and shoulder meet like this:

WineDay31_4

After you fill the bottle, insert the cork into the corker. Normally, the corker will have a slot you use to load it as shown here:

WineDay31_5

When you place the corker on the bottle, make sure it sits squarely and fully on the bottle top as shown here:

WineDay31_6

Push down on both handles (or on the single handle as determined by your corker) with an even, steady pressure. Eventually, the cork will seat properly and fully in the bottle. At this point, you can label your bottle and dress it up a bit (if desired). Even though your wine is drinkable at this point, you’ll normally wait three to six months for it to continue mellowing and settling. Store your wine in a wine holder designed to keep the cork wet in a cool, dry place. That’s ityou’ve completed the wine making process in a mere 31 days! So, are there any questions about day 31? Let me know at [email protected].

This post ends my basic series of posts about wine. Of course, there are all kinds of other topics I can cover. Let me know if you have a personal preference on what I discuss next in this blog.


Using Telnet to Perform Tasks

The previous post in this series, Configuring Telnet, helped you get Telnet set up on a system. Now that you have Telnet installed, you can use all of the command line and interactive features described in Administering Windows Server 2008 Server Core to access it. For example, you can simply type Telnet <Name of Server> and press Enter to start a session with that server. Because of the way Telnet works and the commands that you’ll issue, it’s always a good idea to use an Administrator command line when working in either Vista or Windows 7. To open such a command line, you choose Start > All Programs > Accessories, right click the Command Prompt entry, and choose Run As Administrator from the context menu. You may have to supply a password to gain administrator access.

When you plan to work with Telnet for an extended period, you might find the interactive environment more suited to your needs. To enter the interactive terminal, you simply type Telnet and press Enter. This action places you at the Microsoft Telnet prompt, but doesn’t open a connection for you. Type ? and press Enter to see a list of available commands as shown here.

TelnetUsage01

One of the advantages of using the interactive prompt is that you’ll find it easier to configure Telnet options. To see these options, type Set ? and press Enter. For example, if you want to make your Telnet session a little more secure (and the emphasis is on little), type Set NTLM and press Enter. Some settings are a toggle. For example, if you want to remove NTLM authentication, you type Unset NTLM and press Enter. Type Unset ? and press Enter to see a list of toggled settings. Here is a list of the settings available when using the Windows 7 version of Telnet (your version of Telnet might vary).

TelnetUsage02

The ability to set or reset settings is nice, but it would also be nice to know how Telnet is configured. To obtain this information, you type D (for display) and press Enter. You’ll see a list of configured settings. The default settings depend on your version of Windows and how you configured Telnet in the past. If you don’t see a particular setting, it means that the setting either isn’t configured or is toggled off (unset).


Simply configuring a setting doesn’t guarantee that Telnet will use it. The server determines whether a particular setting is valid. For example, you can request NTLM authentication, but the authentication won’t occur if the server doesn’t support it. Likewise, your choice of terminal is sent to the server, but the server ultimately chooses the terminal type, which is going to be ANSI in most cases.


To create a connection in interactive mode, you type O <Name of Server> and press Enter. You may see a warning message about sending your password in the clear. Type Y and press Enter. At this point, you’ll see the standard Telnet prompt at the server. To regain access to the client side prompt, you press a control key combination. The default is Ctrl+]. This will take you back to the client Telnet prompt where you can enter additional commands. When you want to go back to the server side, simply press Enter twice.

To check your connection, type St and press Enter. You can also ask the server questions, such as “are you there” using the Sen command. To see all of the send options, type Sen ? and press Enter. The help list shows those commands that Telnet definitely supports. However, the Knowledge Base article entitled, “The TELNET Protocol” seems to tell a different story (I’ll check out these additional commands for a future post). For the sake of doing something interesting, try typing Sen AYT (for are you there) and press Enter. Here is typical output from this command.

TelnetUsage03

Now that you’ve asked for information, press Enter twice to see the server’s response. In most cases, you’ll see YES as shown here.

TelnetUsage04

You have several ways to close a connection. However, for this session, press Ctrl+] to return to the Telnet client session. Type C and press Enter. The connection is now closed. To verify this fact, type St and press Enter. Type Q and press Enter to leave the Telnet interactive environment. Now, here’s the interesting part of all this. You can also script this sort of behavior to make many tasks automatic. A future post will also pursue this topic in more detail. For now, let me know if you have any questions about the basic interactive session at [email protected].


Health Benefits of Self-Sufficiency (Part 2)

One of my earliest posts on self-sufficiency touted the health benefits of this form of living. I most definitely stand by that postanything you can do to improve your health is good. In the time since I wrote that post, I’ve gotten critical illness insurance quotes, looked into any illnesses common in my family, improved my diet even more, had more frequent doctor check-ups and lost still more weight – and I now control my diabetes using diet alone. In fact, I no longer take any sort of medication to manage health issues. I’m still not out of the woodsnor is my wife. We both know that we have further to go if we want this lifestyle to produce the desired results. However, it’s nice to see the progress that we’ve made. We’re intending to have the condition of our health regularly checked over by services that can be provided by Southwest Care or a similar health clinic to ensure we are always progressing in the right direction.

Some people are under the wrongful assumption, however, that simply changing diet, losing weight, and living healthier will undo the wrongs of the past. My situation is a case in point. Losing weight has actually caused a health problem in my case and I recently had to have my gallbladder removed to solve the problem. Many sites tell you that rapid weight loss will cause the formation of gallstones, but this isn’t quite true. Every medical professional I’ve talked with has told me outright that any weight loss greater than 50 pounds can result in gallstones. If you’re diabetic, the gallstones are especially troublesome because they can cause problems with the pancreasan organ already overextended by diabetes. Certainly, my 4 pound per month average weight loss isn’t rapid and well within the recommended guidelines. My take on all this is that there is no free lunchif you’ve abused your body you’re going to pay a price for it.

However, in the grand scheme of things, losing a gallbladder is certainly preferable to the problems I’d experience if I remained at my former weight. Diabetics have all kinds of increased health risks, including loss of eyesight, heart troubles, kidney damage, and nerve damage. Getting my weight and diabetes under control was the right thing to do, even if it cost me a gallbladder to do it. You can easily live without a gallbladder, but you can’t live without a heart and life is far less liveable without eyes. In fact, if you’re living a healthy lifestyle, you’re unlikely to even notice that the gallbladder is gone once you get over the surgery.

What bothers me in all this is that the medical profession is lax about telling anyone the potential consequences of a seemingly healthy decision. Perhaps the thought is that any discussion of anything negative will only discourage people so that even fewer will take a positive course of action. Everything you do has a consequence, so it’s best to be informed. I hadn’t gotten very far along my current path when I discovered this potentially negative side effects of weight loss, but I had to conduct my own research to obtain the information. Of course, that’s my recommendation to you as well. You need to go into any health-related decision with eyes open. In my case, I made an informed decision and realized early there were risks.

So, what does this all have to do with self-sufficiency? Getting rid of the medications, learning to eat right, exercising nearly every dayall of these goals are part of being self-sufficient. As part of my self-sufficient lifestyle I’ll maintain more of my muscle mass far later in life (my 78 year old uncle can still lift 100 pound bags of feed), but I’ll pay for that ability with additional joint wear, so I imagine that I’ll need hip and/or knee surgery at some point. A self-sufficient lifestyle isn’t for everyone, perhaps you prefer the gym or simply a walk in the park, but getting healthier is a benefit to everythingmost importantly yourself. I encourage you though to research your decisions and make the best decisions you can, realizing that there are always risks that you’ll have to deal with as part of that decision. How are your healthier living goals progressing? Let me know at [email protected].

Making Wine – Day 28

At this point, it doesn’t appear that there is any activity in your wine container, but activity still exits. Yes, the fermentation process is complete, but the wine is still in an early state. When you remove the air lock and take a whiff, you smell something with a distinct wine odor. It’s even possible to drink the wine now and you might possibly enjoy yourself, but you’d be cutting the process short.

The next step is a seemingly odd one because it requires a certain amount of wizardry on your part. You might have noticed that your wine is still a tiny bit cloudy and that it doesn’t quite have the taste you wanted. That’s what this post addresses. This is the fit and finish phase of your winethe phase that turns your homemade wine into something that could rival the best wine on the market.

Begin by racking the wine using the same procedure found on Day 10. Make sure you clean your container after you pour its contents into another container. Once you have the wine in a suitable container, put a small amount in a small glass. If you want to follow the fancy way of doing this, you’ll swirl the wine around a bit, inhale deeply, and then sip it gingerly. Personally, I find that taking a good deep smell and then tasting the wine using smallish sips is much better. If you used the Montrachet yeast, you’ll find that your wine has a nice odor, but that it’s probably too dry and that the flavor hasn’t quite come out. In short, the wine will be a little disappointing.

To overcome this problem, you add sugar to your wine. Now, remember that your wine is stabilized at this point, so you don’t want to make the wine horribly sweet (a problem I’ve noted in more than a few homemade wines) because there isn’t any yeast to clean up the excess. Add a little sugar at a time and then repeat the smelling and tasting process. Small sips are best. If you find that your nose is working less efficiently by the third or fourth try (I always do), give it a bit of a rest. Inhale some coffee grounds (if you have it around), then try again. The sugar you add at the end of the process is one the place where no one can offer you truly useful adviceeveryone has a different standard.

Now that your wine is properly sweetened, you need to perform one more step. This particular step caused me no end of consternation when I first tried it. It’s time to clarify your wine. Clarity problems come in three forms:

  • Pectin Haze: Pectin found in many fruits will cause a haze in your wine if not removed during the fermentation process. The haze is nearly impossible to remove at this point, but this step will help a little. However, most people won’t even notice it. The haze is slight in most cases. Amend your recipe to use more pectic enzyme (see the Day 1 post for details).
  • Free Floating Particles: Some wine ingredients, such as pumpkin (makes a wonderful warmed wine), will leave particles behind. The best way to avoid this problem is to filter your ingredients initially, before you add them to the wine. You can also use a two-step fermentation process that takes significantly longer than my wine making technique. This step will remove at least some of these free floating particles. Letting the wine rest for an extended period will also help.
  • Yeast Cells and Tanin Complex Materials: Your wine will almost certainly have yeast cells and other materials left over after the fermenting process. These particles are smaller than the larger particles left over from the main ingredient (such as pumpkin) This step always resolves this sort of clarity problems.


You need to obtain some Sparkolloid powder. Not every supply store stocks it, but the effort of getting this product is more than repaid by a superior wine. Add 1 tablespoon to 1¼ cup of vigorously boiling water and stir for five minutes (keep the pan on the stove while you stir). When I first started using this product, I tried all sorts of other time intervals, but you really do need to stir it for the full five minutes to obtain optimal results.

This action doesn’t apparently do muchat least, not much that you can see. What you’re actually doing is creating a static charge in the mixture (hence the need for vigorous stirring). This static charge will help clear your wine, much like an ion filter cleans the air in your house. The fine particles floating around in your wine are attracted to the charged particles in the Sparkolloid powder and drop to the bottom of the container. Interestingly enough, you’ll also find that this step improves both the taste and smell of your wine.

After you stir the Sparkolloid powder for five minutes, add 1/6 cup (8 teaspoons) of mixture to each gallon of wine. Mix it in thoroughly and pour the wine back into the container. Close the container using the airlock as usual. Put the wine containers in a cool location. That’s it! So, are there any questions about day 28? Let me know at [email protected].

Memorial Day – A Time of Remembrance

Many Americans have lost sight of the significance of Memorial Day. For them it has become a time to partyto celebrate something, anything. I spent 10 years of my life in the Navy serving my country—I look on it as the hardest 10 years of my life. Fortunately, I was never called upon to make the ultimate sacrifice that so many people have. Although I’m sure that most of these dear departed liked a good party as much as anyone else, it’s also important to remember why we’re taking a day off.

Our freedom cost many lives. In fact, our freedom is drenched in the blood of all of those who heeded their country’s call to duty. Memorial Day is a time to reflect on the extreme sacrifice of those who have fought and died to ensure that you can be safe in your bed each night, exercise control over your government, and choose to do things like protest an unpopular decision made by those in office. In fact, they died to ensure that you’d also have the choice to do absolutely nothing at allyes, it’s a privilege to decide what to do and when to do it, even if that means doing nothing. During my time in the service, I saw how many people in the world live and I truly wouldn’t want to live like them. I consider America the greatest country in the worldGod has truly blessed us.

I won’t deny that celebrating the lives of those who fought for our freedom is a good idea. However, take a few minutes to also think about the sacrifice these people have made on your behalf. If you see a service member, be sure to thank them for the time they spent serving your needsusually in less than happy conditions. Memorial Day is much more than another holidayit’s a time to reflect on just how good people have it in this country. Make your Memorial Day celebration special this year, take time to consider just how valuable your freedoms are and the price someone paid to get them. If you want some other ways to observe the holiday, check out How to Observe Memorial Day.

There won’t be a blog entry from me on Monday.  Please come back starting on Tuesday for my regular blog entries.


Configuring Telnet

Readers have written in to tell me that they’d really like to see more about Telnet after reading my Telnet Not Included post. Of course, there was the usual disagreement as to where I should begin the discussion, so I decided to start at the beginning. As previously mentioned, I do cover this command in my book Administering Windows Server 2008 Server Core,” but don’t cover it in “Windows Command-Line Administration Instant Reference.”


Adding the Telnet Server feature to a server will likely require a restart. Consequently, you should only take this task on when you know that you can reboot the server afterward.

Neither books tells you how to configure Telnet, which is a necessary first step because Microsoft doesn’t install this application automatically any longer due to some serious security considerations. The purpose of this post then is to help you configure a Telnet setup that consists of a server (WinServer for the purpose of these posts) and a client (Main). You’ll need to substitute the names of your systems when working through the commands on your system.


It’s important to note that you can perform this task on a single machine by configuring both client and server.

WinServer is a Windows 2008 R2 Server. If you have some other version of Windows, the instructions I’m providing here might not work precisely.


  1. Choose Start > Control Panel. You’ll see the Control Panel window shown here.
    TelnetConfig01
  2. Click Turn Windows Features On or Off. You’ll see the Server Manager window.
  3. Choose the Features folder in the left pane. You’ll see a list of installed features like the ones shown here.
    TelnetConfig02
  4. Click Add Features. You’ll see the Add Features Wizard.
  5. Check the Telnet Server entry as shown here.
    TelnetConfig03
  6. Click Next. You’ll see a message about the server needing to be restarted after you complete the installation.
  7. Click Install. Windows installs the Telnet Server feature.
  8. At some point, you’ll see an Installation Succeeded message. Click Close to close the Add Features Wizard.
  9. If necessary, reboot your system (Windows will tell you when it’s necessary to reboot). Unfortunately, your Telnet installation isn’t active yet.
  10. Open the Services console found in the Administrative Tools folder of the Control Panel (depending on how your configure your server, you might actually find this folder right on the Start menumy recommended placement for such an important feature).
  11. Locate the Telnet entry. You’ll notice that the service is not only stopped, but it’s also disabled as shown here.
    TelnetConfig04
  12. Double click the Telnet entry. You see a Telnet Properties dialog box like the one shown here.
    TelnetConfig05
  13. Choose Automatic (Delayed Start) in the Startup Type field and click Apply. Using a delayed start seems to ensure fewer problems when working with Telnet.
  14. Click Start. Telnet should now be accessible on the system.

You can also configure the Telnet server from the command line. To set the server startup configuration type, SC Config TlntSvr Start= Delayed-Auto and press Enter. To start the server, type SC Start TlntSvr and press Enter.

Once you have Telnet installed on the server, you also need to install it on your workstation. The following steps get you started.


  1. Choose Start > Control Panel. You’ll see the Control Panel window.
  2. Click Programs. You’ll see the list of Programs options.
  3. Click Turn Windows Features On or Off. You’ll see the Windows Features dialog box.
  4. Check the Telnet Client option and click OK. Windows will install the Telnet Client.

Of course, you don’t know whether your setup will even work. So, it’s time to check your setup.


  1. Choose Start > All Programs > Accessories to display the Command Prompt link.
  2. Right click Command Prompt and choose Run As Administrator from the context menu. You’ll see a User Account Control dialog box where you click Yes. At this point, you’ll have an administrator level command prompt to use.
  3. Type Telnet WinServer (or whatever the name of your server is) and press Enter. You’ll see a message warning you about sending your password to the server. The password is sent in the clear and this is extremely dangerous from a security perspective.
  4. Type Y and press Enter. Telnet will create a command prompt session on the server for you.
  5. Type Echo %ComputerName% and press Enter. You’ll see that the name of the system matches your server, so you really do have a connection to it.
  6. Type Exit and press Enter. Telnet ends the session with the server.
  7. Type Echo %ComputerName% and press Enter. The output now corresponds to your local workstation.


At this point, you have a Telnet configuration to use for future posts. Of course, you can start experimenting with it now. Any command you can normally type at the command prompt, you can likely type at the Telnet prompt as well (as long as there are no graphics involved with executing the command). Now I need to know what sorts of topics you’d like me to cover. Send me e-mail at [email protected] with your requests.


Making Wine – Day 23

If you’ve been following this series of posts, you’ll know that Monday was actually day 23, but I’m posting today about it due to some scheduling conflicts. The last post was on Day 10. At that time, the wine fermentation was slowing down, but still active. By the time you get to Day 23, the wine has basically stopped fermenting. You might see a line of tiny bubbles at the top of the container, but that’s about it.

You still don’t have drinkable wine. If you tasted it at this point, nothing terrible would happen, but it wouldn’t have a good wine taste just yet. In fact, your wine may still have a yeasty odor to it. The step you perform today is important because it helps stabilize your wine so you start getting the right odor and flavor.

First, look at the bottom of the container. If there is little or no sediment, you don’t have to rack your wine again. However, if you see more than 1/8-inch of sediment, consider racking your wine using the same instructions as Day 10.

At this point, pour about 1/4 cup of your wine into a cup. Add 1/2 teaspoon of potassium sorbate per gallon to the wine. Potassium sorbate is a yeast inhibitor and will help stabilize your wine. It doesn’t stop active yeast from working, but it does stop the fermentation process from restarting. The potassium sorbate mixes with extreme ease. Pour the wine back into the container and stir it using the handle of your spoon. Because the potassium sorbate mixes easily, you don’t have to stir the wine a lot.

Replace the airlock on your container. Move your containers to a cooler location (between 40 and 60 degrees Fahrenheit) to aid in stabilization. That’s it! So, are there any questions about day 23? Let me know at [email protected].


Review of Breath & Other Ventures

I wasn’t quite sure how to categorize Breath & Other Ventures (written by William Bridges, Green Market Press), but for me it was a self-help sort of a book, so I classified it that way. You may very well classify it some other way, which is certainly your right. In reality, this book is both more and less than a self-help book. It won’t help you control your weight or manage your anger, but it does ask an intriguing and thought provoking question, “How do you want to live your life?” It’s a deceptively simple question of the same sort as, “Who are you?” Most people have no idea of who they are, much less how they want to live their life, so this is a helpful book indeed. (Don’t make the mistake of confusing this question with, “What do you want to do with your life?”, which is actually quite easy to answer in comparison.)

The majority of the book is a series of non-fiction short storiesthe author uses the term essays. It’s in three parts. The first part is literally about breathing. Although William includes a number of medical terms and diversions in the book, the focus is on the actual act of breathingsomething I’ll never look at the same again. You’ll find breathing in all its forms, including the breathing that takes place during various sorts of meditation. I’m not a Zen practitioner, but I do meditate daily to manage stress and make some sense of the chaos that’s my life. Such meditation is Biblicalit’s mentioned more than a few times even though I know most Christians sadly leave meditation out of their lives. By the time you’ve finished this first section, I assure you that you’ll no longer take breathing for granted either.

The second part is my favorite. It’s a series of short historical stories. I found them compelling. In fact, I started reading this section and didn’t put the book down again until I had finished it. The historical section isn’t about major events or places that most people would consider all that exciting. You’ll discover something about average people in Indiana. The stories are all about the author’s relatives in some way, but not necessarily exclusively about his family. He digresses into other areas, which makes for an interesting read. (There is even a ghost story included in the set of stories.) You go down the road and aren’t quite sure what to expect nextthe twists and turns keep the eventual goal hidden and elusive.

The essays in the third part of the book are more focused on how the author has lived his life. I probably could have done without the first essay on Obama, but then again, I’m not a political person in the sense that I would go out and protest something, knock on doors, or even make a contribution. On the other hand, I feel quite good about exploring every detail of a politician’s career before voting and will write a letter or two to express my dissatisfaction. For whatever reason, this particular essay didn’t speak to meperhaps it’ll speak to you. I did enjoy the essay entitled, “Ten Weeks with the Circus” quite a lot (it isn’t actually about the circusI’ll leave the details of it for you to discover).

The book also has a very short fourth part (19 scant pages) that contains a fictional detective story about GeeGee Dapple. I found the story quite entertaining and a fitting end to the book.  There is little doubt in my mind that GeeGee is the author’s alter-ego. It appears that there is a number of these stories and I hope the author eventually puts them together into a compilation. For now, this is the first GeeGee story I’ve read. The addition reminds me of the “final page” entries often found in magazines. It was a nice ending to the book that doesn’t necessarily fit in with the rest of the book but is merely meant to entertaina kind of finishing touch not found in many books today.

If you’ve ever read and enjoyed Garrison Keillor, you’ll enjoy William’s style too. It has that same free flowing musing that Keillor employs in his books. This book isn’t meant to be funny though, so there are some distinct differences in the way the two authors approach things. This author also includes more than few pieces of poetry, most of which I found a good read and thought provoking. The poetry isn’t just stuck in place either (like many books out there), it always has a purpose for being placed precisely where the author has placed it in the book. I found the author’s word choices interesting as well. For example, you’ll find “blissninny” on page 44 (I’ll also leave it to you to discover the meaning of this word). If you want to see some examples of the author’s writing, check out his blog.

So, does this book answer the question, “How do you want to live your life?” Of course it doesn’t! That’s for you to decide. The author is relating a story of how he has decided to live his life and I think the hope is that you’ll spend a few moments pondering your life as well. I certainly found myself pondering mine. If nothing else, this is the sort of book you want to read as part of your own personal voyage of discovery.


Becoming a Programmer

I’ve had more than a few readers write and ask how someone becomes a programmer. Of course, that’s a loaded question. The first thing that you must decide is what a programmer does, who they are as a member of society, and what they contribute to society. There are many fields that could be construed as programming. Anyone who writes a set of instructions that somehow directs that actions of a computer is a programmer. This definition encompasses everyone from the administrator or power user who writes macros to the designer who creates engineers huge projects to the low level developer who creates operating system code. Theoretically, the ingenious person who actually succeeds at programming their video recorder to start and stop at certain times to capture a favorite television show is a kind of programmer. Today I’ll focus on the computer scientist, because that’s what I am.

Aptitude is part of becoming a good computer scientist and you need to decide whether you have the required talents, skills, and desires. A love of the abstract is a requirement. Despite the best efforts of companies such as Oracle and Microsoft (and a huge number of others) to create an environment that mirrors the concrete world, creating good code is the domain of those who embrace the abstract. It isn’t simply a matter of knowing how to work with numbers. A computer scientist is an expert in many arenas of abstract thought and can actually feel the numbers in a way that few others can. Developing great computer applications is an art and many of the best computer scientists have an artistic bentthey play music, craft words into books, paint, or otherwise put into physical existence the abstract concepts of the mind.

Most computer scientists are naturally curious. It isn’t sufficient to know that the device workshow the device works is far more interesting. Taking things apart to see how they work and putting them back together again to ensure a true understanding of the underlying principles exists is a joy for the computer scientist. Nothing is too complex and in everything there is wonder. Where others see the mundane, the computer scientist sees the amazing.

Of course, there is the practical to consider as well. My first exposure to computers and programming was punch cards (yes, I’m dating myself here). I was in a typing class and part of that class was to work on a keypunch machine. The fact that holes in a card could control a huge machine was amazing to me. In those early years I also studied computer hardware in depth (right down to the chemical reactions that occur within a transistor) and discovered things like paper tape machines and light panels. This sort of education isn’t available to aspiring computer scientists today, but it’s where I began. Those early days were critical to my development as a computer scientist. Your early days are equally important.

So, where would someone begin today? There is a fear that everyone seems to exhibit about destroying their computer. Get an older machine that you don’t have to care too deeply about, but still works. Take it apart, learn how it works, and put it back together. A computer scientist understands that every line of code does something to the hardware. We’ve lost touch with that connection todaya real loss. Obviously, you don’t need to know absolutely everything about the functioning of the hardware, but you should at least know the basic parts of your computer.

Start small. If nothing else, install an old version of Office on your machine and use it to write macros. For that matter, try working at the command line for a while and write some batch files for it. You could also try working with JavaScriptit’s free and there are some excellent tutorials for it online. Experience the small things and you’ll gain understanding that you can’t get any other way. Most importantly, keep in mind that you’re trying to affect the world around you by writing commands.

Eventually, you’ll want to start working with a programming language. My first true programming language was BASIC. I learned it at a time when DOS was kingbefore Windows was even a twinkle in Microsoft’s eye. Visual Basic or C# are great languages to start with. You can write some extremely useful applications without a very large investment in either time or money. If you prefer, learning Java can be a good experience, but I’ve found it requires a little more time to learn than some other languages. But if you really wanted to stick with learning Java, as my friend did, you could always follow his lead by deciding to see how assignment guidance, that you can get from somewhere similar to bookwormhub can help you when it comes to completing studies that you may find hard to understand. My friend had many experiences like this, but his life was made much easier after using this service. Since I didn’t use it, I found it quite difficult and time-consuming, but my friend had a completely different experience with it, so you may find it easier to handle than me.

Discover a low level language. For me it was assembler. Actually, I learned to work with assembler on a number of systems. Today you’ll want to learn C++ because few people use assembler anymore. Even embedded system programming (the last frontier of truly custom systems) relies on C or C++ for the most part now.

Don’t confine yourself to a single platform or language though. Before I even entered college, I had been exposed to three different computer languages. During college I learned three more. Today I learn whatever seems to be the best language to accomplish a particular task. It wasn’t long ago that I learned IronPython. I’ve worked with PERL, LISP, F#, Java, PHP, and many other languagesthey’re all ways to express something that I need to do with the computerthey’re all beautiful languages for a particular task.

The important thing is not to make writing applications a chore or workkeep it fun. If you’re thinking about a career as a computer scientist, I think you have some amazing things to look forward to because computers are become ever more capable of interacting with the outside world. Let me know your thoughts about computer science at [email protected].