Creating a CodeBlocks Project with Multiple Existing Files

This is an update of a post that originally appeared on July 26, 2011.

Most real world C++ projects include multiple source files. Book I Chapter 7 of C++ All-In-One for Dummies, 4th Edition shows how to create a project that has multiple source files starting on page 170. The first example (page 177), found in \CPP_AIO4\BookI\Chapter07\MultipleSourceFiles, discusses two .cpp files. The second example starts on page 179 and you find it in \CPP_AIO4\BookI\Chapter07\MultipleSourceFiles2. This example includes two .cpp files and a single .h file. I’ll use the files from the second example for this post. The example works the same as the one in the book, but in this case, we’ll start with the three files and create a project around them.

Defining the Project

You need to start with a Code::Blocks project. It’s possible to use either an existing project or create a new project to hold the files (I’m doing the latter and naming the new product MultipleSourceFiles3). In either case, once you have a project to use, you simply add the files you want to it, set the build options for those files, and then create your application. The following steps create a new project, add the files from MultipleSourceFiles2 to it, set the build options, compile the resulting project, and show you the results.

  1. Choose File > New > Project. You’ll see the New From Template dialog box.
  2. Highlight the Empty Project template as shown here:
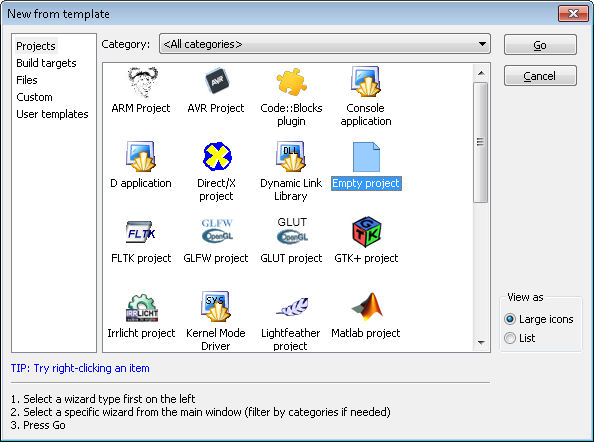
  3. Click Go. You’ll see the Empty Project wizard. If you’re seeing the Welcome screen, click Next to get past it.
  4. Type the name of the project (the example uses MultipleSourceFiles3) in the Project Title field and choose a location for the project (the example uses \CPP_AIO4\BookI\Chapter07\) in the Location field. If you’re following the example, your wizard should look similar to the one shown here:The Empty Project configuration information for MultipleSourceFiles3.
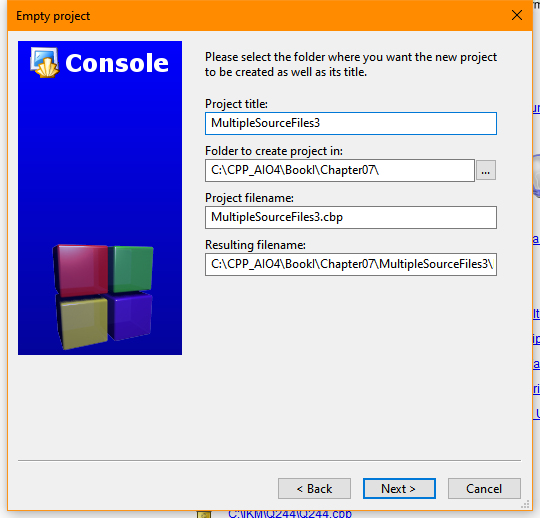
  5. Click Next. Look in the Compiler field and ensure that the GNU GCC Compiler option is selected.
  6. Click Finish. The wizard creates a blank project for you.

Referencing the Other Project Source Files

At this point, you have an empty project without any files in it. However, you can add files to any existing project. The following steps add the files from the MultipleSourceFiles2 project to this project.

  1. Right click the project entry (MultipleSourceFiles3) in the Projects tab of the Management window and choose Add Files from the context menu. You see the Add Files to Project dialog box shown here: Adding new files to an empty project.
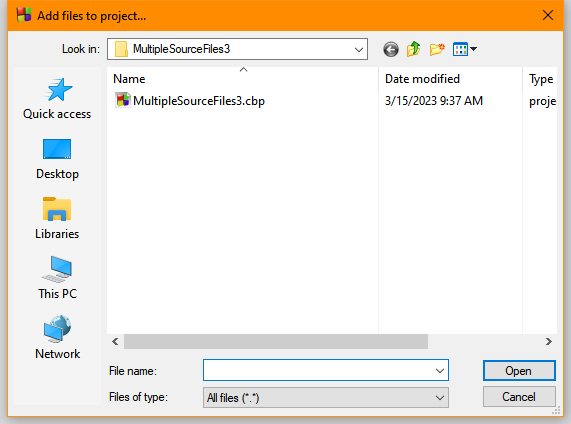
  2. Locate the \CPP_AIO4\BookI\Chapter07\MultipleSourceFiles2 folder on your system.
  3. Click on main.cpp. Ctrl+Click on safestuff.cpp and safestuff.h. You’ll see all three files added to the File Name field.
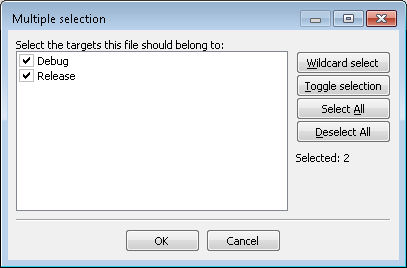
  4. Click Open. You’ll see the Multiple Selection dialog box. This dialog box contains entries for each of the builds that you specified when creating the project. The default is to use the files you’re adding in all of the builds as shown here. (The example uses all of the files in all of the builds.)Ensure the that targets will appear in all build types.
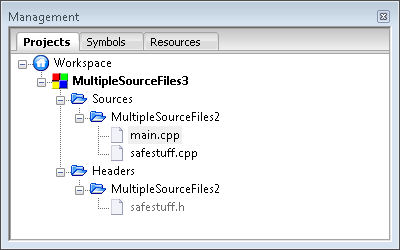
  5. Configure the files you’ve selected by choosing the build the file should appear part of and click OK. You’ll see all three files added below the MultipleSourceFiles3 entry in the Projects tab of the Management window as shown here:The files from MultipleSourceFiles2 are referenced in this project.

The referencing technique adds existing files to a different project. Notice that the files are still referenced in the original project. If you make a change to these files, the changes will also appear in the original project.

Copying the Other Project Source Files

Referencing files isn’t always what you want to do. So, you need an alternative for those situations where you want a copy of the file in a new project (allowing changes in the new project that won’t affect the existing project). In this case, follow these steps instead:

  1. Right click the project entry (MultipleSourceFiles3) in the Projects tab of the Management window and choose Add Files from the context menu. You see the Add Files to Project dialog box.
  2. Locate the \CPP_AIO4\BookI\Chapter07\MultipleSourceFiles2 folder on your system.
  3. Click on main.cpp. Ctrl+Click on safestuff.cpp and safestuff.h. You’ll see all three files added to the File Name field.
  4. Right click main.cpp and choose Copy from the context menu.
  5. Locate the \CPP_AIO4\BookI\Chapter07\MultipleSourceFiles3 folder on your system.
  6. Right click inside the file selection area and choose Paste from the context menu. You see the files pasted into the new location as shown here: Actually copying the files to a new location.
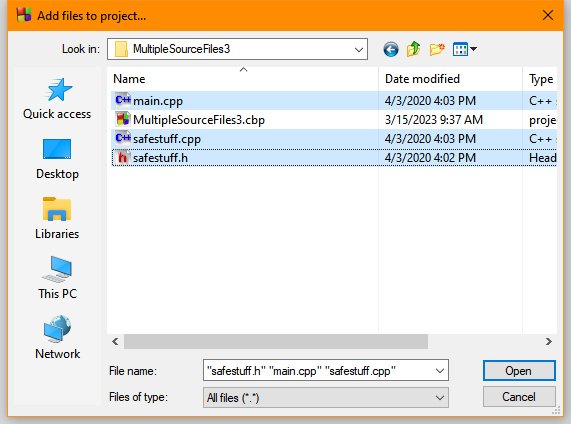
  7. Click Open. You’ll see the Multiple Selection dialog box.
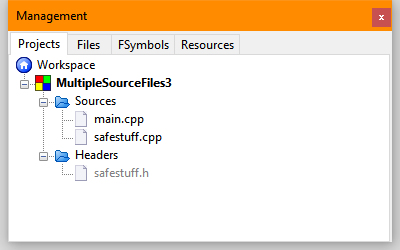
  8. Configure the files you’ve selected by choosing the build the file should appear part of and click OK. You’ll see all three files added below the MultipleSourceFiles3 entry in the Projects tab of the Management window as shown here (notice that they’re now actually part of MultipleSourceFiles3 and not just a reference):The files are now copied, not referenced.

Many developers find the need to use existing files in a project. It’s something you’ll do quite often, especially with header files. Of course, when working with header files you also have the option of using the #include directive. Please let me know if you have any questions about this process at [email protected].

Antivirus and Application Compilation


This is an update of a post that originally appeared on 
April 2, 2014.

Sometimes applications don’t get along, especially when one application is designed to create new content at a low level and the other is designed to prevent low level access to a system. Such is the case with compilers and antivirus applications in some cases. I haven’t been able to reproduce this behavior myself, but enough readers have told me about it that I feel I really do need to address it in a post. There are situations where you’re working with source code from one of my books, compile it, and then have your antivirus application complain that the code is infected with something (even though you know it isn’t). Sometimes the antivirus program will go so far as to simply delete the application you just compiled (or place it in a virus vault).

The solution to the problem can take a number of forms. If your antivirus application provides some means of creating exceptions for specific applications, the easiest way to overcome the problem is to create such an exception. You’ll need to read the documentation for your antivirus application to determine whether such a feature exists. In most cases today, antivirus applications also provide settings that accommodate specific applications and you’ll want to check with the antivirus vendor and/or community support to see if this need has been met.

In some cases, the compiler or its associated Integrated Development Environment (IDE) simply don’t follow all the rules required to work safely in protected directories, such as the C:\Program Files directory on a Windows system. As far as I know, all of the development environments currently used in my books do follow the rules, so you shouldn’t have a problem in this area, but please let me know if you do. Often, the workaround for this problem is to install the application in a directory that the user owns and just avoid the security issue.

Not including the application in the Windows path can cause problems and I cover this issue in the Adding a Location to the Windows Path post. In addition, there are problems with installing the source code in a path containing spaces or lacks proper access. I discuss these issues in the Source Code Placement post.

Unfortunately, creating exceptions and installing the application in a friendly directory only go so far in fixing the problem. A few antivirus applications are so intent on protecting you from yourself that nothing you do will prevent the behavior. When this happens, you still have a few options. The easiest solution is to turn the antivirus program off just long enough to compile and test the application. Of course, this is also the most dangerous solution because it could leave your system open to attack.

A safer, albeit less palatable solution, is to try a different IDE and compiler. Antivirus programs seem a little picky about which applications they view as a threat. Code::Blocks may cause the antivirus program to react, but Eclipse or Visual Studio might not. Unfortunately, using this solution means that steps in the book may not work precisely as written. In addition, unless the compilers are compatible, the book’s source code may not compile at all without changes. Because I can’t cover every contingency, I also can’t support using a compiler other than the one specifically called out in a book.

Getting a different antivirus application is also a good idea. Antivirus applications and IDEs have come a long way since I originally created this post, but some antivirus applications really don’t work well and create more headaches than they’re worth. The choice is up to you, of course, but with the wealth of antivirus programs available on the market today, there isn’t a good reason to avoid getting something new when the situation warrants.

My goal is to ensure you can use the examples in my books without jumping through a lot of hoops. When you encounter problems that are beyond my control, such as an ornery antivirus application, I’ll still try to offer some suggestions, but I can’t take time to fix your system. In this case, the solution truly is out of my control but you can try the techniques offered in this post. Let me know if you find other solutions to the problem at [email protected].

Creating Sensible Error Trapping

This is an update of a post that originally appeared on May 23, 2011.

Errors in software happen. A file is missing on the hard drive or the user presses an unexpected key combination. There are errors of all shapes and sizes; expected and unexpected. The sources of errors are almost limitless. Some developers look at this vastness, become overwhelmed, and handle all errors the same way—by generating an ambiguous exception for absolutely every error that doesn’t help anyone solve anything. This is the worst case scenario that’s all too common in software today. I’ve talked with any number of people who have had to employ extreme effort just to figure the source of the exception out; many people simply give up and hope that someone has already discovered the source of the error.

At one time, error handling functionality in application development languages was so poor that it was possible to give the developer the benefit of a doubt. However, with the development tools that developers have at their disposal today, there is never a reason to provide an ambiguous “one size fits all” exception. For one thing, developers should make a distinction between the expected and the unexpected. Any expected error—a missing file for example—should be handled directly and specifically. If the application absolutely must have the file and can’t recreate it, then it should display a message saying which file is missing, where it is missing from, and possibly how to obtain another copy.

Even more than simply shoving the burden onto the user, however, modern applications have significantly more resources available for handling the error automatically. For example, it’s quite possible to use an Internet connection to access the vendor’s Web site and automatically download a missing application file. Except to tell the user what’s happening when the repair will take a few minutes, the application shouldn’t even bother the user with this particular kind of error—the repair should be automatic.

All of my essential programming books include at least mentions of error handling, debugging, exceptions, and other tasks associated with running code efficiently and smoothly. For example, Part IV of C++ All-In-One for Dummies, 4th Edition is devoted to the topic of debugging. Part V Chapter 3 of this same book talks about exceptions. If you’re a C# developer, C# 10.0 All-in-One for Dummies discusses exception handling in Book I Chapter 9. Book IV Chapter 2 discusses how to use the debugger to find errors. The point is that it’s essential to handle errors in your applications in a manner that makes sense to the users who rely on the application daily and the developers who maintain it.

Note that many of my newer books provide instructions for working with online IDEs, most especially Google Colab. These online IDEs rarely provide built-in debugging functionality, so then you need to resort to other means, such as those expressed in Debugging in Google Colab notebook.

Exceptional conditions do occur. However, even in these situations the developer must avoid the generic exception at all costs. If an application experiences an unexpected error and there isn’t any way to recover from it automatically, the user requires as much information as possible about the error in order to fix it. This means that the application should diagnose the problem as much as possible. Don’t tell the user that the application simply has to end—there is never a good reason to include this sort of message. Instead, tell the user that the application can’t locate a required resource and specify the resource in as much detail as possible. If possible, let the user fix the resource access problem and then retry access before you simply let the application die an ignoble death. Remember this! Any exception that your application displays means that you’ve failed as a developer to locate and repair the errors, so exceptions should be reserved for truly exceptional conditions.

Not everyone agrees with my approach to error trapping, but I have yet to hear a convincing argument to provide unreliable, non-specific error trapping in an application. Poor error trapping always translates into increased user dissatisfaction, increased support costs, and a reduction in profitability. Let me know your thoughts on the issue of creating a sensible error trapping strategy at [email protected].

An Update on the RunAs Command


This is an update of a post that originally appeared on 
May 14, 2014.

Recently I wrote the Simulating Users with the RunAs Command post that describes how to use the RunAs command to perform tasks that the user’s account can’t normally perform. (The basics of using the RunAs command appear in Windows Command-Line Administration Instant Reference.) A number of you have written to tell me that there is a problem with using the RunAs command with built-in commands—those that appear as part of CMD.EXE. For example, when you try the following command:

RunAs /User:Administrator "md \Temp"

you are asked for the Administrator password as normal. After you supply the password, you get two error messages:

RUNAS ERROR: Unable to run - md \Temp
2: The system cannot find the file specified.

In fact, you find that built-in commands as a whole won’t work as anticipated. One way to overcome this problem is to place the commands in a batch file and then run the batch file as an administrator. This solution works fine when you plan to execute the command regularly. However, it’s not optimal when you plan to execute the command just once or twice. In this case, you must execute a copy of the command processor and use it to execute the command as shown here:

RunAs /User:Administrator "cmd /c \"md \Temp""

This command looks pretty convoluted, but it’s straightforward if you take it apart a little at a time. At the heart of everything is the md \Temp part of the command. In order to make this a separate command, you must enclose it in double quotes. Remember to escape the double quote that appears within the command string by using a backslash (as in \").

To execute the command processor, you simply type cmd. However, you want the command processor to start, execute the command, and then terminate, so you also add the /c command line switch. The command processor string is also enclosed within double quotes to make it appear as a single command to RunAs.

Make sure you use forward slashes and backslashes as needed. Using the wrong slash will make the command fail.

The RunAs command can now proceed as you normally use it. In this case, the command only includes the username. You can also include the password, when necessary. Let me know if you find this workaround helpful at [email protected].

Accessing a Global String

This is an update of a post that originally appeared on June 30, 2011.

Some examples work well across multiple editions of my book with slight modifications, so if you have the third edition of my book and this code looks familiar, it probably is with small changes. The example in question in this case now appears in Book I Chapter 7 of C++ All-In-One for Dummies, 4th Edition. The example shown in Listings 7-6, 7-7, and 7-8 describes how to declare a global int variable using extern and one reader wanted to extend this example to the string type. The reader had tried several times, but kept getting the following error message (in fact, you can find this same error in Code::Blocks 8.02 and 10.05 and the update in this post works with both versions):

error: 'string' does not name a type

I’m assuming that you’ve already read the discussion about this example (be sure you read the entire section from pages 183 to 185). Creating a fix for this problem isn’t hard, but providing some example code will make things easier to understand. The first issue is to include the required support in main.cpp (shown in Listing 7-6). Here’s an updated version that includes an entry for a string variable named CheeseburgerType.

#include <iostream>
#include <string>
#include "sharealike.h"
 
using namespace std;
 
int main()
{
  DoubleCheeseburgers = 20;
  CheeseburgerType = "Deluxe";
  EatAtJoes();
  return 0;
}

As you can see, you must provide #include <string> and then set CheeseburgerType to a value, which is "Deluxe" in this case. Otherwise, the example works precisely the same as before.

Let’s look at sharealike.h next (Listing 7-7). The following code changes are essential or the example will never work.

#ifndef SHAREALIKE_H_INCLUDED
#define SHAREALIKE_H_INCLUDED
 
using namespace std;
 
extern int DoubleCheeseburgers;
extern string CheeseburgerType;
void EatAtJoes();
 
#endif // SHAREALIKE_H_INCLUDED

Notice the inclusion of using namespace std;. The example will fail to compile without this statement added unless you specify the namespace as part of the type declaration. Once you define this addition, you can create the extern string CheeseburgerType; declaration. Of course, if string were part of another namespace, you’d use that namespace instead.

The final part of the puzzle is to create the required implementation. This part appears in sharealike.cpp (Listing 7-8). Here’s the final piece of the example:

#include <iostream>
#include <string>
#include "sharealike.h"
 
using namespace std;
 
int DoubleCheeseburgers;
string CheeseburgerType;
 
void EatAtJoes() {
  cout << "How many cheeseburgers today?" << endl;
  cout << DoubleCheeseburgers << " " << CheeseburgerType << endl;
 }

As with main.cpp, you must add the appropriate #include. In addition, this part of the example updates EatAtJoes() to include CheeseburgerType in the output. When you run this example, you’ll now see a cheeseburger type in the output as shown here:

The output of the updated version of GlobalVariable shows the kind of cheeseburger.
The output of GlobalVariable now shows the kind of cheeseburger.

Are there any questions on this extension? Please let me know at [email protected]. You can download the updated version of the code as GlobalVariable2 here:

Simulating Users with the RunAs Command

This is an update of a post that originally appeared on April 26, 2011.

One of the problems with writing applications, administering any network, or understanding system issues is to ensure that you see things from the user’s perspective. It doesn’t matter what your forte might be (programmer, administrator, DBA, manager, or the like), getting the user view of things is essential or your efforts are doomed to failure. Of course, this means seeing what the user sees. Anyone can run an application at the administrator level with good success, but the user level is another story because the user might not have access to resources or rights to perform tasks correctly.

Most knowledgeable users know that you can simulate an administrator by right clicking the application and choosing Run As Administrator from the context menu. In fact, if you Shift+Right Click the application, you’ll see an entry for Run As A Different User on the context menu that allows you to start the application as any user on the system. However, the GUI has limitations, including an inability to use this approach for batch testing of an application. In addition, this approach uses the RunAs command defaults, such as loading the user’s profile, which could cause the application to react differently than it does on the user’s system because it can’t find the resources it needs on your system.

A more practical approach is to use the RunAs command directly to get the job done. You can see some basic coverage of this command on page 480 of Windows Command-Line Administration Instant Reference. To gain a basic appreciation of how the user views things, simply type RunAs /User:UserName Command and press Enter (where UserName is the user’s fully qualified logon name including domain and Command is the command you wish to test). For example, if you want to see how Notepad works for user John, you’d type RunAs /User:John Notepad and press Enter. At this point, the RunAs command will ask for the user’s password. You’ll need to ask the user to enter it for you, but at that point, you can work with the application precisely as the user works with it.

Note that I highly recommend that you create test user accounts with the rights that real users have, rather than use a real user’s account for testing. Otherwise, if something goes wrong (and it usually does), you’ve damaged a real user’s account. Make sure you follow all of the usual policies to create this test user account and that you have as many test user accounts as needed to meet your organization’s needs.

Of course, many commands require that you provide command line arguments. In order to use command line arguments, you must enclose the entire command in double quotes. For example, if you want to open a file named Output.TXT located in the C:\MyDocs folder using Notepad and see it in precisely the same way that the user sees it, you’d type RunAs /User:John “Notepad C:\MyDocs\Output.TXT” and press Enter.

In some cases, you need to test the application using the users credentials, but find that the user’s profile gets in the way. The user’s system probably isn’t set up the same as your system, so you need your profile so that the system can find things on your machine and not on the user’s machine. In this case, you add the /NoProfile command line switch to use your profile. It’s a good idea to try the command with the user’s profile first, just to get things as close as you can to what the user sees. The default is to load the user’s profile, so you don’t have to do anything special to obtain this effect.

An entire group of users might experience a problem with an application. In this case, you don’t necessarily want to test with a particular user’s account, but with a specific trust level. You can see the trust levels setup on your system by typing RunAs /ShowTrustLevels and pressing Enter. To run an application using a trust level, use the /TrustLevel command line switch. For example, to open Output.TXT as a basic user, you’d type RunAs /TrustLevel:0x20000 “Notepad C:\MyDocs\Output.TXT” and press Enter. The basic trust levels are:

  • 0x40000 – System
  • 0x30000 – Administrator
  • 0x20000 – Basic User
  • 0x10000 – Untrusted User

Many people are experiencing problems using the /ShowTrustLevels and /TrustLevel command line switches with newer versions of Windows. The consensus seems to be that Microsoft has changed things with the introduction of UAC and that you’ll need to work with the new Elevation Power Toys to get the job done. You may also want to review the article PowerToys running with administrator permissions because it provides some insights that may be helpful in this case as well. I’d be interested in hearing about people’s experiences. Contact me at [email protected].

Checking Your Compiler in Code::Blocks

This is an update of a post that originally appeared on April 6, 2011.

Compilers are important because they turn your human-readable source code into executable code that the computer understands. Selecting the right compiler is essential if you want to obtain the best results from your application. Some readers have asked, “Just how do you select a compiler when working with C++ All-In-One for Dummies, 4th Edition?” The book assumes that you’re using the GNU GCC Compiler setting and there isn’t any guarantee another compiler will work with the book’s source code. Use these steps to check your compiler setting.

  1. Open the Code::Blocks application.
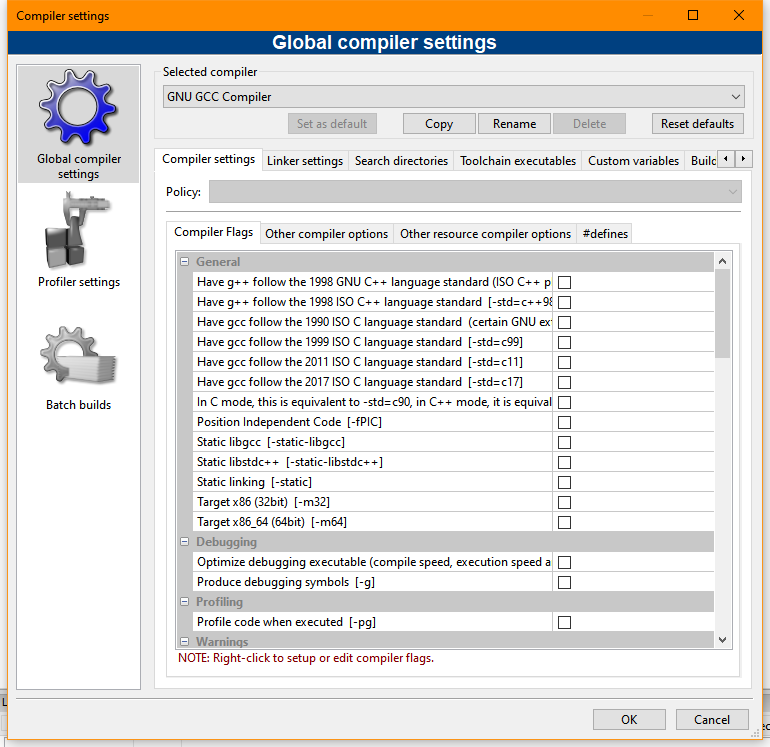
  2. Choose Settings | Compiler and you see the Global Compiler Settings dialog box shown here:
    A display of the Global Compiler Settings dialog box in Code::Blocks.
  3. Choose GNU GCC Compiler in the Selected Compiler field as shown in the figure.
  4. Click OK.

You should be ready to work with the book’s code at this point. Let me know if you have any problems choosing the right compiler at [email protected].

Creating Useful Comments

This is an update of a post that originally appeared on November 21, 2011.

A major problem with most applications today is that they lack useful comments. It’s impossible for anyone to truly understand how an application works unless the developer provides comments at the time the code is written. In fact, this issue extends to the developer. A month after someone writes an application, it’s possible to forget the important details about it. In fact, for some of us, the interval between writing and forgetting is even shorter. Despite my best efforts and those of many other authors, many online examples lack any comments whatsoever, making them nearly useless to anyone who lacks time to run the application through a debugger to discover how it works.

Good application code comments help developers of all stripes in a number of ways. As a minimum, the comments you provide as part of your application code provides these benefits.

  • Debugging: It’s easier to debug an application that has good comments because the comments help the person performing the debugging understand how the developer envisioned the application working.
  • Updating: Anyone who has tried to update an application that lacks comments knows the pain of trying to figure out the best way to do it. Often, an update introduces new bugs because the person performing the update doesn’t understand how to interact with the original code.
  • Documentation: Modern IDEs often provide a means of automatically generating application documentation based on the developer comments. Good comments significantly reduce the work required to create documentation and sometimes eliminate it altogether.
  • Technique Description: You get a brainstorm in the middle of the night and try it in your code the next day. It works! Comments help you preserve the brainstorm that you won’t get back later no matter how hard you try. The technique you use today could also solve problems in future applications, but the technique may become unavailable unless you document it.
  • Problem Resolution: Code often takes a circuitous route to accomplish a task because the direct path will result in failure. Unless you document your reasons for using a less direct route, an update could cause problems by removing the safeguards you’ve provided.
  • Performance Tuning: Good comments help anyone tuning the application understand where performance changes could end up causing the application to run more slowly or not at all. A lot of performance improvements end up hurting the user, the data, or the application because the person tuning the application didn’t have proper comments for making the adjustments.

The need for good comments means creating a comment that has the substance required for someone to understand and use it. Unfortunately, it’s sometimes hard to determine what a good comment contains in the moment because you already know what the code does and how it does it. Consequently, having a guide as to what to write is helpful. When writing a comment, ask yourself these questions:

  • Who is affected by the code?
  • What is the code supposed to do?
  • When is the code supposed to perform this task?
  • Where does the code obtain resources needed to perform the task?
  • Why did the developer use a particular technique to write the code?
  • How does the code accomplish the task without causing problems with other applications or system resources?

There are many other questions you could ask yourself, but these six questions are a good start. You won’t answer every question for every last piece of code in the application because sometimes a question isn’t pertinent. As you work through your code and gain experience, start writing down questions you find yourself asking. Good answers to aggravating questions produce superior comments. Whenever you pull your hair out trying to figure out someone’s code, especially your own, remember that a comment could have saved you time, frustration, and effort. What is your take on comments? Let me know at [email protected].

C++ Data Type Usage

This is an update of a post that originally appeared on October 16, 2015.

Originally I provided this post to correct an example in a previous edition of the book. Now I’m providing it to clarify that same example to a greater degree and answer reader input. The Going Overboard section on page 64 of C++ All-In-One for Dummies, 4th Edition talks about the problems that can occur when you try to stuff a number that’s too large into a specific data type. The problem with the example shown:

cout << 12345678 * 100 / 2 * 3 * 3 << endl;

is that while it does display a warning message, the warning really doesn’t get the point across. In order to see the example as originally intended, you need to change the code to read:

long MyLong = 12345678 * 100 / 2 * 3 * 3;
cout << MyLong << endl;

The code will now produce a warning and you can see why in a clearer way, just as described in the book, because the data type isn’t ambiguous any longer. In both cases you see a warning message of:

warning: integer overflow in expression of type 'int' results in '1260587804'

One of the ways to overcome this problem is to ensure that you use the correct sized variable in the first place. The following code doesn’t produce a warning message because of the use of auto (telling the compiler to choose the correct variable type automatically) and ll (telling the compiler to use a long long variable for the calculation).

auto AutoSize = 12345678ll * 100 / 2 * 3 * 3;
cout << AutoSize << endl;

A number of readers were happy that I pointed the problem out, but wanted to see a fix for the problem as well. When you run the example with the additional code, you see outputs of:

1260587804
1260587804
5555555100

Only the third answer is the correct one and it points out the need to pay attention to both warnings and errors as you code. Please let me know if you have any questions or concerns about this example at [email protected].

C++ Switch Statement Using Strings

This is an update of a post that originally appeared on May 13, 2015.

Readers sometimes ask me the same question often enough that I feel compelled to provide the answer on my blog so that everyone has the benefit of seeing it. C++ does have a switch statement, but you need to use a numeric value with it as described in my book, C++ All-In-One for Dummies, 4th Edition (see page 295 for details). A number of C# developers who are also learning to use C++ have asked me about using strings in the switch statement, which is clearly impossible without some fancy programming technique.

Fortunately, I have found a method for implementing switches using strings on CodeGuru. As the author states, it’s not a perfect solution and you may not find it works for you, but it is an ingenious coding technique and you should at least look at it. It’s better than saying the goal isn’t achievable using any means. To get a better idea of the methods other coders have used to overcome this problem, check out online discussions, such as Why switch statement cannot be applied on strings?.

Something I haven’t been asked about very much, but is really important, is the use of other approaches when working with switches, such as expressions. The C++ switch..case Statement article shows how to use expressions with switch statements, while Switch Statement in C/C++ explores some interesting uses of expressions with switches in more detail. The switch statement documentation discusses upcoming changes for C++ 23, but these changes currently don’t appear in my book.

Of course, I’m always on the lookout for other good solutions to reader problems. If you have another solution to this issue of using strings with the C++ switch statement, please contact me at [email protected]. I always want to keep the door open to an even more innovative solutions. In the meantime, keep those e-mails coming!