Growing Herbs (Part 1)

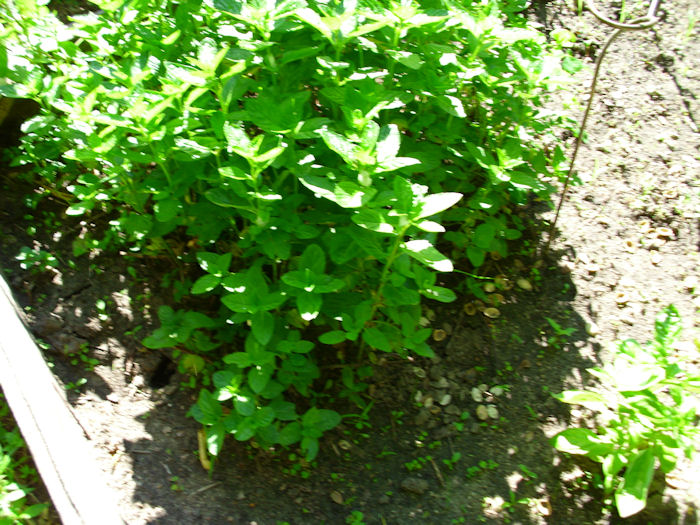
We have a number of gardens on our property and some of them are quite specialized. For example, Rebecca grows a wide variety of mint. She has the usual spearmint, of course, but she grows a huge number of other mints. My personal favorite is lime mint. It actually a lime flavor underlying the mint taste. I find it refreshing during the winter months. Lime mint shares most of the same characteristics of other mints. It looks like this:

LimeMint

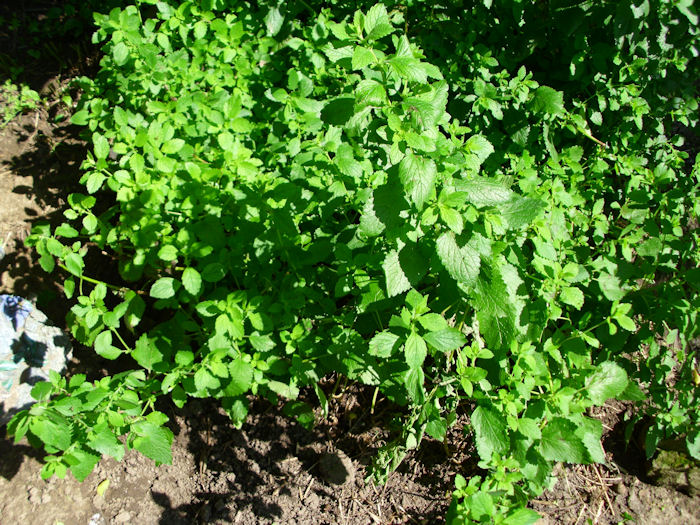
Some of the mints she grows don’t even have mint in the name. Of course, there’s catnip, a form of mint enjoyed mainly by cats. However, there is also lemon balm, another favorite of mine because it has a perky flavor that’s good during the daylight hours (lime mint is more for the evening to relax). You can see by this picture that the two mints look similarthe best way to tell mints apart is to look at the leaf size and shape, and then rub a bit on your fingers and sniff.

LemonBalm

In addition to these mints, we also have orange mint, chocolate mint, and others. Rebecca will wait until these plants grow a bit taller and then take some (but not all) of the stalks inside for drying. She picks the individual leaves off and dries them in a food dehydrator. Another post will discuss this technique. We’re both strong advocates of dehydrating as a way of saving on storing costs and producing fat-free treats.

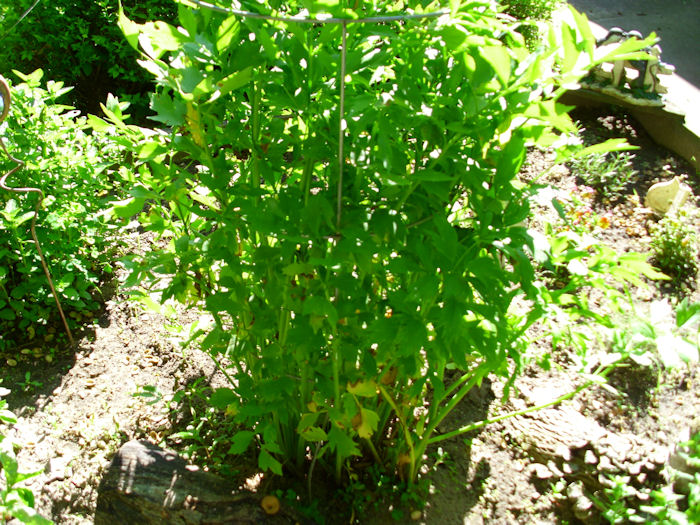
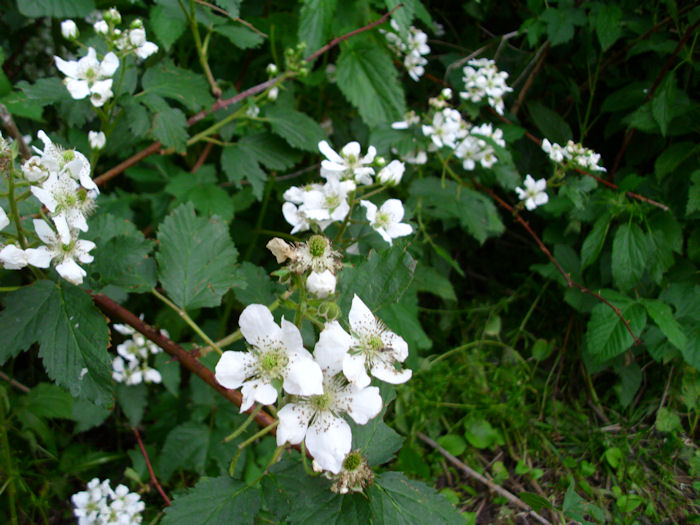
Lest you think our herb garden is entirely devoted to mint, we grow a wide variety of other plants as well. A favorite for soups is lovage, which has a strong celery taste. It grows as tall stalks with sparse leaves. Near the middle of the season the lovage plant will produce flowers. You can use the seeds as celery seed. Here’s what lovage looks like (we keep it in a tomato cage so it doesn’t blow over).

Lovage

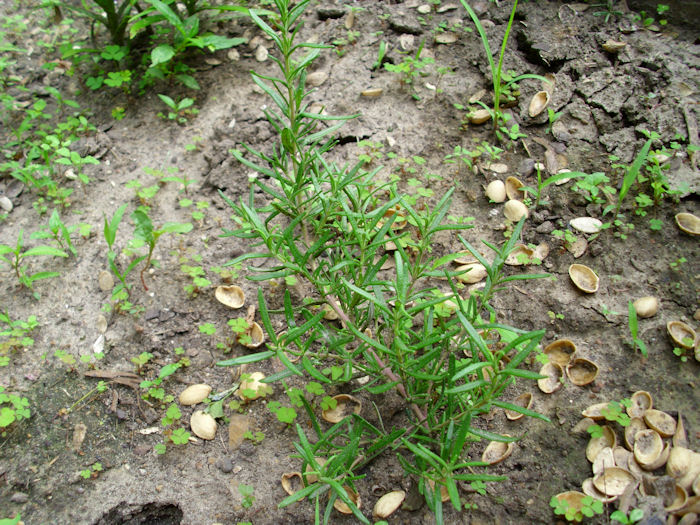
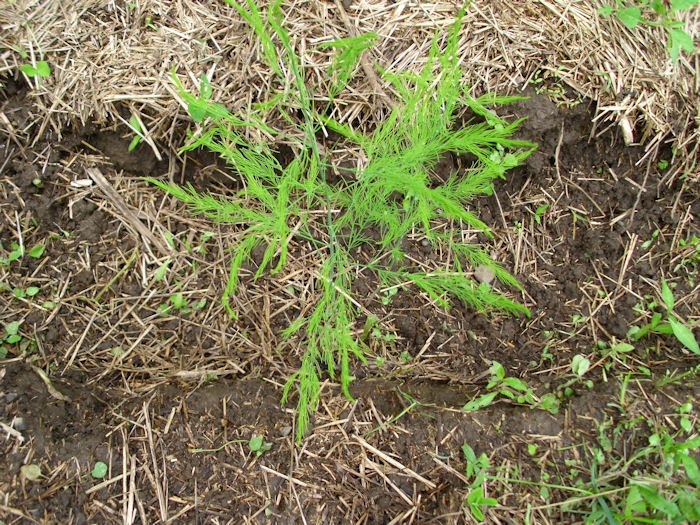
I use a lot of rosemary and thyme in my cooking, so Rebecca grows quite a bit each year. Rosemary has somewhat thick, almost cylindrical leaves and a strong aromatic odor. It does amazing things for chicken, lamb, and pork. Because we eat a lot of chicken, we use a lot of rosemary. Here’s what the young rosemary plant looks like:

Rosemary

By the way, just in case you’re wondering, yes those are nut shells. We don’t waste anything, not even nut shells. They actually make a fine addition to the herb garden soil and keep it loose. Eventually, the nut shells rot down and make nice compost for the herb garden.

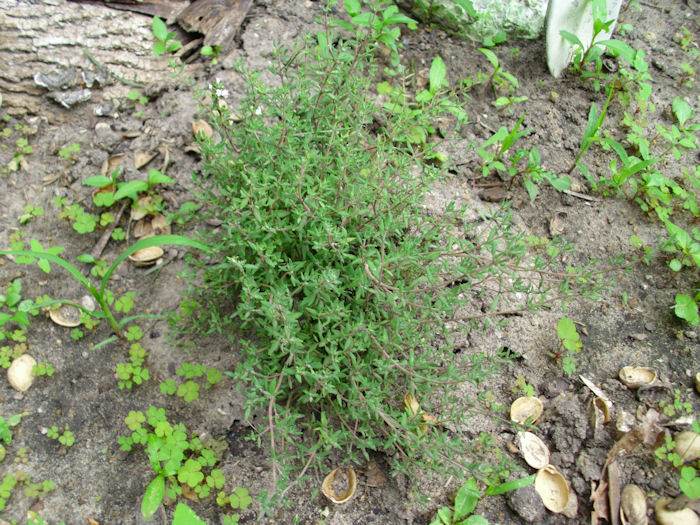
Most people don’t realize it, but there are several different kinds of thyme. This year we have lemon, lime, and orange thyme. All three have a thyme taste and small, but with subtle differences. The plants actually look quite different, so it’s somewhat easy to tell them apart. Here’s the lemon thyme:

LemonThyme

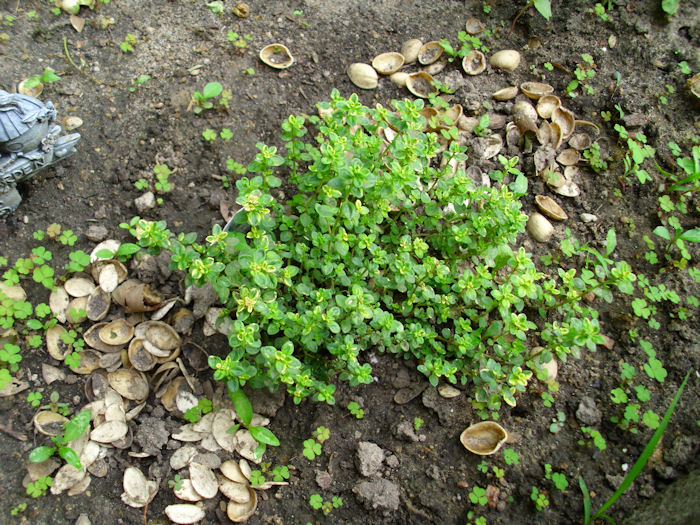
Notice that the lemon thyme has bits of yellow on its leaves. The leaves are also a bit rounder than other kinds of thyme. Compare the lemon thyme to the lime thyme shown here:

LimeThyme

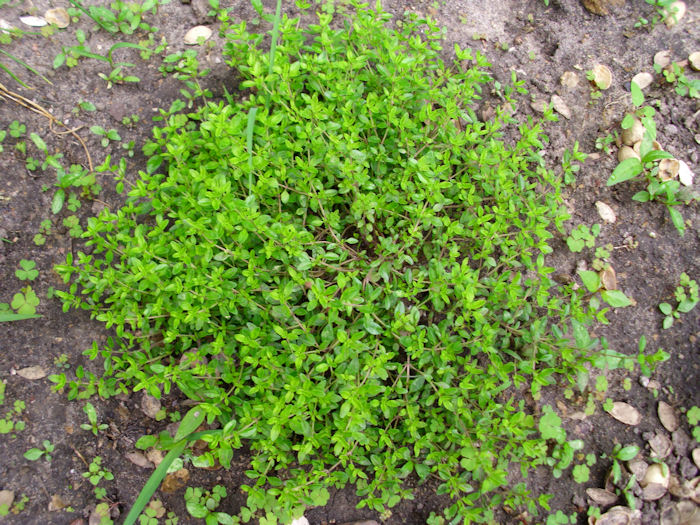
The lime thyme leaves are larger, brighter green, and a little elongated when compared to the lemon thyme. These leaves also last the yellow spots on them (making it a less pretty form of thyme in my opinion). Our newest kind of thyme is the orange thyme, which looks sort of like the lime thyme as shown here.

OrangeThyme

However, as you can see, the leaves of the orange thyme are much darker. In addition, the stems have a significant reddish cast to them. All three are thyme, but each has subtle differences that will make a big difference in cooking. We’ll use all three types with meat dishes, just like the rosemary.

I can’t do our herb garden justice in a single post, so expect to see more as the summer progresses. In the meantime, let me know if you have any questions at [email protected].


Cherry Tree Woes

Cherry trees can be incredibly hard to raise, as I’m learning over the years. We originally planted four Northstar cherry trees on our property. The description of the tree seemed perfectit only grows 6′ to 10′ tall, produces copious amounts of tart cherries, and is quite hardy.

Unfortunately, it also has an open structure that Yellow Bellied Sap Suckers find absolutely irresistible (yes, they really do exist). We ended up with neat rows of little holes in the trunk of each of the cherry trees. Because the birds alternated between the wild cherries in our woods and our cherry trees, our Northstar cherries eventually ended up with a disease called bacterial canker. The sappy ooze emitted by the wounds attracted all sorts of other pests. Eventually, the bacterial canker girdled the trunk and killed our Northstar cherries (well, all except one that simply refuses to die, so we let it stay there, but it has yet to produce cherries and it never has grown more than a few feet tall).

We decided to try again with a cherry that the Yellow Bellied Sap Sucker might find less inviting. This time we chose the Mesabi cherry and planted four more trees. The tight branch structure did keep the birds at bay. In fact, the trees produced 53½ pounds of cherries in 2009. However, late last year we noticed that the leaves were turning yellow in mid-summer and that the fruit yield was very low. This year we won’t receive any fruit from our cherries because they’re essentially dead, as shown here.

Cherries01

There are still some leaves on this tree, but it isn’t nearly as full as it should be and it won’t recover. All four trees have a virus they received from an insect (type unknown). There are a number of indicators. The most noticeable is that the tree has almost no leaves, yet, there isn’t anything obviously wrong such as bacterial canker. The leaves the trees do have are yellowish with darker green around the veins, as if the leaves aren’t receiving enough nourishment.

A more telling symptom is something called flux. The tree is leaking small amounts of sap (not the copious amounts as with bacterial canker). This sap is turning black as bacteria attacks it as shown here.

Cherries02

That blackish spot (circled in red) would be very easy to miss. (Each tree has many of these little black spots.) In fact, I didn’t know what I was looking at. A master gardener friend of mine pointed it out. The ants don’t miss opportunities like this though. The trees are loaded with themall looking for a free meal of sap.

The trees are actually dying from the inside out. There is a wound on one of the trees where you can see the inside of the tree literally rotting as shown here.

Cherries03

Notice how the edge of the wound has lifted upit isn’t curled tight against the wood of the tree. This indicates that the tree is trying to heal itself, but that the new growth has nothing to stick to. The new growth should be tight against the wood.

I’ll be cutting the four trees down sometime soon, drying the wood out, and using it to smoke various meats. It would be a shame to use such nice wood in the wood stove. The trees definitely won’t go to waste.

Unfortunately, I can’t plant new cherry trees in the same spot (or in the location where the other cherry trees were). In both cases, the trees have left their diseases in the ground. If I plant new trees in these locations, they’ll immediately become infected. Consequently, I’ll be looking for a new type of cherry (or cherries) and a completely different location next year. One major lesson I’ve learned is that trees of the prunus genus require significantly more care than either apples or pears.

This spot will be taken over by butternut trees next year.  We don’t have any butternut trees in our woods (they can grow in the wild), so the addition of nut trees will be nice. I know that our woods do contain hickory nuts and plan to gather as many as I can this next fall (as soon as I identify precisely where the trees are located). What are your favorite sorts of nuts and fruits? Let me know at [email protected].


Planting Asparagus – Part 2

Earlier this spring, the Planting Asparagus – Part 1 post discussed some basics of getting the asparagus in the ground. Unlike many other garden plants, asparagus requires quite a bit of effort to get going. However, once planted, an asparagus bed will flourish for many years without much in the way of maintenance, so the up front effort is worth it.

By this time, your asparagus has sprouted and you’ve probably weeded it more than once. It seems as if asparagus attracts weeds for whatever reason. Perhaps it’s the trencheswho knows for certain? If you’ve only seen asparagus in the store, you might have even pulled a few of the young plants accidentally. Here’s what your baby asparagus will look like:

Asparagus011

That’s right, it looks sort of like a fern on a stem. By now you should have a number of these fern-like growths in the trench. When they get this tall, you need to start adding dirt to the trench. Don’t bury any of the branches coming off the main stem. Add just enough loose dirt (don’t pack it down) to bring the trench up to the next level. Burying part of the stem will encourage the asparagus to grow taller.

Now you’ve got some asparagus to tend, but it’s still not done yet for this summer. We’ll visit this topic again. In the meantime, let me know if you have any questions at [email protected].


Getting Started with Chickens

Rebecca and I don’t raise chickens every year. We raise chickens for two years, then give the land a rest on the third year. This cycle ensures we meet a number of goals, including the reduction of disease risks that could occur if we raised chickens every year. We normally start with 75 Cornish Rock chicks because that provides us with about 1½ year’s worth of meat. The chicks arrive in a box like this one:

Chickens0101

The baby chicks are packed pretty closely together so they stay warm. Chicks require a considerable amount of warmth or they’ll die. If you get chicks at some point, don’t be surprised at just how tightly they’re packed:

Chickens0102

Of course, you’ll want to get them out of there as quickly as possible (the chicks will tend to want to run all over the place if you let them). However, the chicks don’t know how to drink when you first get them. The safest way to teach them to drink is to dip their beaks in a water solution as shown here.

Chickens0103

The solution shown here is actually Gatorade. It contains a number of things the chicks need to get started. We provide them with watered down Gatorade for the first few days and find that it reduces the number of chick deaths (in most cases, we lose 2 or 3 chicks during this first stage, but we’ve had years where we didn’t lose any).

At this point, you put the chick into some type of container (we use a large cardboard box) with a pan of chick starter. We don’t believe in using many chemicals with our chickens, but we do use a chick starter that has medications in it to prevent diseases such as coccidia.

The chicks are kept under heat lamps until their full feathers grow in. We use disposable tin plates and replace their paper daily to ensure the chicks remain in the healthiest possible environment as shown here:

Chickens0104

As the chicks grow, we’ll move them to non-medicated food. In fact, they’ll often eat garden scraps, plenty of grass, and have access to various other items that chickens would normally eat (such as worms) because we raise them in chicken tractors. We also move our chicks outdoors to chicken tractors so they can get plenty of fresh air and sunshine. I’ll talk about this next stage in a later post. For now, the chicks are snug under the heat lamps.

Chickens0105

It’s important to provide the chicks with enough space, but not too much space. If you provide too much space, the more aggressive chicks will trample and kill the less aggressive chicks. At this point we supply 9 square inches of space for each chick. As the chicks grow, we increase the allotted area to 1 square foot per chicken.  The full grown chickens will have 2 square feet or more of space. (Full grown chickens normally receive 1/2 square foot of space in factory conditions.)

We’ll start out by making food available to them 24 hours a day.  After the first five days, we’ll withdraw food at night to prevent health problems. The chicks will have clean water available 24 hours a day. Overfeeding chicks (as is done in factory conditions) can result in a condition known as flip (the chick dies of a heart attack). We prefer to let our chickens grow slowly.


Garden Structures

Rebecca and I have managed to get the garden planted for the year. The contents of the garden vary each year to accommodate our personal tastes and also to ensure the larder remains full of good things to eat. One of the big things we wanted to do this year was install a new fence potentially made from aluminum. We are yet to do this but we have learned all about this and more from Illinois Fence Company. So, this year, the small garden (20′ × 20′) contains tomatoes, okra, and eggplants. Our tomato crop is a bit smaller this year at only twelve plants in the main garden (we also have two plants in the salad garden).

Like many people, we use cages to hold our tomatoes. However, the somewhat strong winds in our area have a habit of knocking the tomato cages over and damaging the vines long before they’re through for the season. To prevent this from happening, I came up with a technique for enhancing the survivability of the cage setup using electric fence posts. Electric fence posts come in a number of formswe prefer the 48″ metal variety that comes with a triangle of metal at the bottom. You push them into the ground with your foot and they hold relatively well for smaller loads. Each tomato cage requires one fence post as shown here:

TomatoStakes01

Place the posts so that they’ll oppose movement by the wind, so that little triangle at the bottom has the best chance of holding when the wind is high. The next step is to get the tomato cages in place. Put the upper ring (or third ring on a four-ring tomato cage) on the outside of the post and the second ring on the inside of the post so that the post is threaded through the tomato cage. Use cable ties to secure both rings to the post as shown here:

TomatoStakes02

You can clip off the excess cable tie using a side cutter pliers. The combination of tomato cage and electric fence post normally keeps everything in place, even in high winds. The completed setup looks like this:

TomatoStakes03

The main garden (60′ × 80′) contains a wealth of vegetables and fruit this year. Of course, you saw some of the permanent bed items in the Early Spring – The Garden and Orchard post. In addition to those items, the main garden now contains potatoes, summer squash, winter squash, snap peas, standard peas, lima beans, green beans, broccoli, cauliflower, brussels sprouts, carrots, sweet peppers, sweetcorn, asparagus, and comphrey. Later in the season we’ll probably plant beets and perhaps a few other short growth time items.

We get bush varieties of vegetables when we can because they require significantly less setup than the vine varieties. However, peas are one of the vegetables for which there aren’t any suitable bush varieties, so we need to erect a fence for them to grow on. The one mistake I made in getting fencing material is that our fence is only 30″ highthe peas really need something taller (upwards of 5′). However, we just let the vines grow over the top and things work out acceptably.

The fence has to be movable from year-to-year to allow for rotation. In addition, we don’t grow peas every year, so sometimes the little fence is used for something else (such as cucumbers) and sometimes not at all. In order to grow the quantities we need, the fence is 50′ long.

The weight of the produce demands that we use something a little more sturdy that electric fence posts to hold the fence up at the ends, so this project requires T-posts, which are considerably heavier than electric fence posts (and more expensive too). In addition, you need a T-post driver/puller to work with this type of post. If you have good chest strength, you can get by with a much less expensive T-post driver and pull the posts out by wiggling and then pulling them out at the end of the year.

We used chicken wire as fencing material. It’s inexpensive, lasts an incredibly long time if you take it down each year (ours is 12 years old now and no sign of rust at all), and the small openings are perfect for peas and cucumbers to grow on. You begin by driving a T-post into the ground and then attaching one end of the fence to it using cable ties as shown here. There are other materials that also act as a maintenance free solution but we like to use the chicken wire as the veggies can climb it, giving it a dual purpose.

PeaPost01

Make sure you use enough cable ties and that the cable ties are of the heavier variety available in garden stores. Use the fencing to help define the location of the second T-post. Drive the T-post into the ground, pull the fencing as taut as possible (using one or two helpers), and temporarily attach it to the T-post.

At this point, you can add electric fence posts every four or five feet. Begin at one end and work toward the other end. Always pull the fence taut, using a helper to make it possible to attach the fence using cable ties. Use four cable ties minimum and make sure you use a double cable tie at the top (one cable tie slightly lower than the other) to keep the fence from sagging too much as the peas or cucumbers grow as shown here:

PeaPost02

Eventually, you’ll get to the other end of the row. At this point, you can reattach the fencing the T-post, if needed, to remove any slack. Your fencing won’t be completely straight, but it’ll look nice and provide good structure for the peas. Here’s my completed fence:

PeaPost03

Of course, the garden is far from complete. We’re weeding between the rows now and will then add mulch. More on these tasks in another blog post. In the meantime, let me know if you have any questions at [email protected].

Berries in the Woods

Many people see a woods and think about the trees. In fact, that’s all they think about. However, a healthy woods is more than just the trees. A healthy woods has a significant biodiversity of all sorts of plants and shrubs that rely on the woods for cover and environment. Along the ground you’ll see interesting plants such as the bloodroot shown here:

BloodRoot

There are a number of sources that tell you what a useful plant bloodroot is. Of course, the woods are also the source of foods such as the morel mushroomnot that I was particularly successful in finding any this year. When I do find them, they cook up nicely in a stew or simply sauteed in a bit of butter. The woods provides this amazing bounty without any effort on my part, except in preservation efforts I take on the wood’s behalf.

Keeping the woods happy is incredibly important. One food source (and the reason for today’s post) is the humble berry. My woods is simply packed with berry brambles so I have looked on campingfunzone.com to see which ones are ok to eat. A personal favorite is the gooseberry shown here:

Gooseberry

The gooseberries have already blossomed and set fruit. I won’t pick them though until mid-summer. I prefer a mix of dark black and green gooseberries for use in preserves (jam) or pie. We have both European and American gooseberries. Even though the European gooseberry is larger, the American gooseberry doesn’t suffer from mildew problems and produces more fruit per bush. I’ve found that the American gooseberries are a bit more tart than the European variety and that they’re better a bit on the green side. Mixed, the two kinds of gooseberry produce a delectable treat you won’t find in your local store (at least, not without a lot of looking). Gooseberries are terribly hard to pickthe long thorns will rip up your arms, even with long sleeves. Gingerly picking up the individual canes and picking the berries underneath works best.

A berry that ripens earlier is the blackcap (also known as a black raspberry). They also flowered and set fruit quite some time ago. I keep a watch on them because they tend to ripen quickly and don’t last particularly long on the bushes. Blackcaps are the easiest berries to pick and have an amazing flavor that differs from their red raspberry counterpart. They’re a bit smaller than red raspberries. We have a few red raspberry canes in the woods, but not enough to do much, so we mix them with the blackcaps. Because we don’t have a lot of blackcaps, we tend to use them for preserves.

The last berry of the season is the blackberry. It’s larger than the other berries. In fact, in a good year, a blackberry will be about the diameter of my thumb and about half as long. The blackberries are still in bloom and won’t set fruit for another week or two as shown here:

Blackberries

In a good year it’s nothing for me to fill two or three gallon buckets with blackberries in an early morning picking session. We’ll use them for pie, preserves, wine, and just eating. The thorns of the blackberry are a bit longer than those of the blackcap. The longer canes make it harder to maneuver amongst the plants. In addition, our blackberries tend to grow on the sides of the hills, making them a little inaccessible at times. Of course, the taste is worth all of the effort.

I’ve only touched on a few highlights of the woods in this post. The biggest reason to maintain a healthy woods is that the majority of our pollinators live them. Every spring I count the number of different pollinators that visit our fruit trees. This year I counted eleven. Some I knew, such as the bumblebee, mason bee, black bee, and sweat bee. There were also a number of wasps and a few other varieties of pollinator that I haven’t researched as of yet. The point is, the majority of these pollinators come from our woods, so a healthy woods is essential to our health. Interestingly enough, the berry brambles in the woods are an important food source for pollinators in the early spring, so my delicacy is their delicacy too. What sorts of berries do you like? Let me know at [email protected].


Making Wine – Day 31

Welcome to Day 31the best day of the process . The previous post, Making Wine – Day 28, described how you can clear your wine. At this point, your wine should be clear. It may not be pristine, but you shouldn’t see more than a few particles here or there. If you see a bit of pectin haze, you probably won’t be able to clear it easily at this point and will need to amend your recipe to obtain better results in the future. However, if you’re seeing more than a few particles, wait a few additional days before bottling. If the particles don’t clear up in two or three more days, you might want to repeat the Day 28 processing. Professional wineries actually have a filtering system they use to improve the clarity of their winethe home wine maker has only time and technique to rely upon.

Assuming that your wine is clear, you’ll want to sterilize enough bottles to hold it. A single gallon container will normally provide four bottles of wine, plus a little leftover. These dregs are usually drinkable as long as you don’t pick up too much sediment, but you don’t want to bottle them. Choose good quality wine bottles. The type with the screw top don’t hold up well and you could even break the bottle during the corking process. Use the one-step sterilizer to wash the bottles and make sure you get any sediment out of the bottles. It helps to have a bottle brush designed specifically for wine bottles.

Before you can bottle your wine, you need to have a supply of corks and a corker. Many kits come with tasting corks that are absolutely worthless for storing your wine. These corks are probably good for three or four months worth of storage in optimal conditions and look like this:

WineDay31_1

What you want instead is an actual wine cork that looks like this:

WineDay31_2

You can find them in several sizes and in a number of materials. My personal preference is actual cork, but I know of many people who are able to use the plastic corks with good results. It’s essential to choose a cork that fits the bottle you usea #8 cork fits the standard bottle used by wineries and normally found in kits. You may have to use a different size if you choose to store your wine in a 1.5 liter bottle. The choice of cork determines the corker you use. Even a cheap floor corker (required to use anything larger than a #8 cork) will cost you a small fortune. That’s why I chose standard sized bottles, the #8 corks, and a Portuguese twin lever corker that looks like this one:

WineDay31_3

The problem with this corker is that it does require a fair amount of arm strength to use. Some people much prefer the Gilda compression hand corker, which is moderately priced and requires about half the strength, or a bench model corker, which is whopping expensive and requires even less strength to use. The kind of corker you get is also dependent on how many bottles you plan to cork. Since I only make 2 gallons at a time, I get by corking 8 bottles and using the corker that I do works fine.

A problem that many new wine makers encounter is overfilling the bottle. If you overfill the bottle, you’ll find it nearly impossible to cork. In addition, the cork won’t seat fully (making spoilage more likely). It’s even possible that you could crack the bottle; although, I’ve never personally had this happen. Use the racking technique described on Day 10 to fill the bottles right to the point where the neck and shoulder meet like this:

WineDay31_4

After you fill the bottle, insert the cork into the corker. Normally, the corker will have a slot you use to load it as shown here:

WineDay31_5

When you place the corker on the bottle, make sure it sits squarely and fully on the bottle top as shown here:

WineDay31_6

Push down on both handles (or on the single handle as determined by your corker) with an even, steady pressure. Eventually, the cork will seat properly and fully in the bottle. At this point, you can label your bottle and dress it up a bit (if desired). Even though your wine is drinkable at this point, you’ll normally wait three to six months for it to continue mellowing and settling. Store your wine in a wine holder designed to keep the cork wet in a cool, dry place. That’s ityou’ve completed the wine making process in a mere 31 days! So, are there any questions about day 31? Let me know at [email protected].

This post ends my basic series of posts about wine. Of course, there are all kinds of other topics I can cover. Let me know if you have a personal preference on what I discuss next in this blog.


Health Benefits of Self-Sufficiency (Part 2)

One of my earliest posts on self-sufficiency touted the health benefits of this form of living. I most definitely stand by that postanything you can do to improve your health is good. In the time since I wrote that post, I’ve gotten critical illness insurance quotes, looked into any illnesses common in my family, improved my diet even more, had more frequent doctor check-ups and lost still more weight – and I now control my diabetes using diet alone. In fact, I no longer take any sort of medication to manage health issues. I’m still not out of the woodsnor is my wife. We both know that we have further to go if we want this lifestyle to produce the desired results. However, it’s nice to see the progress that we’ve made. We’re intending to have the condition of our health regularly checked over by services that can be provided by Southwest Care or a similar health clinic to ensure we are always progressing in the right direction.

Some people are under the wrongful assumption, however, that simply changing diet, losing weight, and living healthier will undo the wrongs of the past. My situation is a case in point. Losing weight has actually caused a health problem in my case and I recently had to have my gallbladder removed to solve the problem. Many sites tell you that rapid weight loss will cause the formation of gallstones, but this isn’t quite true. Every medical professional I’ve talked with has told me outright that any weight loss greater than 50 pounds can result in gallstones. If you’re diabetic, the gallstones are especially troublesome because they can cause problems with the pancreasan organ already overextended by diabetes. Certainly, my 4 pound per month average weight loss isn’t rapid and well within the recommended guidelines. My take on all this is that there is no free lunchif you’ve abused your body you’re going to pay a price for it.

However, in the grand scheme of things, losing a gallbladder is certainly preferable to the problems I’d experience if I remained at my former weight. Diabetics have all kinds of increased health risks, including loss of eyesight, heart troubles, kidney damage, and nerve damage. Getting my weight and diabetes under control was the right thing to do, even if it cost me a gallbladder to do it. You can easily live without a gallbladder, but you can’t live without a heart and life is far less liveable without eyes. In fact, if you’re living a healthy lifestyle, you’re unlikely to even notice that the gallbladder is gone once you get over the surgery.

What bothers me in all this is that the medical profession is lax about telling anyone the potential consequences of a seemingly healthy decision. Perhaps the thought is that any discussion of anything negative will only discourage people so that even fewer will take a positive course of action. Everything you do has a consequence, so it’s best to be informed. I hadn’t gotten very far along my current path when I discovered this potentially negative side effects of weight loss, but I had to conduct my own research to obtain the information. Of course, that’s my recommendation to you as well. You need to go into any health-related decision with eyes open. In my case, I made an informed decision and realized early there were risks.

So, what does this all have to do with self-sufficiency? Getting rid of the medications, learning to eat right, exercising nearly every dayall of these goals are part of being self-sufficient. As part of my self-sufficient lifestyle I’ll maintain more of my muscle mass far later in life (my 78 year old uncle can still lift 100 pound bags of feed), but I’ll pay for that ability with additional joint wear, so I imagine that I’ll need hip and/or knee surgery at some point. A self-sufficient lifestyle isn’t for everyone, perhaps you prefer the gym or simply a walk in the park, but getting healthier is a benefit to everythingmost importantly yourself. I encourage you though to research your decisions and make the best decisions you can, realizing that there are always risks that you’ll have to deal with as part of that decision. How are your healthier living goals progressing? Let me know at [email protected].

Making Wine – Day 28

At this point, it doesn’t appear that there is any activity in your wine container, but activity still exits. Yes, the fermentation process is complete, but the wine is still in an early state. When you remove the air lock and take a whiff, you smell something with a distinct wine odor. It’s even possible to drink the wine now and you might possibly enjoy yourself, but you’d be cutting the process short.

The next step is a seemingly odd one because it requires a certain amount of wizardry on your part. You might have noticed that your wine is still a tiny bit cloudy and that it doesn’t quite have the taste you wanted. That’s what this post addresses. This is the fit and finish phase of your winethe phase that turns your homemade wine into something that could rival the best wine on the market.

Begin by racking the wine using the same procedure found on Day 10. Make sure you clean your container after you pour its contents into another container. Once you have the wine in a suitable container, put a small amount in a small glass. If you want to follow the fancy way of doing this, you’ll swirl the wine around a bit, inhale deeply, and then sip it gingerly. Personally, I find that taking a good deep smell and then tasting the wine using smallish sips is much better. If you used the Montrachet yeast, you’ll find that your wine has a nice odor, but that it’s probably too dry and that the flavor hasn’t quite come out. In short, the wine will be a little disappointing.

To overcome this problem, you add sugar to your wine. Now, remember that your wine is stabilized at this point, so you don’t want to make the wine horribly sweet (a problem I’ve noted in more than a few homemade wines) because there isn’t any yeast to clean up the excess. Add a little sugar at a time and then repeat the smelling and tasting process. Small sips are best. If you find that your nose is working less efficiently by the third or fourth try (I always do), give it a bit of a rest. Inhale some coffee grounds (if you have it around), then try again. The sugar you add at the end of the process is one the place where no one can offer you truly useful adviceeveryone has a different standard.

Now that your wine is properly sweetened, you need to perform one more step. This particular step caused me no end of consternation when I first tried it. It’s time to clarify your wine. Clarity problems come in three forms:

  • Pectin Haze: Pectin found in many fruits will cause a haze in your wine if not removed during the fermentation process. The haze is nearly impossible to remove at this point, but this step will help a little. However, most people won’t even notice it. The haze is slight in most cases. Amend your recipe to use more pectic enzyme (see the Day 1 post for details).
  • Free Floating Particles: Some wine ingredients, such as pumpkin (makes a wonderful warmed wine), will leave particles behind. The best way to avoid this problem is to filter your ingredients initially, before you add them to the wine. You can also use a two-step fermentation process that takes significantly longer than my wine making technique. This step will remove at least some of these free floating particles. Letting the wine rest for an extended period will also help.
  • Yeast Cells and Tanin Complex Materials: Your wine will almost certainly have yeast cells and other materials left over after the fermenting process. These particles are smaller than the larger particles left over from the main ingredient (such as pumpkin) This step always resolves this sort of clarity problems.


You need to obtain some Sparkolloid powder. Not every supply store stocks it, but the effort of getting this product is more than repaid by a superior wine. Add 1 tablespoon to 1¼ cup of vigorously boiling water and stir for five minutes (keep the pan on the stove while you stir). When I first started using this product, I tried all sorts of other time intervals, but you really do need to stir it for the full five minutes to obtain optimal results.

This action doesn’t apparently do muchat least, not much that you can see. What you’re actually doing is creating a static charge in the mixture (hence the need for vigorous stirring). This static charge will help clear your wine, much like an ion filter cleans the air in your house. The fine particles floating around in your wine are attracted to the charged particles in the Sparkolloid powder and drop to the bottom of the container. Interestingly enough, you’ll also find that this step improves both the taste and smell of your wine.

After you stir the Sparkolloid powder for five minutes, add 1/6 cup (8 teaspoons) of mixture to each gallon of wine. Mix it in thoroughly and pour the wine back into the container. Close the container using the airlock as usual. Put the wine containers in a cool location. That’s it! So, are there any questions about day 28? Let me know at [email protected].

Making Wine – Day 23

If you’ve been following this series of posts, you’ll know that Monday was actually day 23, but I’m posting today about it due to some scheduling conflicts. The last post was on Day 10. At that time, the wine fermentation was slowing down, but still active. By the time you get to Day 23, the wine has basically stopped fermenting. You might see a line of tiny bubbles at the top of the container, but that’s about it.

You still don’t have drinkable wine. If you tasted it at this point, nothing terrible would happen, but it wouldn’t have a good wine taste just yet. In fact, your wine may still have a yeasty odor to it. The step you perform today is important because it helps stabilize your wine so you start getting the right odor and flavor.

First, look at the bottom of the container. If there is little or no sediment, you don’t have to rack your wine again. However, if you see more than 1/8-inch of sediment, consider racking your wine using the same instructions as Day 10.

At this point, pour about 1/4 cup of your wine into a cup. Add 1/2 teaspoon of potassium sorbate per gallon to the wine. Potassium sorbate is a yeast inhibitor and will help stabilize your wine. It doesn’t stop active yeast from working, but it does stop the fermentation process from restarting. The potassium sorbate mixes with extreme ease. Pour the wine back into the container and stir it using the handle of your spoon. Because the potassium sorbate mixes easily, you don’t have to stir the wine a lot.

Replace the airlock on your container. Move your containers to a cooler location (between 40 and 60 degrees Fahrenheit) to aid in stabilization. That’s it! So, are there any questions about day 23? Let me know at [email protected].