Determining the Amount of Shelving You Need

I never anticipated receiving quite so many e-mails about larder shelving (including a few comments about the quaintness of the term). When determining the amount of larder shelving you need, you must consider the kinds of storage you use. We group our storage into four areas:

  • Ready Storage: Used to hold food short term. It includes the refrigerator, kitchen cabinets, and under worktable storage (five gallon buckets).
  • Deep Freeze: Used for moderate term food storage. Some foods don’t can well or they taste better when you freeze them. We have two freezers (one small and one large) for freezing fruit, vegetables, and meat items. Because we vacuum pack our foods, we store some items up to two years. The freezers are kept at 0 or less to ensure the food is thoroughly frozen. Each summer, before we begin storing the harvest, we take everything out of the freezers and use everything that has gotten old in some way (we sometimes put old food in the compost where it turns into dirt that will be used for new food).
  • Larder: Used for long term canned storage of food. Many items will last up to five years in the larder because of the canning techniques we use. Every spring every can is cleaned and inspected to ensure it remains safe. The larder is organized to present the oldest items up front so they’re used first.
  • Root Cellar: Used for winter fresh storage. As the name implies, we use our root cellar to store roots. However, we also use this area to store apples, pears, and squash. The root cellar sees use from September to around April each year. It’s never used during the summer months, mainly because our root cellar isn’t damp or cool enough during that time and the food would spoil.

It’s essential that you determine how each area will ultimately work into your food storage strategy. If you decide to expand your storage area by using an unused cabinet, make sure it is cleaned and sanitized well. Especially the kitchen cabinets ought to be thoroughly cleaned. If your cabinets are broken or needs refinishing, you can consider looking for cabinet refinishing companies in fairfax va (or where it is more local to you). Determining how large to make the larder then becomes a matter of portions. If you want to be fully self-sufficient, you need to decide where the food will come from for your meals in a general sense.

Let’s look at a specific example. We drink a 6 ounce glass of juice with breakfast four days a week on average. That’s a total of 6 ounces per glass * 2 people * 4 days a week * 52 weeks a year or 2,496 ounces per year. We follow a two year plan for juice because it’s easy to obtain from a number of sources, so that’s a total of 4,992 ounces for the two years. All of our juice is canned, so all of that juice has to be stored in the larder. Juice is canned in quart jars, so we need 156 jars (at 32 ounces per jar) to store that much juice. From last week’s post you know that each shelf segment can hold 42 quart jars, so we need 3.7 shelf segments for juice.

To fill out the remainder of breakfast, we usually have a grain product of some type. In addition, some meals include breakfast meat and/or eggs. Along with juice, we also drink milk and coffee. All of these items come from ready storage, so you don’t need to consider them in creating your larder.

Lunch is our main meal of the day. Normally we have meat four days a week. Most of the meat comes from the freezer. However, on busy days, we used canned meat from the larder. The canned meat is computed a bit differently. We normally can the smallest chickens and one chicken produces two quarts of canned meat. Each quart contains four pieces: half a breast, wing, leg, and thigh (see Cutting Up a Chicken for details). One quart serves as a main meal and a snack when eaten directly or as two main meals when eaten as part of a salad or casserole. Normally we process eight chickens at a time and the first two processing sessions produce the canned chicken, so there are 32 quarts of canned chicken produced each year, that require 0.8 shelf segments. We produce 1 ½ years worth of canned chicken each year for two years (and take off the third year), so the maximum shelf space used at the end of year 2 is 1.6 shelf segments.

Along with our meat, we normally have two kinds of vegetables, some of which come from the larder, but can also come from ready storage, the root cellar, or the freezer. This is where you need to keep records on how you use your various food storage areas. About 70 percent of our vegetables come from the larder. We eat one quart of vegetables when there is meat included in the meal and one and a half quarts on our vegetarian days. Vegetables are generally stored in pints, but there are times when we store vegetables in quarts as well. Because vegetables tend to have longer cycles between good yields we follow a three year plan. The calculation for vegetables becomes ((1 quart a day * 4 days) + (1.5 quarts a day * 3 days)) * 52 weeks a year * 3 years * .70 percentage stored in larder or 928 quarts or 22.1 shelf segments.

Our afternoon snack usually includes fruit, a grain product, and a dairy product. The fruit is the only item that comes from the larder. It can also come from ready storage, freezer, or root cellar. Our fruit portion is normally 1 pint per day when taken from the larder. Because fruit production can be incredibly unpredictable, we follow a four year plan. About 30 percent of our fruit comes from the larder. This means the calculation for fruit is 1 pint per day * 365 days a year * 4 years * .30 percentage stored in the larder or 5.2 shelf segments.

The evening snack can come from a variety of sources, but we normally have something quite small. This is the time of day we’ll have ice cream, leftover canned meats, fruit, cookies, or something else small such a dried fruit/vegetable slices (see Making Dehydrated Chips for details). I normally don’t include this snack in the calculations, but your eating habits might be different and you might need to include it. The new shelving does include space for four 5 gallon buckets worth of dried fruits and vegetables that don’t appear as part of the calculations that come later in this post.

We also make our own condiments, salsas, jellies, and other items that take up 3 shelf segments. Again, you need to consider your eating habits and make decisions based on those habits.

Now it’s time to add everything up to see how much space is required. Our total shelf segment usage (a shelf segment consists of 42 quarts or 84 pints) is 3.7 for juice, 1.6 for meat, 22.1 for vegetables, 5.2 for fruit, and 3 for condiments or a total of 35.6 shelf segments. Our two larder shelving units currently provide 39 shelf segments (not including the 5 gallon bucket/canning equipment storage in the new shelving unit). The remaining shelf segments are used for organizational purposes and for empty jars.

The calculations for determining how much shelf space you need can seem daunting, but if you address one meal at a time as I’ve done in this post, you should find it possible to do. What you need to do is focus on that meal and the portions you typically eat during that meal. Let me know if you have any additional questions on this topic at [email protected].


The Making of a Grape Fence

I have spoken a few times about our grapes (see Pruning the Grapes (Part 1) and Pruning the Grapes (Part 2) for details). A few people have asked for details about our four-cane Kniffin system setup. You can see some pictures of the setup in my posts and there is line art available that shows the setup various places online. However, most posts don’t provide details about the actual construction of the setup.

In my case, I used seven large black locust posts cut from trees my grandfather planted. I debarked the logs using a draw knife and then let them dry for a year before putting them into the ground. Black locust is naturally rot resistant and incredibly hard—even the woodpeckers don’t like it. However, carpenter ants will infest your logs given the chance, but even in this case, they hollow out the center and leave the outside intact. So far, I haven’t encountered a problem with carpenter ants because the grape fence is located far enough away from the woods. Because the posts I’ve used are so strong, I didn’t add the angled end posts shown in a lot of illustrations of grape fences. If you were to buy your posts from a lumber hard, you’d want sturdy 4″ diameter or larger posts. Each post is 9′ long and you bury 3′ of the post in the ground.

The cabling is 1/8-inch galvanized wire rope. You want to use wire rope because it’s made up of many small wire fibers and is quite flexible—making it easier to work with. This size cabling will support six to ten canes without any problem. Make sure you read about the weight capacity of the cabling. Each cable must be able to support a minimum of 50 pounds per cane per cable. So, if you have six canes in a row, the cable must be able to support at least 300 pounds (more is better). Otherwise, you have the risk of the cable breaking as the fruit ripens.

You’ll need some method of clamping the cabling. The method for attaching the cable to the earth anchors and turnbuckles is to create a loop and then clamp the loop. Some people will try to use crimping sleeves because they’re easy to work with and inexpensive. This solution works fine for fencing, but not for grapes. As your setup flexes and breaks into the task of supporting the grapes, you’ll need to make adjustments and tighten the cables. For this reason, you want to use wire rope cable clip clamps instead. I’ve found that the 3/16″ or 1/4″ sizes work best for the cabling used on my setup.

Two turnbuckles help tighten the cables. One turnbuckle for the upper wire and one for the lower wire. The turnbuckles make it possible to make small tightening adjustments as the season progresses (you normally make major adjustments in spring, before the canes become active). You want to keep the cables as tight as possible to help support the canes properly. I prefer a 5/16″ × 9 turnbuckle because it provides enough adjustment potential in most cases. Make sure the turnbuckles you choose can support the weight of the wire rope and canes.

The wire rope is ultimately supported by two earth anchors—one at each end. Both rope wires can go to the same earth anchor. It’s a mistake to assume that you can use a short earth anchor because it will pull out over time. In order to ensure that your setup will remain sturdy, you need a large earth anchor. My setup uses 6 × 48″ earth anchors with attached auger for maximum strength.

An earth anchor the size of the one discussed in this post requires a fair amount of muscle to put into the ground. I highly recommend having a piece of metal pipe to use to help get the anchor into the ground. My piece of pipe is about 30″ long. You put the pipe through the eye in the earth anchor and use it to turn the earth anchor as it goes down into the ground.

The final piece of the puzzle are the screw eyes used to hold the cable at each post. The screw eyes are attached at heights of 30″ and 60″ on my setup. Each screw eye must be able to support the weight of all of the canes and the wire rope. A 2-1/16″ screw eye (size 104) will probably work, but I prefer a larger 3″ screw eye to ensure it will hold up.

This is all that you need to setup a grape fence of the type I use. There are ways to make the fence using other materials and I’m not saying my method is the only method available, but it has worked well over the years we’ve had grapes. Let me know your thoughts on grape fence construction at [email protected].


Building Larder Shelving

Creating a place to store your canned goods is an essential part of making self-sufficiency work. In Fun is Where You Find It! (Part 3) you see one view of the larder shelving we use to store our canned goods in the basement. The shelving has to be built to withstand the weight of the canned goods without sagging. In addition, you want to be able to support part of someone’s weight when they need to regain their footing. If you are looking for supplies to help with your building project, you may want to visit a trade supplier website similar to Tradefix Direct, where you may be able to find the supplies you need for your building needs.

In order to create our shelving, I played with some wood and actually weighted it down to see when it would sag. I then used those assumptions to start designing the shelving and to feed the numbers into the Sagulator. The maximum amount of sag you should be willing to tolerate is 0.01 inch per foot. You need an engineering margin to ensure the shelves will hold up.

Of course, the problem is getting the numbers the Sagulator requires. A typical quart jar of canned goods filled with a liquid weighs 3 pounds. If you make the shelves 24 inches deep using three 1 × 8 boards and create spans of 25 inches, you can store 42 jars per span for a total weight of 126 pounds. Using #2 Douglas fir, you get a sag of 0.01 inch. You must consider the kind of wood that you’re using as part of your calculation and keep refining the measurements until you obtain a setup that works.

You also need to consider the shelf spacing. It’s important to allow finger spacing between the shelves so that someone can reach all the way into the back to retrieve a jar without problem. After a lot of experimentation, I came up with the following shelf spacing:

  • 8 inches for quart jars stacked one high
  • 10 inches for pint jars stacked two high
  • 16 ¾ inches for 5 gallon buckets and canning equipment

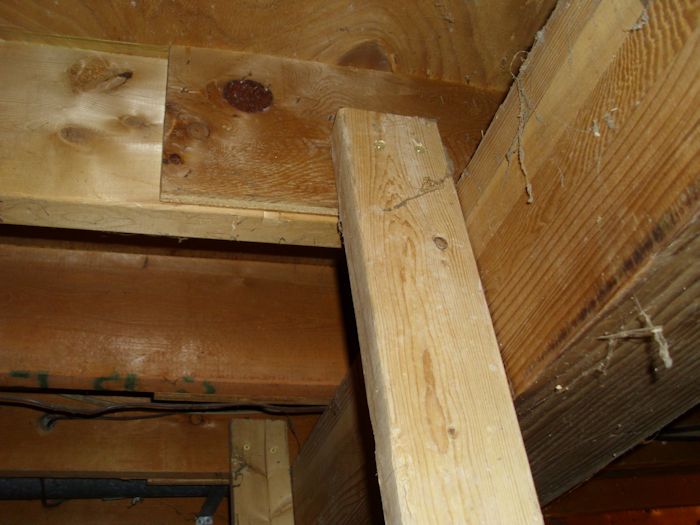
To create our new larder shelving, I started with four 2 × 4 supports tied into the ceiling joists. You absolutely don’t want the shelves falling on you, so make sure you use sturdy screws. I relied on 5-inch heavy decking screws that went completely through both the 2 × 4 support and the joist as shown here.

LarderShelving01

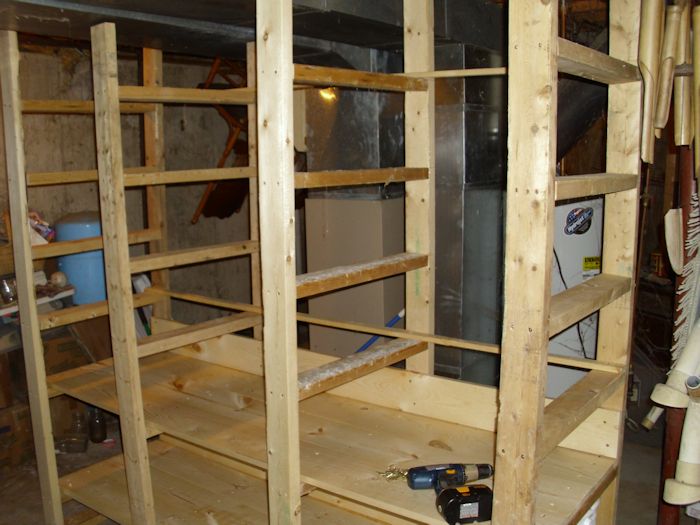
Make sure you use at least two sturdy screws to hold each framing member for the shelves for each shelf you create. My shelving ended up being 75 inches long, 24 inches deep, and 84 inches high. The shelving arrangement includes one shelf for five gallon buckets, two shelves for quart jars, and three shelves for pint jars as shown here.

LarderShelving02

Make absolutely certain you keep everything square and level as you build because any deviation will lower the amount of weight the shelving can carry. Each shelf should be tied into every framing member with at least two screws. In this case, that means eight screws per board or 24 screws for each shelf (because there are three 1 × 8 boards used for each shelf).

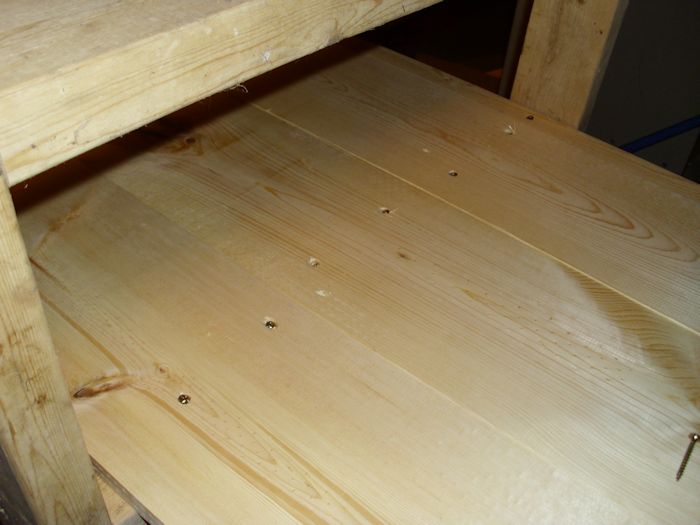
Because of the shelf heights, you’ll find that you have to insert the screws at an angle. Actually, this is a good way to add the shelving anyway because the screws gain greater purchase in the wood. However, make sure you alternate the direction you screw the screws so that you don’t end up racking the shelving (making it out of square or level). Of course, you may be able to insert the screws at a better angle if you had access to the best crossover ladder that you can find. My friend was telling me about them once, as he is required to use them whilst he is working in a warehouse. They can help you to reach things at a certain height, as well as keeping you safe at the same time, as otherwise, you could face some serious injuries. Even though the ladder is a good idea in this scenario, I think they are primarily used for things at a greater height. So, adjusting is key. Here is how your screw pattern should look.

LarderShelving03

In this case, the first and third shelves have screws coming in from the right, while the second (center) shelf has them coming in from the left. In the next section, I reversed the direction so that the first and second shelves came in from the left, while the second shelf came in from the right. Alternating directions like this helps make the shelves stronger.

Every shelf should also have a backer board to keep the canned goods from simply falling out the back of the shelf. In this case, I used 1 × 6 boards secured with two screws in each section. The backer boards also provide added strength to the entire unit.

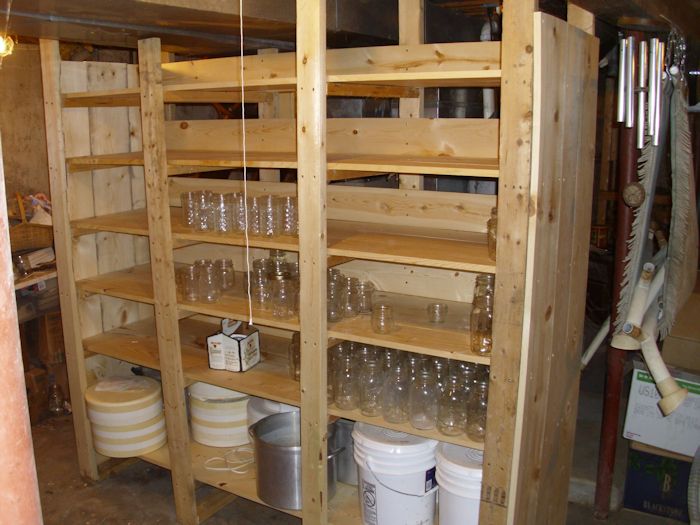
Finally, to keep things from sliding out of either side and to also provide places to put hooks for items we wish to hang, I added end pieces. These end pieces are made from two 1 × 10 and one 1 × 8 boards. Here is how the shelving looked after I finished it (with some items already in place).

LarderShelving04

When building shelving, make sure you take time to ensure that the shelving will actually hold the items you want to put on it. The essential issue is to control sag so that the shelving doesn’t fail in the long term. Let me know your thoughts about larder shelving at [email protected].

Rabbits Do Talk!

Some people envision rabbits as these quintessentially quiet animals who sit silently and never make their feelings known. However, in the real world, rabbits are actually quite vocal and will let you know precisely how they feel about any given topic. Of course, as with people, some rabbits are more vocal than others are. A few rabbits actually are quite docile and you must coax their feelings from them, but they’re rare (as are quiet people).

If you listen, your rabbit will talk to you. For example, if you hear a growling type noise, it means that your rabbit is annoyed or feels threatened in some way. When threatened, the rabbit will back into a corner (or at least away from the threat). However, when the rabbit is annoyed, it follows the growl with a loud thump from those tremendous feet. (OK, they don’t look all that huge to you, but when you consider the rabbit’s overall size, those feet really are monsters.)

Females who are annoyed with the male in their cage really do growl quite loud and will sometimes charge the male. In fact, several females we’ve had were quite willing to take a chunk out of the poor guy’s back (and all he was doing was asking for a date). If the female is feeling territorial, the growl may become a shorter and louder bark. When you see this behavior, it means the female is bred and the male had better just leave as quickly and as quietly as possible. If you hear barking from two males, it means that they’re both alpha males and are about ready to get into a fight. You must move one of the two males to a different cage.

A change in cage can sometimes trigger an annoyance response. We moved one of our rabbits to a different (and we thought nicer) cage. The rabbit was obviously not impressed. She spent quite some time charging at us, thumping her feet, and growling quite loudly. In some cases, she preceded a lunge with a hiss, which showed a kind of extreme annoyance. Yes, we heard her loud and clear (unfortunately, there was little we could do to appease her and she finally decided the new cage would be just fine after all).

Sometimes thumping goes hand-in-hand with some sort of physical demonstration. One male seemed quite annoyed that another rabbit (a female and her kits) had received all the nice carrot shavings while he was offered the same dry rabbit pellets as normal. So he thumped quite loudly and then threw his dish across the cage. We decided that the extra carrot in the refrigerator would make a wonderful peace offering and the rabbit agreed. The chickens ate the food that fell through the bottom of his cage, so everyone seemed quite happy with the way things turned out.

Honking is another vocalization. Think of it as someone with a serious sinus condition and you get the idea. A rabbit will generally make this noise when happy or wanting attention. Some of our breeder rabbits will actually shovel their noses into us and then honk to demonstrate that we really do need to pay attention to them. Of course, if we show them some, but not enough attention, the rabbit will almost certainly thump when we close the cage (and possibly throw the food dish against the wall as well).

Some rabbits will also grind their teeth when they are happy and want attention. Teeth grinding is a good thing and you want to hear it. It’s important to note that the teeth grinding in this case is quiet and light, not the heavy grinding associated with eating something.

Along with honking and teeth grinding, seriously happy rabbits will sometimes coo. Depending on the kind of rabbit and the level of happiness, some people associate this sound with a sort of buzzing noise. The rabbit will usually be extremely relaxed, sometimes with its back legs splayed out, and normally with its eyes closed.

Finally, there is the sound no one wants to hear, the high pitched rabbit scream. You normally hear it when the rabbit is in pain or in fear of its life. If you hear this sound, you know the rabbit needs immediate help. We heard it when some feral dogs in the area decided they might like a rabbit for dinner. Fortunately, our cages are well-built and the dogs didn’t have their way, but the rabbits in those cages were screaming quite loud. In fact, at least one of them passed out from fright (it later recovered).

Facial activities can also alert you to a rabbit’s mood. For example, twitching whiskers often denote curiosity (normally for a food item, but also for attention). The faster those whiskers twitch, the more curious the rabbit. Ears held forward and at the alert tell you that the rabbit has heard an unexpected sound. We’ve noted that some rabbits will furrow their brow when upset or annoyed.

What sorts of sounds does your rabbit make? Have you noticed facial expressions, positions of back feet and ears, and other behaviors that help you understand what your rabbit is trying to say? Let me know what you’ve observed at [email protected].


Chickens in the Woods

We let our chickens run about as they want. Yes, they have a run so that they can stay in a safe environment when desired or they’ll have a protected place to run if something chases them, but chickens do need the freedom to wander about. Besides, letting the chickens run around doing what chickens do best, eating insects, helps reduce the tick population in the woods. So, it didn’t surprise me the other day to see chickens in our woods while I was working on a relatively large log. However, I thought that they’d maintain their distance because my chainsaw does make a frightful amount of noise.

As I worked along, I noted that the chickens were getting closer. As soon as they saw me looking at them, they curtsied. Now it may sound quite odd to hear that chickens curtsey, but ours do quite regularly. The move their wings out in a manner reminiscent of a woman holding out her skirts and then they do a bit of a bow legged dip. It really is quite humorous to see. Our chickens curtsey when they want us to pick them up and hold them. Normally, this is followed by some amount of petting and us telling them how good they are. Our birds truly are spoiled in grand fashion.

Since I didn’t want to stop cutting the log up, I ignored the chickens and kept working. I felt that they would probably head back the other direction due to the noise of the chainsaw. So, it surprised me quite a lot to look up and see that they had gotten closer still. When they saw me looking again, they curtsied yet again—looking quite annoyed in a chicken sort of a way. I could almost see them huff and they were quite annoyed that their human just hadn’t gotten the idea that they really needed to be picked up and told what good birds they were.

Not taking the hint, I decided to continue working on the log. Certainly, they’d get the idea this time and go in the other direction or possibly stop to watch me for a while (something that chickens do relatively often because they really are quite nosy). When I looked up the third time, the chickens had gotten dangerously close to my logging operation and I decided that I really must get them to safety. Seeing me look again, they not only curtsied, but squawked quite loudly in order to better attract my attention.

So, I shut my saw off and went over to the two birds. I picked a bird up in each arm (good thing there weren’t three of them). Now, I’m walking down this rather steep hill, one chicken under each arm, hoping that I don’t fall. All the while I’m telling the chickens what good birds they are. Eventually, I get to the coop and let them inside. I go inside with them and tell them what good birds they are again and give them some pets. At this point, I closed the run door, got the rest of the birds inside, and then went back to work.

Lesson learned? If your chickens really think they need to be petted and they take the time to curtsey, don’t ignore them. I have to admit, they really did make my afternoon better. I laughed about their antics all the way back up the hill where I finished my log, loaded it into the cart, and dumped it down the chute. Feel free to share your favorite humorous chicken story with me at [email protected].


Cleaning Substitute

I’ve received a number of positive comments about the Using a Bleach Substitute post I provided a little over a month ago. The bleach substitute is somewhat potent and there are some negative issues with paracetic acid (although, far fewer than when using bleach). The main reason to use the bleach substitute is as an antibacterial. You use it on surfaces that you must keep bacteria free and are subject to contamination from various sources. The actual amount of paracetic acid in the bleach substitute I provided is quite small, but still, any amount does present hazards, so one of the most commonly asked questions is whether there is an alternative.

You can create a simple relatively non-toxic cleaner using 2 cups of water, 2 tsp of borax, and 2 tsp of white vinegar. However, enough borax (a naturally occurring mineral) will still cause some level of respiratory problems. Theoretically, you could eat enough of it to cause a number of negative symptoms or even cause death, but you’d have to eat quite a lot of it. In fact, borax is used as a food preservative in many countries (albeit, not in the United States). Borax is relatively benign as far as cleaning agents are concerned, but you must still treat it with respect.

This cleaning agent can be kept in a spray bottle beneath the sink because the amount of problematic agents is so small. You’ll find that it does an admirable job of cleaning surfaces and won’t cause any damage to metal surfaces. However, you’ll have to deal with the after effects of the vinegar smell, which does go away relatively fast. Some people recommend using essential oils to control the smell. However, if you add 6 or 7 drops of essential oil to the mixture, it may smell better, but now you have to consider the toxicity of the essential oil. If you choose to add an essential oil, make sure that you obtain a pure oil from a non-toxic source such as peppermint or orange.

Never mix the bleach substitute that I told you about with this cleaning substitute. In fact, mixing cleaners of any sort can cause all sorts of woe (up to and including death). Just as you would never mix bleach with ammonia (the resulting gas will kill you), you shouldn’t mix anything else unless you have a recipe for doing so. Let me know if you have any other questions regarding cleaning substitutes at [email protected].


Pruning the Grapes (Part 2)

It has been a while since I wrote Pruning the Grapes (Part 1). Of course, the grapes were actually pruned long ago. In fact, the biggest impediment to my pruning the grapes was the knee deep snow in many areas of the orchard. We still have some snow, but it has greatly diminished since then. In that first post I described some of the conclusions I had reached from pruning our own grapes and watching others work with their canes. I also mentioned that we use a four-cane Kniffin system for pruning purposes. I decided to grab a few pictures of the pruning process, in part, because the pictures in books sometimes make it hard to see precisely what you should do. This is just one method of how to prune grapes, but there are several other ways of doing so. If you’re wanting to learn to prune grapes, then carry on reading for my version –

There are actually two kinds of buds on a grape cane. The first is sharp and pointy like the one shown here.

PruningGrapes0202

This bud type produces the leaves later in the season. The second is rounder, almost globular like the one shown here.

PruningGrapes0203

This bud type produces the flowers that will eventually produce the grapes. The concept that completely eluded me at the outset was that a grape won’t produce any more buds for the current year after the previous year’s growing season. In other words, the buds you grow this summer are for next year’s fruit. When you prune, you must prune with the idea that the buds you have now are the only buds you’re going to get, so you need to prune carefully. A lot of the books also fail to point out that you want to keep the buds nearest the main branch so that the grapes receive sufficient water and nutrients. Finally, each spur should have only two or three fruiting buds-the globular ones. The spur can have any number of leaf buds-more is better in this case.

Some of these pictures are a bit hard to see because the light was intolerably harsh on the day I worked on the vines. However, there are a few things you should notice in this picture:

PruningGrapes0201

Notice that the spurs coming off the main cane don’t necessarily point down as it always seems to show in the pictures in books. The spurs will eventually point in the right direction because the grapes will pull them down. Don’t worry about spur direction-look instead for the spurs that have the nicest fruiting buds.

Also notice that the canes are tied to the steel cable. You need to put the canes in contact with the cable to promote attachment to it. Those curlicues coming from the cane are actually quite strong and will hold it in place, but only if they actually curl around the steel cable. You can’t use anything harsh to tie the canes in place. We actually use old pairs of pantyhose that have been cut up into usable pieces. The pantyhose are quite inexpensive and last several years (as many as five) before they start to disintegrate too badly. The most important part though is that they hold well without causing damage to the cane. Using a steel cable manufacturer you can trust is important to make sure your machinery is working properly and efficiently for you.

When you get done, your cane won’t look quite as pretty as the ones in the book. In fact, grape vines tend to look a bit gnarled. Here is how the pruned vine looked this year when I got done with it.

PruningGrapes0204

You can see the trunk, the four fruiting canes, and the spurs coming from the canes. The canes are looped or tied to the steel wire as needed. I’ll actually retie the lower left cane when the season progresses. At the time I pruned the cane, I was a bit worried about breaking it, so I left it as is. The upper right cane will also require a bit more support. Again, I chose to wait until it warms up a bit and the cane is more flexible. This grape vine will likely produce sixteen nice sized clusters of medium-sized grapes that I’ll eventually use to make wine or Rebecca will use for jelly or juice.

This is my approach to pruning grapes. Of course, there are many schools of thought on the issue. However, what I do hope is that the combination of pictures and some insights will help you get better grapes out of your vines. Let me know your thoughts on grape pruning at [email protected].

Get Ready…Get Set…Garden! 2013

This year’s trip to Baraboo for Get Ready…Get Set…Garden! is part of our continuing education. I talked about this particular educational opportunity in last year’s Get Ready…Get Set…Garden! post. The sessions are hosted by the Sauk County UW Extension, which actually puts on a substantial number of events during the year. Our itinerary for this year consisted of container bag gardening techniques, growing small fruits (strawberries, raspberries, and blueberries), and gardening with aches and pains (essentially a session on dealing with accessibility needs for gardeners).

The first session discussed container bag gardening and the advantages it offers over using buckets or over-sized pots to hold your garden on the patio. Every year Rebecca puts together a wonderful salad garden for me. Of special interest are the cherry and salad tomatoes. If I need a snack, I simply go outside, enjoy the flower garden she has put together for me, and munch a few tomatoes-nothing could be better than that. However, we had always wondered whether there might be something more that we could do. This year’s sessions shows that we can. However, instead of using the really expensive gardening bags that the instructor promoted as part of her business, we plan to use feed sacks. They’ll perform the same function and only cost a fraction of the amount (a bag large enough to grow tomatoes costs $22.00 if you go the garden bag route, the same size feed bag is free since we get them as part of buying feed for our animals). I’ll post again sometime later this year to let you know how the garden bags work.

We have also had a lot of problems growing blueberries, despite ensuring the ground is acid enough for them. It turns out that we have been doing a few things wrong-the most important of which is that we haven’t been watering our blueberries enough. It seems that they require almost boggy conditions to grow acceptably. Equipped with our new knowledge, we’re going to give blueberries another try this summer. One of the problems with gardening is that you aren’t likely to get the technique right on the first try, or the second, or the third. There are some people who think gardening is science. Well, that’s partially correct, but it’s also part art. Sometimes you just need to feel your way through a growing experience. The garden is looking great at the minute and I’m currently looking at storage buildings in PA as I need somewhere to store my tools and to put my feet up at the end of a rough day! I’m thinking of putting the building next to my allotment so that it’s looking out onto a nice view. I’m not 100% sure yet though!

Unfortunately, our instructor didn’t arrive for the third session. Someone with the UW Extension did fill in, but I can’t help but feel a bit disappointed because I was really looking forward to getting quite a lot out of this third class. As Rebecca and I get older, it would be nice to know about a few of the things we could do to make our gardening experience better. Even so, I must applaud the UW Extension instructor for getting up and giving an impromptu discussion on a topic that she hadn’t prepared for without any preparation time. To simply get up and start talking would be one thing-to do it exceptionally well given the circumstances is nothing short of amazing. I also plan to post again on some thoughts I garnered on meeting accessibility requirements for gardening.

There are some benighted people who think that education ends when you leave high school or college. Education is a lifelong endeavor. Gaining new knowledge and then turning it into wisdom adds spice and keeps our minds fit. Whether your intellectual love is technical, natural, or in some other realm, take time to embrace it by furthering your education. Let me know your thoughts on continuing education at [email protected].


Using a Bleach Substitute

I have become a label commando in recent years. People actually become quite disturbed waiting for me to finish my latest epic reading of a cleaning product or food label. I read everything, including the list of ingredients when I can find one. More importantly, I look for what’s missing on the label. For example, I’m surprised at how many margarine labels refuse to tell me that they don’t contain any cholesterol. Lest you think this is one of those odd fetish requirements-some fish oil tablets actually contain cholesterol. We pay the extra to buy a product that’s labeled cholesterol free (and yes, it does make a difference when the doctor tests your cholesterol).

So I was taken by surprise recently when I read a bleach label. The stuff should be labeled toxic waste and left go at that. The label told me about the dire consequences of using the product, such as permanent damage to my esophagus. Bleach is also a terrible product to use in a house with a septic system because it kills off all of the helpful bacteria in the septic tank and causes the waste to just sit there (possibly flooding your house with a really smelly mess). However, the part about not putting the empty container in the trash or in the recycle bin is what got me most. Just where was I supposed to dispose of the container? It turns out that you’re supposed to take it to a hazardous waste disposal site, at least that is according to the Control of Substances Hazardous to Health (COSHH) regulation. A product labeled hazardous waste has no place in my house. (Just consider the fact that many of the foods you buy in the store have been soaked in bleach and you don’t have to think very long about why your food is making you sick.) It made me think about what other hazardous materials around my house needed special disposal procedures and the COSHH meaning regarding these materials.

Of course, country homes require some means of keeping things clean and getting rid of bacteria, just like anyone else does. It turns out that there is a really good solution and it actually works better than bleach. Most importantly, this solution is pretty much harmless to everyone and everything. You fill up two bottles: one with vinegar and another with hydrogen peroxide. Spray a surface first with the vinegar and second with the hydrogen peroxide and you create a really effective cleaning agent called peracetic acid. The point is to keep the two components separate until you actually need to use them in order to gain a highly effective cleaner that’s a whole lot less harmful than bleach.

What impressed me most is that the combination actually works well on carpets as a stain remover. It’s also much more effective than bleach at getting bathroom grout clean and it works especially well on surfaces with small crevices. Some people do mix the two and add water for use in laundry, but keeping the two chemicals separate is the best way to avoid the potentially toxic qualities of the peracetic acid. As with any cleaner, you do want to use this one with care, but it’s frankly a lot better than using bleach. Let me know your thoughts about this interesting cleaning aid at [email protected].


Keeping Things Clean

Not a lot of time is spent in discussing cleanliness in many self-sufficiency texts except to say that it’s important to maintain the cleanliness of the animal enclosures to improve overall animal health and to reap the monetary benefits of doing so. It’s true, keeping the animal enclosures clean does provide these benefits. No matter what sort of animal is in your care, dog, cat, chicken, or rabbit, cleanliness is a requirement if you want to maintain their health. Unhealthy animals are a lot more expensive to keep and you won’t obtain much financial benefit from them.

A few texts will stress that animal cleanliness also produces happier animals. Animals tend not to express happiness or unhappiness in the same way that humans do. However, each of our animals does express happiness or displeasure in specific ways. Anyone can see these emotional conditions if they care to look. Animals do feel things and the need to be clean (after a certain manner) is a characteristic that they have in common with us.

However, I’ve never encountered a text that stresses that animals have a preference for being clean or that they even have the intellectual resources to determine the difference between clean and dirty. Over the years, we’ve worked hard to keep the environment our animals live in as clean as possible. During that time we’ve also noticed that the animals definitely have a desire to be clean and that they do, in fact, have the intelligence to tell the difference.

For example, one rabbit purposely chewed a hole in the side of it’s enclosure to gain access to the middle enclosure of a three rabbit hutch. It was only after I discovered an air leak in the side of the rabbit’s current enclosure and fixed the leak that the rabbit was happy to stay in the enclosure I chose for it. The rabbit was uncomfortable and determined a method for overcoming that discomfort. It’s method of addressing the problem showed a certain level of intelligence.

As another example, in cleaning the chicken’s nest box enclosure, some of the bedding gets tromped down, but is still dry and clean. We fluffed up the bedding and added a bit more to ensure the chickens comfort and to keep the eggs from breaking. Other bedding was soiled, and so we put it into the compost heap to decompose. New bedding was put in the nest boxes that had soiled bedding in them. The chickens unerringly chose the nest boxes with new bedding in which to lay their eggs. Since the chickens were outside in their run and didn’t see which nest boxes received the new bedding, we can only assume that they can smell or somehow see the difference between the new and old bedding. However, it’s important to note that they knew the difference and made a choice to use the new bedding, rather than the old, even though the old bedding is still clean and usable.

We had three cats at one point. One of the cats had become enfeebled due to old age and was sick. The other two cats would refuse to use the potty pan after the sick cat until we cleaned the potty pan up. The odor left behind by the sick cat signaled disease and the other two didn’t want to pick up. Even if the potty pan had just been cleaned, the other two would refuse to go into after the sick cat. The cats made a choice. Keeping your animal’s environment clean is, therefore, more than simply a matter of health or monetary gain. Animals are happier when you keep their environment clean and they do have the intelligence to make choices about their environment, given the chance to do so. That’s why it’s important that a pet carpet cleaner is always on hand for those pets who live inside. If they are sick or have an accident, it’s easy to use a carpet cleaner to just ensure that any stains or odors are removed from the area. This can benefit both owners and animals alike. Animals know when their environment isn’t up to par and you should too. Providing your animals with a clean environment is a responsibility that you should take seriously.

However, it’s also important to remember that animals don’t use human standards of cleanliness. The essentials are to keep the environment clean and comfortable. A rabbit or chicken is unlikely to want, need, or even accept room deodorizer or other human niceties in their environment. In fact, some human niceties (such as scents) are actually detrimental to animal health in some cases. Make sure you take an animal eye view of environment when you setup, maintain, and clean their equipment. Let me know your thoughts on animal environments at [email protected].