The Making of a Grape Fence

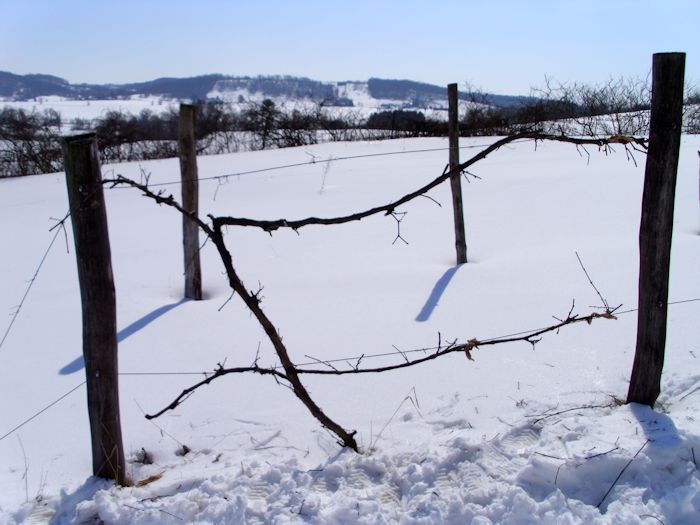
I have spoken a few times about our grapes (see Pruning the Grapes (Part 1) and Pruning the Grapes (Part 2) for details). A few people have asked for details about our four-cane Kniffin system setup. You can see some pictures of the setup in my posts and there is line art available that shows the setup various places online. However, most posts don’t provide details about the actual construction of the setup.

In my case, I used seven large black locust posts cut from trees my grandfather planted. I debarked the logs using a draw knife and then let them dry for a year before putting them into the ground. Black locust is naturally rot resistant and incredibly hard—even the woodpeckers don’t like it. However, carpenter ants will infest your logs given the chance, but even in this case, they hollow out the center and leave the outside intact. So far, I haven’t encountered a problem with carpenter ants because the grape fence is located far enough away from the woods. Because the posts I’ve used are so strong, I didn’t add the angled end posts shown in a lot of illustrations of grape fences. If you were to buy your posts from a lumber hard, you’d want sturdy 4″ diameter or larger posts. Each post is 9′ long and you bury 3′ of the post in the ground.

The cabling is 1/8-inch galvanized wire rope. You want to use wire rope because it’s made up of many small wire fibers and is quite flexible—making it easier to work with. This size cabling will support six to ten canes without any problem. Make sure you read about the weight capacity of the cabling. Each cable must be able to support a minimum of 50 pounds per cane per cable. So, if you have six canes in a row, the cable must be able to support at least 300 pounds (more is better). Otherwise, you have the risk of the cable breaking as the fruit ripens.

You’ll need some method of clamping the cabling. The method for attaching the cable to the earth anchors and turnbuckles is to create a loop and then clamp the loop. Some people will try to use crimping sleeves because they’re easy to work with and inexpensive. This solution works fine for fencing, but not for grapes. As your setup flexes and breaks into the task of supporting the grapes, you’ll need to make adjustments and tighten the cables. For this reason, you want to use wire rope cable clip clamps instead. I’ve found that the 3/16″ or 1/4″ sizes work best for the cabling used on my setup.

Two turnbuckles help tighten the cables. One turnbuckle for the upper wire and one for the lower wire. The turnbuckles make it possible to make small tightening adjustments as the season progresses (you normally make major adjustments in spring, before the canes become active). You want to keep the cables as tight as possible to help support the canes properly. I prefer a 5/16″ × 9 turnbuckle because it provides enough adjustment potential in most cases. Make sure the turnbuckles you choose can support the weight of the wire rope and canes.

The wire rope is ultimately supported by two earth anchors—one at each end. Both rope wires can go to the same earth anchor. It’s a mistake to assume that you can use a short earth anchor because it will pull out over time. In order to ensure that your setup will remain sturdy, you need a large earth anchor. My setup uses 6 × 48″ earth anchors with attached auger for maximum strength.

An earth anchor the size of the one discussed in this post requires a fair amount of muscle to put into the ground. I highly recommend having a piece of metal pipe to use to help get the anchor into the ground. My piece of pipe is about 30″ long. You put the pipe through the eye in the earth anchor and use it to turn the earth anchor as it goes down into the ground.

The final piece of the puzzle are the screw eyes used to hold the cable at each post. The screw eyes are attached at heights of 30″ and 60″ on my setup. Each screw eye must be able to support the weight of all of the canes and the wire rope. A 2-1/16″ screw eye (size 104) will probably work, but I prefer a larger 3″ screw eye to ensure it will hold up.

This is all that you need to setup a grape fence of the type I use. There are ways to make the fence using other materials and I’m not saying my method is the only method available, but it has worked well over the years we’ve had grapes. Let me know your thoughts on grape fence construction at [email protected].


Pruning the Grapes (Part 2)

It has been a while since I wrote Pruning the Grapes (Part 1). Of course, the grapes were actually pruned long ago. In fact, the biggest impediment to my pruning the grapes was the knee deep snow in many areas of the orchard. We still have some snow, but it has greatly diminished since then. In that first post I described some of the conclusions I had reached from pruning our own grapes and watching others work with their canes. I also mentioned that we use a four-cane Kniffin system for pruning purposes. I decided to grab a few pictures of the pruning process, in part, because the pictures in books sometimes make it hard to see precisely what you should do. This is just one method of how to prune grapes, but there are several other ways of doing so. If you’re wanting to learn to prune grapes, then carry on reading for my version –

There are actually two kinds of buds on a grape cane. The first is sharp and pointy like the one shown here.

PruningGrapes0202

This bud type produces the leaves later in the season. The second is rounder, almost globular like the one shown here.

PruningGrapes0203

This bud type produces the flowers that will eventually produce the grapes. The concept that completely eluded me at the outset was that a grape won’t produce any more buds for the current year after the previous year’s growing season. In other words, the buds you grow this summer are for next year’s fruit. When you prune, you must prune with the idea that the buds you have now are the only buds you’re going to get, so you need to prune carefully. A lot of the books also fail to point out that you want to keep the buds nearest the main branch so that the grapes receive sufficient water and nutrients. Finally, each spur should have only two or three fruiting buds-the globular ones. The spur can have any number of leaf buds-more is better in this case.

Some of these pictures are a bit hard to see because the light was intolerably harsh on the day I worked on the vines. However, there are a few things you should notice in this picture:

PruningGrapes0201

Notice that the spurs coming off the main cane don’t necessarily point down as it always seems to show in the pictures in books. The spurs will eventually point in the right direction because the grapes will pull them down. Don’t worry about spur direction-look instead for the spurs that have the nicest fruiting buds.

Also notice that the canes are tied to the steel cable. You need to put the canes in contact with the cable to promote attachment to it. Those curlicues coming from the cane are actually quite strong and will hold it in place, but only if they actually curl around the steel cable. You can’t use anything harsh to tie the canes in place. We actually use old pairs of pantyhose that have been cut up into usable pieces. The pantyhose are quite inexpensive and last several years (as many as five) before they start to disintegrate too badly. The most important part though is that they hold well without causing damage to the cane. Using a steel cable manufacturer you can trust is important to make sure your machinery is working properly and efficiently for you.

When you get done, your cane won’t look quite as pretty as the ones in the book. In fact, grape vines tend to look a bit gnarled. Here is how the pruned vine looked this year when I got done with it.

PruningGrapes0204

You can see the trunk, the four fruiting canes, and the spurs coming from the canes. The canes are looped or tied to the steel wire as needed. I’ll actually retie the lower left cane when the season progresses. At the time I pruned the cane, I was a bit worried about breaking it, so I left it as is. The upper right cane will also require a bit more support. Again, I chose to wait until it warms up a bit and the cane is more flexible. This grape vine will likely produce sixteen nice sized clusters of medium-sized grapes that I’ll eventually use to make wine or Rebecca will use for jelly or juice.

This is my approach to pruning grapes. Of course, there are many schools of thought on the issue. However, what I do hope is that the combination of pictures and some insights will help you get better grapes out of your vines. Let me know your thoughts on grape pruning at [email protected].

Get Ready…Get Set…Garden! 2013

This year’s trip to Baraboo for Get Ready…Get Set…Garden! is part of our continuing education. I talked about this particular educational opportunity in last year’s Get Ready…Get Set…Garden! post. The sessions are hosted by the Sauk County UW Extension, which actually puts on a substantial number of events during the year. Our itinerary for this year consisted of container bag gardening techniques, growing small fruits (strawberries, raspberries, and blueberries), and gardening with aches and pains (essentially a session on dealing with accessibility needs for gardeners).

The first session discussed container bag gardening and the advantages it offers over using buckets or over-sized pots to hold your garden on the patio. Every year Rebecca puts together a wonderful salad garden for me. Of special interest are the cherry and salad tomatoes. If I need a snack, I simply go outside, enjoy the flower garden she has put together for me, and munch a few tomatoes-nothing could be better than that. However, we had always wondered whether there might be something more that we could do. This year’s sessions shows that we can. However, instead of using the really expensive gardening bags that the instructor promoted as part of her business, we plan to use feed sacks. They’ll perform the same function and only cost a fraction of the amount (a bag large enough to grow tomatoes costs $22.00 if you go the garden bag route, the same size feed bag is free since we get them as part of buying feed for our animals). I’ll post again sometime later this year to let you know how the garden bags work.

We have also had a lot of problems growing blueberries, despite ensuring the ground is acid enough for them. It turns out that we have been doing a few things wrong-the most important of which is that we haven’t been watering our blueberries enough. It seems that they require almost boggy conditions to grow acceptably. Equipped with our new knowledge, we’re going to give blueberries another try this summer. One of the problems with gardening is that you aren’t likely to get the technique right on the first try, or the second, or the third. There are some people who think gardening is science. Well, that’s partially correct, but it’s also part art. Sometimes you just need to feel your way through a growing experience. The garden is looking great at the minute and I’m currently looking at storage buildings in PA as I need somewhere to store my tools and to put my feet up at the end of a rough day! I’m thinking of putting the building next to my allotment so that it’s looking out onto a nice view. I’m not 100% sure yet though!

Unfortunately, our instructor didn’t arrive for the third session. Someone with the UW Extension did fill in, but I can’t help but feel a bit disappointed because I was really looking forward to getting quite a lot out of this third class. As Rebecca and I get older, it would be nice to know about a few of the things we could do to make our gardening experience better. Even so, I must applaud the UW Extension instructor for getting up and giving an impromptu discussion on a topic that she hadn’t prepared for without any preparation time. To simply get up and start talking would be one thing-to do it exceptionally well given the circumstances is nothing short of amazing. I also plan to post again on some thoughts I garnered on meeting accessibility requirements for gardening.

There are some benighted people who think that education ends when you leave high school or college. Education is a lifelong endeavor. Gaining new knowledge and then turning it into wisdom adds spice and keeps our minds fit. Whether your intellectual love is technical, natural, or in some other realm, take time to embrace it by furthering your education. Let me know your thoughts on continuing education at [email protected].


Unexpected Drought Consequences

I’ve written a number of posts about the effects of global warming from a personal perspective. It does make a difference in how I view the whole issue of global warming. Whether global warming is a matter of cyclic world changes, human interaction, natural sources, or some combination of thereof isn’t the point-the point is that the earth is getting warmer, which is causing changes of various sorts that affect me as a person. Your best way to deal with these changes is to make a list of how they affect you and come up with effective strategies for dealing with them.

This summer saw a drought come to our area. There is more than a little evidence to say that the drought is just another effect of global warming. People focus on droughts during the summer months because crops are affected, grass dies, and the heat becomes oppressive. The television, radio, and newspaper blare pronouncements of impending doom from dawn till dusk each day. However, the winter effects of drought can become even more devastating than those in summer.

Consider the fact that snow acts as an insulating blanket for the earth. It helps retain some of the heat in the deep layers. When there is a lack of snow, frost tends to go further into the ground and cause all sorts of nasty consequences, especially during a heavy freeze. My reason for writing about heavy freezes is that we’re experiencing one here in Wisconsin and I’m concerned about the potential of damage to either my well or septic system. Nothing is quite as exciting as living almost four miles from town and not being able to use any water because your septic system is frozen. Once frozen, you need to call a professional to thaw the system so you can use it again. If your professional is especially busy, you may be waiting for a few days.

The problems of deep frost aren’t limited to the well or septic system. A deeper frost creates more heaving-water freezes and the resulting ice displaces some of the earth underground. The most conspicuous result of heaving is that any pavement on your property buckles and doesn’t last nearly as long as it could. It’s possible to assign an actual dollar amount to the lost longevity of your sidewalks and driveway. The effects can also profoundly affect your house’s foundation.

Heaving also causes myriad other problems for the self-sufficient person. For example, those posts you put in for your grape vines will become misaligned-forcing you to spend time readjusting the cables and possibly damaging the vines. A deep frost can kill tree, vine, and permanent bed plant roots. You’ll also have the pleasure of picking more rocks from the garden come spring because heaving brings them to the surface (despite the perception that they grow there during the winter). I’m also wondering how a deep frost will affect our new chicken coop (despite having put the posts as deeply as we could in the ground, heaving will still have an effect on them).

There is also the direct heating costs to consider. A blanket of snow on your roof acts as additional insulation. When this blanket is removed completely, your house loses more heat. If you do find that you are losing a lot of heat from your roof, you might want to consider looking at some cedar park roofing companies to come and assess for any damage. Of course, there is also a problem when there is too much snow on your roof (causing damage from the weight) and the whole issue of ice dams. Winter is the worst time to be struck with a roofing emergency so if you suspect any signs of damage, you may wish to contact someone at trusted-roofing.com promptly. Although it can be nice to have that extra heat in your home, there are dangers of having a thick layer of snow on your roof. To prevent any future damage, you might want to ask a company (like this roofing austin service) to check that your roof hasn’t become vulnerable after having that layer of snow on it throughout winter.

Drought causes serious problems during the winter as well as the summer. No matter where you live, you have to consider the effects of drought on your property and the structures it supports. What sorts of winter drought effects have you seen in the past? I’ve seen cases of areas with sustained droughts end with torrential rainfall, the issue in this particular case of a friend of mine… I was told their property was drenched by rainfall after searing heat for weeks, the problems they came to face was a pooling of water in places near their home where they’ve never experienced it before, and caused water damage to their basement and foundations. The issue being, their homes’ gutters hadn’t been used in weeks and therefore became clogged with all sorts, because of the heat they had completely forgotten about the gutters. Either way, once they got in touch with a company like this Clean Pro Gutter Cleaning Denver area (Of course it was Colorado!) they had their gutters cleaned out, the pooling of water drained and their properties structure checked over for repairable damage – so in this case, their extreme drought caused them some serious water damage in the coming weeks. This leads me to the question, do you think the increased number of droughts is due to a natural cycle in the earth’s weather pattern or from global warming (or possibly a combination of both)? Write me about your drought observations at [email protected].

Pruning the Grapes (Part 1)

Previously I had written about trimming our trees. We normally perform tree trimming in March or possibly April in a really cold year. The snow is gone and the temperatures, even though they’re still quite cool, are warm enough to work in without suffering frost bite. Pruning grapes seems to be a different story. Past experience has shown us that pruning grapes in March almost assures that we won’t obtain much in the way of a harvest because the cuts don’t have time to heal properly before the grapes start pumping water into the stems. What you end up seeing is water dripping from all of the cuts if you prune grapes that late.

We’ve also tried pruning our grapes in the fall. Unfortunately, the winter air damages the cut ends, leaving more dead material than we would like. It also seems as if the wildlife takes the fresh cuts as an invitation for further pruning. We actually had several vines trimmed to unusable nubs by the local deer. Obviously, fall pruning doesn’t work for us either.

As with many other self-sufficiency issues, this one is a learning experience. We know that if we keep at it long enough, eventually we’ll have a good system down for our grapes. You can read all you want and ask everyone who has any idea at all about how to do things, but your plot of ground is different from any other plot of ground out there. When you’re self-sufficient, you have to be prepared to experiment. So, undaunted by previous failures, this year we’re pruning our grapes in mid-January. The timing will allow the grape ends to heal before spring takes hold, but should present less opportunity to the local wildlife for extra trimming and the weather won’t have as much of an effect either.

The approach you use for pruning your grapes depends on your weather and the method you use to train them. We use a four-cane Kniffin system. The approach yields a relatively large number of grapes, is easy to maintain, and doesn’t tend to have problems with mildew due to lack of airflow (as is the case with arbors). Picking can be more time consuming than when working with arbors and you need a source of rot resistant posts. Fortunately, we do have a native source of rot resistant posts in the form of the black locust trees that grow in our woods. Farmers actually planted them to use as fence posts.

Most of the books we have say that it takes seven years for grapes to grow to sufficient size to start producing well. Our own experience says that it’s more like ten years, especially if you have wildlife constantly nibbling at the canes. We finally ended up staking out one of our dogs to keep the wildlife at bay one year so the vines could grow unmolested.

We’ve chosen to plant a number of grape varieties: Niagra (white), Catawba (red), Concord (purple), Delaware (pinky purple), and King of the North (blue). Each cultivar has specific properties to recommend it. For example, the Delaware produces an outstanding wine grape, while the Concord is better for jelly production. The King of the North is a good juice or table grape. We prefer the Niagra for table and juice uses, but it should also make for a nice wine. The Catawba has yet to produce sufficient quantities of grapes for us to test it for various uses, but we’re assuming that we’ll use it for wine. When choosing grapes for your own vineyard, make sure you pick from a variety of cultivars. A single mature trunk can produce a significant number of grapes (upwards of 40 pounds), so you need a plan for using them.

It’s also a mistake to prune every year. I had noticed some of our local vineyards don’t trim their canes absolutely every year. When I started pruning every other year, our harvest went up significantly without reducing the vitality of the vines. It may be that some locations require yearly pruning, but this doesn’t seem to be the case here.

What are your experiences with grapes? Do you favor particular cultivars over others? Let me know your thoughts at [email protected].


After the First Frost

First frost is always a hectic time around here. The day before sees Rebecca and me running around trying to harvest everything that won’t survive the frost intact (such as tomatoes, okra, and eggplants). We had our first frost on Saturday, so we spent the day trying to get everything picked (after waiting until the last second for the plants to grow as much as possible.

On Sunday Rebecca and I went out to the garden to start picking the items that actually require a frost to taste good. This year we started with the squash and sweet potatoes. Despite the bad summer, we ended up with a nice assortment of both butternut and acorn squash.

SquashandSweetPotatoes01

It wasn’t our largest harvest, but it was a lot more than we expected considering we didn’t plant that many plants. We actually had squash growing up inside the tomato cages. The squash performed amazingly well this year. I wish we had planted more of them.

However, the big news for us was the sweet potatoes. We planted just one plant and expected to receive four or five standard sized sweet potatoes and a few smaller ones for our efforts. What we received instead was eight relatively large sweet potatoes and a wealth of smaller ones. The largest sweet potato is a monster that weighs nearly 7 pounds.

SquashandSweetPotatoes02

Yes, that really is just one sweet potato. It’s misshapen, but there is only one little crack in the surface and the potato is quite firm. I was expecting something around four pounds, so we were both surprised when we weighed it and the scale showed 6¾ pounds.

SquashandSweetPotatoes03

We’re planning to use this one sweet potato to feed our entire family during Thanksgiving this year. I’m not sure how we’d be able to use it otherwise. That’s one big potato.

I’ve said it before and I’ll say it again, Every Year is a Good and a Bad Year. This year we had great results with okra and squash. We’ll never forget this monster sweet potato though. What did well for you in your garden this year?  Let me know at [email protected].


Potatoes, Buried Treasure

Arr matey! ‘Tis potato season and time to seek buried treasure! Potatoes really are a kind of buried treasure. For one thing, the dried stalk you see above ground only gives you a clue as to the location of the potatoes underneath-not a precise location. The potatoes might be all to one side or another of that stalk, or they might be centered beneath it. I use a garden fork to dig potatoes to reduce the risk of making one unusable. I usually start digging about a foot or a foot and a half from the stalk and move inward.

Unlike many people, we mulch our potatoes instead of creating hills for them. I’ve discussed the benefits of mulching in the Mulching Your Garden post. Using a little heavier mulch makes it possible to plant the potatoes and then basically forget them for the entire growing season. To harvest the potatoes, you simply move the mulch away in the fall and dig the thin layer of dirt from around each of the potatoes. Using the mulching technique seems to produce larger potatoes (or at least, larger quantities of potatoes) with less work and no watering. However, potatoes don’t create set amounts of output. There is an uncertainty factor that gives the potato the feel of buried treasure. One plant may produce a few large potatoes and another copious amounts of smaller (salad) potatoes.

Potatoes and tomatoes are both part of the nightshade family. This family contains a number of highly toxic plants. In fact, some varieties of potato are so odd that you’d hardly recognize them and a few varieties are eaten with clay because they’re not digestible otherwise. The varieties sold in the US are rather bland when compared with the unique diversity found in the Andes (amongst other places). The largest potato we’ve ever had weighed an impressive 1½ pounds, which is far below the 25 pound monster dug in Lebanon in 2008.

You can see the resemblance of potatoes and tomatoes in the leaves. In addition, potatoes will produce a tomato-like fruit. It really does look like a green cherry tomato, but the fruit is quite toxic and you should never eat it. The flowering spud looks pretty though and you should carefully look for the blossoms. They last, at most, two or three days. In other words, blink and you’ll miss the flowering completely.

Domestic potatoes are attacked in a number of ways. This year we lost a few to burrowing insects. The most devastating pests were millipedes who ate directly through the potato and left a rotting mess behind. Because of the drought this year, mice were a particular problem. They normally don’t bother the potatoes much, but this year they were looking for food and water-the potatoes provided both. In addition to these pests, there were also other ones too. Pests can be irritating to have around the house, especially when you’re trying to grow vegetables. One of my friends did suggest that I should contact an exterminator in Charlotte NC to see if they could do anything to help me remove these pests from my garden. By the time my friend has told me about this company, the pests had already ruined the majority of the vegetables. In addition to pests, quackgrass was also a bit of a problem. We lost some potatoes when the quackgrass roots grew right through the tubers. Finally, some of the potatoes had scabs. The scab ruins the skin and makes it impossible to store the potato for any length of time (otherwise, the potato is perfectly edible as long as you cook it).

Our 20′ × 20′ patch produced two bushels of potatoes this year (about 120 pounds). That’s down from the 3½ bushels we received four years ago in the same patch (we rotate our potatoes between three areas). Between the effects of the drought, the extreme heat this summer, and abundance of pathogens, I think we still did quite well. We managed to get a few really nice sized potatoes with a maximum size of 1 pound this year. Buried treasure indeed!

Do you grow potatoes? If so, how did your potatoes do this year? Do you ever encounter any special problems with them? Let me know at [email protected].


In Praise of Dried Beans

One of the more amazing vegetables in the garden is the green bean. Green beans typically take little work to grow, produce well, and don’t appear to have many problems (with the exception of mold in wet years). We grow the bush variety because they don’t require a trellis. You can eat green beans in all sorts of ways—raw by themselves, cooked, in salads, and even fried. What most people don’t realize is that the uses of green beans don’t end there. You can also use green beans dried. Simply let the green bean stay on the plant until the shell is completely dry (usually after a few frosts).

Dried beans have a significant advantage over other items you grow. Unlike most items, they require no preparation. You can simply pick them, put them in a bucket, put a lid on the bucket, and then stuff it in a cool, dry place. That’s it! The beans will stay good almost indefinitely. I just finished shelling the last of our dried beans from last year. There was no deterioration of the bean whatsoever. Rebecca will use them in baked beans, soups, and in salads. Dried beans are also quite high in nutrients, making them a great food value. For example, if you make them into baked beans, a single serving supplies 28 percent of your daily requirement of iron.

Before I get e-mail about the relative merits of other vegetables, yes, you can store root vegetables such as potatoes in your basement without doing anything special to them. In addition, winter squash also lasts quite well in the basement without any special preparation. However, in both cases you face the problem of having to use the items by February or (in a good year) March. The winter squash tends to start rotting by that time and the potatoes start to get soft in preparation for sprouting. Dried beans appear to have no such limitation.

Of course, the big thing is to ensure that the bean really is dried. We keep the beans on the plants until late fall after a few frosts have killed the plant completely. The beans should rattle within the shells when shaken. The outside should be a nice tan color in most cases and should feel quite dry. The shells will also be a bit on the hard side, rather than soft as a green shell will be.

Don’t worry if you see a bit of discoloration on the shell. That’s normal. If you see a little discoloration, shell a bean or two to see for yourself that the beans inside are shiny and that the skin is intact. Even if the bean is a little dirty, it’s acceptable to use as long as the skin is intact.

The one thing you must do before using beans you dry yourself is to wash them. The beans do pick up a few contaminants during the drying process. You don’t use soap and water. Just place the beans in a colander and rinse thoroughly. Make sure you move the bean around and get all of the dirt off. When you see that the water is coming out of the colander without any dirt, the beans are probably clean.

The bean is one of those items with a nearly unlimited shelf life that’s both nutritious and delicious. The fact that you can use them green or dry, raw or cooked, makes them exceptionally versatile. Even a small garden has space for some of these marvelous plants. Let me know your thoughts about beans (both green and dried) at [email protected].


Harvest Festival 2012

Last year I told you about some of the things we do for Harvest Festival in Fun is Where You Find It! (Part 3) post. Of course, every year has some similarities. There is the special music and it wouldn’t be Harvest Festival without a few games. Apple cider is always part of our celebration, along with plenty of samples from the garden. Our “kids” (the animals we keep as pets) always play a big role in Harvest Festival too.

As with everything else, this year’s Harvest Festival is a bit different. For one thing, our fruit trees didn’t produce anything. Things started off badly with an early spring that saw the trees bloom well before they should have. A late frost killed off a lot of the blossoms before the pollinators were even out to pollinate them. After that, some heavy winds knocked off a few more blooms. The fruit that did manage to set was killed off during this summer’s drought (we couldn’t even attempt to water all our trees). The result is that we ended up buying two bushels of apples so that Rebecca could make me some apple chips. I know that buying the apples by the bushel was a lot less expensive than buying them in the store, but even so, I wish we hadn’t had to do so.

Nothing goes to waste when we work with items from the garden. Of course, I use one of the apple peelers that produce the really long strands of apple peels. This year is the first time that we’ve had laying hens, so I was curious to see what they would make of the apple peels. They didn’t disappoint. One hen would grab an end of a peel and fly up to the nest box, while another would grab the other end to try and get the peel from the first hen. The two would then play this silly looking game of tug of war, even though there were lots of peels in the dishes. Both chickens just insisted that they really must have that single peel. By the time the chickens had played with the peels for a while, we had apples strung between the windows, rafters, nest box, and the dishes. It looked like some sort of crazy spider web created by a demented spider. By morning, all of the apple peels were gone, which also surprised me considering I had peeled 30 apples to get them. The chickens certainly like fresh fruit.

We don’t just process fruit during Harvest Festival. Our friends offered us some tomatoes and we gratefully accepted them considering our own tomatoes have had an anemic output this year. Rebecca turned the first bushel into salsa, catchup, and a canned salad. We hope to get two additional bushels for juice, whole canned tomatoes, and a bit for wine making. A lot of people enjoy my tomato wine.

It looks like this is going to be a stellar squash year. We have squash vines growing everywhere. Normally, the vines stay within the 40′ × 60′ area as long as we redirect them a bit. This year we have vines trying to grow into the grass and along the rows. There is a squash plant vying for space in one of the tomato cages and slowly edging the tomato out. I saw one trying to grow up the side of an eggplant and another is heading toward our okra. A vine that might normally produce three really nice squash has produced five, six, or possibly more (it’s such a mess out there that I’m having a hard time counting them all). Rebecca has also made all of the zucchini chips we need for the year. (See the Making Use of Those Oversized Zucchinis post for details.)

As I’ve always said, there is something interesting going on with each year. We never get bored here. One of the rewards of being self-sufficient is that you do see the changes wrought by the weather. What do you find exciting about the fall months of the year? Let me know at [email protected].


Picking a Delicious Ear of Corn

Nothing is quite so good as a delicious ear of corn picked fresh from the garden. A freshly picked ear of corn is sweeter and more delicious than any ear of corn you’ll ever taste. The fresher the ear, the more delicious the taste. Of course, that delicious ear of corn starts with the correct planting technique and choice of corn variety. We happen to prefer the Bodacious variety because it produces evenly colored corn with a great taste. The ears are normally full (indicating good pollination), the stalks don’t seem to break quite as often, it’s a little less susceptible to pests, and we find that the ears are often larger. We’ve also tried a number of other varieties such as Kandy Corn (somewhat sweeter) and Serendipity Bi-color Corn (interesting color combinations and ripens somewhat earlier). So far, we like Bodacious the best, but you need to choose a corn variety that works well in your area. Take factors such the type of soil, variety of pests, and weather into account when making your choice.

Planting the seeds correctly is also important. We have quite a bit of high wind in this area, so we plant the seeds one foot apart in rows and each of the rows two feet apart. If you plant the corn seeds too closely together, the corn won’t ever produce a strong stalk. In fact, a worst case scenario is that the corn won’t produce any ears. Planting the corn too far apart makes the stalks more susceptible to wind damage and reduces pollination. You may get full sized ears, but you won’t get ears that are full of kernels. You may have to plant your corn differently depending on your area to get optimal results.

The tough part is figuring how when to pick the corn. Yes, you see the ears pop out sometime after the corn tassels (corn cross pollinates through wind action—it doesn’t depend on a pollinator to pollinate it). The tassels are the male flowering member of the plant, while the kernels (ovules) are the female flower member of the plant. These female members reside in a husk and sent out silks to receive the pollen. Pollen travels down the silks to the ovules and pollinates them. Each ovule requires individual pollination, which is why you can see ears with only a few kernels or you can see one or two ovules that didn’t pollinate in a given ear. The point is that the pollination occurs, the kernel grows, and then there is a magical period when the kernels are full of delicious sugar-filled liquid that is absolutely delightful to ingest. After that, the sugars begin to turn to a less tasty starch.

The silks are part of the key to discovering when to pick the corn. When the silks whither and turn black, you know they have done their job—the kernels are pollinated (or at least as pollinated as they’ll get). However, the kernels aren’t instantly fully sized. The dying silks tell you that pollination is over and that you’ll soon have tasty corn to eat.

The next clue is to feel the ears. Gently place your hand around an ear and you can feel the kernels growing. It takes a while, but you’ll eventually developer a touch that tells you that the kernels are getting larger. At some point, you’ll stop feeling any growth. In addition, the ears will feel solid, without any gaps between kernels.

At this point, you can peak at the ears. Gently pull the husk back to reveal the tip of the ear. The kernels at the tip develop last, so the kernels at the bottom are always riper and fuller than the kernels at the tip. When the last few rows start the look the right color and fullness, try sticking a thumbnail into one of the kernels. If you see a liquid come out, the corn is ready to pick.  If there is no liquid, carefully smooth the husk back over the ear. It should ripen normally within a day or two.

Of course, sometimes the kernels at the tip of the ear aren’t pollinated or may not grow right for other reasons. Sometimes a corn borer ruins your day. Earwigs are also a problem at times (and beneficial at others). Never allow the corn to stay on the stalk for more than a week after you feel full ears. If you have doubts, pull one ear, fully husk it, and evaluate the results. Cutting the kernels from the ear and trying a few raw will tell you quite a bit about the status of the corn.

Sweetcorn—it’s the stuff of summer. What are your experiences with corn? Do you grow it yourself or get it from a roadside stand? Let me know at [email protected].