Automating Your Configuration with a Daily Batch

Batch files are still an important part of your system, especially if you find that you need to perform certain configuration tasks every day. Both Administering Windows Server 2008 Server Core and Windows Command-Line Administration Instant Reference discuss batch files, but this post is about a practical example of a batch file in daily use.

My system has a daily batch file. It runs every morning when I start the system up. (To save electricity, I do turn off my system every night and find that things also run better because I do.) The main reason for using a daily batch file is to configure my system so I don’t end up performing the same repetitive tasks every day. I tell the computer what to do and it performs the required configuration for me. After I get my cup of coffee, my system is ready to go—fully configured for my use.

The daily batch file appears as an entry in the Startup folder on my system. Placing the file in the Startup folder means that it runs automatically, but that I can also easily disable the batch file should I wish to do so. Use these instructions to add a daily batch file to your Startup folder:


  1. Choose Start > All Programs. You see a list of entries including Startup.
  2. Right click Startup and choose Open from the context menu. (Unless you want everyone to use the same automatic batch file, you don’t want to choose Open All Users.) You see a copy of Windows Explorer open for the Startup folder.
  3. Right click anywhere in the right Windows Explorer pane and choose New > Text Document from the context menu. Windows will create a new text document named New Text Document.txthowever, only the New Text Document part of the filename is highlighted.
  4. Highlight the entire filename and type Daily Tasks.bat. Make absolutely certain that you also overwrite the .txt part of the filenameDaily Tasks.bat.txt won’t do anything for you.
  5. Press Enter. You see a Rename dialog box that asks whether you’re sure that you want to change the extension of the file.
  6. Click Yes. Windows renames the file.

Of course, the file is empty at this point. Right click Daily Tasks.bat and choose Edit from the context menu. Windows will open a copy of Notepad with the empty batch file loaded. At this point, you can start typing commands for Windows to execute automatically when you start up in the morning. It’s possible to execute many commands directlyespecially those that are meant to execute at the command line, such as W32Tm /Resync, which forces an update of the system clock. Other commands require that you use the Start command to execute them. For example, you might want to tell Firefox to automatically open the Astronomy Picture of the Day site using this command:


Start “C:\Program Files\Mozilla Firefox\Firefox” http://antwrp.gsfc.nasa.gov/apod/

<font<> <font<>The Start command starts Firefox in this case. It passes the URL you provide to Firefox as a command line parameter. Obviously, the application must support command line parameters for this technique to work. More applications than you might think do support command line parameters (many undocumented), so a little research can provide a lot in automation.

Any command that you can execute in any other batch file is also available when you’re starting Windows. There is one special consideration. You’ll likely find that executing one command immediately after another causes timing problems when Windows is initially starting. For example, if you try to open several Web sites, you’ll find that Windows actually misses opening a few unless you provide some sort of wait period between commands. Fortunately, the Choice command fulfills this task perfectly. For example, the following command provides a 15 second delay that you can insert between commands:


@CHOICE /C:N /N /T:15 /D:N


Using this command the user won’t even be aware of the delay. The @ symbol makes the Choice command invisible. The /C command line switch provides the available choices (which consists solely of N in this case). The /N command line switch hides the list of choices from view. You create the actual timeout value using the /T command line switch, which is set for 15 seconds in this example. However, the /D command line switch actuates the delay by automatically choosing N after the 15 seconds. In short, this entire command line is a wait statement.

If you want your batch to run more or less invisibly, make sure you start it with an @Echo Off command. Otherwise, every command appears in the window. It’s helpful to check for errors when you first put the batch file together and when you make changes. Adding an @Pause at the end of the batch file keeps the command window visible so you can check for errors.

After you finish the batch file, you can execute it as you would any other batch file. The only difference in this situation is that this batch file executes automatically each day because it resides in the Startup folder. When you need to make changes to this file you can choose Start > All Programs > Startup, then right click Daily Tasks.bat, and choose Edit from the context menu. The file will open in Notepad for you.

This is one of the more interesting and useful ways to employ batch files. What are your favorite batch processing techniques? Let me know at [email protected].


Review of Creative Close-Ups

You may have noticed that I use quite a few photographs in my blog entries. Some of these photographs look nice (they aren’t art by any means) and some of themwell, they didn’t quite work out as I hoped they would. Over the years I’ve grappled with unwanted shadows and close-ups that aren’t quite close enough. Focus is also a problem and fuzzy pictures never convey what you want when it comes to factual posts of the sort I create. I was recently talking with Harold Davis about my photographic ventures and he graciously offered me a copy of Creative Close-Ups. As expected, this is a self-help book for people who want to create better close-up photography, which is the sort found most often in my blog posts.

The one thing that will strike you immediately about this book is that Harold is quite talented and is possibly wasting him time writing books, but I’m extremely happy that he did. The book contains page-after-page of striking images. Some of them have been Photoshopped, something that Harold readily admits and even recommends to an extent. Because I’m looking more for better real world shots and not necessarily art, I’ll very likely not Photoshop anything on my blog from an artistic perspective (I could very well use Photoshop to enhance images to make them better convey the information I want), but the book also pointed out the usefulness of creative croppinga technique I intend to employ from now on.


I’ll always tell you if I’ve modified a picture in some way. Otherwise, you can be sure that the picture you’re seeing on the blog is the picture as it came from the camera. I know that there is a certain amount of discussion about this topic and plan to be up front about any modifications or twiddling I perform.

Harold has convinced me that using a tripod isn’t quite the waste of time I thought it might be. The discussion starting on page 64 will probably change your mind too. There are few sections of the book that provide a purely artistic view of a topic, but you won’t find many. Instead, Harold tries to provide good solid reasons for doing things a certain way and then backs them up with stunning pictures. In fact, there isn’t a single photograph in the book where Harold has kept the technique secrethe exposes every technique for your learning pleasure. Where there are multiple ways to accomplish the task, you’ll find them listed, along with any pros or cons of that particular technique.

I found the discussion of equipment helpful in many cases. For example, in page 60 you’ll find a tip about the Lensebaby 0.42X Super Wide Angle accessory lens. However, the text isn’t formatted differently (as a Tip or a Note found in other books), so finding the information later isn’t as easy as it could be. In addition, there isn’t any picture of the lens taken apart so that I can see what he’s talking about. The information is probably quite helpful, but it’s less useful than it could be due to a lack of pictorial backup.

Overall, the book is more focused on technique, than on how to apply the techniquethe discussions of equipment left me scratching my head and I ended up researching the information on my own online and found many new pieces of equipment such as the DJI OM4 that is used for smartphone photography. I also found some different lenses and tripods available. (Harold also kindly answered some of my e-mail queries.) Admittedly, there is a short list of URLs on page 234, but you won’t find a resource for every piece of equipment listed in the book. Creative Close-Ups lacks pictures of any of the equipment, so someone like me has no idea of what these devices look like. If I were to go to a store, I’d be completely lost. It would also be nice to know if there are places online to buy equipment where I won’t be cheated since the nearest camera shop is in Milwaukee (170 miles away). So, this book will tell you how to do something, but not provide you much in the way of describing the means to accomplish the task.

That said, there are many sections that make the book worth the purchase price (if the amazing photography and associated setup instructions isn’t reason enough). The section on focusing on page 68 is especially insightful. In fact, the tips on page 70 are precisely what I need to do a better job with my own photography.

This book provides me with plenty of room to grow. The discussion of focus stacking starting on page 124 will require plenty of work on my part and I may never master the technique in the same way that Harold obviously has. Still, the discussion gives me some ideas and I hope that I’ll be able to use the technique in my blog.

Creative Close-Ups provides inspiration, food for creative thought, and lots of technique. I don’t think that a complete novice will be able to use the book because Harold doesn’t explain many terms such as ISO and what an f-stop is, making notations such as ISO 100 and f/40 useless. (There is a short description of these terms on page 72, but hardly enough for the novice and not early enough in the book to make the initial discussions helpful.) However, for someone who is truly serious about taking better photographs, this book provides a lot of informationmore than most people will be able to absorb in a single reading. I personally plan to read through some sections multiple times and use the book as a reference in the future. Whether this book makes me a better photographer remains to be seen. (As Harold says on page 46, “Cameras don’t take pictures; people do.”) I wish that there was more about the mechanics of performing these amazing tasks and better descriptions of the equipment the author used, but that may be asking too much out of a single book on a complex topic. Overall, I think the author has achieved his goals admirably and that anyone reading this book will truly be dazzled by what is possible.

Fun is Where You Find It! (Part 2)

One of my more popular previous posts is Fun is Where You Find It! In this post, I suggested that family crafting can provide a source of cheap entertainment. Finding crafting activities that the entire family can enjoy is productive from a number of perspectives, not the least of which is promoting communication between family members. Of course, not every activity has to be craft related. Every year Rebecca and I put together a number of jigsaw puzzles. They’re inexpensive, require a few hours to complete as a minimum, and also promote communication. We discuss all sorts of things while putting our puzzles together.

One of the complaints about jigsaw puzzles is that they’re boring. In order to make the jigsaw puzzle interesting, it has to have a twist. Some have jigsaws with a theme or find a way to make their family pictures into puzzles. A simple Google search for ‘Turn Picture into puzzle‘ reveals a whole host of options, but for us, we liked our twist to come with a theme. The glow in the dark puzzle offered such a twist, but it was probably more complex than the average family would want to do and the subject matter was along the lines of a Gothic image that many people would dislike (it was of several women walking through a medieval forest at night to a party of some sort). Families will also want to avoid the double-sided and 3D puzzles because they can prove difficult to complete. Some of the jigsaw puzzles we’ve done are quite exotic. We put one together that glows in the dark and some are works of art that we’ve displayed for weeks on the dining room table before begrudgingly packing it away. A few have been oddly shaped or had other special features. In a few cases, we’ve even discussed using Mod Podge to preserve our treasure for all time, but have never quite made it to that point. Should we ever decide to do so, we could easily frame our treasure for everyone to see. Given the number of puzzles we do though, it’s unlikely that any particular puzzle will prove so spectacular that we’ll actually go this extra step.

However, a puzzle we just completed could prove interesting to quite a few people, Murder at Bedford Manor. You put the puzzle together, read an associated booklet that contains the basic story, and then look at the completed puzzle for clues as to who committed the murder.

The puzzle took about 22 hours for two people to complete and solving the murder required another 3 hours, for a total of 25 hours of fun for the low cost of $26.00. Where else can you entertain two people for 25 hours at a little over $1.00 an hour? We actually worked on a 1,000 piece version of the puzzle, but the 500 piece version will probably work better with a family that has younger children with shorter attention spans. The point is that you need not spend vast sums to have funa good time can be had for just a few dollars, which is perfect for the self-sufficient family on a budget. What is your favorite jigsaw puzzle? Let me know at [email protected].
 

Making Brussels Sprouts Palatable

Rebecca and I grow a large assortment of vegetables. There are many reasons to grow a variety of vegetables, but you can distill them down into several important areas:


  • A balanced diet requires diversity because each vegetable has something different to offer.
  • Each grown year comes with different challenges and you can’t be assured that a particular vegetable will grow well in a given year.
  • Local nurseries will offer different choices in a given year, so unless you start absolutely every vegetable in your own greenhouse, you’re reliant on what the greenhouses have to offer.
  • Biodiversity ensures that your garden’s soil won’t be able to concentrate any particular pathogen.
  • Crop rotation is known to help garden soil by keeping any particular element from becoming depleted.

There are likely other reasons for growing a large variety of vegetables, but this list will suffice for the purpose of this post. I eat every vegetable we grow. In fact, I’ve never had a problem eating vegetables, having had insistent parents when I grew up who ensured I developed a taste for everythingeverything thing that is except Brussels sprouts. No matter how hard I tried, I just couldn’t convince myself that the little cabbages were good tasting. As a child, I’d swallow them whole to avoid tasting them at all (since eating them wasn’t an option).

Imagine my surprise then, when I got married and found that the one vegetable that my wife loved best was Brussels sprouts. Given a chance, she probably would have eaten them at every meal, leaving me wondering what to do next. So, I embarked on a quest to make the Brussels sprout more palatable while begging my wife’s indulgence in eating them only occasionally until I found a solution.

A good part of overcoming any vegetable dislike is to find a way to prepare them. Simply boiling Brussels sprouts in water and serving them with a bit of butter preserved the bitter taste all too well. My first discovery was that boiling Brussels sprouts (or any other vegetable for that matter) is simply a bad idea. Simmering tends to reduce the bitterness. I also discovered that lemon juice and garlic salt make the bitterness of many vegetables appear considerably less. So, here is my first Brussels sprouts recipe that made the vegetable at least sort of palatable.


Plain Brussels Sprouts


3 tsp

Garlic Salt

1/2 cup

Lemon Juice

3 tsp

Butter

2 cups

Brussels Sprouts

1/2 cup

Parmesan Cheese


Just
barely cover Brussels sprouts with water. Add lemon juice, garlic salt, and
butter. Simmer Brussels sprouts slowly until tender (don’t boil them). Remove
from heat and dish out into a bowl. Let cool for about 5 minutes. Coat top with
parmesan cheese. Serves 4.

Later I discovered that the method used to grow Brussels sprouts makes a huge difference. Most people pick them during the hot summer months. We found that by letting the Brussels sprouts continue to grow until late fall and only picking them after the second frost, that the Brussels sprouts were not only much larger, but also considerably sweeter. Since that time, we’ve found a few other vegetables that benefit (or at least survive) a light frost, including broccoli. (Most vegetables don’t like frost, so this technique does come with risks.) The combination of the new growing technique and my recipe made Brussels sprouts a somewhat regular visitor to the table, much to the happiness of my wife (who had waited patiently for many years for the day to arrive).

Recently I experimented with a new Brussels sprouts recipe that makes them taste even better. In fact, I’ll go so far as to say, I like them enough to eat them more often now. Here’s the fancier Brussels sprouts recipe.


Fancy Brussels Sprouts


1/2 tsp

Lemon Peel

3/4 tsp

Corriander

2 tsp

Garlic Salt

1/2 cup

Pomegranate Balsamic Vinegar

1/2 cup

Water

2 tsp

Butter

1/4 cup

Parmesan Cheese

2 cups

Brussels Spouts


Mix
the water, lemon peel, coriander, garlic salt, pomegranate balsamic vinegar,
and butter together in a pot. Bring the mixture near a boil, but not a full
boil. Add Brussels sprouts. Reduce heat to a simmer. Simmer Brussels sprouts
until tender. Remove from heat and dish out into a bowl. Let cool for about 5
minutes. Coat top with parmesan cheese. Serves 4.

Now you know my secret methods for dealing with Brussels sprouts. However, there are some important lessons here for the self-sufficient grower. First, make sure you pick your vegetables at the optimal time because timing is everything when it comes to taste. Second, the manner in which you choose to cook a vegetable is important. Taking time to make your vegetables taste good is an essential part of learning to like them. Let me know about your vegetables eating experiences at [email protected].

Squash and Pesticides

Rebecca and I avoid pesticide/insecticide use whenever we can. However, I regret my laissez-faire attitude towards pesticides when we allowed a large family of termites to move into our home. If you find yourself in a similar position, you should be aware that a service provider like this termite control can help you deal with your pests in a sustainable way. Pesticides cost money, are costly to apply, and tend to ruin our health. They also kill pollinators, which are already in short supply. In fact, we’re able to use other solutions for every pest in the garden other than the squash bug. There is a host of bugs that will attack your squash, but the squash bugs seem to be the worst in this area.

Most other bugs are easily picked off (such as the tent caterpillars we squash by hand in the spring), drown in standard dish washing soap, killed using an environmentally safe method, like searching “terminix iowa” on Google and finding the best and closest pest control to you! Mulching (see my Mulching Your Garden post) can also help control bugs, as will keeping your garden weeded. One of the few good reasons to mow your lawn is to keep all sorts of pests under control by reducing the places they can hide. If you read this guide on mole control, you’ll see that mowing the lawn is one of the ways to rid your garden of moles, so it’s worth making the effort to maintain your lawn. (That being said, I’m a strong advocate of mowing the lawn less often to reduce mower emissions and to make the grass a length usable for purposes other than filling the landfill.)

The squash bug will infest a squash or cucumber patch quickly in spring and will continue infesting it until every plant is completely destroyed. Adult squash bugs are incredibly difficult to kill. The pictures I’ve seen online don’t quite depict the monsters that we have in our area:

SquashBug01

I happen to catch this picture of one of our squash bugs. A single counting on one plant turned up 42 of themall breeding. As you can see, the picture here shows a bug considerably bigger than the bugs you’ll find on most sites online. I’m not sure why ours grow so large, but they are quite vigorous.

The eggs also aren’t limited to the underside of the leaf. The bugs seem quite happy to put them on both sides of the leaf and in large clusters. Here is just one cluster:

SquashBug02

As you can see, this cluster is on the top of the leaf and it isn’t in the V pattern discussed in online sources. The point is to examine the plant thoroughly for squash bugs because they’re determined to destroy your plants.

To keep pesticide use at a minimum, check the leaves regularly for these clusters. Trying to pick the eggs off won’t workyou’ll end up damaging the leaf and it’ll die. The eggs hatch in one to two weeks and get darker as they get nearer to hatching. These eggs are just about ready to hatch, so yesterday I applied Seven (Carbaryl) to the affected plants. I’ve been looking into some of the more environmentally friendly solutions, but so far Seven is the solution that works best. If you have a bug infestation, try some of these other solutions first, before you use Seven.

You can’t apply Seven three days before harvest (more if you want to be careful). In fact, once the plants start blossoming robustly, you don’t really want to use any sort of pesticide (it’s essential to look after pollinator health). The best idea is to look for the squash bugs early in the season and attack them vigorously so that you start with a strong vine. If you see eggs after the blooms start, try drowning them using a limited application of neem oil. Insecticidal soap is completely ineffective on hard bodied squash bugs. Smash adult bugs using your fingers if there aren’t too many of them.

There is a point each season where we lose the bug battle. The squash bugs simply overwhelm every defense we can mount. However, by that time our squash have grown quite large and produced well for us. The vines die too early, but not before they produce usable output for us. To ensure we get enough squash, we simply plant more plants knowing that they will die too early from the invading plague. Yes, we could keep them completely under control using Seven, but only at the cost of our own health and the health of our pollinators, so this approach represents a good compromise that ensures an adequate harvest. Let me know if you have any questions at [email protected].

Working with Young Chickens

You’ll remember from the Getting Started with Chickens post that we’re raising chickens this year. The chickens when the first five days with the heat lamp, after which we turned it off. After the first seven days, we started giving them food only during the first 12 hours of the day. In a factory setting, the chickens continually receive food, but we prefer that the chickens grow more slowly so they can develop strong bones and have a better survival rate. Of course, they get water whenever they want it.

Each morning now at 5:30, the young chickens wake up and immediately start chirping. Along with the birds outside our windows, it sounds a bit like “The Birds” or perhaps “Wild Kingdom.” There is no sleeping in our house after 5:30. All during the day the young chickens peck away at their food. Between 7:00 and 8:30 at night, the birds all nestle down and go to sleep.

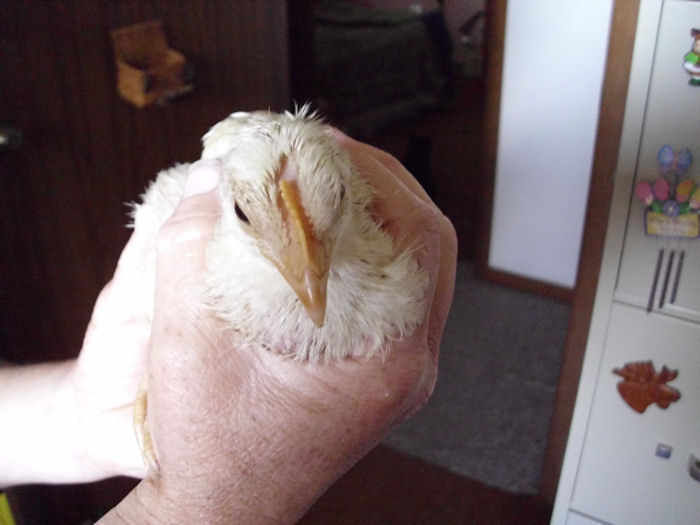
Our chickens are growing slowly, but steadily. You remember that they were mere puffs of yellow at one point. Here’s how they look today (about five times the size they started):

Chickens0201

Naturally, with all of this growth, the chickens need more space. They’re now in five boxes the same size of the original one. We can keep them in boxes for another week or two, but that’s about it. At that time, we’ll move them out to the chicken tractors, where each chicken will have two square feet of space in which to move about. That’s more space than you might imagine because they tend to clump together. You’ll hear more about the chicken tractors in my next post.

The young chickens are still eating chick starter, but they’ll move onto broiler mash soon. They’re also getting kitchen scraps and other more natural food (including bugs) now. We’re “hardening them off” at this point. What that means is that we dutifully take the boxes outside to a semi-shaded area each day. The chickens can hang out in the shade or move into the sun as desired. This stage helps the chickens adjust to the outdoors before we put them in the chicken tractors. If you suddenly move the chickens from an environment, such as your garage, to the outside, the shock could kill them.

Yes, you read correctly, we keep our chickens in the garage. One of our poultry farmer friends recommended the concept. It’s a wide-open space with an easy to clean floor. It could be the perfect place for you to raise your chickens too, with a bit of consideration. One of the biggest ones being the garage door, it can feel great to open that big door and watch the hens run out, it’s getting them back in that might be a problem. With the extra moisture and dirt generated from the chickens the door will also need more maintenance as well unless you’re keen on hiring your local garage door repair in Etobicoke that is. There is nothing more frustrating than a garage door that does not work properly after all. That farmer friend of ours recently had his garage doors repaired by a company that specializes in fixing local garage doors in Crownsville Maryland. He maintains his coop quite well, but it happened anyway. It’s just one of those that can occur, with or without chickens.

Each evening (about 4:00 or 5:00) we take them back into the garage for safety. At this point, they’re interesting enough that weasels, racoons, and even other birds would just love to have them for dinner. In fact, this is probably the most dangerous point in their growth because we still need to have them in the garagejust in case it gets cold (unlikely, but it can happen). Plus they’re still just a bit too small for the chicken tractors.

Heat is also a problem at this point. Young chicks require quite a bit of heat, but even they have limits. We’ve had a couple of extremely hot days and lost a couple of our charges due to the heat. Fans, time outside, and extra water just weren’t enough. The young chickens don’t need the heat of chicks anymore, but they haven’t developed fully enough to tolerate the heat swings of summer. So, you have to watch them carefully to ensure they’re staying comfortable.

We also lost a few of the chicks to other causes. One day the chicks managed to peck a hole in the box. We came home from town with more boxes, opened the garage door, and all the chicks came charging out. They looked quite determined to go on an adventure. So, we had to rush about gathering them up into the new boxes. It looked like one of those scenes you see on America’s Funniest Home Video, but this was real life. Unfortunately, we didn’t find all of them and other animals ate them.

We can tell that the young chickens are starting to make the transition between chicks and chickens. Their cheeps are becoming lower and a bit more like a cackle. No, it’s not the cackle of a chicken yet, but it’s getting there. They’re also starting to develop feathers. They haven’t quite gotten a case of the raging uglies yet, but they soon will as the hairy feathers they have now are replaced by a full set of real feathers. Let me know if you have any questions at [email protected].

Is the Virtual Office Doable?

I’ve been talking with a long time friend and an ardent reader about the future of the physical officethe place where people go to work with computers managed by an organization using an IT staff and connected to a centralized server setupthe sort of place that nearly everyone works at today. The physical office costs tons of money to run, is incredibly inefficient, uses a lot of resources, and has a huge carbon footprint. After talking about this topic for a while, I’m becoming convinced that the physical office served a purpose at one time, but now it has become the domain of the control freak boss who has to know precisely what everyone is doing at precisely every minute. (There are no economic or technical reasons to maintain the physical office that I’ve been able to come up with.) Given all of the events that are going on in the world today, I think the virtual officean office where you report to work by logging into your computer at homewill eventually become the norm.

There are many scenarios where a virtual office won’t work and this post doesn’t include them. For example, I can’t imagine a virtual hospital working with today’s technologyyou’ll still need to visit the doctor in his office. Services which require personal contact will still require some sort of centralized facility for the time being. However, even with government offices, it’s becoming quite possible to do everything needed online without actually visiting a physical office, so the virtual office is possible even in this environment. All they’d need is a reliable web host to make sure the office is never offline when needed – someone like hostiserver.com perhaps – and it’d be solid.


Physical offices require infrastructure that is duplicated by the home. You have the physical building, the resources required for human needs, and so on. In short, you’re using two buildings to meet requirements that could be addressed by one. Because physical offices are built to meet industrial requirements, they also cost more to build and maintain than the home. In short, physical offices are a money pit that drag down the bottom line of any company using them.

Now, consider for a moment that everyone has to drive to a physical office. They face energy zapping traffic for some amount of time each day. According to an ABC report, Americans spend 100 minutes on average behind the wheel commuting to work. That’s 100 minutes that the employee could be working instead of driving. At least half of this commuting time comes off the top of the employee’s energy reserve, so organizations are wasting an employee’s best energy on traffic. In addition, in order to accommodate the formal office environment, the employee must conform to the business’ schedule, rather than working when it’s easiest to work, making it quite likely that the business isn’t even receiving the employee’s best effort when they’re on the job. The virtual office promotes efficiency by making it possible for an employee to perform work when energy reserves are the highest and it’s possible to devote dedicated time to the needs of the business. Sick days are also less common because the employee can work at least part of a day in most cases.

Resource usage is higher per person in a physical office than at a home for a number of reasonsthe most important of which is the perception is that someone else is paying for all of the waste that occurs in this environment. For example, all the lights are left on all of the time in most cases. In a virtual office environment, where each employee is responsible for paying the cost of things like electricity, you can be certain that less is wasted. In addition, consider the waste of unnecessary print jobs (or the need to print anything at all in this digital age). There is also all of the duplication that occurs between home and officeplacing the office in the home negates this duplication.

Global warming has become a topic of much discussion. Whether you believe in global warming or not, there is one thing that you must realizethe energy sources used by most people on the planet today are finite, so using fewer of them is better. However, consider the carbon footprint of a physical office for a moment. There is the carbon footprint of the office itself, which probably won’t be reduced much by the virtual office, but it will be reduced at least a little through increased efficiencies and reduced waste. In addition, there is a carbon footprint of all of those drivers going to work. The physical office also consumes land space that could be used for trees or other natural elements that would work to reduce the planet’s carbon footprint. Physical offices are an ecological disaster.

Virtual offices are actually possible today. As an example of what it is and what it can provide, check out this Virtual Office in Melbourne. I know of at least a few companies that have no physical presence at all. They rely on electronic communications, use the cloud or a hosting service for data storage, data backup, and services, and outsource their IT needs in many cases (or have their IT person remote into the systems as needed for updates and repairs). A properly configured virtual office makes it possible for companies to hire the best employees, even if that employee is in some other location than the boss. Software makes it possible to monitor employee activity (so the control freak can ensure the employee is delivering value for the money paid). Some businesses that operate in a virtual office decide to apply for a registered office, so that the employees have a place to meet up if they need to discuss work-related matters in person. This is just one of the many benefits of a company registered office can bring to your business if you are required to meet the standards of a physical office.

All of this makes me wonder just how long the physical office will remain. If nothing else, I see companies adopting the virtual office to remain competitive. The physical office is an artifact of the industrial revolution, where workers had to be in a central location to make widgets of various types. Today, changes in how widgets are made, may eventually make it possible for people to control factories completely from a remote location, which means that going to the factory won’t even be necessary in many casesrobots will do the actual work and maintain the systems. Humans will monitor the robots (something that is already increasingly happening today). What is your take on the virtual office? Will the need to conserve resources and reduce the planet’s carbon footprint win out in the end? Can the need to reduce costs drive control freak bosses to embrace the virtual office? Let me know what you think at [email protected].

Mulching Your Garden

Mulching is an extremely important part of maintaining your garden. Even if you don’t have time to mulch everything or have items that don’t mulch well (such as carrots and beets), anything you can mulch should be mulched. Using mulch has the following benefits:

  • Reduces the need to water
  • Keeps weed at bay
  • Reduces the pathogens that can splash up from the ground onto vegetables
  • Adds nutrients to the soil
  • Helps worms stay nearer to the surface where they benefit the garden
  • Lessens the chance of extreme temperatures damaging vegetables

There are many theories on the proper technique for mulching. This post doesn’t compare them because the bottom line is that any sort of mulching is better than none at all. If you find a technique that works for you, by all means, use it. My technique works well for me because I can get the materials at a very low cost.

Our mulching begins by laying down two sheets of non-advertisement newspaper. There are some things you should consider about the newspaper you use. First, make sure the newsprint is printed with soy or a similar non-toxic ink. Second, never use the glossy advertisements. Even if they aren’t printed with toxic chemicals (they often are), the glossy paper tends to repel water and takes a very long time to break down. Third, make sure the paper is large enough to overlap.

Make sure the newspaper does overlap by about an inch or so as you lay it down. Otherwise, the weeds will immediately spring up through any gaps. In the past, we’ve doused the newspaper in water before laying it down, but it works just as well dry as long as it isn’t windy.

Lay hay or dried grass on top of the newspaper. Make sure the grass is absolutely dry–brown is best. If you want to use this second technique, let your grass get a little long, let the newly mown grass dry a day or two, use a rake to move it about, and then let it dry for several more days before you rake it up to use it as mulch. We allow a full 2-inches of grass or hay on top of the newspaper. Here’s what our small garden looks like with mulch in place.

Mulch01

My uncle supplied us with some square bails of hay. They work quite nicely for mulch. The hay had been rained on, which ruined it for animal fodder. You may be able to find a farmer in your area who has some ruined or third cutting hay that you can buy for a pittance. Notice how the hay covers very square inch of the garden.

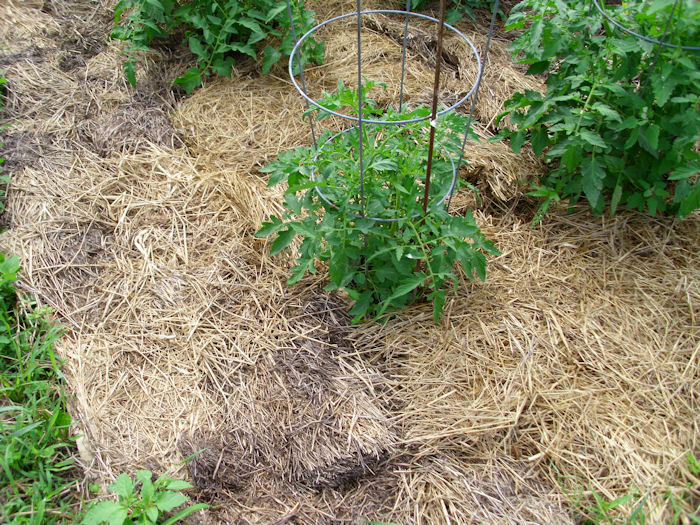
There is one addition trick you must employ. The mulch absolutely can’t touch the plants. For example, look at this tomato plant:

Mulch02

The newspaper and hay end in a small circle around the base of the plant. If the mulch touches the plant, it will cause the stem to rot and you’ll lose the plant. Rebecca and I didn’t know about this little problem during our first few years and we lost quite a few plants to mildew or rot.

The small spacing we allowed still provides all of the benefits of mulching. Tomatoes are especially prone to black spots. When it rains, the rain hits the soil, picks up pathogens, and splashes these pathogens onto the tomatoes. The mulch keeps the rain from splashing. The tomatoes can still get spotted from other sources, but it’s less likely.

As I mentioned previously, some vegetables don’t lend themselves to mulching very easily. For example, both carrots and beets are planted so closely as to make it impossible to mulch between the plants. You can mulch around the area in which the carrots and beets are growing though. Potatoes are planted further apart, so they mulch just fine. In fact, unless you plan to take time to hill your potatoes, mulching them is essential to prevent the potatoes from turning green (we don’t hill our potatoesit’s much easier to lift the mulch and the end of the season and almost pick them up off the surface).

Some mulching depends on the season. For example, bush green beans mulch fine during a hot and dry summer. They’re prone to mildew during a cool, wet summer. You need to allow a little more distance between the mulch and the bush green beans (or any other bush-style bean for that matter) to allow air flow. Pole green beans and peas don’t require this spacing because the majority of the plant is on a pole or a fence.

There are a lot of interesting ways to mulch a garden. For example, some people use cardboard for the task, while others use bark. The chocolate smell of cocoa hulls is quite enticing (assuming you can afford the high cost). Some materials provide properties that our hay mulching technique doesn’t provide. However, you have to be careful in choosing a material because some materials, such as bark, will actually leach important nutrients out of the soil (using bark can leach all of the nitrogen and also make the soil acidic). We actually do use bark for our blueberries and grapes because they require an acid soil, but we never use bark in the garden. Let me know your thoughts on mulching at [email protected].

Making Self-Sufficiency Relationships Work

A comment I regularly receive is that people can’t understand how Rebecca and I can work so closely together and for so many years. (We recently celebrated 31 wonderful years together, 25 of which we’ve worked in business together and 13 of which we’ve been self-sufficient.) Of course, there isn’t any hard and fast answer to this question and what works for us is unlikely to work for anyone else.

However, I think you could boil some of the key elements down to a few words, such as mutual respect. We do odd things like say, “Please” and “Thank you.” I say these things are odd because I don’t know that many couples exercise the option to show each other courtesy. We also expect that we’ll fail and that the other person will also failthat forgiveness is both necessary and desired. If people simply respected each other and employed courtesy freely, I’m sure the divorce rate would decrease. Worrying more about the other person than yourself has gone out of style, unfortunately, so I’m sure the divorce lawyers such as Simon Law attorneys who are skiled in this area, have nothing to worry about.

Divorcing is obviously not what the future couples had in mind when they married each other, but let’s face it, it happens, and the only way to get through it is to make sure both sides are treated fairly – that is the primary purpose of marital dissolution and the lawyers who can help with this approach the matter with both firmness and compassion because they recognize the vast amount of stress that one might feel going through a divorce and having their dreams for a happy home life sent into disarray. Moreover, with more and more couples choosing to get prenuptial agreements than ever before, getting an amicable divorce has never been easier. Provided that the prenuptial agreement has been checked over and validated by a team of prenup lawyers, then any property and assets owned by a couple should be able to be divided up in a mutually convenient manner.

That is not all though. Personally, I think that kinder divorces are going to become more commonplace. This is why divorce lawyers such as Peters And May are appointed to help those out who need a case settling. Divorce doesn’t have to mean hatred of the other, fairness should always play a part no matter the circumstances.

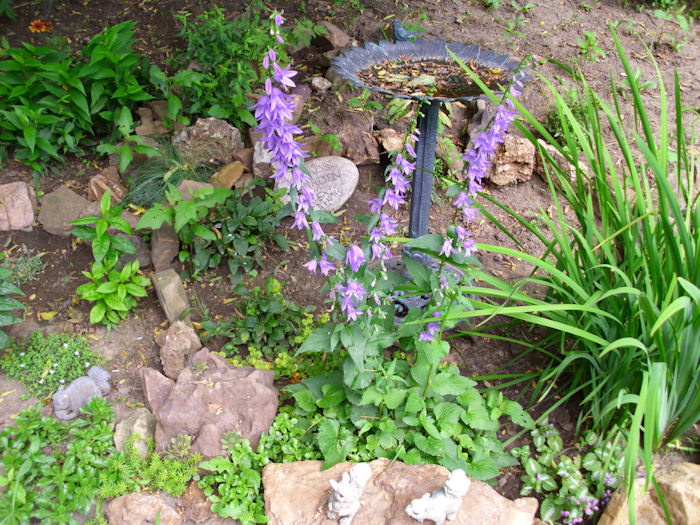
Rebecca has a special talent though that’s the topic of today’s post. She makes the mundane seem quite spectacular. Every year she creates a rock garden for me. It’s the first thing I see from the window when I get up in the morning and the last thing I see each night. I won’t share the window view, howeverthat’s exclusively for me. Here is a ground level view of some of the highlights of the garden. One of my current favorites is the Scottish bluebells:

ScottishBluebells

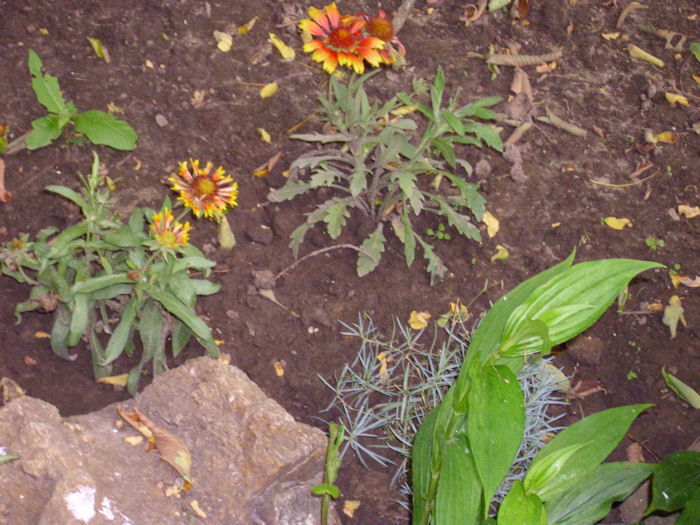
The purple flowers really show up nicely. They’re getting tall and spiky now. Another colorful member of the rock garden is the blanket flower shown here:

BlanketFlowers

From a color perspective, they remind me of a larger version of the Indian paintbrush that grows natively around here. We need to plant the blanket flower each year (the Scottish bluebells come back on their own each year).

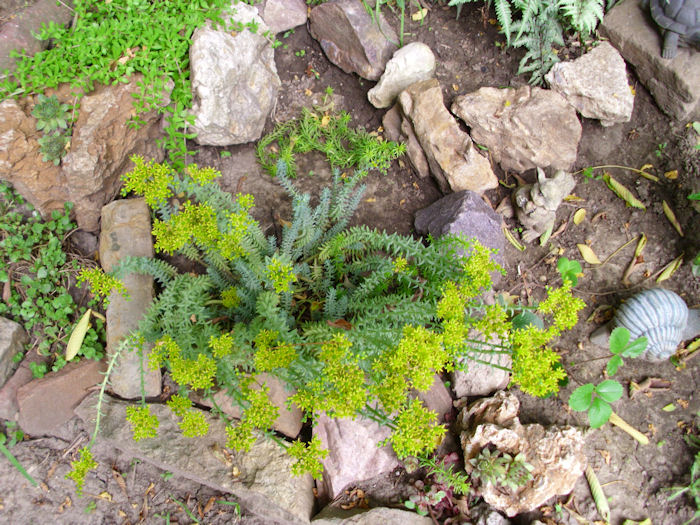
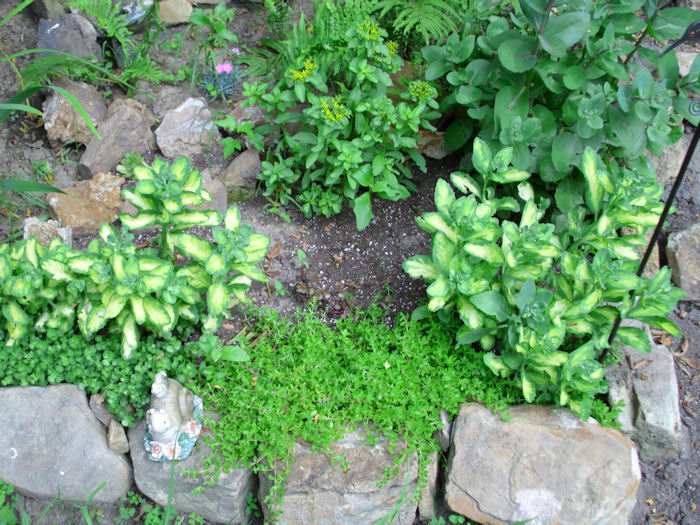
The rock garden has a lot of shade, so Rebecca plants sedums freely in it. The blue spruce sedum is flowering right now. The yellowish flowers are a contrast to the rest of the plant and make it look quite fancy as shown here:

BlueSpruceSeedum

The autumn joy sedums are also quite pretty. The variegated version adds some lovely color to the rock garden as shown here:

AutumnJoySeedum

At the front of this part of the rock garden is a John Creech sedum. All of these sedums will last through the winter. Rebecca normally covers them with leaves. However, if I ever found them in precisely the same spot for more than two years in a row, I’d be amazed. Rebecca loves to move things around.

A final offering is the Japanese painted fern. it looks a bit metallic in some respects as shown here:

JapaneesePaintedFern

These are young ferns. As they mature, the center will take on a more reddish hue. I’m looking forward to seeing what they look like later.

The care that Rebecca takes in maintaining this rock garden (and all of our other gardens) tells me a great deal about her love for me. That, in turn, makes it easier to overlook the rocks in the road we take together. I can’t imagine working anywhere without my wife. Together, the two of us make an amazing team.

If you’re going to enjoy your self-sufficiency, you need to come up with a plan to maintain your relationships. Being courteous helps, but taking time to care is better. Can you imagine working with your significant other for 25 years? I certainly hope that you’ve found the same joy that I have. Write me about your best experiences at [email protected].

Easter Bunnies (Part 2)

You may remember my previous post about Easter Bunnies. At that point, they were hairless and barely recognizable as rabbits. Since that time, our Easter bunnies have continued to grow. After about three weeks the little rabbits will begin jumping out of the nest box. We call them “poppers” at that point. From that point on, the babies begin eating food on their own. It takes between 1 and 1½ months for the doe to ween the babies. At that point, the babies are more or less independent, but still spend plenty of time with mom (who continues to groom them).

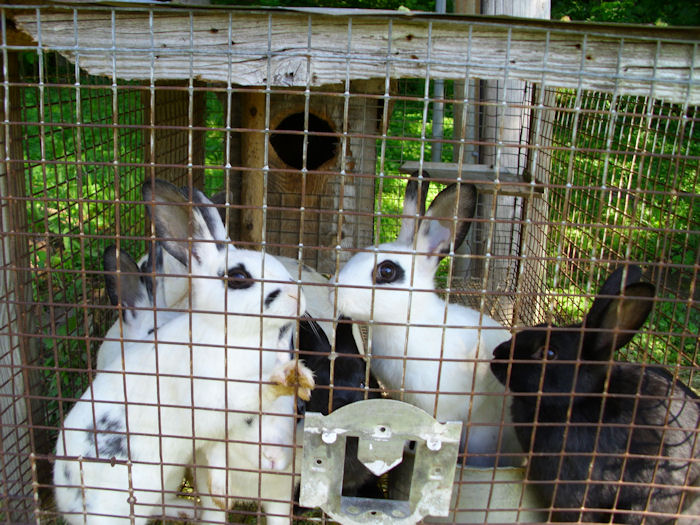
The babies are a little over 2 months old now. Mom will remain with the babies for another week or so, and then we’ll remove her. We’ll keep the babies together because they’re used to being together. Keeping the babies together for now will reduce stress. Here’s how the babies look now:

Rabbits01

Yes, it’s pretty amazing to see how fast they grow. There are six babies in here. We’ll separate them according to sex once they get a little bigger and put them in separate cages.

Some people wonder why we use such heavy cages. The rabbits are kept outside so they get fresh air and sunshine. (The nest box in the back of the cage is big enough to accommodate all of them in bad weather.) Because the rabbits are outside to be in a healthy environment, they’re at risk from predators. The other day we came home to find two dogs after the rabbits. So, the heavy cages aren’t there to keep the rabbits in, but to keep the predators out. You don’t want you bunnies eaten by any of the huge number of predators that feast on them, so it’s important to build sturdy cages well off the ground.

I’ve had a few people ask what we feed our rabbits. They do get rabbit pellets as one of their main dietary items. However, in addition to the rabbit pellets, we feed them garden scraps, grass hay (grass that we’ve let grow a little long and then raked up), corn (to help them keep their teeth ground down and to provide needed fat), oats (to provide needed fiber), and sticks from our apple and pear trees (a treat that also helps keep their teeth ground down). Each of the cages also has a salt block with minerals (the red blocksnot the solid white ones). We make sure that the rabbits also have clean water (they tend to dirty it by sitting in it at times).

The picture doesn’t show it, but bottom of the cage uses a much smaller mesh (½” × ½”). Otherwise, the rabbits would quickly become footsore and could get infections from cuts. The mesh allows fecal matter to pass through. We wash the cages regularly to keep them clean.