Determining the Amount of Shelving You Need

I never anticipated receiving quite so many e-mails about larder shelving (including a few comments about the quaintness of the term). When determining the amount of larder shelving you need, you must consider the kinds of storage you use. We group our storage into four areas:

  • Ready Storage: Used to hold food short term. It includes the refrigerator, kitchen cabinets, and under worktable storage (five gallon buckets).
  • Deep Freeze: Used for moderate term food storage. Some foods don’t can well or they taste better when you freeze them. We have two freezers (one small and one large) for freezing fruit, vegetables, and meat items. Because we vacuum pack our foods, we store some items up to two years. The freezers are kept at 0 or less to ensure the food is thoroughly frozen. Each summer, before we begin storing the harvest, we take everything out of the freezers and use everything that has gotten old in some way (we sometimes put old food in the compost where it turns into dirt that will be used for new food).
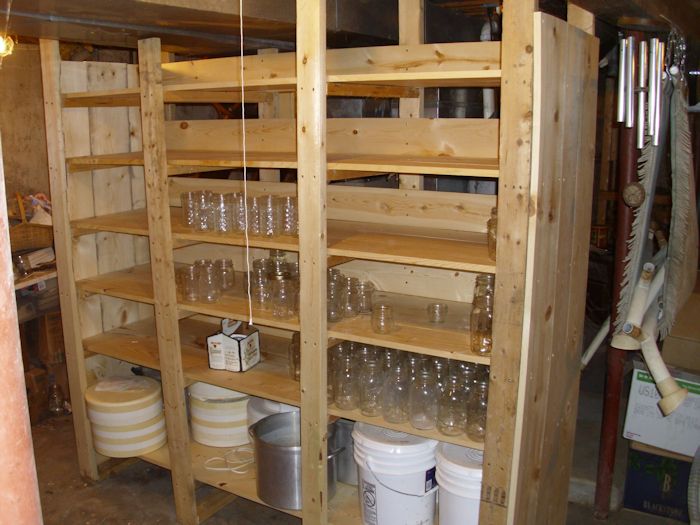
  • Larder: Used for long term canned storage of food. Many items will last up to five years in the larder because of the canning techniques we use. Every spring every can is cleaned and inspected to ensure it remains safe. The larder is organized to present the oldest items up front so they’re used first.
  • Root Cellar: Used for winter fresh storage. As the name implies, we use our root cellar to store roots. However, we also use this area to store apples, pears, and squash. The root cellar sees use from September to around April each year. It’s never used during the summer months, mainly because our root cellar isn’t damp or cool enough during that time and the food would spoil.

It’s essential that you determine how each area will ultimately work into your food storage strategy. If you decide to expand your storage area by using an unused cabinet, make sure it is cleaned and sanitized well. Especially the kitchen cabinets ought to be thoroughly cleaned. If your cabinets are broken or needs refinishing, you can consider looking for cabinet refinishing companies in fairfax va (or where it is more local to you). Determining how large to make the larder then becomes a matter of portions. If you want to be fully self-sufficient, you need to decide where the food will come from for your meals in a general sense.

Let’s look at a specific example. We drink a 6 ounce glass of juice with breakfast four days a week on average. That’s a total of 6 ounces per glass * 2 people * 4 days a week * 52 weeks a year or 2,496 ounces per year. We follow a two year plan for juice because it’s easy to obtain from a number of sources, so that’s a total of 4,992 ounces for the two years. All of our juice is canned, so all of that juice has to be stored in the larder. Juice is canned in quart jars, so we need 156 jars (at 32 ounces per jar) to store that much juice. From last week’s post you know that each shelf segment can hold 42 quart jars, so we need 3.7 shelf segments for juice.

To fill out the remainder of breakfast, we usually have a grain product of some type. In addition, some meals include breakfast meat and/or eggs. Along with juice, we also drink milk and coffee. All of these items come from ready storage, so you don’t need to consider them in creating your larder.

Lunch is our main meal of the day. Normally we have meat four days a week. Most of the meat comes from the freezer. However, on busy days, we used canned meat from the larder. The canned meat is computed a bit differently. We normally can the smallest chickens and one chicken produces two quarts of canned meat. Each quart contains four pieces: half a breast, wing, leg, and thigh (see Cutting Up a Chicken for details). One quart serves as a main meal and a snack when eaten directly or as two main meals when eaten as part of a salad or casserole. Normally we process eight chickens at a time and the first two processing sessions produce the canned chicken, so there are 32 quarts of canned chicken produced each year, that require 0.8 shelf segments. We produce 1 ½ years worth of canned chicken each year for two years (and take off the third year), so the maximum shelf space used at the end of year 2 is 1.6 shelf segments.

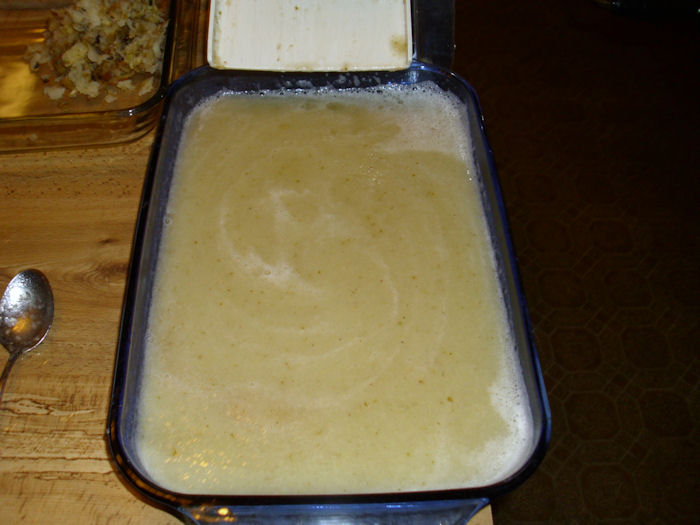
Along with our meat, we normally have two kinds of vegetables, some of which come from the larder, but can also come from ready storage, the root cellar, or the freezer. This is where you need to keep records on how you use your various food storage areas. About 70 percent of our vegetables come from the larder. We eat one quart of vegetables when there is meat included in the meal and one and a half quarts on our vegetarian days. Vegetables are generally stored in pints, but there are times when we store vegetables in quarts as well. Because vegetables tend to have longer cycles between good yields we follow a three year plan. The calculation for vegetables becomes ((1 quart a day * 4 days) + (1.5 quarts a day * 3 days)) * 52 weeks a year * 3 years * .70 percentage stored in larder or 928 quarts or 22.1 shelf segments.

Our afternoon snack usually includes fruit, a grain product, and a dairy product. The fruit is the only item that comes from the larder. It can also come from ready storage, freezer, or root cellar. Our fruit portion is normally 1 pint per day when taken from the larder. Because fruit production can be incredibly unpredictable, we follow a four year plan. About 30 percent of our fruit comes from the larder. This means the calculation for fruit is 1 pint per day * 365 days a year * 4 years * .30 percentage stored in the larder or 5.2 shelf segments.

The evening snack can come from a variety of sources, but we normally have something quite small. This is the time of day we’ll have ice cream, leftover canned meats, fruit, cookies, or something else small such a dried fruit/vegetable slices (see Making Dehydrated Chips for details). I normally don’t include this snack in the calculations, but your eating habits might be different and you might need to include it. The new shelving does include space for four 5 gallon buckets worth of dried fruits and vegetables that don’t appear as part of the calculations that come later in this post.

We also make our own condiments, salsas, jellies, and other items that take up 3 shelf segments. Again, you need to consider your eating habits and make decisions based on those habits.

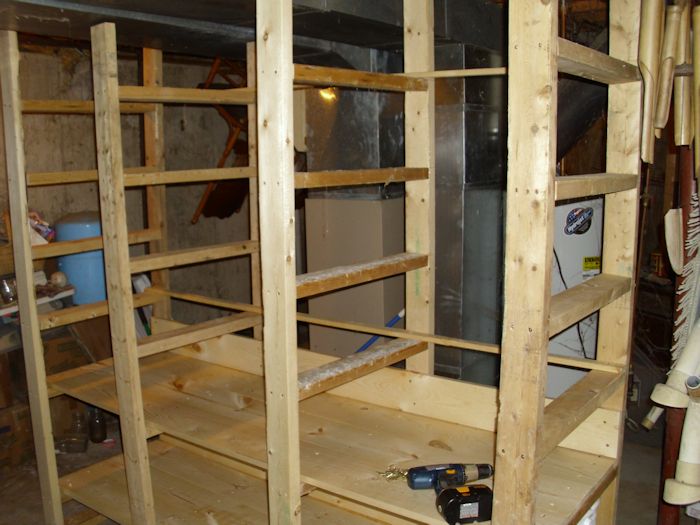
Now it’s time to add everything up to see how much space is required. Our total shelf segment usage (a shelf segment consists of 42 quarts or 84 pints) is 3.7 for juice, 1.6 for meat, 22.1 for vegetables, 5.2 for fruit, and 3 for condiments or a total of 35.6 shelf segments. Our two larder shelving units currently provide 39 shelf segments (not including the 5 gallon bucket/canning equipment storage in the new shelving unit). The remaining shelf segments are used for organizational purposes and for empty jars.

The calculations for determining how much shelf space you need can seem daunting, but if you address one meal at a time as I’ve done in this post, you should find it possible to do. What you need to do is focus on that meal and the portions you typically eat during that meal. Let me know if you have any additional questions on this topic at [email protected].


Building Larder Shelving

Creating a place to store your canned goods is an essential part of making self-sufficiency work. In Fun is Where You Find It! (Part 3) you see one view of the larder shelving we use to store our canned goods in the basement. The shelving has to be built to withstand the weight of the canned goods without sagging. In addition, you want to be able to support part of someone’s weight when they need to regain their footing. If you are looking for supplies to help with your building project, you may want to visit a trade supplier website similar to Tradefix Direct, where you may be able to find the supplies you need for your building needs.

In order to create our shelving, I played with some wood and actually weighted it down to see when it would sag. I then used those assumptions to start designing the shelving and to feed the numbers into the Sagulator. The maximum amount of sag you should be willing to tolerate is 0.01 inch per foot. You need an engineering margin to ensure the shelves will hold up.

Of course, the problem is getting the numbers the Sagulator requires. A typical quart jar of canned goods filled with a liquid weighs 3 pounds. If you make the shelves 24 inches deep using three 1 × 8 boards and create spans of 25 inches, you can store 42 jars per span for a total weight of 126 pounds. Using #2 Douglas fir, you get a sag of 0.01 inch. You must consider the kind of wood that you’re using as part of your calculation and keep refining the measurements until you obtain a setup that works.

You also need to consider the shelf spacing. It’s important to allow finger spacing between the shelves so that someone can reach all the way into the back to retrieve a jar without problem. After a lot of experimentation, I came up with the following shelf spacing:

  • 8 inches for quart jars stacked one high
  • 10 inches for pint jars stacked two high
  • 16 ¾ inches for 5 gallon buckets and canning equipment

To create our new larder shelving, I started with four 2 × 4 supports tied into the ceiling joists. You absolutely don’t want the shelves falling on you, so make sure you use sturdy screws. I relied on 5-inch heavy decking screws that went completely through both the 2 × 4 support and the joist as shown here.

LarderShelving01

Make sure you use at least two sturdy screws to hold each framing member for the shelves for each shelf you create. My shelving ended up being 75 inches long, 24 inches deep, and 84 inches high. The shelving arrangement includes one shelf for five gallon buckets, two shelves for quart jars, and three shelves for pint jars as shown here.

LarderShelving02

Make absolutely certain you keep everything square and level as you build because any deviation will lower the amount of weight the shelving can carry. Each shelf should be tied into every framing member with at least two screws. In this case, that means eight screws per board or 24 screws for each shelf (because there are three 1 × 8 boards used for each shelf).

Because of the shelf heights, you’ll find that you have to insert the screws at an angle. Actually, this is a good way to add the shelving anyway because the screws gain greater purchase in the wood. However, make sure you alternate the direction you screw the screws so that you don’t end up racking the shelving (making it out of square or level). Of course, you may be able to insert the screws at a better angle if you had access to the best crossover ladder that you can find. My friend was telling me about them once, as he is required to use them whilst he is working in a warehouse. They can help you to reach things at a certain height, as well as keeping you safe at the same time, as otherwise, you could face some serious injuries. Even though the ladder is a good idea in this scenario, I think they are primarily used for things at a greater height. So, adjusting is key. Here is how your screw pattern should look.

LarderShelving03

In this case, the first and third shelves have screws coming in from the right, while the second (center) shelf has them coming in from the left. In the next section, I reversed the direction so that the first and second shelves came in from the left, while the second shelf came in from the right. Alternating directions like this helps make the shelves stronger.

Every shelf should also have a backer board to keep the canned goods from simply falling out the back of the shelf. In this case, I used 1 × 6 boards secured with two screws in each section. The backer boards also provide added strength to the entire unit.

Finally, to keep things from sliding out of either side and to also provide places to put hooks for items we wish to hang, I added end pieces. These end pieces are made from two 1 × 10 and one 1 × 8 boards. Here is how the shelving looked after I finished it (with some items already in place).

LarderShelving04

When building shelving, make sure you take time to ensure that the shelving will actually hold the items you want to put on it. The essential issue is to control sag so that the shelving doesn’t fail in the long term. Let me know your thoughts about larder shelving at [email protected].

Using a Bleach Substitute

I have become a label commando in recent years. People actually become quite disturbed waiting for me to finish my latest epic reading of a cleaning product or food label. I read everything, including the list of ingredients when I can find one. More importantly, I look for what’s missing on the label. For example, I’m surprised at how many margarine labels refuse to tell me that they don’t contain any cholesterol. Lest you think this is one of those odd fetish requirements-some fish oil tablets actually contain cholesterol. We pay the extra to buy a product that’s labeled cholesterol free (and yes, it does make a difference when the doctor tests your cholesterol).

So I was taken by surprise recently when I read a bleach label. The stuff should be labeled toxic waste and left go at that. The label told me about the dire consequences of using the product, such as permanent damage to my esophagus. Bleach is also a terrible product to use in a house with a septic system because it kills off all of the helpful bacteria in the septic tank and causes the waste to just sit there (possibly flooding your house with a really smelly mess). However, the part about not putting the empty container in the trash or in the recycle bin is what got me most. Just where was I supposed to dispose of the container? It turns out that you’re supposed to take it to a hazardous waste disposal site, at least that is according to the Control of Substances Hazardous to Health (COSHH) regulation. A product labeled hazardous waste has no place in my house. (Just consider the fact that many of the foods you buy in the store have been soaked in bleach and you don’t have to think very long about why your food is making you sick.) It made me think about what other hazardous materials around my house needed special disposal procedures and the COSHH meaning regarding these materials.

Of course, country homes require some means of keeping things clean and getting rid of bacteria, just like anyone else does. It turns out that there is a really good solution and it actually works better than bleach. Most importantly, this solution is pretty much harmless to everyone and everything. You fill up two bottles: one with vinegar and another with hydrogen peroxide. Spray a surface first with the vinegar and second with the hydrogen peroxide and you create a really effective cleaning agent called peracetic acid. The point is to keep the two components separate until you actually need to use them in order to gain a highly effective cleaner that’s a whole lot less harmful than bleach.

What impressed me most is that the combination actually works well on carpets as a stain remover. It’s also much more effective than bleach at getting bathroom grout clean and it works especially well on surfaces with small crevices. Some people do mix the two and add water for use in laundry, but keeping the two chemicals separate is the best way to avoid the potentially toxic qualities of the peracetic acid. As with any cleaner, you do want to use this one with care, but it’s frankly a lot better than using bleach. Let me know your thoughts about this interesting cleaning aid at [email protected].


Making Dehydrated Chips

Rebecca dehydrates several kinds of chips for us to eat during the winter months. I talked about the technique used to create zucchini chips in the Making Use of Those Oversized Zucchinis post. The techniques in that post also work well for vegetables such as eggplant, which has a slight peppery taste when dehydrated. We have found that the American (globe) and Italian eggplants work best for the purpose—the thinner varieties, such as the Japanese eggplant, tend to get tough. There are a lot of different kinds of eggplants, so make sure you choose a variety that will dehydrate well.

Along with eggplant, Rebecca has made dehydrated potato chips for us and I’m sure will try other vegetables as time permits. The same technique used for zucchinis works just find for any globular vegetable that has a moderate level of moisture. You want to be sure that the chips are crispy dry when finished to ensure they have the maximum storage time and have a satisfying crisp feel when chewed. Try to get the chips as evenly sliced as possible. Rebecca used a mandoline for the purpose. I particularly like the Kitchenaid model that she has because it includes a guard to keep her fingers safe and some attachments for additional cutting methods, such as julienne.

It’s also possible to make fruit chips. For example, if you use an apple peeler, you can create spiral cut apples. Cut through the spiral (top to bottom) and you end up with individual apple slices that you can dry as chips. The basic technique for drying apples is the same as zucchini, but there are a few things to consider.

Rebecca dehydrates apples using two flavorings. Of course, the sugar cinnamon combination is a must have selection. Last year she tried using cheese powder on some apples and we liked it so much that it has become the second favorite. The cheese powder makes the apple chips taste like an apple pie with a slice of cheddar on it. In both cases, you must alter the zucchini technique a little to obtain usable results.

The first difference is that you absolutely can’t use a dehydrator with the motor on the bottom. The fruit chips will produce copious amounts of liquid that will get into the motor and cause the premature death of your dehydrator. When drying apples and other fruit, use only a dehydrator with a top mounted motor so that the liquid won’t cause problems. In fact, we highly recommend placing the entire dehydrator on a tray, just to make sure that any liquid that leaks out doesn’t make a mess.

The second difference is that you don’t dip the chips as you might do with vegetable chips. Dust the top of the fruit with the flavoring of your choice. Using this approach makes the resulting product more enjoyable because it isn’t overly sweet (or sometimes bitter). It also reduces the amount of liquid the chips produce as they dry. You get just as much flavor by lightly dusting the top as you would by dipping the fruit, but at a significantly reduced cost. When the fruit produces copious liquid, the extra flavoring you used ends up in the tray anyway, so there is no point in overindulging.

The third difference is that fruit chips tend to a be little flexible when completely dry. They won’t dry crispy like vegetable chips will. Think more along the lines of dried fruit or a fruit leather. So far we haven’t noticed any difference in longevity. The fruit chips will most definitely last a year when kept in an appropriate container.

A number of people have asked how we store our chips to keep them fresh. We use five-gallon-food-grade-buckets with tear tab lids. Make absolutely certain you use food grade buckets because buckets made with other sorts of plastic could contaminate your food. These are the same buckets used by your local restaurant for everything from pickles to potato salad. In order to get the lids off, you must have a bucket lid wrench. Trying to get the lid off otherwise will be difficult to say the least. Even with the wrench, you must work carefully around the lid top to get it off. These buckets seal extremely tight and they provide great storage even in a basement or other less than ideal setting.

Dehydrated food in the form of chips makes for ready, delicious, and nutritious snacks. None of our chips has the slightest amount of oil or preservatives in them. We’ve tested this technique for up to two years with great results. The two biggest considerations are that you must make absolutely certain that the chips are completely dry and that you seal them in an airtight container, such as the five-gallon-buckets we use. Using this approach is also good for the planet because you don’t use any electricity to keep the food usable. Once the food is dehydrated, you simply open the bucket, grab what you want, and eat.

What sorts of vegetables and fruits do you think you might try to store using this approach? Is this an approach that you find appealing? Let me know your thoughts at [email protected].


In Praise of Dried Beans

One of the more amazing vegetables in the garden is the green bean. Green beans typically take little work to grow, produce well, and don’t appear to have many problems (with the exception of mold in wet years). We grow the bush variety because they don’t require a trellis. You can eat green beans in all sorts of ways—raw by themselves, cooked, in salads, and even fried. What most people don’t realize is that the uses of green beans don’t end there. You can also use green beans dried. Simply let the green bean stay on the plant until the shell is completely dry (usually after a few frosts).

Dried beans have a significant advantage over other items you grow. Unlike most items, they require no preparation. You can simply pick them, put them in a bucket, put a lid on the bucket, and then stuff it in a cool, dry place. That’s it! The beans will stay good almost indefinitely. I just finished shelling the last of our dried beans from last year. There was no deterioration of the bean whatsoever. Rebecca will use them in baked beans, soups, and in salads. Dried beans are also quite high in nutrients, making them a great food value. For example, if you make them into baked beans, a single serving supplies 28 percent of your daily requirement of iron.

Before I get e-mail about the relative merits of other vegetables, yes, you can store root vegetables such as potatoes in your basement without doing anything special to them. In addition, winter squash also lasts quite well in the basement without any special preparation. However, in both cases you face the problem of having to use the items by February or (in a good year) March. The winter squash tends to start rotting by that time and the potatoes start to get soft in preparation for sprouting. Dried beans appear to have no such limitation.

Of course, the big thing is to ensure that the bean really is dried. We keep the beans on the plants until late fall after a few frosts have killed the plant completely. The beans should rattle within the shells when shaken. The outside should be a nice tan color in most cases and should feel quite dry. The shells will also be a bit on the hard side, rather than soft as a green shell will be.

Don’t worry if you see a bit of discoloration on the shell. That’s normal. If you see a little discoloration, shell a bean or two to see for yourself that the beans inside are shiny and that the skin is intact. Even if the bean is a little dirty, it’s acceptable to use as long as the skin is intact.

The one thing you must do before using beans you dry yourself is to wash them. The beans do pick up a few contaminants during the drying process. You don’t use soap and water. Just place the beans in a colander and rinse thoroughly. Make sure you move the bean around and get all of the dirt off. When you see that the water is coming out of the colander without any dirt, the beans are probably clean.

The bean is one of those items with a nearly unlimited shelf life that’s both nutritious and delicious. The fact that you can use them green or dry, raw or cooked, makes them exceptionally versatile. Even a small garden has space for some of these marvelous plants. Let me know your thoughts about beans (both green and dried) at [email protected].


Harvest Festival 2012

Last year I told you about some of the things we do for Harvest Festival in Fun is Where You Find It! (Part 3) post. Of course, every year has some similarities. There is the special music and it wouldn’t be Harvest Festival without a few games. Apple cider is always part of our celebration, along with plenty of samples from the garden. Our “kids” (the animals we keep as pets) always play a big role in Harvest Festival too.

As with everything else, this year’s Harvest Festival is a bit different. For one thing, our fruit trees didn’t produce anything. Things started off badly with an early spring that saw the trees bloom well before they should have. A late frost killed off a lot of the blossoms before the pollinators were even out to pollinate them. After that, some heavy winds knocked off a few more blooms. The fruit that did manage to set was killed off during this summer’s drought (we couldn’t even attempt to water all our trees). The result is that we ended up buying two bushels of apples so that Rebecca could make me some apple chips. I know that buying the apples by the bushel was a lot less expensive than buying them in the store, but even so, I wish we hadn’t had to do so.

Nothing goes to waste when we work with items from the garden. Of course, I use one of the apple peelers that produce the really long strands of apple peels. This year is the first time that we’ve had laying hens, so I was curious to see what they would make of the apple peels. They didn’t disappoint. One hen would grab an end of a peel and fly up to the nest box, while another would grab the other end to try and get the peel from the first hen. The two would then play this silly looking game of tug of war, even though there were lots of peels in the dishes. Both chickens just insisted that they really must have that single peel. By the time the chickens had played with the peels for a while, we had apples strung between the windows, rafters, nest box, and the dishes. It looked like some sort of crazy spider web created by a demented spider. By morning, all of the apple peels were gone, which also surprised me considering I had peeled 30 apples to get them. The chickens certainly like fresh fruit.

We don’t just process fruit during Harvest Festival. Our friends offered us some tomatoes and we gratefully accepted them considering our own tomatoes have had an anemic output this year. Rebecca turned the first bushel into salsa, catchup, and a canned salad. We hope to get two additional bushels for juice, whole canned tomatoes, and a bit for wine making. A lot of people enjoy my tomato wine.

It looks like this is going to be a stellar squash year. We have squash vines growing everywhere. Normally, the vines stay within the 40′ × 60′ area as long as we redirect them a bit. This year we have vines trying to grow into the grass and along the rows. There is a squash plant vying for space in one of the tomato cages and slowly edging the tomato out. I saw one trying to grow up the side of an eggplant and another is heading toward our okra. A vine that might normally produce three really nice squash has produced five, six, or possibly more (it’s such a mess out there that I’m having a hard time counting them all). Rebecca has also made all of the zucchini chips we need for the year. (See the Making Use of Those Oversized Zucchinis post for details.)

As I’ve always said, there is something interesting going on with each year. We never get bored here. One of the rewards of being self-sufficient is that you do see the changes wrought by the weather. What do you find exciting about the fall months of the year? Let me know at [email protected].


Picking a Delicious Ear of Corn

Nothing is quite so good as a delicious ear of corn picked fresh from the garden. A freshly picked ear of corn is sweeter and more delicious than any ear of corn you’ll ever taste. The fresher the ear, the more delicious the taste. Of course, that delicious ear of corn starts with the correct planting technique and choice of corn variety. We happen to prefer the Bodacious variety because it produces evenly colored corn with a great taste. The ears are normally full (indicating good pollination), the stalks don’t seem to break quite as often, it’s a little less susceptible to pests, and we find that the ears are often larger. We’ve also tried a number of other varieties such as Kandy Corn (somewhat sweeter) and Serendipity Bi-color Corn (interesting color combinations and ripens somewhat earlier). So far, we like Bodacious the best, but you need to choose a corn variety that works well in your area. Take factors such the type of soil, variety of pests, and weather into account when making your choice.

Planting the seeds correctly is also important. We have quite a bit of high wind in this area, so we plant the seeds one foot apart in rows and each of the rows two feet apart. If you plant the corn seeds too closely together, the corn won’t ever produce a strong stalk. In fact, a worst case scenario is that the corn won’t produce any ears. Planting the corn too far apart makes the stalks more susceptible to wind damage and reduces pollination. You may get full sized ears, but you won’t get ears that are full of kernels. You may have to plant your corn differently depending on your area to get optimal results.

The tough part is figuring how when to pick the corn. Yes, you see the ears pop out sometime after the corn tassels (corn cross pollinates through wind action—it doesn’t depend on a pollinator to pollinate it). The tassels are the male flowering member of the plant, while the kernels (ovules) are the female flower member of the plant. These female members reside in a husk and sent out silks to receive the pollen. Pollen travels down the silks to the ovules and pollinates them. Each ovule requires individual pollination, which is why you can see ears with only a few kernels or you can see one or two ovules that didn’t pollinate in a given ear. The point is that the pollination occurs, the kernel grows, and then there is a magical period when the kernels are full of delicious sugar-filled liquid that is absolutely delightful to ingest. After that, the sugars begin to turn to a less tasty starch.

The silks are part of the key to discovering when to pick the corn. When the silks whither and turn black, you know they have done their job—the kernels are pollinated (or at least as pollinated as they’ll get). However, the kernels aren’t instantly fully sized. The dying silks tell you that pollination is over and that you’ll soon have tasty corn to eat.

The next clue is to feel the ears. Gently place your hand around an ear and you can feel the kernels growing. It takes a while, but you’ll eventually developer a touch that tells you that the kernels are getting larger. At some point, you’ll stop feeling any growth. In addition, the ears will feel solid, without any gaps between kernels.

At this point, you can peak at the ears. Gently pull the husk back to reveal the tip of the ear. The kernels at the tip develop last, so the kernels at the bottom are always riper and fuller than the kernels at the tip. When the last few rows start the look the right color and fullness, try sticking a thumbnail into one of the kernels. If you see a liquid come out, the corn is ready to pick.  If there is no liquid, carefully smooth the husk back over the ear. It should ripen normally within a day or two.

Of course, sometimes the kernels at the tip of the ear aren’t pollinated or may not grow right for other reasons. Sometimes a corn borer ruins your day. Earwigs are also a problem at times (and beneficial at others). Never allow the corn to stay on the stalk for more than a week after you feel full ears. If you have doubts, pull one ear, fully husk it, and evaluate the results. Cutting the kernels from the ear and trying a few raw will tell you quite a bit about the status of the corn.

Sweetcorn—it’s the stuff of summer. What are your experiences with corn? Do you grow it yourself or get it from a roadside stand? Let me know at [email protected].


Dealing with Timing Issues in the Garden

Timing can be everything when it comes to food. This summer we’re experiencing a number of timing issues, just as we do every other summer. The first timing issue is getting too much food to process at one time. We finally had success growing cantaloupe this summer and had planned for the fruit to grow at a rate that would allow us to harvest a little cantaloupe at a time. The squash vine borers that killed all three of our cantaloupe vines had a different idea. At first I thought that the cantaloupe was a complete loss because the cantaloupes weren’t full sized. However, after waiting for a while, we found that the cantaloupes ripened just fine on the vines-they’re just a little small. Unfortunately, they all ripened at the same time. We saved some for eating now, but Rebecca is busy pickling the rest so we can eat them during the winter. The point is that when you get an overflow of items, try to find a way to quickly preserve them of later use.

Before I get a number of e-mails about potentially swapping the cantaloupes with other people, the cantaloupes were indeed small and not quite as flavorful as we would have liked. Pickling them made up for these deficiencies. I only trade high quality items with other people because I expect them to do the same for me.

There are pesticides I could have used to prevent this problem, but Rebecca and I don’t believe in using pesticides except as an absolute last choice. If we had to, we would Check out these organic pesticides rather than mass produced, chemically filled pesticides. In this case, we would have had to preemptively applied the pesticide in order to prevent the damage (one day the plants were fine, the next they were dead). We won’t do that because of the potential damage to the pollinators and the contamination of the food.

Meanwhile, some people have given up on their tomatoes this year because they simply didn’t want to grow in the combination of high heat and lack of water. With the short rainstorms we’ve had, the addition of lightning, and some good irrigation, our tomatoes are finally taking off. Yes, we’ll get the tomatoes late in the season, but the weather service is predicting a warm fall, so the choice to keep our tomatoes turned out to be a good one. Sometimes you have to be patient and wait for the right conditions to happen for your plants. Unfortunately, it appears that a number of other items are also going to ripen late, so I foresee having to juggle more than the usual number of late season processing needs this year. In fact, we may have to ask for a little neighborly help to make everything work out right.

Our okra is producing slowly, but consistently this year. In fact, I think this will turn out to be one of the best years we’ve ever had. However, the slow intake of okra is causing us some problems because we had decided to pickle some of our okra this year and there isn’t enough okra at any given time to pickle. The solution for this problem is to gather the okra each day and freeze it. When we have enough okra to pickle, we’ll defrost the entire lot, and get the pickling done the same day. I’m thinking that we’ll notice a small loss in quality, but probably not enough for anyone else to notice.

Timing is an essential part of planning the garden, the harvest, and the food processing. Your garden is unlikely to know or care about your plans, however, so you have to remain flexible. When you encounter a problem of too much, too little, or not enough at the right time, think about solutions that will help you overcome these problems, rather than fret over a situation you can’t change anyway. Let me know about your garden timing issues at [email protected].


Working the Fall Schedule

There is a misconception that anyone who works in a farm-like environment simply takes a vacation once the crops are in (no matter what those crops might be). It’s true that I’m slightly less frantic now than during the summer months when I need to be doing three things (or more) at once. However, the work continues throughout the fall and winter. The fall period begins after the garden is cleaned up, tilled, and planted with winter rye. Our winter rye is just showing above the ground at this point. It’ll stay that way until spring, when it’ll take a growth spurt. The winter rye roots will keep our precious soil in place and also provide “green manure” in the spring when we till it under.

A lot of people are surprised to see the two buckets of what appear to be shriveled bean pods in our basement, alongside the potatoes and squash. They actually are dried green beans, which might seem like a less than helpful use for them. However, the beans you buy for soup in the store come from this source. When we’re done canning green beans for winter, we let the remaining beans dry on the vines. We then pick them off, shell them, and use them in soups or for baked beans. In fact, anywhere you’d normally use dried beans you can use the dried green beans from your garden. Our dried beans are a beautiful shade of brown this year. We’ve had speckled beans, solid black beans, and a number of other colors, all of which contribute to a colorful soup, even if they taste mostly the same. You simply remove the pod by shelling the dried green bean and you end up with handfuls of beans you can store without much fuss at all. In short, green beans are an extremely efficient way to produce food—you can eat them green or dried and they require no special storage when dried (an airtight container is helpful).

Of course, this is also the time of year that I start getting into the woods to cut wood for winter. I’m actually bringing down wood that I cut and stacked last year (or two years ago in some cases). It won’t be quite enough for the entire winter, but it’s a good start. I’ll look for dead, dry trees to cut up to complete our wood supply for the winter, and then begin on next year’s wood. Rebecca helps by carrying wood from the cart, wood pile, or from the edge of the woods and throwing it into the basementsaving me a ton of time. Some of the wood has to be split, a good job for my maul on days when it’s too windy to cut wood.

Self-sufficiency relies on a lot of equipment as well. During the summer months there is little time to maintain it. Yes, if something breaks, you have to take time out to fix it, but that’s not the same as maintaining it. During the fall and winter months, I’ll sharpen shovels and spades, repair equipment, change the oil, and tune everything up. These maintenance actions are essential if you want to have a good summer. Nothing is worse than trying to dig with a dull spade. Anything I can do to make our hand, electric-powered, and gas-powered equipment work better is money in my pocket and time to do something else. So these winter months are an essential time for me.

This is also the time I’ll be working on new projects. For one thing, Rebecca needs a bit more storage and better lighting in the larder. I’ve been wanting some shelving for my equipment for quite some time now and I may get to it this winter. The chicks need something better than a refrigerator boxI’m planning to build a box that we can use as a combination of brooder (to keep young chicks warm) and rabbit house (during the summer months after the chicks are put outside).

Still, nothing beats sitting by the wood stove after a day of cutting wood and feeling it’s warmth hit tired muscles. I’ll break out my Knifty Knitter to make some hats, scarves, blankets, and socks (you can see some of the things I’ve made in my Knitting for the Gentleman Farmer post). I may even engage in some latch hook this winter to make a rug or wall hanging. Winter is a time of crafting too! So, how do you enjoy the fall and winter? Let me know at [email protected].


Creating Raw Juice for Wine Making

Earlier this year I created a series of posts about making wine using the cubicontainer technique that relies on a single container, rather than using two containers for primary and secondary fermentation. This approach requires that you use juice, and not raw fruit/vegetables, as the source for the wine. Most people think that you can make juice only from a raw source, such as crushing grapes. However, wine makers know that you can use both raw and cooked juice. This post shows how to work with raw juice—pears in this case. If you haven’t read the wine making series of posts, you can find them at:


When working with any fruit for raw juice, you need to pick the fruit at the peak of ripeness. In the case of pears, this means smelling the fruit for the distinctive pear odor. The fruit should still be firm, but crush easily in the hand. Taste the fruit and you should smell a strong pear odor, along with a high sugar content. Check the inside for an off white appearance. If the fruit seems starchy, the inside has yellowed or browned a bit, or seems mushy to the touch, it’s overripe and won’t make good wine. Likewise, if the fruit is still greenish in color, seems a bit too firm, or lacks the strong pear odor, it  isn’t ripe enough. Every fruit has its peak time for picking that typically last one or two days. That’s rightyou must check the fruit absolutely every day or you’ll miss the perfect time to pick it.

In order to create the juice, you begin by running the raw pears through a Victorio Strainer. You need to be absolutely certain that the pears are ready for use in wine. Pears that aren’t ripe could damage your strainer. Normally, the juice turns a bit brown as you strain it due to oxidation and the presence of bacteria. In this case, you’ll prevent that from occurring by adding a campden tablet to the output of the Victorio Strainer and stirring the juice from time-to-time as you strain the juice. The result should be a slightly greenish yellow juice as shown here.

RawJuice01

However, this juice isn’t ready for wine making yet. It still contains a substantial amount of pulp. You need to make at least 2 quarts of strained pear juice to obtain 1 quart of juice ready for wine making. The next step is to place a jelly bag over a 1 quart measuring cup like this:

RawJuice02

Pour as much of the strained juice into the jelly bag as possible. Now you’ll squeeze the bag to separate the pulp from the juice like this:

RawJuice03

Once you have a quart of juice, you can use it immediately to make wine or freeze it for later use. A quart of pear juice will make one gallon of wine using the wine making techniques I discussed earlier. If you decide to freeze the juice, make absolutely certain that you mark it for wine use only because the juice already has the campden tablet in it.

This same technique works fine for any fruit that gets soft enough when ripe to put through the Victorio Strainer. For example, it works great with berries. However, I haven’t ever gotten this technique to work properly with applesmost apples are still too crisp when picked to get through the Victorio Strainer successfully. Apple wine requires the use of a cider press or the cooked juice method. Other fruits, such as rhubarb, require the cooked juice method. You can use this technique for some vegetables as well. This is the technique I use to make tomato wine. If you want to work with a harder vegetable, such as beets, then you need to use the cooked juice method. (I’ll describe the cooked juice method in a future post.) Let me know if you have any questions about this technique at [email protected].