Maintaining Your Chainsaw

It’s wood cutting season and I’ve already been in the woods a couple of times. Nothing is quite as nice as a fresh breeze, wonderful scenes, the feel of nature, and the smell of freshly cut wood. I choose the wood carefully, as described in Choosing Wood Carefully. However, no matter how carefully you choose the tree, the task is only as easy as the condition of the tools you use. The tools must be the right size, fully maintained, and inspected carefully. Of the tools I use, the one I worry about most is my chainsaw. A failure of my chainsaw at the wrong time could mean death. This means that as well as thorough inspections, your chainsaw must be of good quality, like these top rated cordless chainsaws.

I know a lot of people maintain their saws personally. However, given that my small engine experience is limited, I normally take my saw to a professional for its annual maintenance. This includes everything from cleaning the air filter and changing the fuel filter, to making sure the saw is clean and has a sharp chain on it. This annual workup is enough for my needs because I’m not using the saw professionally. I cut just enough wood to meet my heating needs each year, plus stock up a bit of emergency wood.

However, I do perform certain types of maintenance every time I go out to cut wood, the kind that may need some stuff from safety equipment suppliers to perform safely. This frequent maintenance may seem like overkill, but I really don’t want to end up dead due to an equipment failure, so I perform these checks absolutely every time I use my chainsaw:

  • Clean the exterior of the saw.
  • Inspect the saw for damage.
  • Check the sharpness of the chain and replace it if necessary.
  • Clean the area that houses the chain when I have the chain off.
  • Verify the chain is at the proper tension.
  • Grease the bar sprocket.
  • Fill the chain lubricant reservoir.
  • Fill the gas reservoir.
  • Check my safety equipment, which includes safety glasses, hearing protectors, and heavy gloves.


Even performing all of these checks, it’s possible that you’ll have an equipment failure, but it’s a lot less likely. If you’re smart, you’ll continuously check for potential problems while you’re working in the woods. Make sure you check the saw every time you refuel it and always ensure that you add bar chain lubricant when you gas up. It also doesn’t pay to be cheap in this case-use high quality lubricant and make sure your gas is fresh and has the proper two-cycle engine oil in it.

It often amazes me that people don’t take more care when they prepare to go into the woods. Even though I feel that the woods are one of the most beautiful places on earth, I also give them the respect their due and you should too. Let me know your thoughts on chainsaw maintenance at [email protected].

Trimming the Trees (Part 3)

In Trimming the Trees (Part 2) I discussed some of the specifics of pruning trees. At this point, my trees are all pruned. However, there is still work to be done. For one thing, this is the time of year when I examine the trees for egg masses of the Eastern Tent Caterpillar. Despite what you may have heard, repeated infestations will definitely kill a fruit tree, especially if the infestation is severe enough. It only makes sense. If you remove all of the leaves from a tree that only gets one set of leaves per season, the tree can’t store energy for the winter months.

Our experience has been that they’re a nuisance with apple trees. Yes, the tent caterpillars will cause a problem, but if you get in there and squish all of the caterpillars in the tent (or better yet, get rid of those egg masses in the spring), the apple hardly notices. However, plum trees seem to attract tent caterpillars like magnets. All four of our plum trees were in danger from dying at one point because we simply couldn’t keep the caterpillars under control. I told my friend about my problem with the plum trees and he said I should work with someone like The Local Tree Experts or at the very least get their perspective on how to manage this problem so we could enjoy our plum trees again. They had some useful advice from what I hear. Trying a few sprays was the first suggestion.

We did try a number of sprays-all of which proved ineffective. Spaying the trees with a dormant oil spray in the spring helps only a little. By far the best strategy is to hunt down the egg clusters and destroy them. The secondary strategy is to look for the tents absolutely every day in the spring and summer after the trees have leafed out and destroy them by individually squishing the caterpillars by hand. We actually had two of our plum trees stripped of leaves in a single day by these pests.

While we’re looking for tent caterpillar egg clusters, we also look for other problems in the trees, such as disease, insect infestations, and so on. It’s easier to find problems after you’ve pruned the trees and there are fewer branches to check. Taking time now to check the trees will save you a lot of effort later.

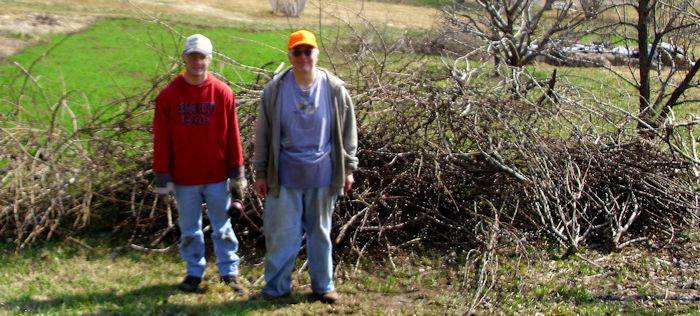
Of course, now we have a pile of branches to deal with. This year we pruned our pear trees heavily because they’ve become a little overgrown. If pear trees get too overgrown, they’ll tend to prune themselves in heavy winds-usually not in a way you would have chosen. The pile of branches from all of our trees is quite high this year.

TreeTrimming0301

We’ll put all of these branches through the chipper and then use them for mulch. A lot of people would probably burn the branches up, but using them for mulch does save at least some money. I’ve been trying to figure out the environmental balance in this case. On the one hand, burning the branches would produce a lot of particulate smoke that would pollute the air for at least a while. However, using the chipper also produces pollutants, and some of those pollutants are harsher on the environment than the smoke from burning would cause.

If we had burned the branches, I would have placed the pile in the middle of the garden. That way we could have plowed the ashes into the ground where they would have provided fertilizer on top of the winter rye you can see growing in the background of the picture. So, either way, the branches wouldn’t have gone to waste. However, we really need the mulch more than the ashes, so we’re creating the mulch.

Our orchard is ready for spring at this point. Let me know about your tree pruning and bug eradication experiences at [email protected].


Trimming the Trees (Part 2)

I would like to start this by saying that I’ve had lots of experience and training when it comes to using the tools needed for trimming and cutting trees. I know what I’m doing so I know how to do it safely. I would never encourage any of you to cut your trees if you don’t have experience as this could lead to serious injury. Take a look on stamfordtreeservices.com if you’re wanting your trees serviced professionally.

Anyway, I’m starting to get down to the last few trees in the orchard (and I may not be able to get them because the sap is starting to run). When the pruning is light, I can get through all 33 of my trees in a couple of days-assuming I can work all day at it and the weather isn’t too cold (or hot). This year it’s taking a bit longer because I’ve had a number of personal issues that have kept me from working full days outside. Even so, I normally don’t get the trees finished until the end of March or beginning of April, so I’m getting done early this year. As mentioned in Trimming the Trees (Part 1), when to prune is a matter of much debate. Some people prune their trees in the fall, some in mid-winter, and some a bit earlier in the spring than I do.

Part of pruning your trees is knowing how to prune that particular tree. For example, I visualize an umbrella shape when trimming apples. In fact, a lot of home growers use this particular shape. An umbrella shape is quite strong and tends to ensure a good harvest. In addition, the umbrella shape is easier to pick. Commercial orchards use a variety of other shapes, some of which work best when the pickers are working from the back of flatbed trucks. Some people tie down water sprouts to obtain the umbrella shape, which tends to stress the tree. I prefer to look for branches that are already heading in the right direction and trim off everything else. Water sprouts are branches that grow straight up from joints in the tree. You need to trim these off as they’ll never produce any fruit.

Our pears and cherries are dwarf trees with a strong central leader. When pruning these trees, I visualize a flame shape. The tree should be topped to keep it from growing too high. Yes, you’ll get fruit all the way up, but the problem is figuring out a way to pick it without damaging the tree. Keeping the tree down to between 14 feet and 16 feet high ensures that you can reach all of the fruit in fall. Water sprouts aren’t a problem with the central leader trimming technique. What you want to do is ensure that none of the branches are crossing and that the limbs aren’t overextended. Cherry trees require a significantly lighter hand than pears do. In fact, pear trees are quite forgiving when you over-prune them. Cherry trees are also stronger than pear trees. If you don’t trim your pear trees heavily enough, the limbs have a habit of breaking off at the crotch, especially in high winds.

Plum trees are just plain messy looking. I don’t think I’ve ever seen one that I would consider a beautifully shaped tree (at least, not one that produces fruit). Plum trees are normally trimmed using the open center approach. This technique relies on three or four branches attached to a main trunk. You don’t trim the tree heavily. In fact, unless there is some sort of problem with crossing branches or water sprouts, you don’t trim at all. Of all the trees, prunes are the least forgiving when it comes to over-pruning. They grow slowly, so taking off too much this year means paying for several years. Two of my prunes actually look more like a bushes than trees and I trim them quite carefully to keep them that way.

Some trees produce well every other year. My apples are this way. They’ll produce quite heavily one year and then take a vacation the next. With this in mind, I establish a pattern of trimming heavier on off years and lighter on production years. This way, I maximize the amount of fruit I get from the tree and still maintain it properly.

I haven’t personally tried my hand at growing anything more than apples, pears, plums, and cherries. However, the basic techniques I use likely apply to most fruit tree types. My next project is to try my hand at growing some nut trees. Hickory nuts and butternuts grow well in this area, so I’ll try them first. Unfortunately, we can’t grow English walnuts or you can be sure I’d be planting them. We can grow black walnuts, which work well in baked goods. The only technique I haven’t tried so far is the trellis technique of pruning for fruit trees. I’d love to hear from anyone who has tried it at [email protected]. In my last post (for now) on this topic, I plan to discuss some of the things you should look at on the tree while pruning.


Trimming the Trees (Part 1)

There are many different theories about trimming fruit trees. Talk to five orchards and you’ll likely hear five completely different tales of the precise technique that someone should use for trimming fruit trees. My own personal theory is to trim the trees later in the winter or early spring, before the sap begins to run, but after the majority of the hard winter weather is gone. The idea is to have fresh cuts to encourage growth, but also to let the cuts heal before the sap runs so that the tree won’t “bleed” from the trimming. Other people get Greenleaf tree pruning in Austin to trim in the fall or at other times during the fall to winter season. One thing you never want to do is to trim your fruit trees after the sap begins to run because the tree will lose too many nutrients that way.

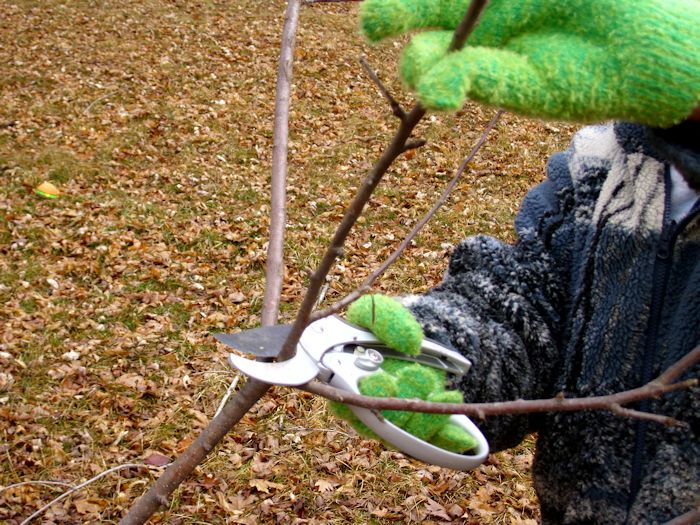
Rebecca normally does the majority of the lower cutting. It’s time consuming work because you have to decide just which twigs to cut. Every twig has the potential to bear fruit, so what you’re really doing is cutting off fruit before the tree even has a chance to produce flowers. We trim a little bit away from joints to help prevent disease as shown here:

TreeTrimming01

Rebecca prefers a ratcheted hand pruner. It helps amplify her hand strength so that trimming the tree isn’t quite so hard. In addition, you can generally prune larger branches using a ratcheted pruner than you can other hand pruner types. There are many different types of trimmers and you should choose the type that works best for you. I generally use an anvil-style hand pruner. It requires significantly greater hand strength to use, but in exchange, I get cleaner cuts, I can trim the tree faster, and the pruner itself wears longer. I strongly recommend against using bypass hand pruners on trees because the blades tend to bend and not produce a clean cut. A bypass pruner works much like a scissor and the tree branch can become wedged between the two blades.

In addition to hand pruners, your tree trimming kit should include a lopper, which is used to cut thicker branches. I highly recommend a long handled geared lopper because it will last longer, produce smoother cuts, and require less muscle to use. A good lopper will enable you to cut branches up to 2-1/2 inches in diameter in most cases. The idea is to use the lopper whenever possible because it produces a smooth cut that won’t bleed as much.

At some point, you’ll encounter branches that you can’t cut using a pruner or a lopper. In this case, you must resort to using a pruning saw. As with pruners and loppers, pruning saws come in all sorts of shapes and sizes. When working with fruit trees, you want to get a curved razor tooth saw so that the cuts are as smooth as possible and you have the fullest possible range of motion. Remember that when you cut with a saw, you start by making a counter cut on the opposite side of your final cut. Then you make the final cut. If you don’t provide a counter cut, the branch could break or the bark could end up peeled from the tree, inviting disease.

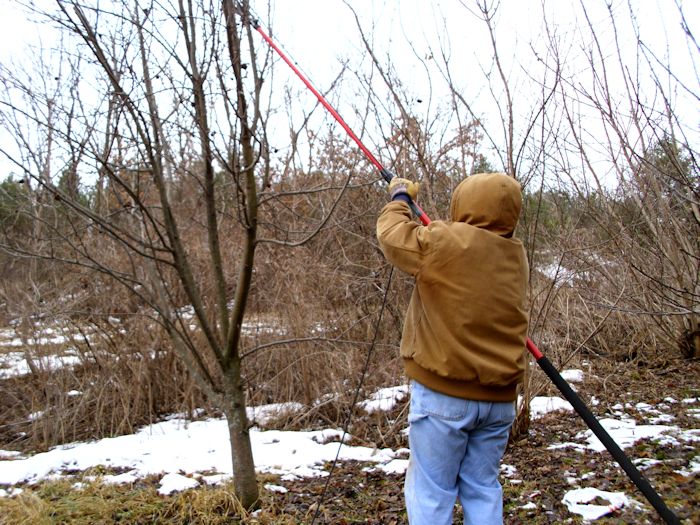
All of the tools mentioned so far will cut up to around five feet of the tree’s height, but even a short fruit tree is six or seven feet (most are more). In order to trim the rest of the tree, you need a tree pruner of the sort shown here:

TreeTrimming02

This particular tree pruner is 14 feet long. The pole telescopes so I can make it shorter or longer as needed. Believe me, the ability to adjust the length is essential. The longer the pole, the more strength required to hold it up. After a few hours of using this tool, your shoulders are guaranteed to ache. Unlike most tree pruners, this tree pruner relies on a chain for the clipper head, which means that it’s a lot less likely to become tangled in the branches or get twisted. The chain also reduces friction so you don’t use as much muscle to cut the branches.

The tree pruner also has a razor saw for cutting larger branches. You have to develop a technique for cutting the branches because when you get up this high, they tend to sway back and forth with the saw, rather than being cut by it. I find that moving my whole body in the correct rhythm (counter to the tree sway) does the trick.

If possible, get a fiberglass pole. Wooden poles tend to get heavy and can sometimes start getting weathered (making them splinter). This pole also includes a foam pad, which feels a lot more comfortable on the underarm when I’m cutting up higher than shown in the picture.

That’s the equipment needed for tree trimming: hand pruner, pruning saw, lopper, and tree pruner. If you want to be 100% safe to avoid any unwanted tree accidents, I would recommend hiring a tree service to remove/trim the trees for you, rather than attempting it yourself. Safety has to be a priority and hiring a tree service to cut your trees is a great way to prevent common tree accidents. If you want to have a go yourself, to keep from spreading disease between trees, make sure you wipe your equipment down with alcohol after cutting a diseased tree. However, the alcohol rub will cause your equipment to rust. To keep that from happening, make sure you apply oil after the alcohol rub. Let me know if you have any questions or thoughts about equipment at [email protected]. I’ll continue this post next week with some insights into pruning techniques and things you should look for as you prune.