Working with Net User

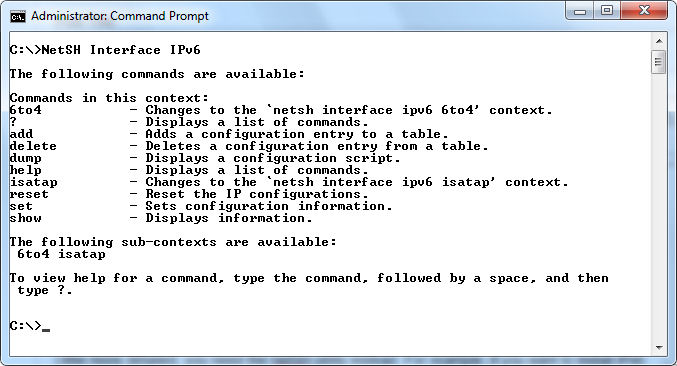
The Net User command on page 142 of Windows Command-Line Administration Instant Reference seems to have generated a bit of confusion. The /Add command line switch is straightforward; /LogonPasswordChg isn’t. For one thing, the /LogonPasswordChg command line switch doesn’t appear to be documented, even in Windows 7. Here’s the help provided with Net User now:

NetUser01

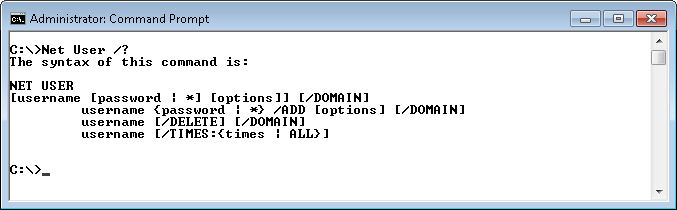
As you can see, not even a mention for /LogonPasswordChg. Microsoft doesn’t help matters. For example, if you look at the “How to Use the Net User Command” Knowledge Base article, you won’t find any mention of this command line switch. While writing the book, I had found a tantalizing clue at Manage XP and Vista Users Using DOS Commands and decided to try it on Windows 7 as well. The command works fine when used correctly in Windows 7.

However, here is where the plot thickens. It seems that the command line switch doesn’t work in Windows XP. When you execute the command shown on page 142 you get an error message reading something like, “The option /LOGONPASSWORDCHG:YES is unknown.” Somewhere between Windows XP and Vista, Microsoft added the /LogPasswordChg command line switch to Net User and then didn’t tell anyone about it. Consequently, the command shown on page 142 won’t work under Windows XP.

There is another problem that occurs when using the /LogonPasswordChg command line switch. If the account currently has the Password Never Expires option checked as shown here:

NetUser03

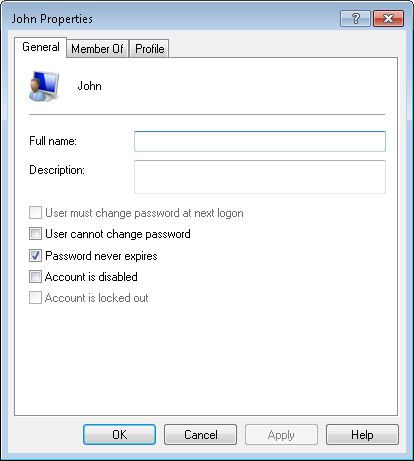
the command appears to succeed, but doesn’t change anything. In order to make the command work properly, you must first set the password to expire using the WMIC Path Win32_UserAccount Where Name=’UserName’ Set PasswordExpires=True command. So, the sequence to set an existing account to force a password change during the next logon is like this:

NetUser04

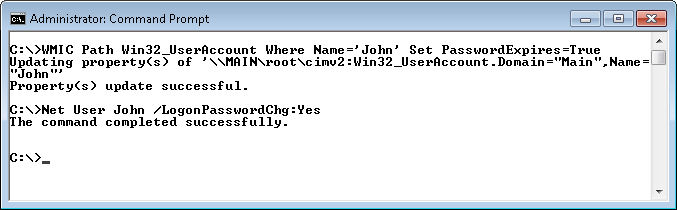
When you execute these two commands, you’ll see the user account settings to change to appear like this:

NetUser05

which means the user must change the password during the next logon.

So, why does the command on page 142 work without this extra step? In this case you’re adding a new user and the Password Never Expires option is disabled by default. Creating the combined command works fine because there is nothing to hinder it with a new account. Please let me know if you encounter any problems with this particular command at [email protected].


Delimiters and Batch Files

The example on page 402 of Windows Command-Line Administration Instant Reference produces the correct result. You see the result of passing various bits of information between two batch files. However, as someone wrote to me recently, the output from the Batch2.BAT file isn’t the result you might expect. Instead of showing the entire %PATH% environment variable, you see just the first part of this environment variable as shown here.

BatchFile01

The reason you only see C:\Program as the environment variable output is the fact that %PATH% contains delimiters. There are a number of characters that the command prompt uses as delimiters, separators between elements in a single string. My testing shows that the space, tab, and semi-colon are three characters that always act as delimiters within a batch file. Of course, delimiters are extremely useful when you want to use one string to hold multiple elements for processing, but they can also cause interesting results, such as in this case where only part of the %PATH% environment variable appears in the output.

Of course, you’re probably asking how to obtain the entire environment variable as output. A simple change to Batch1.BAT makes this possible as shown here.

@ECHO OFF
Call Batch2.BAT
Call Batch2.BAT Passed %1 "%PATH%"
ECHO In Batch 1
GOTO :EOF
ECHO Goodbye

Notice that %PATH% now appears within double quotes. This change tells the command processor not to process the information within the %PATH% environment variable as separate entities. With this change you see the following output.

BatchFile02

Now you’re seeing the entire environment variable in the output. It’s important to note this difference in processing strategies when creating batch files of your own. What other batch file quirks have you encountered. Let me know at [email protected].

Deleting a Session at the Command Line

A reader of my book, Windows Command-Line Administration Instant Reference, recently wrote in to say that the Net Sessions /Delete command apparently doesn’t work, which I found interesting because I’ve tested it on a number of occasions and found it always worked for me. It turns out that we had two different scenarios in mind. Normally, you’ll use the Net Sessions /Delete command to free up resources when a remote terminal has frozen or left the session intact in some other way. For whatever reason, the remote user didn’t log out and that means all of the file locks are still in place, for one thing, and that all of the session resources are in use, for another. Using Net Sessions /Delete cleans up this mess, but only at the potential expense of data loss and all of the other things that go with terminating a session without following the usual protocol.

In this case, the reader was simply trying the command to see if it would work. However, the command didn’t appear to work become the remote terminal was still active. Since Windows XP SP1 there has been an automatic reconnection feature.  You disconnect the session and Windows XP (and above) automatically reconnects it. You can read about it at http://support.microsoft.com/kb/323258.

Microsoft used to say that you had to turn this feature on manually (such as by using a policy). The fact of the matter is that the sessions automatically reconnect by default. You’ve probably seen it work already. For some reason, the network disconnects. However, after a few seconds, you magically see the network connection reappear. I know I’ve even seen it on my network. There isn’t anything magic about it—the session is being automatically reconnected in the background without any interaction from you. So…while the command does in fact work, it’s disabled by the automatic reconnection feature. Windows can reconnect faster than you can disconnect it.

Of course, this makes me wonder about other commands that apparently don’t work, but are merely thwarted by well-intentioned Windows behavior. Let me know if you see any behavior of this sort at [email protected].

Considering the Move to IPv6

I was getting my technical reading done this morning and ran across yet another article about IPv6 by Woody Leonhard entitled, “Caution: Bumps in the road to IPv6“. One of the main focuses of the article is that you should check your IPv6 compatibility using the features provided by Test Your IPv6 Connectivity. The article also assumes that you have IPv6 installed on your local system if you’re using a newer version of Windows. Of course, most people do have IPv6 functionality on their Windows 7 systems, but what if you don’t? How can you even check for IPv6 functionality?

Performing a local check is relatively easy. Open a command line, type IPConfig, and press Enter. You’ll see a listing of your IP configuration similar to the one shown here:

IPv601

In this case, you can see that the connections do indeed have IPv6 connectivity. If you need additional information, you can type IPConfig /All and press Enter instead. Of course, the presence of the information doesn’t always mean that the connections are working properly. In many cases, you can fix IPv6 problems by using the IPConfig /Renew6 command. There are separate versions of the command for IPv6 and IPv4—the IPv4 version of the command is simply IPConfig /Renew, so make sure you use the correct version.

The IPConfig utility is good for quick information and fixes. If you want to perform something a little more detailed, you need the NetSH utility instead. For example, if you want to install IPv6 on a machine, you type NetSH Interface IPv6 Install and press Enter. Interestingly enough, you need to simply know about this particular command because it doesn’t appear when you type NetSH Interface IPv6 and press Enter (which shows the other available IPv6 commands) as shown here:

IPv602

However, you do get a wealth of information from NetSH. Type NetSH Interface IPv6 Show and press Enter to see the entire list of Show commands listed here:

IPv603

One of the least appreciated and underused NetSH commands is NetSH Interface IPv6 Dump. This command creates a batch script for you that recreates the configuration on the current machine as shown here:

IPv604

So, if you type NetSH Interface IPv6 Dump > IPvConfig.BAT and press Enter, you end up with a batch file you can use to create a successful configuration on other systems. The Dump subcommand is available in a number of NetSH contexts and you should employ it freely. You can find myriad other uses for NetSH in Chapters 2 and 24 of Windows Command-Line Administration Instant Reference. The IPConfig utility appears in Chapter 9. Let me know about your unique uses for both of these utilities at [email protected].

Quotas Revisited for Windows XP

The other day I provided a post about quotas that contained a simple three step process for turning quota monitoring on and logging quota events, without actually enforcing the quota. It turns out that the process works just fine with Vista and Windows 7, but it doesn’t quite work with Windows XP. Microsoft made a fix between operating systems and didn’t mention the change to anyone. Of course, this is an old story with Microsoft. You have to watch carefully because you might miss a fix and find that your perfectly functioning batch file or script suddenly stops working.

It turns out that Windows XP does things a little differently. When you execute the FSUtil Quota Track C: command, you get the expected result; tracking is enabled. The next step is to turn on exception logging using the WMIC QuotaSetting Where Caption=”C:” Set ExceededNotification=True command, which also works as expected. However, when you execute the WMIC QuotaSetting Where Caption=”C:” Set WarningExceededNotification=True command to turn on warning logging, suddenly, the exception logging is turned off. Likewise, if you were to reverse the order of the two WMIC commands, you’d find that warning logging is turned off.

Fortunately, there is a fix to this problem and it’s a very odd fix indeed. In order to enable tracking and turn on both levels of logging, you need to follow this order in Windows XP:

  1. FSUtil Quota Track C:
  2. WMIC QuotaSetting Where Caption=”C:” Set ExceededNotification=True
  3. WMIC QuotaSetting Where Caption=”C:” Set ExceededNotification=True

That’s right, you issue the exception logging command twice and you’ll find that both logging check boxes are checked. Microsoft fixed this particular error between Windows XP and Vista, but I can’t find any source that tells me about the fix. If you find one, feel free to contact me at [email protected].

FSUtil and Quotas

There is more than a little confusion about the use of FSUtil with quotas. For one thing, precisely why would someone use the FSUtil Quota Track command when it doesn’t enforce the quotas you set? I’m sure Microsoft has some scenario in mind for just tracking and not enforcing the quotas. I did talk with one of my administrator friends. She uses just the tracking option at her company. The reasoning is that she can then talk with the user when the user goes over a limit. In this particular organization, it’s bad form to limit the user’s access to the hard drive when in the midst of an important procedure (as it might have dire consequences). She says that she does see the event log entries when someone goes over their quota. So, that’s one potential scenario—you have an administrator that has to work with the users to maintain the hard drive but isn’t allowed to enforce those limits directly because doing so could impede work.

Of course, one of the problems with the tracking feature is that it doesn’t automatically set logging. In order to configure drive C on your system to track user activities and log them in the event, you must initially configure the drive using these three commands.

  1. FSUtil Quota Track C:
  2. WMIC QuotaSetting Where Caption=”C:” Set ExceededNotification=True
  3. WMIC QuotaSetting Where Caption=”C:” Set WarningExceededNotification=True

The two WMIC commands set the two logging options for you. What these commands do is set the quota exceeded and quota warning flags for drive C. After you issue these three commands, the Quota Settings dialog box will look like this:

Quota1

You can now add quotas using the FSUtil Quota Modify command as described in page 89 of my book, “Windows Command Line Administration: Instant Reference.” Generally speaking, you can add an overall quota for the entire drive or individual quotas for each person. The overall quota affects everyone who doesn’t have a specific individual quota.

OK, now you’ve configured the C drive to provide quota information in the form of event log entries. So, you create a test case to make sure everything works and that’s when you figure out that you can’t see any entries in the event log. In addition, it appears that the FSUtil Quota Violations command doesn’t work either. Well, that’s a little disappointing.

The problem is a lot simpler to correct than you might initially think. Microsoft hides the information you need in the Knowledge Base article at http://support.microsoft.com/kb/228812. The short story is that NTFS only scans the drive once an hour for violations, so you’ll have to wait a while to see any test violations. Of course, you might not have all day to wait around for NTFS to get around to scanning the drive. So, you can use the FSUtil Behavior Set QuotaNotify 60 command to set NTFS to scan the drive once a minute. In order to get this command to work, however, you must reboot the system. It seems that NTFS also loads its settings once during each boot cycle and then ignores the registry settings thereafter.

Once NTFS starts scanning the drive at a reasonable interval, you’ll begin seeing entries in the System event log. In addition, you can use the FSUtil Quota Violations command to look for violations as shown here:

Quota2

At this point, you’re ready to go. Your system is setup to monitor quotas in a critical environment, but not to enforce the quotas (thus preventing people from completing tasks). I’ve had at least one person tell me that the FSUtil Quota Violations command tends not to work if the System event log gets too full; I’d like to find out whether other people are having the same problem. Let me know how you use quotas on your system at [email protected].

Regular Expressions with FindStr

Regular expressions are a powerful feature of the FindStr utility. However, they can also prove frustrating to use in some cases because the documentation Microsoft provides is lacking in good examples and difficult to follow. You can see some usage instructions for FindStr starting on page 82 of the Windows Command-Line Administration Instant Reference .

A reader recently commented that there is a problem with the dollar sign ($) regular expression. It must actually appear after the search term to be useful. Of course, the problem is creating a test file to sufficiently check the use of the regular expressions, so I came up with this test file:

TestFile

Now, let’s perform some tests with it.  Here is the result of some tests
that I performed using this test file and FindStr regular expressions:

TestResults

The first test case shows what happens when you try
the command on page 82 of the book.  It appears to work, but you’ll see
in a moment that it actually doesn’t.  Let’s take the two parts of the
regular expression apart.  Using
FindStr “^Hello” *.TXT seems to work just fine.  However, the command FindStr “$World” *.TXT doesn’t produce any output.
Only when the $ appears after World does the command produce an
output.  Consequently, page 82 should show the rather counterintuitive
command, FindStr “^Hello World$” *.TXT to produce the correct output.

It’s also important to be careful about making generalizations when
using FindStr. For example, when working with the test file originally
shown in this example, the FindStr /B /C:”Hello World” *.TXT command produces the same output as FindStr “^Hello” *.TXT as shown here:

TestResults2

If you change the test file like this though:

TestFile2

you’ll see these results:

TestResults3

As you can see, you must exercise care when using FindStr to obtain the
desired results.  What other odd things have you noticed when using
regular expressions with FindStr?  Add a comment here or write me at [email protected] to let me know.