JavaScript and Memory Leaks

This is an update of a post that originally appeared on January 25, 2013.

I’ve written any number of books that either include JavaScript development directly or indirectly. For example, when you create a web application in C#, there is some JavaScript involved that might ruin your day unless you have some idea of what that code is doing and how it can go wrong. If you enable JavaScript on your Android phone or tablet, then you can also use JavaScript development techniques in that environment. Because JavaScript provides a well-known and standardized environment, you often find it used in places where you may not think to look, which means taking the time to actually review the code that your IDE generates for web-based applications.

One of my goals in writing a book is to introduce you to techniques that produce useful applications in an incredibly short time without writing bad code. The term bad code covers a lot of ground, but one of the more serious issues is one of memory leaks. Applications that have memory leaks will cause the application and everything else on the system to slow down due to a lack of usable memory. In addition, memory leaks can actually cause the application to crash or the system to freeze when all of the available memory is used up. So, it was with great interest that I read an LogRocket article recently entitled, How to escape from memory leaks in JavaScript. The article contains a lot of useful advice in writing good JavaScript code that won’t cause your users heartache.

One of the most important parts of this article is that it covers memory leaks as a process. There is a list of common memory leak types and how to identify them. It also introduces you to tools and techniques for fixing memory errors using Chrome DevTools.

It’s essential to know that this article doesn’t cover everything. A big one is that the memory leak you’re seeing in your application may not be due to your code—it may be caused by the browser. The potential for browser problems is an important one to keep in mind because these issues affect every application that runs, not just yours. However, when your application performs a lot of work that requires heavy memory use, the user may see your application as the culprit. It pays to track browser issues so that you can support your users properly and recommend browser updates for running your application when appropriate. For that matter, you can simply determine whether the user has one of the poorly designed browsers and tell the user to perform an update instead of running the application.

There are other potential sources of memory leaks. For example, using the wrong third party library could cause considerable woe when it comes to memory usage (amongst other issues). Consequently, you need to research any libraries or templates that you use carefully. The libraries, templates, and other tools discussed in my books are chosen with extreme care to ensure you get the best start possible in creating JavaScript applications.

One of the reasons I find JavaScript so compelling as a language is that it has grown to include enough features to create real applications that run in just about any browser on just about any platform. The ability to run applications anywhere at any time has been a long term goal of computer science and it finally seems to be a reality at a certain level. What are your thoughts on JavaScript? Let me know at [email protected].

Checking SQL Server Status

This is an update of a post that originally appeared on November 14, 2012.

A number of my books rely on database access. Today that database access can take many forms, such as the use of .csv files in my AI, machine learning, and deep learning books. However, this post is specific to those books that use Microsoft’s SQL Server on the local system, which is currently limited to C++ All-In-One for Dummies, 4th Edition (optionally) and C# 10.0 All-in-One for Dummies, but could include other books in the future (or you may simply decide to use Microsoft SQL Server with one of my other books).

In order to access any server, the server must be running. It only makes sense that you can’t access something that isn’t listening. The problem is that SQL Server may not start automatically for a number of reasons on your system and that Visual Studio doesn’t always make it apparent that the server isn’t running. You may get a nebulous message when you try to make a connection that doesn’t tell you anything. (No, SQL Server doesn’t start automatically when you make a request for data.) With this in mind, a post of checking the status of SQL Server is important.

Normally, I would tell you to use the tools that come with SQL Server to check the status of the server. However, some versions of SQL Server Express Edition install without the standard tools now, such as SQL Server Management Studio (SSMS). Without access to these tools, it may seem as if checking the server status is impossible. Fortunately, you have other options.

The best way to check the status of SQL Server on your system is to use the Services console found in the Administrative Tools folder of the Control Panel. The Services console is one of a number of Microsoft Management Console (MMC) snap-ins that Windows installs automatically for you. However, to use this console, you must have administrator rights on the target system. Without these rights, you truly are out of luck in checking the status of your SQL Server setup and will need to get an administrator to help you.

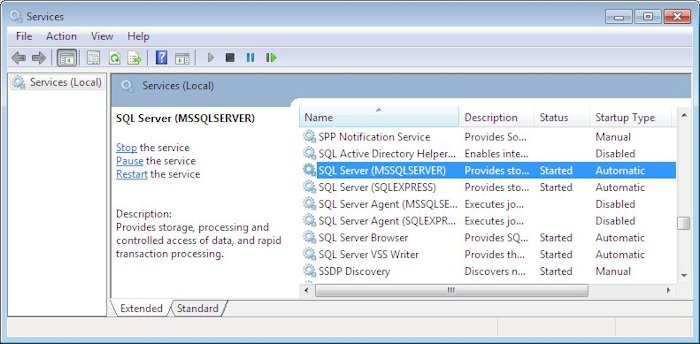
Open the Services console by right clicking Start, choosing Run from the menu, typing services.msc in the Open field, and clicking OK. You find a list of all of the services installed on your system in the resulting Services window. Scroll down the list and you should find one or more SQL Server entries like the ones shown here.

The services window contains a list of Windows services installed on the local machine that their status.
Use the Services console to check the status of services on your system.

In order to work successfully with the examples in my book, you should have SQL Server set to start automatically. In addition, when you check the service, you should see Started in the Status column as shown in the screenshot. If you don’t see Started, then highlight the service as shown and click the Start link you see on the left side (not shown in this case because the service is already started).

To make the examples easier to work with, you should also ensure that the SQL Server Browser service is started. This service makes it possible for Visual Studio to find the SQL Server installation on your system. Without this service, you must correctly type the name of the SQL Server installation you want to use when creating a connection, which is both time consuming and error prone.

If you find that you encounter problems making database examples in my books work, please check the status of SQL Server to ensure the service is actually started. Contact me at [email protected] if you experience any other connectivity problems. I may not be able to fix every problem you encounter, but I often have a good idea of what problems you might be seeing on your system and will do my best to help you.

Considering Perception in User Interface Design

This is an update of a post that originally appeared on January 24, 2014.

The original version of this article had humans seeing images in as little as 13 ms. Nothing much has really changed since then. I read a few articles recently that reminded me of a user interface design discussion I once had with a friend of mine. First, let’s discuss the articles:

  • The first, Everything we see is a mash-up of the brain’s last 15 seconds of visual information, says that humans can actually see something in as little as 15 ms. That short time frame provides the information the brain needs to target a point of visual focus.
  • The older second article, ‘Sixth Sense’ Can Be Explained by Science, explains how the sixth sense that many people relate as being supernatural in origin is actually explainable through scientific means. The brain detects a change-probably as a result of that 15 ms view-and informs the rest of the mind about it. However, the change hasn’t been targeted for closer inspection, so the viewer can’t articulate the change.
  • The third article, The silent “sixth” sense, is a more scientific and slightly modernized view of the second article. In short, you know the change is there, but you can’t say what has actually changed.

So, you might wonder what this has to do with website design. It turns out that you can use these facts to help focus user attention on specific locations on your site. Now, I’m not talking here about the use of subliminal perception, which is clearly illegal in many locations. Rather, it’s possible to do as a friend suggested in designing a site and change a small, but noticeable, element each time a page is reloaded. Of course, you need not reload the entire page. Technologies such as Asynchronous JavaScript And XML (AJAX) make it possible to reload just a single element as needed. (Of course, changing a single element in a desktop application is incredibly easy because nothing special is needed to do it.) The point of making this change is to cause the viewer to look harder at the element you most want them to focus on. It’s just another method for ensuring that the right area of a page or other user interface element gets viewed.

However, the articles also make for interesting thoughts about the whole issue of user interface design. Presentation is an important part of design. Your application must use good design principles to attract attention. However, these articles also present the idea of time as a factor in designing the user interface. For example, the order in which application elements load is important because the brain can perceive the difference. You might not consciously register that element A loaded some number of milliseconds sooner than element B, but subconsciously, element A attracts more attention because it registered first and your brain targeted it first. This essentially explains the difference between UX and UI, since the two are eternally intermingled in the world of development.

As science continues to probe the depths of perception, it helps developers come up with more effective ways in which to present information in a way that enhances the user experience and the benefit of any given application to the user. However, in order to make any user interface change effective, you must apply it consistently across the entire application and ensure that the technique isn’t used to an extreme. Choosing just one element per display (whether a page, window, or dialog box) to change is important. Otherwise, the effectiveness of the technique is diluted and the user might not notice it at all.

What is your take on the use of perception as a means of controlling the user interface? Do you feel that subtle techniques like the ones described in this post are helpful? Let me know your thoughts at [email protected].

In Praise of Dual Monitors

This is an update of a post that originally appeared on February 5, 2014.

In reading many of my old blog posts, I’m finding that many of the things I said way back when apply equally well today. I’ve received email from budding developers who use their smartphone to code. Just how they perform this trick is beyond me because I squint at the screen performing the simplest of tasks and often find that my fingers are two sizes too big. I have tried coding on a tablet, a laptop, and (oddly enough) my television. While they do work, they’re not particularly efficient, so I’ll stick with my dual-monitor desktop system for coding.

Yes, I know that some developers use more than just two monitors, but I find that two monitors work just fine. The first monitor is my work monitor—the monitor I use for actually typing code. The second monitor is my view monitor. When I run the application, the output appears on the second monitor so that I can see the result of changes I’ve made. Using two monitors lets me easily correlate the change in code to the changes in application design. Otherwise, I’d be wasting time switching between the application output and my IDE.

I also use two monitors when writing my books. The work monitor contains my word processor, while my view monitor contains the application I’m writing about. This is possibly one time when a third monitor could be helpful—one to hold the word processor, one to hold the IDE, and one to view the application output. However, in this case, a third monitor could actually slow things down because the time spent viewing the output of an example is small when compared to creating a production application.

The concept of separating work from the source of information used to perform the work isn’t new. People have used the idea for thousands of years, in fact. For example, when people employed typewriters to output printed text, the typist employed a special stand to hold the manuscript being typed. The idea of having a view of your work and then another surface to actually work on is used quite often throughout history because it’s a convenient way to perform tasks quickly. By employing dual monitors, I commonly get between a 15 percent to 33 percent increase in output, simply because I can see my work and its associated view at the same time.

Working with dual monitors not only saves time, but can also reduce errors. By typing as I view the output of applications, I can more reliably relate the text of labels and other information the application provides. The same holds true when viewing information sources found in other locations. Seeing the information as I type it is always less likely to produce errors.

Don’t get the idea that I support using dual monitors in every situation. Many consumer-oriented computer uses are served just fine with a single monitor. For example, there isn’t a good reason to use two monitors when viewing e-mail in many cases—at least, not at the consumer level (you could make a case for using dual monitors when working with e-mails and a calendar to manage tasks, for example). Dual monitors commonly see use in the business environment because people aren’t necessarily creating their own information source—the information comes from a variety of sources that the user must view in order to use reliably.

Do you see yourself using dual monitors? If you use such a setup now, how do you employ it? Let me know at [email protected].
Choosing Variable Names

This is an update of a post that originally appeared on January 17, 2014.

It often surprises me that developers seem to choose completely useless variable names like MyVariable when creating an application. Although MyVariable could be an interesting variable name for an example in a book, it never has a place in any sort of production code. Even then, I try to create book examples with meaningful variable names, especially when getting past the initial “Hello World” example. Variable names are important because they tell others:

  • What sort of information the variable stores
  • When the variable is commonly used
  • Where the variable is used
  • How to use the variable correctly
  • Why the variable is important

In some cases, the variable name could even indicate who created the variable; although, this sort of information is extremely rare. If you never thought a variable name should contain all that information, then perhaps you haven’t been choosing the best variable names for your application.

Even with these restrictions in place, choosing a variable name can be uncommonly hard if you want to maximize the name’s value to both yourself and other developers. Some organizations make the selection process easier by following certain conventions. If you don’t have an organizational style guide for variable naming, modern programming languages like Python commonly provide a style guide for you to use. These style guides often consider a great deal more than simply variable naming and include issues like the amount of indentation to use. In some respects, they become quite draconian in their approach. Other style guides, like the one for C#, are less time consuming to learn, which is a good thing because most developers have better things to do with their time than to learn some of these nitpicky details. A few languages suffer from an abundance of style guides, like C++. It’s best to choose one of them, such as the Google C++ Style Guide, and stick with it.

However, let’s say that you want to create your own style guide for your organization to use because you use multiple languages and having a different style guide for each language seems just a bit absurd, not to mention adding needless complexity. In this case, you need to ask yourself a series of questions to determine how you want the style guide to work, such as these:

  1. What sort of casing do you want to use for what types of variables?
  2. What information does the variable contain (such as a list of names)?
  3. How is the variable used (such as locally or globally, or to contain coordinates, or a special kind of object)?
  4. When appropriate, what kind of information does the variable contain (such as a string or the coordinate of a pixel on screen)?
  5. Is the variable used for a special task (such as data conversion)?
  6. What case should prefixes, suffixes, and other naming elements appear in when a language is case sensitive?

The point is that you need to choose variable names with care so that you know what they mean later. Carefully chosen variable names make it possible for you to read your code with greater ease and locate bugs a lot faster. They also make it easier for others to understand your code and for you to remember what the code does months after you’ve written it. However, most important of all, useful variable names help you see immediately that a variable is being using the wrong way, such as assigning the length of a name string to a coordinate position on screen (even though both variables are integer values). Let me know your thoughts about variable naming at [email protected].

Sending Comments on My Books

This is an update of a post that originally appeared on February 23, 2012.

I regularly receive a stack of e-mail about my books. Readers question everything and it makes me happy to see that they’re reviewing my books so closely. It means that I’m accomplishing my principle goal, helping you understand computers in every possible way so that you can be more productive and accomplish tasks with less effort. When I make something easier for someone and they tell me about it, the grin extends from one side of my face to another. It really makes my day.

Some readers are still asking me if it’s OK to send me comments. I definitely want to see any constructive comment that you have. Anything that helps me understand your needs better makes it possible for me to write better books. I really do want to hear from you. The main element that I need to obtain a usable comment is that it’s constructive. A comment that lacks details isn’t helpful because I’ve written so many books. Emotional comments without any substance are especially hard to deal with because they leave me wondering what you need from me. Here are some of the things you can do to create a constructive comment:

  • What is the title of the book you’re reading (be sure to include the edition number, which is usually right on the cover unless it’s a first edition)?
  • Are you using the downloadable source code if this is a programming book?
  • Did you install the recommended version of any required software using the instructions found in the book?
  • Which page contains the error (if you’re using Kindle or other electronic media, please provide a chapter number and section title as a minimum)?
  • What do you view as an error on that page?
  • How would you fix the error?
  • What sort of system are you running?
  • When did you encounter the problem?

The more information you provide, the easier it is for me to understand the issue and provide you with feedback. In many cases, I’ll upload the fix to my blog so that everyone can benefit from the response (so be sure you keep an eye on my blog for new entries). I work hard to ensure that my books are as error free as possible, but everyone makes mistakes. Also remember that sometimes mitigating factors, such as differences in software versions or anticipated hardware, make it appear that there is an error in the book when you’re really looking at a different in environment. Help me provide you with better books—send me comments!

There are a few things that I won’t do for you. I won’t help you pass an exam at school. Your learning experience is important to me, which means that I want you to continue your education by working through the instruction on your own. I also don’t provide free consulting. This means I won’t check the code that you created on your own for errors. In addition, if you don’t use the downloadable source, be sure to read Verifying Your Hand Typed Code for restrictions on the level of support that I provide. I’ll help you with any book-specific question, but I draw the line at that point. Let me know if you have any input or insights on my books at [email protected].

Book Reviews – Doing Your Part

This is an update of a post that originally appeared on October 4, 2013.

Readers contact me quite a lot about my books. On an average day, I receive around 65 reader e-mails about a wide range of book-related topics. Many of them are complimentary about my books and it’s hard to put down in words just how much I appreciate the positive feedback. Often, I’m humbled to think that people would take time to write.

There is another part to reader participation in books, however, and it doesn’t have anything to do with me—it has to do with other readers. When you read one of my books and find the information useful, it’s helpful to write a review about it so that others can know what to expect. I want to be sure that every reader who purchases one of my books is happy with that purchase and gets the most possible out of the book. The wording that the publisher’s marketing staff and I use to describe a book represents our viewpoint of that book and not necessarily the viewpoint of the reader. The only way that other readers will know how a book presents information from the reader perspective is for other readers to write reviews. A good review will tell:

  • What you liked about the book
  • How it met your needs
  • What it provides in the way of usable content
  • Whether you liked any intangibles, such as the author’s writing style
  • When you used the content to obtain a new job or learn a new skill
  • Who recommended the book to you

    The review should also present any negatives (obviously, I want to know about the flaws, too, so that I can correct them in the next edition of the book and also discuss them on my blog):

    • Did the book provide enough detailed procedures needed to accomplish a task?
    • Are significant technical flaws and why do you feel they’re an issue?
    • Are there enough graphics to augment the text and make it clearer?
    • Is the source code useful?

    Many reviewing venues, such as the one found on Amazon, also ask you to provide a rating for the book. You should rate the book based on your experience with other books and on how this particular book met your needs in learning a new topic. The kind of review to avoid writing is a rant or one that isn’t actually based on reading the whole book. As always, I’m here (at [email protected]) to answer any questions you have and many of your questions have appeared as blog posts when the situation warrants.

    So, just where do you make these reviews? The publishers sometimes provide a venue for expressing your opinion and you can certainly go to the publisher site to create such a review. I personally prefer to upload my reviews to Amazon because it’s a location that many people frequent to find out more about books. You can go to the site, click Write a Customer Review (near the bottom of the page), and then provide your viewpoint about the book.

    Thank you in advance for taking the time and effort required to write a review. I know it’s time consuming, but it’s an important task that only you can perform.

    Using the Set Command to Your Advantage

    This is an update of a post that originally appeared on February 24, 2014.

    A short while ago, I created a post about the Windows path. A number of people wrote me about that post with questions. Yes, you can use the technique for setting the Path environment variable to set any other environment variable. The Windows Environment Variables dialog box works for any environment variable—including those used by language environments such as Java, JavaScript, and Python. Windows doesn’t actually care what sort of environment variable you create using the method that I discuss in that post. The environment variable will appear in every new command prompt window you create for either a single user or all users of a particular system, depending on how you create the environment variable.

    A few of you took me to task for not mentioning the Set command. This particular command appears in Microsoft Windows Command Line Administration Instant Reference. It’s a useful command because you can temporarily configure a command prompt session to support a new set of settings. When the session is ended, the settings are gone. Only those settings you create as part of Environment Variables window have any permanence. There are other tricks you can use, but using Set for temporary environment variables and the Environment Variables window for permanent environment variables are the two most common approaches.

    In order to see the current environment variables you simply type Set and press Enter at the command line. If you add a space and one or more letters, you see just the matching environment variables. For example, type Set U and press Enter to see all of the environment variables that begin with the letter U.

    To set an environment variable, you add the name of the variable, an equals sign (=), and the variable value. For example, to set the value of MyVariable to Hello, you type Set MyVariable=Hello and press Enter. To verify that MyVariable does indeed equal Hello, you type Set MyVariable and press Enter. The command prompt will display the value of MyVariable. When you’re done using MyVariable, you can type Set MyVariable= and press Enter. Notice the addition of the equals sign. If you ask for the value of MyVariable again, the command prompt will tell you it doesn’t exist.

    Newer versions of the command prompt provide some additional functionality. For example, you might set MyVariable within a batch file and not know what value it should contain when you create the batch file. In this case, you can prompt the user to provide a value using the /P command line switch. For example, if you type Set /P MyVariable=Type a value for my variable: and press Enter, you’ll see a prompt to enter the variable value.

    It’s also possible to perform math with Set using the /A command line switch. There is a whole list of standard math notations you can use. Type Set /? and press Enter to see them all. If you write application code at all, you’ll recognize the standard symbols. For example, if you want to increment the value of a variable each time something happens, you can use the += operator. Type Set /A MyVariable+=1 and press Enter to see how this works. The first time you make the call, MyVariable will equal 1. However, on each succeeding call, the value will increment by 1 (for values of 2, 3, and so on).

    Environment variables support expansion and you can see this work using the Echo command. For example, if you type Echo %MyVariable%, you see the value of MyVariable.

    However, you might not want the entire value of MyVariable. Newer versions of the command prompt support substrings. The variable name is followed by a :~, the beginning position, a comma, and the ending position. For example, if you place Hello World in MyVariable, and then type Echo %MyVariable:~0,5% and press Enter, you see Hello as the output, not Hello World. Adding a negative sign causes the expansion to occur from the end of the string. For example, if you type Echo %MyVariable:~-5% and press Enter, you see World as the output.

    The Set command is a valuable addition to both the administrator’s and programmer’s toolkit because it lets you set environment variables temporarily. The Set command figures prominently in batch file processing and also provides configuration options for specific needs. Let me know about your environment variable questions as they pertain to my books at [email protected].

    Adding a Location to the Windows Path

    This is an update of a post that originally appeared on February 17, 2014.

    A number of my books tell the reader to perform tasks at the command line. What this means is that the reader must have access to applications stored on the hard drive. Windows doesn’t track the location of every application. Instead, it relies on the Path environment variable to provide the potential locations of applications. If the application the reader needs doesn’t appear on the path, Windows won’t be able to find it. Windows will simply display an error message. So, it’s important that any applications you need to access for my books appear on the path if you need to access them from the command line.

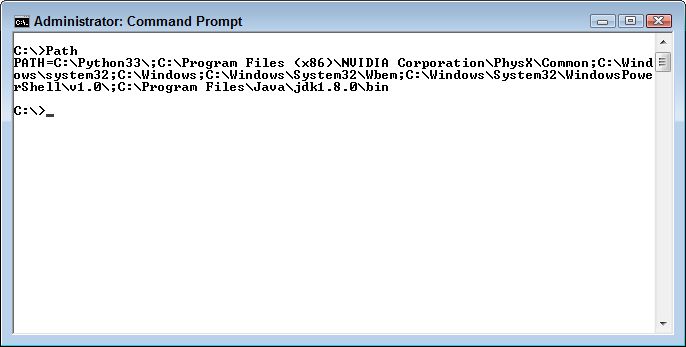
    You can always see the current path by typing Path at the command line and pressing Enter. What you’ll see is a listing of locations, each of which is separated by a semicolon as shown here (your path will differ from mine).

    Using the Path command displays the current path.

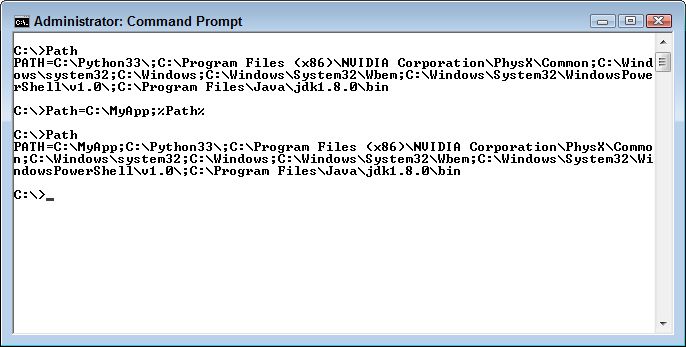
    In this case, Windows will begin looking for an application in the current folder. If it doesn’t find the application there, then it will look in C:\Python33\, then in C:\Program Files (x86)\NVIDIA Corporation\PhysX\Common, and so on down the list. Each potential location is separated from other locations using a semicolon as shown in the figure.

    There are a number of ways to add a location to the Windows path. If you only need to add a path temporarily, you can simply extend the path by setting it to the new value, plus the old value. For example, if you want to add C:\MyApp to the path, you’d type Path=C:\MyApp;%Path% and press Enter. Notice that you must add a semicolon after C:\MyApp. Using %Path% appends the existing path after C:\MyApp. Here is how the result looks on screen.

    Adding a path is a relatively simple process using the Path= command

    Of course, there are times when you want to make the addition to the path permanent because you plan to access the associated application regularly. In this case, you must perform the task within Windows itself. The following steps tell you how.

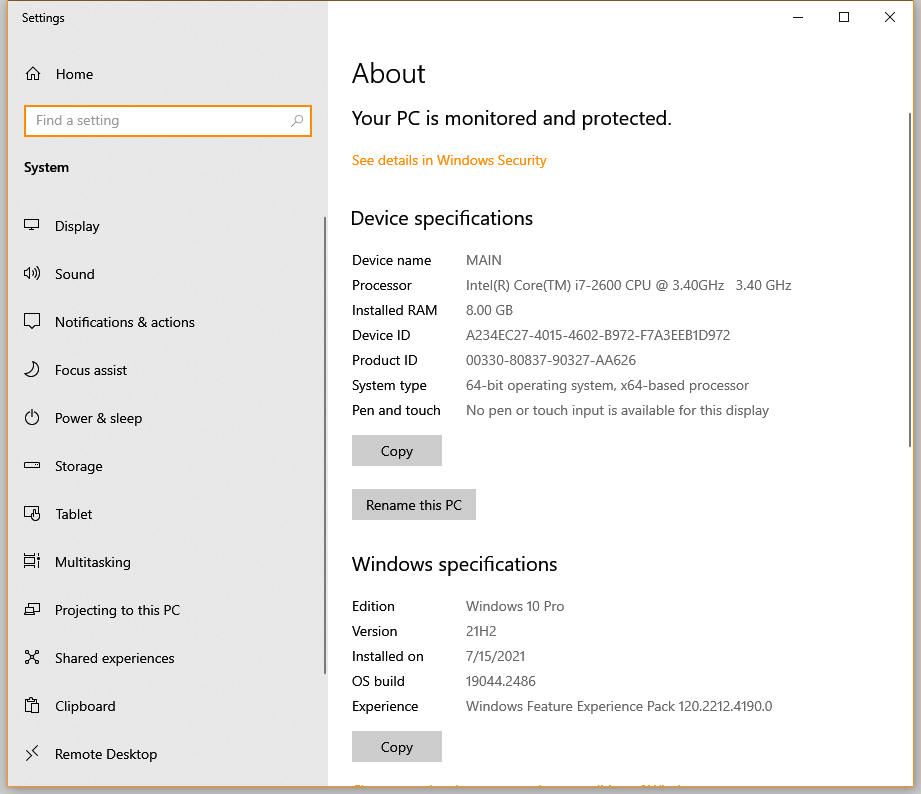
    1. Right click This Computer (or Computer) and choose Properties from the context menu or select Settings (or System in the Control Panel). You see the a Settings (System) window similar to the one shown here open (precisely what you see depends on which version of Windows you have, the figure shows Windows 10).

      The Settings window in Windows 10.

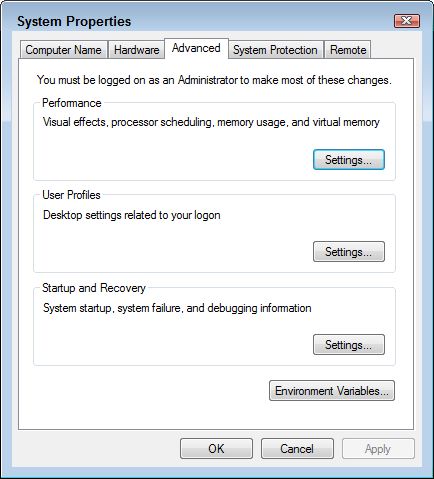
      2. Click Advanced System Settings. You see the Advanced tab of the System Properties dialog box shown here.

      The Advanced tab provides access to your permanent path in Windows.

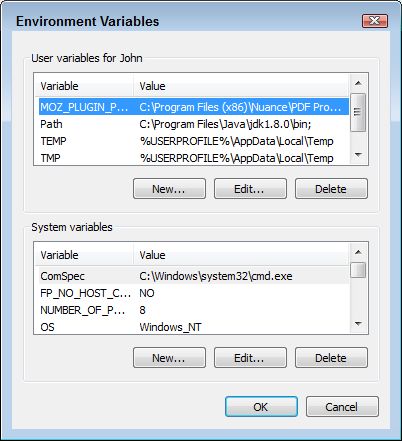
      3. Click Environment Variables. You see the Environment Variables dialog box shown here. Notice that there are actually two sets of variables. The top set affects only the current user. So, if you plan to use the application, but don’t plan for others to use it, you’d make the Path environment variable change in the top field. The bottom set affects everyone who uses the computer. This is where you’d change the path if you want everyone to be able to use the application.

      There are paths that affect only the current user and those that affect the system as a whole.

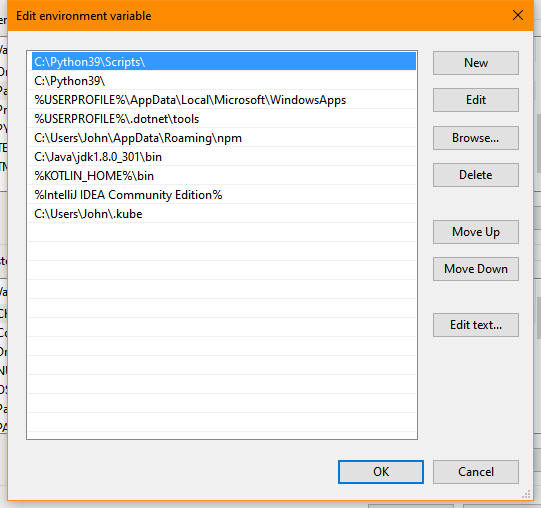
      4. Locate the existing Path environment variable in the list of variables for either the personal or system environment variables and click Edit. If there is no existing Path environment variable, click New instead. You see a dialog box similar to the one shown here when working with Windows 10 (other versions of Windows will show a different dialog box, but the purpose is the same, to edit the path).

      Each path location appears on a separate line to make it easy to edit.

      When you open a new command prompt, you’ll see the new path in play. Changing the environment variable won’t change the path for any existing command prompt windows. Having the right path available when you want to perform the exercises in my books is important. Let me know if you have any questions about them at [email protected].


      Antiquated Technology Making Developers Faster

      This is an update of a post that originally appeared on November 7, 2014.

      I often wonder when I create a blog post whether the technology I’m describing will stand the test of time. In this case, I asked whether the reader would like to be able to type application code faster and with fewer keystrokes. The article, The 100 Year Old Trick to Writing at 240 Words Per Minute, probably has some good advice for you—at least, if you’re willing to learn the technique. It turns out that stenography isn’t only useful for court typists and people who print out the text for the hearing impaired on television, it’s also quite useful for developer. Yes, your IDE probably has more than a few tricks available for speeding up your typing, but I guarantee that these tricks only go so far. My personal best typing speed is 110 wpm and that’s flat out typing as fast as my fingers will go.

      Since that original post, someone has come out with a book called Learn Plover! that describes how to use this stenographic technique in more detail. There is also a site devoted to Plover now.

      Naturally, I haven’t ever used one of the devices mentioned in the article. However, a stenographer named Mirabai Knight has tried one of the devices and reproduced a 140 keystroke Python application using only 50 keystrokes. By the way, she has produced a series of interesting videos that you may want to review if you really think that Plover is for you. I don’t know of any IDE that can provide that sort of efficiency. Of course, it’s one thing for a trained stenographer to produce these sorts of results, but I’d like to hear from any developer who has used the technique to hear about how well it worked for them. Please contact me about your experiences at [email protected]. (Oddly enough, I did hear from at least one developer who uses it successfully.)

      The part that interested me most though is that the system, called Plover, is written in Python. (If you want to see Plover in action, check out the video at http://plover.stenoknight.com/2014/10/longer-plover-coding-snippet-in-python.html. A number of Beginning Programming with Python For Dummies, 3rd Edition readers have written to ask me how they can use their new found programming skills. The book contains sections that tell you about all sorts of ways in which Python is being used, but many of these uses are in large corporations. This particular use is by a small developer—someone just like you. Yet, it has a big potential for impacting how developers work. Just imagine the look on the boss’ face when you turn in your application in half the time because you can type it in so much faster? So, Python isn’t just for really large companies or for scientists—it’s for everyone who needs a language that can help them create useful applications of the sort that Python is best suited to target (and I describe all of these uses in my book).