A Little Pressure

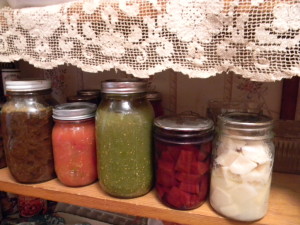
From Left to Right:  Beef, Carrots, Green Salsa, Beets, Potatoes All canned using a pressure Canner
From Left to Right: Beef, Carrots, Green Salsa, Beets, Potatoes
All canned using a pressure Canner

As I was growing up, I helped in the  kitchen quite a bit, especially during canning season.   We had several big blue (water bath) canners that were used for pints and quarts of all kinds of tomato products as well as jams and jellies.  I never saw my mom use a pressure canner.  One day I asked her—why? It turned out that before I  was born, she and her mother  were working with a pressure canner.  They went into the other room for something and forgot to check on it until they heard the pressure value and gasket blow off.  A jar had broken inside and the vegetables had clogged the pressure  valve. The content of canner spewed into the air, all over the kitchen!  Seeing this chaos—and cleaning up the mess afterward—convinced my mom never to can anything under pressure while there were kids around, just in case.

So it wasn’t until I was a young wife that I convinced my Aunt Betty to teach me about pressure canning.  After doing some research, we went together and bought a pretty expensive “All-American” brand  canner.
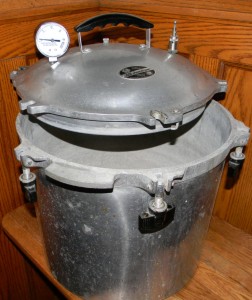
With a new pressure gauge and careful storing, this 30+  canner is still going strong.
With a new pressure gauge and careful storing, this 30+ canner is still going strong.

It has a metal to metal construction with 6 turn-screws to hold the lid in place.  It is extremely safe.  For the amount of food that I process, it was a wonderful investment.  I think of my Aunt Betty every time I use it.

Here are some safety tips to use if you decide to dive  into the world of pressure canning.

  • READ THE INSTRUCTIONS CAREFULLY.
  • Familiarize yourself with the equipment to make sure that you know exactly how it works before using it to process food.  Be sure you know how much water is needed (a metal yardstick works well to measure the depth of the water) and how many jars should go in a batch.
  • Follow the recipe exactly, at least the first time you are making something new.  The herbs and spices used during the canning process develop as the product cools and is stored.  After opening it, you can decide whether you want to change the recipe for next year’s harvest.
  • Invest in good equipment and treat it with respect.  You don’t necessarily need new equipment.  Garage sales and thrift stores often have sturdy equipment for sale.  Watch for breaks, holes, scorch marks or cracks in the metal.  These are sure signs that the canner has been used for something other than its original purpose.
  • Replace the rubber seals regularly, if your canner uses them.
  • Replace the pressure valve if it is showing any sign of wear. It is important that this part of the canner be accurate.
  • Stay in the kitchen while the pot is cooking. In this case, a watched pot is a good thing. The canner will build up to pressure.  The stove must be adjusted to keep it at the right  pressure throughout the whole canning time.  If the pressure is under the required amount—the food won’t cook correctly.  If the pressure goes over—there is risk of breaking jars and messes in the kitchen.
  • FOLLOW THE INSTRUCTIONS for cooling down the canner.  Remember there are glass jars inside and they are very fragile in this state.
  • Do NOT open the canner until the pressure has naturally gone down to zero, according to the pressure gauge.  This part of the process cannot be hurried.
  • Remove the jars carefully and finish them according to the recipe.  Putting a towel on your table  or counter will keep the area drier and reduce the risk of the jars bumping together.
  • After the jars are cool, inspect them to make sure they have sealed properly.  If any fail to do so, put it in your refrigerator to use right away.
  • LABEL jars with contents and the year, before putting it into your pantry,

All in all, pressure canning is a great way to store your harvest,  You have control of exactly what is in your food.  Many recipes can be adapted for special diets. And, the jars  look so pretty in your pantry! If you have stories about your pressure canning experiences or any questions, please share them by adding your comment to this post or contacting John at [email protected].


Lessons Learned as a Child

Jars of canned goods in the pantry.
Colorful Jars of Home Canned Vegetables

Most of what I learned about self-sufficiency was done while I was hanging around my mom, aunts and uncles.  My grandmother was one of thirteen children.  My mother had ten brothers and sisters.  I have 4 sisters and three brothers. It’s a large family, but it’s a close family.  We have always spent lots of time together. As a kid, much of it was spent gathering, gleaning, cooking and eating.  I didn’t realize I was learning self-sufficiency, I just knew that if I wanted to be in the kitchen I needed to make myself useful.

The earliest lesson that I remember happened while my mom and her sisters were canning concord grapes.  My uncle had a neighbor with an overabundance of grapes.  My mom had teenage brothers who needed something to do on a Saturday afternoon. So she sent dad with the boys off to pick the grapes while the women got ready to make jelly and jams.

Since I was only 8 years old and my sister was 11, our job was washing the jars.  There were dozens of jars that had been brought up from the cellar.  We worked in a back room of the house with two tubs.  She washed and I rinsed.  It was also the job for both of us to feel the top edge of the jars to make sure there weren’t any nicks or cracks that would prevent the canning lids from sealing.  Once the jars passed our inspection, they were taken into the kitchen where they were boiled to sterilize them and filled by the adults.  It may seem like a lot of work for an 8 year old, but I still check my canning jars this way because of the lesson I have always remembered.

Getting kids involved early is key to teaching life long lessons.  Kids are naturally curious about what the grownups are doing.  Kids WANT to be included in grownup activities. There are oodles of ways to bring your kids along on the road to self sufficiency.  It’s never too early.

  • If your kids are the kind who enjoy water, set them up washing jars to prepare for canning.  Let them help wash the dog or the car.  It may end up in a water fight, but those are great fun in the summer!
  • If they like making mud pies, teach them that making bread or pie crust dough is similar, and let them try it out. Even a preschooler can help roll cookie balls (and unlike PlayDoh, you can bake and eat the results).
  • If they like picking flowers, give them a small plot or row of their own in your garden and let them take responsibility for the tending, watering and weeding.
  • If your kids who are the kind that like to read and figure out things, introduce them to recipe books and let them choose what is going to be made for supper.  It will help them practice reading as well as teach valuable math and science skills.
  • Do you have an animal lover at your house? Let them take charge of the pet care and update you on the health of the critters – keeping records like the veterinarian.

When you include kids in your activities, at their skill level  and with ample encouragement, you are opening up a whole new way of communicating with your child. They learn that adults sometimes make mistakes or have failures and have to figure things out differently.  You are creating an environment where your kids can try, succeed (or learn that failure isn’t fatal) and grow.

As the harvest progresses and the canning/freezing season is upon us, there is an opportunity to teach the value of starting early to make a great Christmas.  By canning and collecting the summer fruits and vegetables, you can fill your cupboards full of basic things like corn, peas, beans and jelly.  You can also  try special recipes for treats like  green and red colored pears, spiced apple rings, green tomato mincemeat and peach pie filling.  Then when it comes time to put together a gift basket for a teacher or putting on a Holiday dinner, your child can proudly say “I helped to make that!”

Is there any greater feeling than “real” accomplishment?  I don’t think so!

If you have stories about your self-sufficiency lessons or any questions, please share them by adding your comment to this post or contacting John at [email protected].


Becoming Even More Self-sufficient

Those of you who have been reading my blog for a long time know that Rebecca died recently (see A Tribute to My Wife and Friend). Today would have been her birthday, so naturally it’s one of the harder days I’ve had. In looking back at our 33+ years together, everything was defined by our relationship. We did everything together. Now, I’m learning to do everything on my own, which means taking a look at the procedures and processes I’ve used in the past, as well as organizing tasks and resources around the needs of just one person. Of course, that’s the focus of today’s post. The idea of keeping things organized so that it’s possible to become as self-sufficient as possible, but in the least amount of time possible and with the least amount of effort.

I’ve read a considerable number of books and articles about self-sufficiency and most mention processes and procedures—the requirements for getting a task accomplished. Of course, this information is indispensable. You can’t do much unless you know how to do it. Learning how to do things on your own is always good, but it’s better when you can benefit from someone else’s mistakes. However, simply knowing what to do and how to do it usually isn’t enough. I’m discovering that fact as I go through this transition. I know how to accomplish a great many things, but doing them in a way that works for one person is becoming a learning process.

The organization of tasks and ensuring that you can actually accomplish them with the resources you have on hand is a significant goal in self-sufficiency. At times, it will become impossible to accomplish a task, even if you know the process, without the required organization and resources, especially the required personnel. It’s something you should consider before you attempt to perform that task. Nothing is worse that getting in the middle of something and only then discovering that you can’t finish it because you simply don’t have enough hands.

I’ve actually started using dry runs and walkthroughs as I rediscover how to perform tasks using just one person. Setting everything up and then going through the required steps is helping me understand where I might fall short if I don’t come up with a new way to do things. It’s an important thing for anyone who wants to become self-sufficient to consider. There have been times where I have seen people just standing around, waiting for something to do, when there were more people available than the person who started the task envisioned. Using skills and resources efficiently helps you complete tasks faster.

There is an important point to all this. A lot of my posts, such as Calculating Your Actual Bulk Goods Store Savings and Calculating an Hourly Wage deal with money issues. Making self-sufficiency profitable will help keep you interested in pursuing it. Of course, profit can be viewed in a lot of different ways. The Health Benefits of Self-Sufficiency and Health Benefits of Self-Sufficiency (Part 2) posts speak to this need. However, the bottom line is that getting things done quickly and efficiently improves the profit margin of self-sufficiency no matter how you look at it. Let me know your thoughts about efficient self-sufficiency at [email protected].


Dealing with a Rainy Summer

It has been a rainy summer so far in Wisconsin. Thank goodness it hasn’t been the kind that sees lots of flooding, as we had in 2008 when the entire town flooded out and I was locked in the house for days at a time. No, this has been a lighter, steady sort of rainy summer. It has rained often enough that the young lad mowing my lawn has had to work hard just to find days to do it and sometimes needs to come back another day because it starts raining right in the middle of cutting the grass. However, the things that tell you most that this has been a really rainy summer are the mushrooms and the mosquitoes.

The mushrooms are interesting because they’re growing all over the place and are of such diversity that they’re simply fun to look at. I’ll often wander around in the early morning hours looking at mushrooms before the dogs get out there and rip them up (yes, Reese and Shelby can get quite frisky during their morning game of Frisbee). If I knew a bit more about mushrooms, this would be a year to stock the freezer. As it is, I’m only positive enough about button, morel, and puffball mushrooms to pick them for eating (and even then I’m extremely careful).

The mosquitoes are a bit more of a problem. There have been notices on the radio that many of them carry West Nile Virus, a disease I’d prefer not to get. So, I’ve stocked up on the usual remedies and make sure I spray myself before I go out to work in the flower beds or gardens. A friend of mine did tell me that he’d recently contacted his local lawn care company (https://www.lawncare.net/service-areas/texas/) to come and spray a repellent on his lawn, meaning that his garden should now be free from mosquitoes. It also lowers his chances of catching that disease in his garden. Perhaps I’ll see if my usual remedies work in the garden, and then I can just contact a professional to remove the mosquitoes from my garden if they don’t work. Just to be prepared though, I’ve also been reading articles such as, “10 Signs You May Have West Nile Virus” so that I know what to look for.

The rains have had some interesting effects (other than the mushrooms) in my salad garden. The cherry tomatoes are already to the top of their cages and they’re producing blooms like crazy. At some point I’m going to be eating cherry tomatoes a bit more often than I might like. My plan is to collect enough up that I can dry them for later use. Dehydration is always a good way to preserve food for later use. Likewise, my green peppers are getting quite large. In fact, I picked my first green pepper (a tad small) the other day. The extra rain hasn’t seemed to affect the taste or quality of the peppers so far.

What I do worry about is my herbs. So far they’re growing like crazy, but I’m concerned that they won’t dry well and that they’ll lack some of the oils that they normally do. I tried some lime mint in tea the other day and it seemed a bit weak. The rest of the summer will determine just how the herbs do. I know they’ll definitely be usable, but it may require more of them to get the same effects as normal. Fortunately, none of the herbs seems to be rotting or having other problems so far.

Did I mention that the weeds absolutely love the rain too? It seems as if I can’t pick them fast enough and the nearly constant rain causes them to grow quite large, quite fast. Fortunately, I’ve been able to keep up well with everything except my personal garden, which is a little weedier than I’d like at the moment. Let me know your thoughts about rainy summers at [email protected].


Is It a Cantaloup or a Muskmelon?

It all started at the store where a sign for cantaloup was clearly incorrect—the melon in question was definitely a muskmelon—a honeydew to be exact. A little later, I was looking through the larder and saw one of the jars of pickled cantaloup Rebecca had canned for me. Then, someone else talked with me about melons in e-mail. So, I thought it was a sign that I should talk a bit about the difference between cantaloup and muskmelon.

A cantaloup is actually a kind of muskmelon, but not all muskmelons are cantaloupes. It turns out that there are actually two kinds of cantaloup, but the kind you most likely see in the store is a North American Cantaloup (Cucumis melo reticulatus). There is also a European Cantaloup (Cucumis melo cantalupensis) that looks nothing like the cantaloup Americans are used to seeing in the store (Europeans appear to be equally confused about the American variety). In fact, you can find arguments that the European variety is the only true cantaloup. I’ll leave such discussions to those who want to buck the rest of the growing community. In my mind, they’re both types of cantaloupes.

The number of muskmelon varieties is huge. However, some of the most common types are: honeydew, crenshaw, and casaba. All of them have some characteristics in common, such as the strong musky scent when ripe and a plethora of seeds in the center. However, they also have significant differences that include the skin color and texture of the fruit. Personally, I enjoy all of the muskmelon varieties and look forward to growing at least one or two of them each summer.

The flavor, odor, and sugar content of all muskmelons is greatly affected by environment. In fact, two muskmelons growing on the same vine can have different tastes simply because one of the muskmelons gets to drink from the vine first. Too much water tends to make the muskmelon less tasty because the sugars become diluted—too little tends to reduce the melon size and it may not mature at all.

Some gardeners are also unaware that muskmelons rely on gender-specific flowers: male and female to produce fruit. Hot weather tends to produce a significant number of male flowers. When a vine has all male flowers, it won’t produce any fruit at all. Unfortunately, I don’t have any sort of guideline to offer you as to detecting whether a flower is male or female, but I do know that high temperatures tend to produce vines with lots of flowers and no fruit. When the temperatures are too low, the fruit tends to rot, rather than ripen.

Muskmelons also require mulching. If the fruit directly touches the ground, it won’t mature. They also need a constant level of moisture that only mulch can provide. In short, muskmelons are picky fruit to grow and you can’t always be assured of a high quality output.

So, the next time someone asks whether a fruit is a cantaloup or a muskmelon, you can answer with a bit more authority. You can also get the sign for the mislabeled honeydew fixed in your store. Let me know your thoughts about cantaloupes and muskmelons at [email protected].


The Glorious Benefits of Growing Your Own Herbs

You go to the store and pick up a jar of sage or a box of mint tea. In both cases, you’re buying an herb. The only problem is that you have no idea of how fresh that herb is or whether it’s actually pure. For that matter, you have no idea of how that herb was handled or whether it has pesticides applied. In fact, except for what the label tells you, you can’t even be completely sure that you’re getting the right kind of herb. A lot of people will tell you that the main reason to grow your own herbs is to avoid all the problems. They’re correct, of course. Nothing beats fresh herbs for taste, potency, and purity. However, this is only a small part of the story and if you grown your own herbs for just these reasons, you’re missing out on a much bigger picture.

Packaging is part of the problem when you buy an herb at the store. Sage makes a wonderful addition to tea, but the form it takes at the store makes it impossible to use in that manner. Mint makes a wonderful spice for pork, but you won’t be able to easily use it that way unless you’re willing to break a teabag apart to do it. When you grow your own herbs, you know that you’re getting just the best parts and you can prepare them precisely as you need them for whatever purpose you have in mind. The post entitled Drying Herbs tells you everything you need to know to prepare the herbs for use in whatever way you want.

Another problem with herbs you get from the store is cost. Some herbs are horribly expensive, which makes people avoid something that could make them healthier. The herbs provide some health benefits, but the main health benefit is that you can use herbs in place of salt and sugar to make food taste significantly better with fewer side effects. When you grow your own herbs you obtain a product that has higher potency because it’s always going to be fresher and it costs you almost nothing to grow.

The best reason to grown your own herbs are the varieties you can’t get in the store. This year I’m growing common thyme (the product you get in the store), along with both lemon thyme and lime thyme. Neither alternative variety is available in stores, yet each has a unique characteristic taste. The difference is subtle, but noticeable. I personally prefer using lime thyme when baking chicken because it brings out the flavor of chicken better. Of course, unless you grow your own lime thyme, you’ll just have to take my word for it.

An herb with a huge number of varieties is mint. My herb garden currently has the common mints: peppermint and spearmint. In addition, it has chocolate, lime, orange, and even grapefruit mint. There are many other varieties, many of which I probably don’t even know about. Every kind of mint has a unique taste, yet when you go to the store you have to settle for one or two of them. Only when you grow your own mint can you experience the broad range of possibilities that this plan has to offer.

The best part about herbs is that they take little space to grow and many of them are quite forgiving of growing conditions. All you really need is a window and a pot. If your window doesn’t have a shelf, you can always grow the herb in a hanging basket. There are a lot of ways to grow herbs with in your own home, on a patio, or just about any other place you can think of. I actually knew one person who had a pot of herbs in her car. I’m not entirely sure how well that worked, but she always had the pot there and the plant always looked healthy. Let me know your thoughts about growing your own herbs at [email protected].


Time to Check for Tent Caterpillars

A lot of the documentation I read about tent caterpillars online says that they’re relatively harmless, which is true when they appear on certain kinds of trees. However, when it comes to fruit trees, tent caterpillars can become a horrible problem. In fact, tent caterpillars nearly killed our plum trees (which are still recovering three years later).

The problem is one of tree growth. A lot of trees get a secondary growth of leaves. When the tent caterpillars do their job during the mid-spring to late-spring months, they damage the first growth of leaves. The trees can recover with the secondary growth. However, many fruit trees get just one set of leaves for the entire summer, so when the tent caterpillars damage them, the tree is stripped for the summer and can’t store enough energy for the winter months.

Tent caterpillars also tend to strip fruit trees, partly because they’re smaller than some of the other trees that are affected by them. In fact, that’s what happened to our plum trees. The foliage was stripped before we knew what was happening and the trees simply didn’t recover. After viewing other trees the tent caterpillars have attacked, it becomes obvious that they really are just a pest at times.

Part of the solution is to inspect the trees carefully during pruning. Unfortunately, even a close inspection won’t reveal all the tent caterpillar clusters and some hatch. During the spring months I take regular tours of the orchard to look for the tent caterpillar nests, especially during the early morning when the night moisture reveals the nests with greater ease. (The inspections are also good exercise and are quite pleasant, so it’s not really work in the traditional sense of the word.) I hand pick the caterpillars and ensure I crush them. Removing them from the trees simply invites them to come back later.

The trees that seem most affected by tent caterpillars are plums and apples. Cherries are also affected, but the tent caterpillars haven’t acquired a taste for the Mesabi cherries for whatever reason (the yellow-bellied sapsuckers tend to avoid them as well). Untouched are the pears, which don’t seem to attract nearly as many pests at other trees on our property do.

A proactive approach to dealing with tent caterpillars is essential if you want to maintain tree vitality. Make sure you take that walk each day to mellow out, improve your health, and keep your trees healthy. Let me know your thoughts about tent caterpillars at [email protected].


Dealing with Thin Shells

A while back I provided a post entitled Feeding for Healthy Chickens that described conditions where chickens could eat their own eggs. This post provides you with some good ideas on just what to do to prevent the problem in most cases. However, it seems that the post doesn’t go quite far enough. There are situations where the weather is cool, the chickens are perfectly healthy, and they aren’t eating their eggs when you’ll still see broken eggs in the coop. In this case, you see the whole egg and need to clean it up immediately. However, the defining characteristic of this condition is that the shell will be paper thin.

Chickens need sunlight, just like everyone else, to produce Vitamin D. In addition, chickens need quite a bit of calcium in their diet and it isn’t always easy to get them to eat enough. When you see that the chickens are healthy and that the weather isn’t too hot, but the shells are still thin, it’s a sign that the chickens likely have a Vitamin D or calcium deficiency. In this case, the thin shells came right after winter, so the problem was Vitamin D.

In order to combat this problem, you may need to resort to unusual measures. In order to fix this particular problem, I started feeding the chickens expired yogurt. No, the yogurt hadn’t gone bad yet, but it was far enough past the expiration date that it had started separating quite badly. The chickens won’t care. It turns out that chickens absolutely love yogurt and can’t get enough of it. Just make sure the yogurt you feed them is made with Vitamin D enriched milk or has the vitamin added to it.

After some experimentation, I found that I could get the shells to harden up by feeding our ten chickens 1 cup of yogurt each day for about a week. Given that I have a cheap source for expired yogurt, I’ll keep feeding them yogurt on a regular basis, but not continuously. Part of the problem here is to ensure you get high quality eggs without cutting your profits too much. An egg shell should be relatively thick and smooth. When you start to see the egg shell getting thin and rough, it’s time for more yogurt.

There is a problem that can occur when you feed the chickens too much calcium. I’ve actually managed to get the shells thicker than they should be and that makes the eggs hard to use. If you like your eggs over easy or sunny side up, it’s important to maintain the correct egg shell thickness. Let me know about your egg production problems at [email protected].


Appreciating the Healing Powers of Animals

I’ve always appreciated the ability of animals to make bad feelings better. There always seems to be something interesting going on with animals that makes the day more pleasant and happy. Of course, there is an almost continuous array of bird song in our area during the daylight hours. Just the happy song of birds is enough to make me smile.

When the native birds add antics to the mix, I sometimes get a good laugh in as well. Such is the case with a little downy woodpecker that visits the feeder near our house. He never seems to arrive right side up. No, despite his best efforts, he always seems to hit the perch upside down and must fight his way to an upright position. The vibrant mix of colors doesn’t help the woodpecker’s cause—he looks a bit like a clown anyway. Our particular downy woodpecker seems to have a bit more head color than pictures I see online show, but far less than a red headed woodpecker.

Now, when you mix native birds with chickens, you really get a visual treat. In most cases, the chickens try their best to ignore the native birds because they’re obviously better (at least, as far as the chickens are concerned). However, the other day the chickens didn’t have much choice in the matter because some sparrows decided to have fun with them. Imagine this scene for a moment, chickens running madly about flapping their wings and clucking crazily while sparrows are dive bombing them. I laughed so hard that it took several minutes for me to compose myself enough to come to the chicken’s aid.

In a contrast to the antics of the chickens, our rabbits are lovers, not fighters. They often need a hug. At the top of the hugging list is Twilight. She always wants a hug whenever I open her cage to feed her. In fact, she actively pursues hugs every time I walk by. She does this odd sort of clapping motion to attract my attention by sitting on her hind feet and moving her front paws back and forth.

Entertainment isn’t something that happens just outside either. Our dog Reese is hysterical. For one thing, she can’t go anywhere in a straight line. She runs in circles every time she goes from one place to another. When she’s excited, she mixes the frantic circles with a mix of barking and baying. How any one dog can look so happy and absurd at the same time is amazing.

Whenever Shelby (our other dog) senses that I’m blue, she offers me a paw. She’s not really looking for a handshake. Instead, she wants me to hold the paw—possibly for as long as I need to do so. So, I hold her paw and she washes my hand. It’s therapeutic, even if it does get a bit wet.

Another washer is Smucker who offers kisses by the gross. He likes to lean into my side and then wash my arms, hands, or other exposed body parts. Of course, the bath comes complete with purring.

Finally, Sugar Plum is absolutely frantic about getting petted. She’ll keep nuzzling me until I pet her (and keep petting her until she’s satisfied that I’ve petted her enough). Her purr is a bit louder than Smucker’s purr (as is her meow).

All of these behaviors (and many others) serve to help keep my calm and feeling good. I can actually measure a change in both blood pressure and heart rate after interacting with the animals. Many medical studies have noted similar results with other people, so I’m definitely not alone. The point is that animals provide benefits far beyond companionship and laughter. They also make it easier for people to deal with a host of problems in their lives. Let me know about your health benefit experience with a pet at [email protected].


Cold Spring

This has been an interesting spring for people in Wisconsin. Not only did we have a cold winter that included some late snow, but we can’t seem to warm up this spring either. Generally, people plant their potatoes on Good Friday here. I haven’t heard of anyone who has actually made the attempt yet and it’s now past Easter. If the trend continues, the gardens will be late this year and we’ll have to hope for a longer fall to make up for it.

This may be a good year for brassicas, which require cooler temperatures to do well. If the weather continues as it has, we might have problems growing green beans, tomatoes, okra, and peppers, all of which require warmer temperatures and a bit of dryness as well. Trying to discern what the summer weather will be like from the clues provided in spring can be difficult and we’ve been quite wrong about them in some years. The result is that the garden doesn’t produce as well as it could. So, even though it looks like it won’t be a good year for tomatoes, we’ll plant some anyway. The best gardens are diverse and the best gardeners hedge their bets about how the weather will change.

Having a late spring means that the flowers aren’t out yet. In fact, we don’t have a single Easter flower yet. Our trees, usually starting to bloom by now, are just barely experiencing bud swell. It’s possible for a garden to overcome a late spring to some extent simply by planting items that take less time to develop. However, fruit trees are another matter. Growing fruit requires a certain amount of time and you can’t easily change the trees you have from year-to-year based on the probable weather. The hard winter is supposed to provide us with a better fruit crop this year by killing a broader range of harmful bugs, but the helpful effects of the hard winter may be subdued by the late spring. Late flowering means that fewer fruits will mature to a full size and that trees may drop more fruit should the summer become hot.

The one thing that isn’t really affected by the late spring are the herbs. Because herbs typically have a short growing cycle, a late spring isn’t as big of a problem. The only herb that might be affected is the lovage, which may not have time to go to seed (a real loss for us since the plant doesn’t produce enough seeds to hold over for multiple years).

It’ll be interesting to see how this summer turns out and what we get in the way of crops. Every year provides surprises, but the weather this year may provide more than most. How do you overcome the oddities of weather in your garden and orchard? Let me know at [email protected].