Sniffing Telnet Using Wireshark

In my previous post about Telnet entitled, “Using Telnet to Perform Tasks” you discovered how to use Telnet to work interactively. Now you have enough information to view some of the security issues with Telnet. It’s incredibly easy for someone to monitor your Telnet session. The only protection you have is firewalls and other security you might have in placeTelnet is completely open and offers nothing in the way of security. Lack of security is one of the reasons I didn’t cover this utility in the Windows Command-Line Administration Instant Reference.” (Telnet is covered from a command line perspective in Administering Windows Server 2008 Server Core.”) However, the lack of security isn’t a problem in some situations and many administrators prefer to use Telnet to manage some network hardware such as switches and routers. Consequently, the main emphasis of this post is building an awareness of the security issues behind using Telnet so that you can make a good decision about using it to meet your needs.

Before you can see the security issues for yourself, you need to download a utility to sniff packets on your network. This post will rely on a free utility named Wireshark because it does the job admirably and is supported on a number of platforms. Because I’m using the 64-bit version of Windows 7, I downloaded the 64-bit Windows installer for the 1.4.7 version of Wireshark. To make things simple, I performed a full install. Part of the Wireshark setup will also install WinPcap, so you don’t need to install this product separately. If you’re using some other version or configuration of Wireshark, your screen may not look precisely like mine.


Using a sniffer is somewhat dangerous and you need administrator privileges to do it. This post isn’t designed to make you an expert in protocol sniffing. In fact, this post is exceptionally simple and is designed only to make you aware of deficiencies in Telnet security. The nefarious individual who gains access to your network to sniff about will have significantly more skills and be able to learn considerably more than you’ll learn using the simple directions in this post.


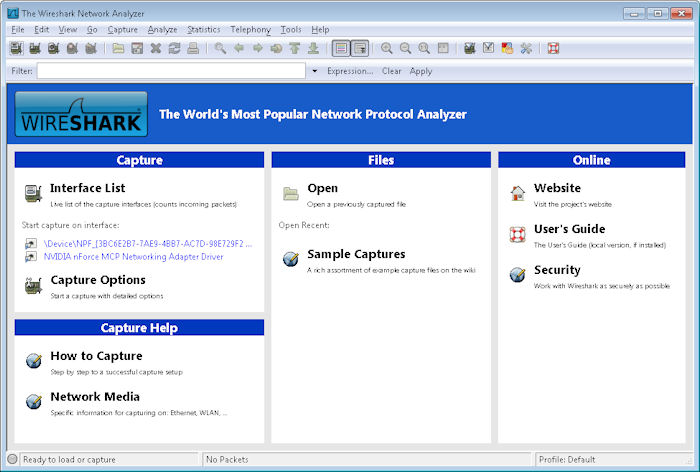
After you complete the installation, you’ll be able to start Wireshark. Choose Start > All Programs > Wireshark and you’ll see the initial Wireshark display shown here.

Wireshark01

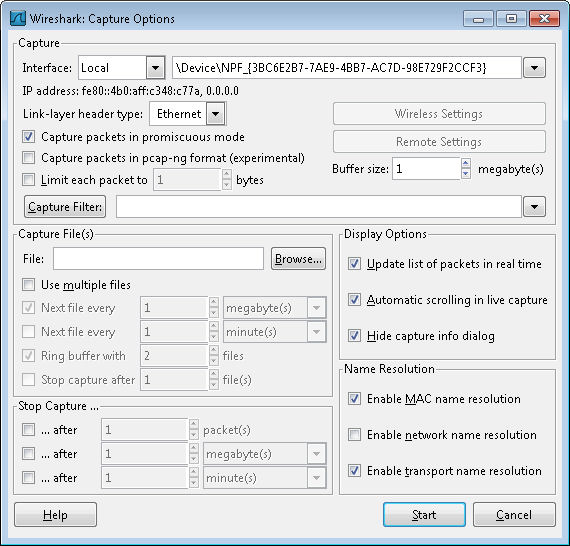
Wireshark isn’t configured to work with Telnet at the outset, so you need to tell it what to sniff. Click Capture Options and you’ll see what looks like an incredibly complex Capture Options dialog box like the one shown here.

Wireshark02

We’re not going to worry about the vast majority of these options. In fact, you only need to set two options to sniff out Telnet packets. Look first at the Interface field. Make sure it’s set to Local. Select your network adapter from the drop down list box. The network adapter will normally have a human readable name, not something odd as shown in the screenshot.

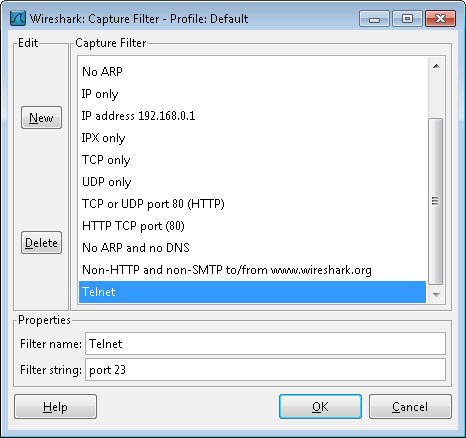
Next you need to tell Wireshark what to sniff on the interface you’ve selected. Click Capture Filter. Type Telnet in the Filter Name field and port 23 in the Filter String field. Click New. Your dialog box should look like the one shown here.

Wireshark03

Click OK. You’ll see the filter criterion entered in the Capture Filter field. More importantly, Wireshark is now configured to offer a Telnet filter anytime you need one. Click Start. The Wireshark display will change, but you won’t see anything on itthe display will be blank.

Open a command prompt and start a copy of Telnet in interactive mode. Make sure you open a command prompt with administrator privileges. The act of starting Telnet won’t create any packets as you can see in Wireshark. In fact, type ? and press Enter. You’ll see that Telnet is still perfectly safeit isn’t generating any packets.

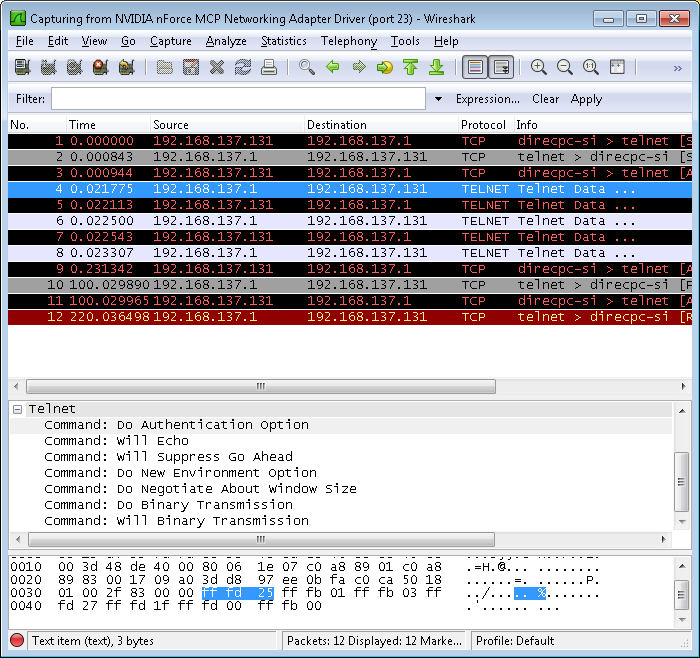
Use the Open command to open a connection to your server. Simply typing O ServerName and pressing Enter generates packets. You can see them in Wireshark like this:

Wireshark04

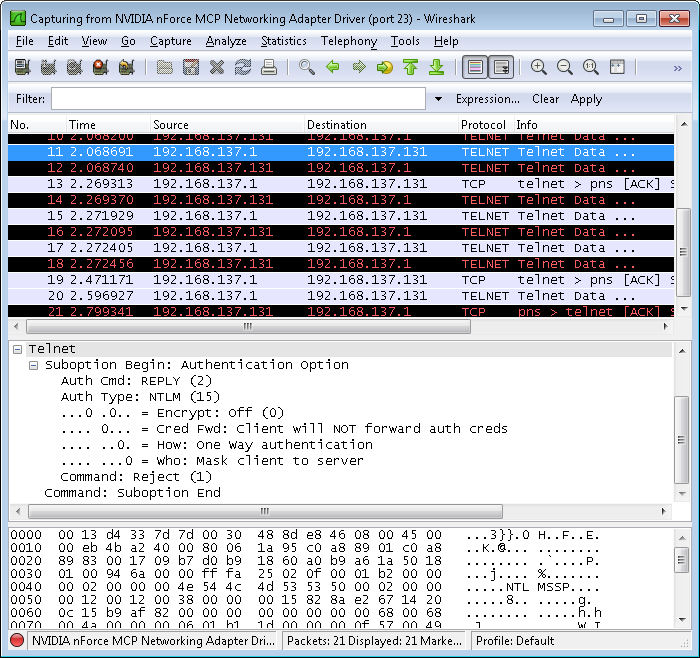
Notice that some of these entries are labeled Telnet Data. In addition, the Source and Destination columns tell you which direction the information is flowing (the client is 192.168.137.131 in this case). Click on the first of these entries and you’ll see that the middle panel contains some information about the Telnet Data. Open the Telnet entry and you’ll see some interesting information as shown in the figure. For example, the packet information tells the viewer that Telnet is set to use the authentication option.

Go back to the command prompt now. Type y and press Enter to send your password information to the server. Of course, one of the big questions you probably have is whether Telnet is exposing your username and password. Near the end of the packets, you’ll find one that contains an Suboption Begin: Authentication Option entry like the one shown here.

Wireshark05

In this case, the option entry tells the server that the client won’t forward the authentication credentials. The option works because I’m already signed onto the server and the server already has my credentials. This is one of the items you’ll want to check for your own Telnet setup, however.

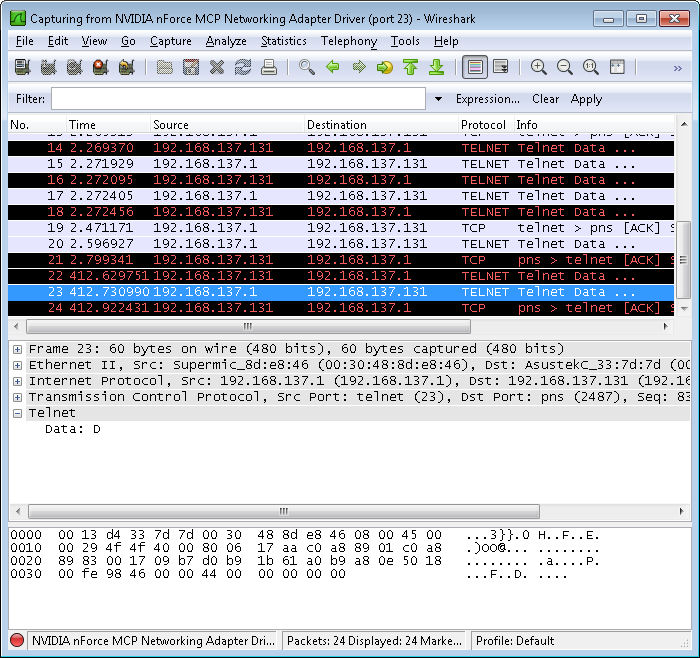
Unfortunately, this session isn’t safe by a long shot. Type just a single letter, a D, at the command prompt. You’ll find that typing this single letter generates a packet that you can see with Wireshark like the one shown here.

Wireshark06

In fact, you’ll find that every action on your part creates more packetseach of which is easily sniffed by anyone with Wireshark or any other application of the sort. Finish the command by typing ir and pressing Enter. You’ll see the expected response at the command line.

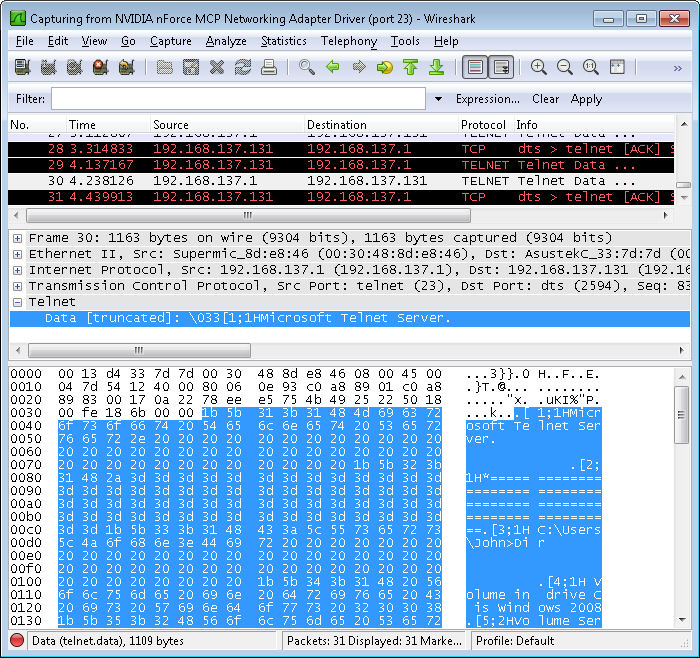
At this point, you can also see the response from the server in Wireshark. The text isn’t as readable because it contains all of the control characters normally used to format the text. However, here’s an example of the response as it appears on my system.

Wireshark07

Look at this response carefully and you’ll see that anyone can learn precisely what you’re doing. If you have to enter passwords to perform a particular task, the viewer will get them too. Telnet isn’t a secure method to manage anythingyou need to provide a secure environment in which Telnet can run. This post only touches on the tip of the iceberg, of course. Let me know if you have any questions about it at [email protected].


Making Wine – Day 31

Welcome to Day 31the best day of the process . The previous post, Making Wine – Day 28, described how you can clear your wine. At this point, your wine should be clear. It may not be pristine, but you shouldn’t see more than a few particles here or there. If you see a bit of pectin haze, you probably won’t be able to clear it easily at this point and will need to amend your recipe to obtain better results in the future. However, if you’re seeing more than a few particles, wait a few additional days before bottling. If the particles don’t clear up in two or three more days, you might want to repeat the Day 28 processing. Professional wineries actually have a filtering system they use to improve the clarity of their winethe home wine maker has only time and technique to rely upon.

Assuming that your wine is clear, you’ll want to sterilize enough bottles to hold it. A single gallon container will normally provide four bottles of wine, plus a little leftover. These dregs are usually drinkable as long as you don’t pick up too much sediment, but you don’t want to bottle them. Choose good quality wine bottles. The type with the screw top don’t hold up well and you could even break the bottle during the corking process. Use the one-step sterilizer to wash the bottles and make sure you get any sediment out of the bottles. It helps to have a bottle brush designed specifically for wine bottles.

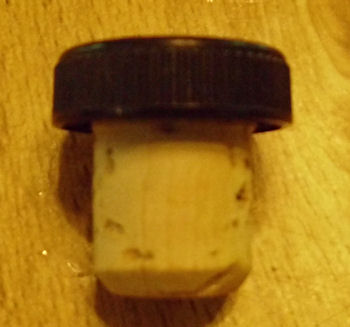
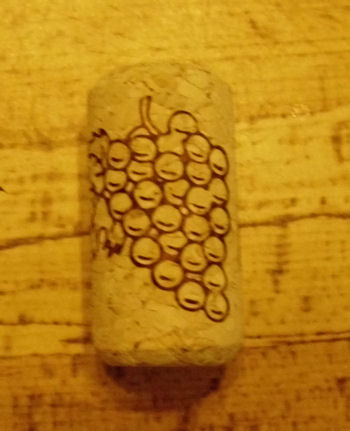
Before you can bottle your wine, you need to have a supply of corks and a corker. Many kits come with tasting corks that are absolutely worthless for storing your wine. These corks are probably good for three or four months worth of storage in optimal conditions and look like this:

WineDay31_1

What you want instead is an actual wine cork that looks like this:

WineDay31_2

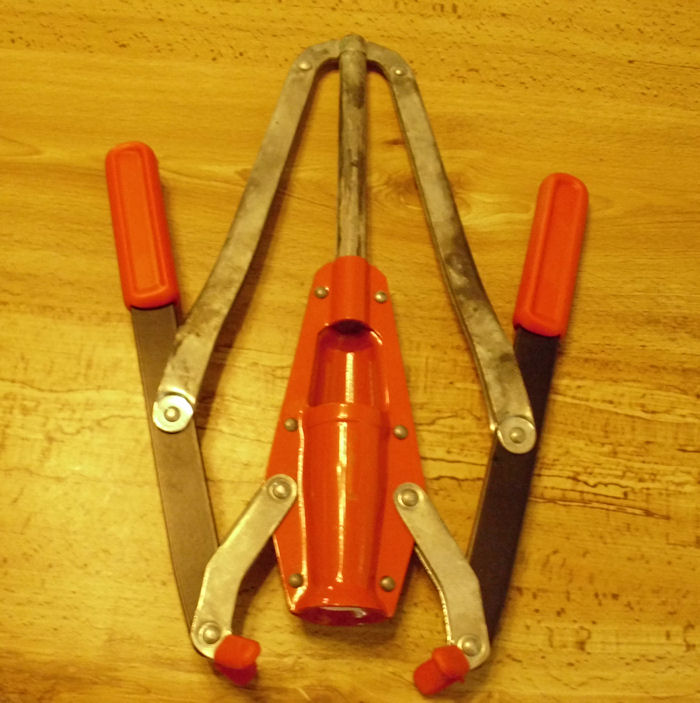
You can find them in several sizes and in a number of materials. My personal preference is actual cork, but I know of many people who are able to use the plastic corks with good results. It’s essential to choose a cork that fits the bottle you usea #8 cork fits the standard bottle used by wineries and normally found in kits. You may have to use a different size if you choose to store your wine in a 1.5 liter bottle. The choice of cork determines the corker you use. Even a cheap floor corker (required to use anything larger than a #8 cork) will cost you a small fortune. That’s why I chose standard sized bottles, the #8 corks, and a Portuguese twin lever corker that looks like this one:

WineDay31_3

The problem with this corker is that it does require a fair amount of arm strength to use. Some people much prefer the Gilda compression hand corker, which is moderately priced and requires about half the strength, or a bench model corker, which is whopping expensive and requires even less strength to use. The kind of corker you get is also dependent on how many bottles you plan to cork. Since I only make 2 gallons at a time, I get by corking 8 bottles and using the corker that I do works fine.

A problem that many new wine makers encounter is overfilling the bottle. If you overfill the bottle, you’ll find it nearly impossible to cork. In addition, the cork won’t seat fully (making spoilage more likely). It’s even possible that you could crack the bottle; although, I’ve never personally had this happen. Use the racking technique described on Day 10 to fill the bottles right to the point where the neck and shoulder meet like this:

WineDay31_4

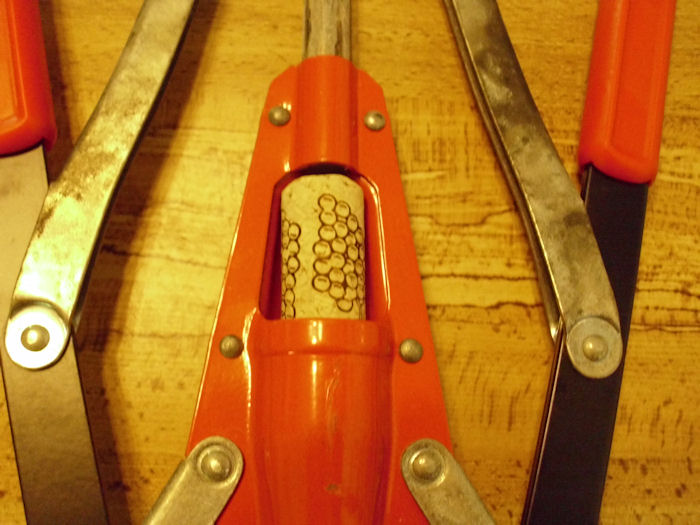
After you fill the bottle, insert the cork into the corker. Normally, the corker will have a slot you use to load it as shown here:

WineDay31_5

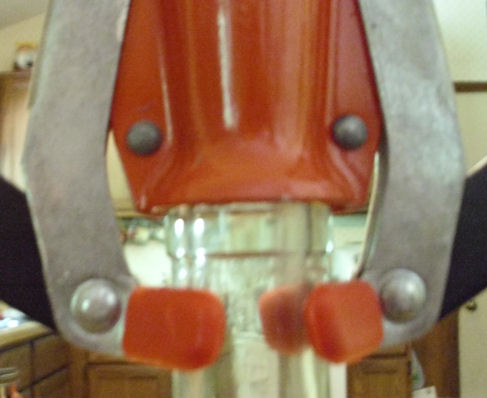
When you place the corker on the bottle, make sure it sits squarely and fully on the bottle top as shown here:

WineDay31_6

Push down on both handles (or on the single handle as determined by your corker) with an even, steady pressure. Eventually, the cork will seat properly and fully in the bottle. At this point, you can label your bottle and dress it up a bit (if desired). Even though your wine is drinkable at this point, you’ll normally wait three to six months for it to continue mellowing and settling. Store your wine in a wine holder designed to keep the cork wet in a cool, dry place. That’s ityou’ve completed the wine making process in a mere 31 days! So, are there any questions about day 31? Let me know at [email protected].
This post ends my basic series of posts about wine. Of course, there are all kinds of other topics I can cover. Let me know if you have a personal preference on what I discuss next in this blog.


Using Telnet to Perform Tasks

The previous post in this series, Configuring Telnet, helped you get Telnet set up on a system. Now that you have Telnet installed, you can use all of the command line and interactive features described in Administering Windows Server 2008 Server Core to access it. For example, you can simply type Telnet <Name of Server> and press Enter to start a session with that server. Because of the way Telnet works and the commands that you’ll issue, it’s always a good idea to use an Administrator command line when working in either Vista or Windows 7. To open such a command line, you choose Start > All Programs > Accessories, right click the Command Prompt entry, and choose Run As Administrator from the context menu. You may have to supply a password to gain administrator access.

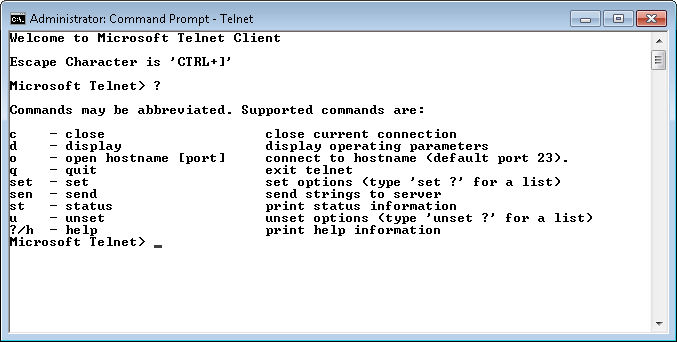
When you plan to work with Telnet for an extended period, you might find the interactive environment more suited to your needs. To enter the interactive terminal, you simply type Telnet and press Enter. This action places you at the Microsoft Telnet prompt, but doesn’t open a connection for you. Type ? and press Enter to see a list of available commands as shown here.

TelnetUsage01

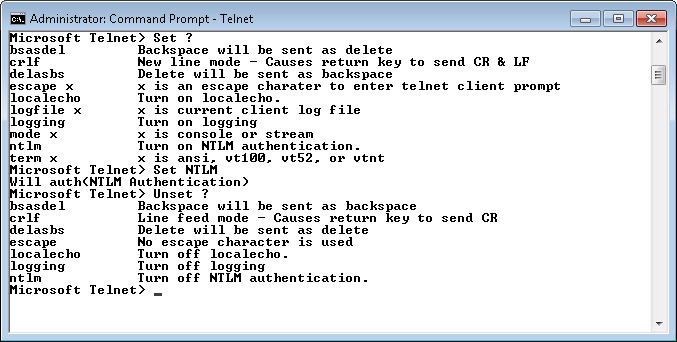
One of the advantages of using the interactive prompt is that you’ll find it easier to configure Telnet options. To see these options, type Set ? and press Enter. For example, if you want to make your Telnet session a little more secure (and the emphasis is on little), type Set NTLM and press Enter. Some settings are a toggle. For example, if you want to remove NTLM authentication, you type Unset NTLM and press Enter. Type Unset ? and press Enter to see a list of toggled settings. Here is a list of the settings available when using the Windows 7 version of Telnet (your version of Telnet might vary).

TelnetUsage02

The ability to set or reset settings is nice, but it would also be nice to know how Telnet is configured. To obtain this information, you type D (for display) and press Enter. You’ll see a list of configured settings. The default settings depend on your version of Windows and how you configured Telnet in the past. If you don’t see a particular setting, it means that the setting either isn’t configured or is toggled off (unset).


Simply configuring a setting doesn’t guarantee that Telnet will use it. The server determines whether a particular setting is valid. For example, you can request NTLM authentication, but the authentication won’t occur if the server doesn’t support it. Likewise, your choice of terminal is sent to the server, but the server ultimately chooses the terminal type, which is going to be ANSI in most cases.


To create a connection in interactive mode, you type O <Name of Server> and press Enter. You may see a warning message about sending your password in the clear. Type Y and press Enter. At this point, you’ll see the standard Telnet prompt at the server. To regain access to the client side prompt, you press a control key combination. The default is Ctrl+]. This will take you back to the client Telnet prompt where you can enter additional commands. When you want to go back to the server side, simply press Enter twice.

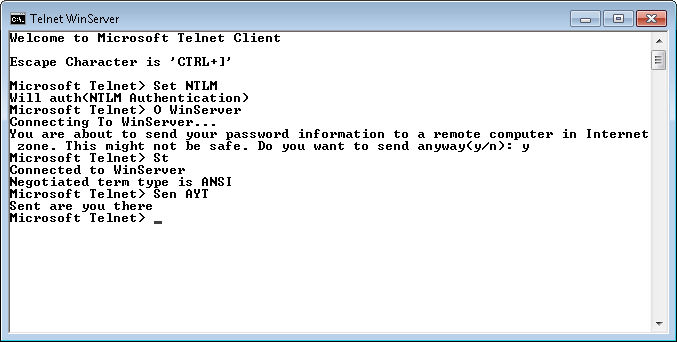
To check your connection, type St and press Enter. You can also ask the server questions, such as “are you there” using the Sen command. To see all of the send options, type Sen ? and press Enter. The help list shows those commands that Telnet definitely supports. However, the Knowledge Base article entitled, “The TELNET Protocol” seems to tell a different story (I’ll check out these additional commands for a future post). For the sake of doing something interesting, try typing Sen AYT (for are you there) and press Enter. Here is typical output from this command.

TelnetUsage03

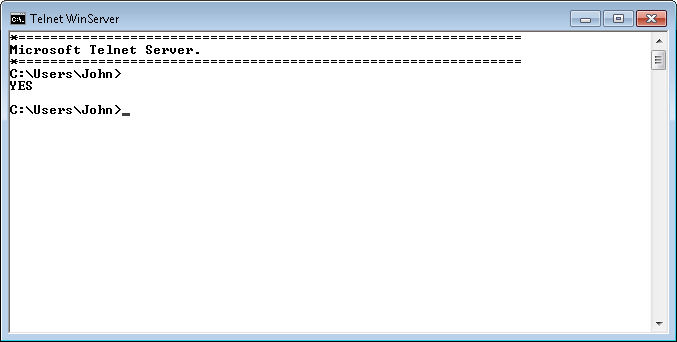
Now that you’ve asked for information, press Enter twice to see the server’s response. In most cases, you’ll see YES as shown here.

TelnetUsage04

You have several ways to close a connection. However, for this session, press Ctrl+] to return to the Telnet client session. Type C and press Enter. The connection is now closed. To verify this fact, type St and press Enter. Type Q and press Enter to leave the Telnet interactive environment. Now, here’s the interesting part of all this. You can also script this sort of behavior to make many tasks automatic. A future post will also pursue this topic in more detail. For now, let me know if you have any questions about the basic interactive session at [email protected].


Health Benefits of Self-Sufficiency (Part 2)

One of my earliest posts on self-sufficiency touted the health benefits of this form of living. I most definitely stand by that postanything you can do to improve your health is good. In the time since I wrote that post, I’ve gotten critical illness insurance quotes, looked into any illnesses common in my family, improved my diet even more, had more frequent doctor check-ups and lost still more weight – and I now control my diabetes using diet alone. In fact, I no longer take any sort of medication to manage health issues. I’m still not out of the woodsnor is my wife. We both know that we have further to go if we want this lifestyle to produce the desired results. However, it’s nice to see the progress that we’ve made. We’re intending to have the condition of our health regularly checked over by services that can be provided by Southwest Care or a similar health clinic to ensure we are always progressing in the right direction.

Some people are under the wrongful assumption, however, that simply changing diet, losing weight, and living healthier will undo the wrongs of the past. My situation is a case in point. Losing weight has actually caused a health problem in my case and I recently had to have my gallbladder removed to solve the problem. Many sites tell you that rapid weight loss will cause the formation of gallstones, but this isn’t quite true. Every medical professional I’ve talked with has told me outright that any weight loss greater than 50 pounds can result in gallstones. If you’re diabetic, the gallstones are especially troublesome because they can cause problems with the pancreasan organ already overextended by diabetes. Certainly, my 4 pound per month average weight loss isn’t rapid and well within the recommended guidelines. My take on all this is that there is no free lunchif you’ve abused your body you’re going to pay a price for it.

However, in the grand scheme of things, losing a gallbladder is certainly preferable to the problems I’d experience if I remained at my former weight. Diabetics have all kinds of increased health risks, including loss of eyesight, heart troubles, kidney damage, and nerve damage. Getting my weight and diabetes under control was the right thing to do, even if it cost me a gallbladder to do it. You can easily live without a gallbladder, but you can’t live without a heart and life is far less liveable without eyes. In fact, if you’re living a healthy lifestyle, you’re unlikely to even notice that the gallbladder is gone once you get over the surgery.

What bothers me in all this is that the medical profession is lax about telling anyone the potential consequences of a seemingly healthy decision. Perhaps the thought is that any discussion of anything negative will only discourage people so that even fewer will take a positive course of action. Everything you do has a consequence, so it’s best to be informed. I hadn’t gotten very far along my current path when I discovered this potentially negative side effects of weight loss, but I had to conduct my own research to obtain the information. Of course, that’s my recommendation to you as well. You need to go into any health-related decision with eyes open. In my case, I made an informed decision and realized early there were risks.

So, what does this all have to do with self-sufficiency? Getting rid of the medications, learning to eat right, exercising nearly every dayall of these goals are part of being self-sufficient. As part of my self-sufficient lifestyle I’ll maintain more of my muscle mass far later in life (my 78 year old uncle can still lift 100 pound bags of feed), but I’ll pay for that ability with additional joint wear, so I imagine that I’ll need hip and/or knee surgery at some point. A self-sufficient lifestyle isn’t for everyone, perhaps you prefer the gym or simply a walk in the park, but getting healthier is a benefit to everythingmost importantly yourself. I encourage you though to research your decisions and make the best decisions you can, realizing that there are always risks that you’ll have to deal with as part of that decision. How are your healthier living goals progressing? Let me know at [email protected].