Early Season Canning

I’ve already been canning this season. A lot of people hear this claim and wonder just what it is that I’m canning. The first food I started canning is soup. I get the ingredients from my freezers. Anything that’s starting to get a bit old is fair game. I also save the larger bones from various meats, especially when I have the meat processed by someone else. The meat and vegetables made into soup can quite well and last a lot longer than they would in the freezer. Nothing is quite so nice on a cold winter’s day than hot soup. I usually get two or three servings out of each quart that I can (sometimes four if I add enough additional items). Given the cold winters here in Wisconsin, I can go through a lot of soup.

Once I can the soup, the freezers are less full, so it’s time to defrost them. It’s essential to defrost, clean, and reorganize your freezers every year. Doing so lets you create an inventory of what you have in stock so that you have a better idea of what you need to grow. In addition, you don’t want to keep items so long that they become unpalatable and visually unappealing. Freezer burned food is completely safe to eat, but you may not want to eat it. Some of the ways in which you can prevent freezer burn is to vacuum pack your food and to ensure you rotate it out before it sits in the freezer too long. In some cases, when food is mildly freezer burned, I’ll make it up into pet food (my animals don’t seem to mind as long as the food is prepared to their liking). However, it’s better to use the food up before anything actually does happen to it.

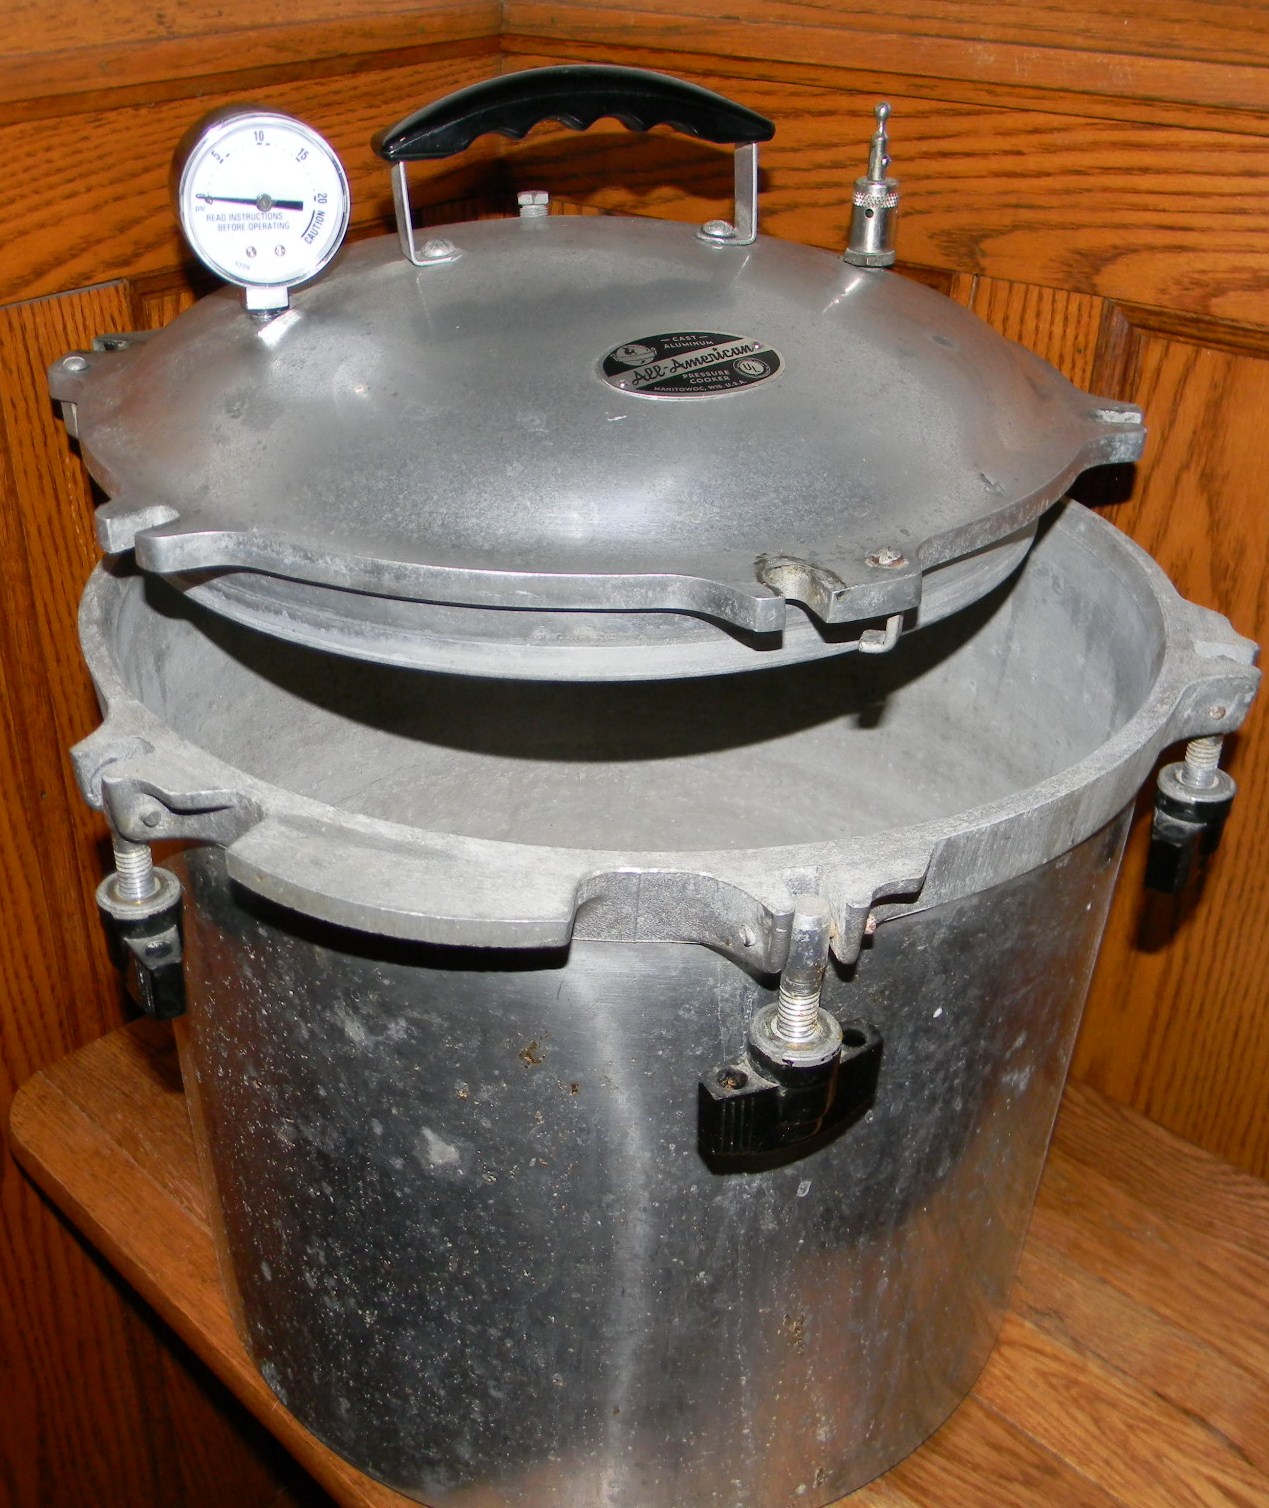
So far I’ve made 14 quarts of chicken soup and another 14 quarts of venison stew. Canning soup means using a pressure canner. Make sure you follow the instructions in a resource such as the Ball Blue Book and the book that comes with your pressure canner. Read Considering the Dangers of Outdated Canning Information for details on keeping yourself safe when using the Ball Blue Book.

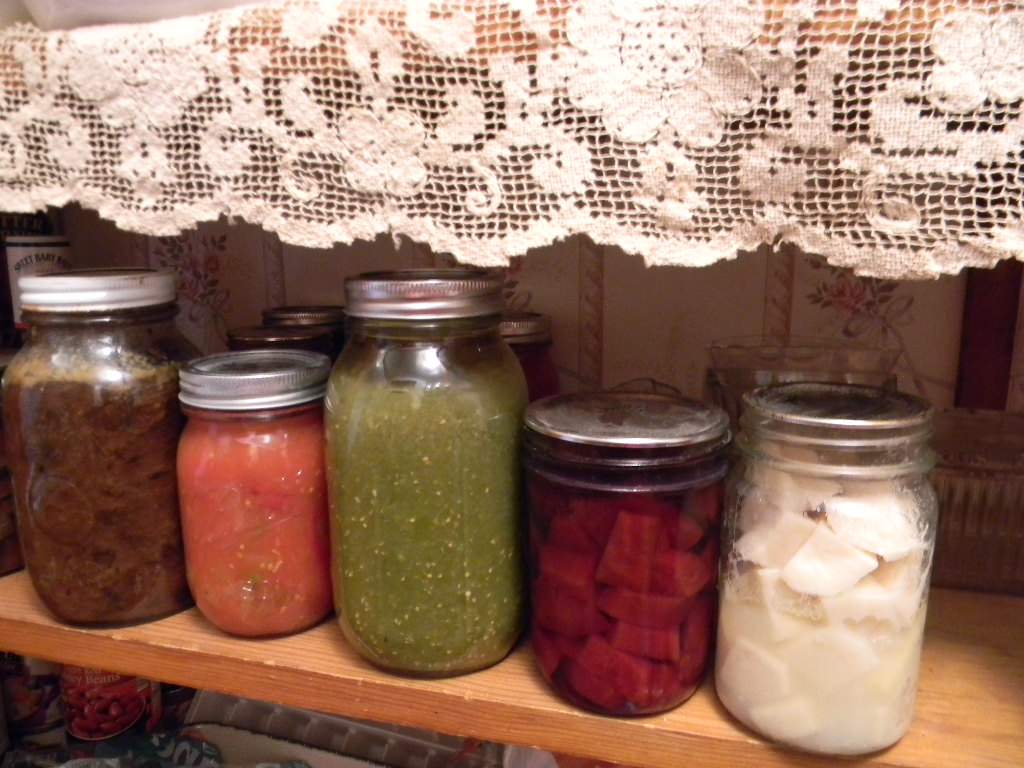
It’s also time to can early garden items. For example, when canned properly, rhubarb makes a highly nutritious fruit dish that I eat directly from the jar. You can also make it into pie filling. So far, I’ve made up 7 quarts of plain rhubarb and 7 quarts of spiced rhubarb, both of which will be quite tasty this upcoming winter. Fortunately, you can use hot water bath canning techniques with rhubarb and other high acid foods.

In some cases, you need to mix and match items. The frozen green and wax beans in my freezer weren’t getting any younger, so I used them to make up four bean salad. Actually, it’s supposed to be three bean salad, but some of my recipes called for Lima beans, while others called for kidney beans. I decided to use both, hence four bean soup. I used up all the remaining beans and garnered 16 pints of four bean salad on my larger shelf. Doing so also used up the cans of kidney and Lima beans in my cabinets.

Finally, pickled asparagus can be quite a treat in the middle of winter. So far, I’ve only made up 8 pints of pickled asparagus, but I’ll make up more. I’ll also be freezing some asparagus for fresh use later in the year. In short, canning season has started—time to get going! Let me know about your current canning project at [email protected].


Colorful Carrots

The carrots go by many different names, but the main idea is that they’re quite colorful. I have now tried two different kinds, Carnival and Rainbow. Both kinds produced yellow, orange, red, and purple carrots. The Carnival variety pictured below also produced white and, oddly enough, one green carrot. I’m pretty sure the green carrot was due to some oddity in the seeds (or possibly it was introduced to sunlight in some manner). They both produced tasty carrots where the color definitely affected carrot taste. Of the two packages, I obtained the largest carrots from the Rainbow packet, but a single season doesn’t truly provide enough testing time to say that this would always be the case. I may simply have had an exceptional year. I plan to buy one packet of each sometime and plant them in the same area of the garden in the same year so I can perform side-by-side comparisons.

Colorful carrots make for exceptional meals.
A Colorful Array of Carrots

The carrots weren’t just colored on the outside. Cutting the carrots showed that the white, yellow, and orange carrots were the same color all the way through. The red carrots were red on the outside and orange in the inside. The purple carrots proved the most interesting, with bands of purple, orange, and yellow. Eating the carrots raw proved to be a real joy because you got different flavors with each bite and adding a dip (such as ranch or blue cheese dressing) simply added to the variety.

Growing colorful carrots means seeing color both inside and out.
Carrots Can Vary in Color Inside and Out

Cooking the carrots will change the color of the red and purple carrots to a dark orange. The white carrots do take on an orange cast, but you can still tell they were originally white. The same holds for the yellow carrots—they grow a bit more orange, but are most definitely remain lighter than the orange carrots. Therefore, even when cooked, you end up with a colorful meal, but not quite as colorful as the raw carrots. The colorful carrots even can well. The taste differences between carrots tends to fade a little when cooked and even more when canned. I can still tell the difference between these carrots when canned and other, pure orange, carrots.

Even the canned version of the carrots are colorful.
Canned Carrots Retain Some Color Differences

Unlike many multi-colored vegetable choices, getting multi-color carrots will provide you with enjoyment throughout the year. I now have some colorful choices for a variety of uses this winter. Let me know your thoughts about colorful vegetable choices at [email protected].


Harvest Festival 2015

Harvest Festival is one of my favorite holidays of the year. What, you haven’t heard of Harvest Festival? Well, it happens each year sometime during September. The date isn’t precise because you just can’t hold Mother Nature to a specific time to make the majority of the fruits and vegetables ripe. That said, the harvest does happen every year and it’s a time to celebrate, even though it also means hard work. I’ve presented Harvest Festival in the past:

What made this Harvest Festival different is that I did the majority of the work on my own. There was lots to do, of course, and I plan to talk about some of the things I did in future posts. This year the Harvest Festival included getting some of my wood for the winter into the basement. My friend Braden helped me get the wood down there—it’s a big job even for two people. I now have five cords down there and two cords outside. Seven cords will take me through most winters, but I’ll cut another cord just in case things get extra cold. The wood you see in the picture is mostly slab wood, with about a cord of logs underneath.

John and Braden standing next to a huge pile of wood.
Getting the firewood stacked in the basement was a big job.

This year the apples ended up as chips for the most part. I also saved some for eating. The larder already has all applesauce, juice, pie filling, and odd assorted other apple products I could use. The remaining apples ended up with friends. I did make up pickled crab apples this year and did they ever turn out nice. I also made a crab apple vinaigrette salad dressing and canned it. The result is quite nice. For once, my pears let me down. The weather just wasn’t conducive to having a good pear crop. I did get enough pears for eating and a few for sharing as well.

Every year is good for something though and it was a banner squash year. The squash vines grew everywhere. At one point, the squash was chest high on me—I’ve never seen it grow like that.


A largish squash patch with chest high squash plants.
The squash grew like crazy this year!

The picture shows the squash about mid-summer. By the end of the summer they had grown into the garden (overwhelming the tomatoes) and into the grass. The squash also grew larger than normal. I ended up with a total of 700 pounds worth of squash (much of which has been preserved or distributed to friends). Here is some of the squash I harvested this year.


The squash patch produced three kinds of squash in abundance this year.
A cart full of squash.

The largish looking round green squash (one of which has a yellow patch on it) are a Japanese variety, the kabocha squash. So far, I’m finding that they’re a bit drier and sweeter than any of my other squash. I think I could make a really good pie with one and they’ll definitely work for cookies. Unlike most winter squash, you can eat the skin of a kabocha squash, making it a lot easier to prepare and it produces less waste. Given that I received these squash by accident, I plan to save some of the seeds for next year. The squash I was supposed to get was a buttercup squash. The two look similar, but are most definitely different (especially when it comes to the longer shelf life of the kabocha).

Canning season was busy this year. I’ve started filling in all the holes in the larder. For one thing, I was completely out of spaghetti sauce. Even though making homemade spaghetti sauce is time consuming, it’s definitely worth the effort because the result tastes so much better than what you get from the store. I also made a truly decadent toka plum and grape preserve and grape and pear juice. I’ve done hot water bath canning by myself before, but this was the first year I did pressure canning on my own. Let me just say that it all comes down to following the directions and not getting distracted. My two larder shelves are looking quite nice now (with Shelby on guard duty).


The larder contains two shelving units and a freezer.
A view of the larder from the front.

The right shelving unit contains mostly fruit products of various sorts and condiments. Yes, I even make my own ketchup and mustard. Of course, some of the squash also appear on the shelves, along with my cooking equipment and supplies. Let’s just say there isn’t a lot of room to spare.


Fruit products dominate the right shelving unit.

The left shelving unit contains mostly vegetables and meats. In years past I’ve canned venison, pork, and chicken. This year I thought I might try canning some rabbit as well. Canning the meat means that it’s already cooked and ready to eat whenever I need it. The meat isn’t susceptible to power outages and it lasts a lot longer than meat stored in the freezer. Even though canning meat can be time consuming and potentially dangerous when done incorrectly, I’ve never had any problem doing so.


The left shelving unit contains mostly vegetables and meats.

Harvest Festival 2015 has been a huge success. The point is that I have a large variety of different foods to eat this winter, which will make it easier to maintain my weight and keep myself healthy. I had a great deal of fun getting everything ready. There was the usual music, special drinks, and reminiscing about times past. What makes your harvest preparations joyful? Let me know at [email protected].


Considering the Dangers of Outdated Canning Information

I am now the proud owner of not one, not two, but three copies of the Ball Blue Book. Of course, the first question anyone should ask is why I own so many copies, given that all three copies are in great shape. The problem is one of outdated information. Science is constantly finding out more about bacteria and the methods used to battle it, so working with old information is dangerous from a number of perspectives.

All of these issues affect how you can food. Consequently, it’s a good idea to keep your canning resources updated to ensure you stay safe. The point was driven home to me again last week when I went to check on the process for canning zucchini. My oldest Ball Blue Book had a perfectly usable recipe for the process. I also found recipes on several sites online, some of which included pictures that looked precisely like the process I had followed in the past. At least one resource talked about another book on my shelf, Putting Food By. However, I became suspicious when a third resource mentioned a potential issue with canning zucchini. Locating the USDA resource online provided the full story. It turns out that the USDA can’t determine a good processing time for zucchini because of the way the squash cooks. So, I froze my zucchini using the process found in all three copies of my Ball Blue Book (a process that hasn’t changed).

After spending some time researching this issue, I’ve come to the conclusion that I really need to recheck those old family recipes of mine to ensure they’re still safe. I also need to spend more time ensuring my resources, such as the Ball Blue Book, are updated regularly. Saving money by canning your own food loses its luster when a family member gets sick or possibly dies due to food contamination. Play it safe—throw that outdated book out and get the latest copy of any resources you use to ensure that you’re using the latest techniques. If in doubt, check additional resources such as the National Center for Home Food Preservation site for additional information or choose not to preserve the food in question. Let me know your thoughts on safe canning techniques at [email protected].


A New Type of Canner

There are many different ways to perform some tasks. Until recently, I thought that the only two ways to effectively hot water bath can were in the oven and on the stove top. I haven’t used the oven method for quite a number of years, partly because there is a chance that the jars won’t seal properly afterward and the opportunity for pathogens to enter the jars unwanted. The method I currently use is on top of the stove using a suitably large pot or a canner. In fact, it was this technique that caused me to write, Choosing an Appropriate Stove. It’s probably the method I’ll continue to use, but there are other options.

The proliferation of stoves with tops that aren’t suitable for heavy pots has companies like Ball scrambling, especially since there is a resurgence in interest about canning foods. You can’t really can safely on a glass top stove; although, some people do it successfully for the most part. The alternative is to have a separate device that’s designed to can away from the stove. After checking out a number of these devices, the only one that looks really interesting is the Ball FreshTech Electric Water Bath Canner. I’ve found a number of reviews about this particular device online, but the most comprehensive so far is a Washington Post article, Finally, an appliance that can help newbies and pros alike get canning.

The device does seem really convenient and would be great for someone with a bad back because the drain spout makes it easy to empty hot water from the canner without physically lifting it from the stove. I know the canner can get quite heavy, having lifted a number of them myself. Of course, the assertion that you normally lift canner, jars and all, is incorrect. You use a jar lifter to remove the jars from the canner first, then empty the hot water from the canner. Over the years I’ve seen people employ all sorts of weird methods to remove the jars and even try to lift the canner, jars and all. Believe me, using the jar lifter is much easier and safer.

The point of this new device is that you can make your own high acid canned goods and store them away. The food you get is much tastier and lacks the usual chemical soup of preservatives found in store bought foods. More importantly, you can save a considerable amount of money. However, I’m not quite sure whether you’d actually save enough to pay the price for this appliance unless you entered wholeheartedly into canning. Even then, it would take a while to pay the device off in terms of money saved at the store.

I haven’t personally used this device and therefore can’t actually recommend it to you. However, I present it as a viable alternative to those of you who have asked me about canning and then went away disappointed when I mentioned problems using a glass top stove. I’d love to hear from people who have used this device. Please contact me at [email protected].


In Praise of the Humble Potato

You say Po-TAE-to and I say Po-TA-to.

Kennebec. Pontiac. Norland Red.

Burbank. Russet. Yukon Gold.

Even the names are beautiful, humble and poetic.

So useful. So nutritious. So versatile.  So comfortable and comforting.

Just in case you’re wondering, all Russet potatoes are Burbanks, but not all Burbank potatoes are russet. The Russet Burbank is described as a natural genetic variant of the Burbank potato. It has a russet-colored skin that visually identifies this potato type. The Russet is the world’s predominant potato used in food processing, so you have probably seen a lot of them and eaten even more.

I grew up in a meat and potatoes household. Although my mom grew a garden full of a wide variety of vegetables, my dad really only believed that there were 4 kinds of vegetables worth eating. Those were corn, peas, beans and potatoes.   As a result, most of our meals were created with those basics but there was always plenty! If we didn’t have enough production of potatoes from the garden, my dad would stop by a roadside stand in the fall and buy a bag of 100 pounds for about $4. That would last us through the winter and into the early spring.   In the fall, potatoes are at their least expensive and best quality compared to any other time of year. Buying them in bulk and storing them is as good an investment now as it was when my dad was doing it in the 60’s.

Storing potatoes is one of the earliest self-sufficiency skills I learned. We always lived in an old house with an unfinished cellar. We would put the potatoes down in the basement in a barrel and just go to collect what we needed when it was time to make supper. Once in awhile we would come in contact with a slimy potato that had to be tossed out. We were warned that we should always bring up anything that had been in contact with the bad potato so they could be used right away. As kids, the science wasn’t explained to us. It was just the rule. Now that I understand the science, it’s still a rule that I live by.

Here are some rules for successful potato storage:

  • Choose a potato variety that is appropriate for storage.  My favorite is Kennebec.  Some like Russet.  There are others.  The grocer or garden center should be able to tell you which potatoes are going to be good for storing.  You can also go online to find the attributes for most vegetables.
  • Raw potatoes should not be washed before storing. Remove the big chunks if you have been digging during a wet season.  However, a powdery coating of dry soil toughens the skin and helps them stay dry longer in storage.
  • Check all potatoes over for spade cuts or bad spots. If there are soft spots, cut away the bad section and use only the good one or discard the whole potato.
  • Do NOT store anything with a bad spot or spading fork cut.
  • After sorting, store the unwashed raw potatoes in any place that is dry, cool (but not cold) and dark. Exposure to sunlight will cause the skin to go green, get bitter and can cause illness if you eat a large quantity.
  • Frequently check your stored potatoes for any that have developed soft spots and discard them immediately when you find them.
  • Wash and dry any potatoes that are in contact with a bad one during storage.  Keep it apart so it can be used soon.

With smaller houses and less storage space, it is still possible to find good storage for potatoes. One way is to store them in milk crates in a pantry, cool closet or heated garage alongside an outer wall. If the area has a window, drape a heavy cloth over the whole stack. With the coolness  of the wall, the airflow created by the construction of the milk crates and the dark provided by the cloth, it works beautifully. As the potatoes at the top are used, take the crates out to store and start on the crate below it.

Also, if you have a rarely used, cool bedroom; a layer of crunched up paper under potatoes in an under-the-bed container is the perfect place for storing them. Winter squash and pumpkins can be stored there also!  The main idea is to keep them dry, dark and cool but not frozen.

Another favorite way to store potatoes is simply to put your pressure canner into play.  

As with other vegetables, canning potatoes is a great way to control the salt level and quality of the food as well as customizing the cut of the finished product.

Quart Jars of White Potatoes cut into cubes
Fast Food at its Finest!
  • For best results, the potatoes should be washed and peeled before cutting into your favorite shapes – slices, cubes, shreds or small whole potatoes.
  • A mandolin is a useful tool when cutting potatoes into thin, even slices. Be very careful when using a mandolin because it has an extremely sharp edge. 
  • A French fry cutter is great for making cubes. Simply put the potato through the cutter and then cut the ‘fries’ into chunks. This cuts the potatoes into really nice sized cubes. 
  • Always follow the instructions for canning that came along with your pressure canner. 
  • Do NOT try to pressure can anything completely absent of salt.  A little salt is absolutely necessary for successful canning.

Once the potatoes are processed and cooled they are ready to eat! You can rinse them, cold and use them in potato salads. You can microwave them to have them warm. You can mash them with garlic and butter. You can drain them, dry them and fry them with your favorite seasonings for fantastic hash browns. In a pinch, you could eat them straight from the jar! 

The potato is the workhorse of the pantry. It is low in saturated fat and sugar.  It has no cholesterol or sodium unless you add it. It is also high in potassium and vitamin C as well as very high in vitamin B6, the vitamin that helps to improve moods. 

If you have stories or recipes using potatoes, I would love to hear from you. Please share them by adding your comment to this post or contacting John at [email protected].


A Little Pressure

From Left to Right:  Beef, Carrots, Green Salsa, Beets, Potatoes All canned using a pressure Canner
From Left to Right: Beef, Carrots, Green Salsa, Beets, Potatoes
All canned using a pressure Canner

As I was growing up, I helped in the  kitchen quite a bit, especially during canning season.   We had several big blue (water bath) canners that were used for pints and quarts of all kinds of tomato products as well as jams and jellies.  I never saw my mom use a pressure canner.  One day I asked her—why? It turned out that before I  was born, she and her mother  were working with a pressure canner.  They went into the other room for something and forgot to check on it until they heard the pressure value and gasket blow off.  A jar had broken inside and the vegetables had clogged the pressure  valve. The content of canner spewed into the air, all over the kitchen!  Seeing this chaos—and cleaning up the mess afterward—convinced my mom never to can anything under pressure while there were kids around, just in case.

So it wasn’t until I was a young wife that I convinced my Aunt Betty to teach me about pressure canning.  After doing some research, we went together and bought a pretty expensive “All-American” brand  canner.

With a new pressure gauge and careful storing, this 30+  canner is still going strong.
With a new pressure gauge and careful storing, this 30+ canner is still going strong.

It has a metal to metal construction with 6 turn-screws to hold the lid in place.  It is extremely safe.  For the amount of food that I process, it was a wonderful investment.  I think of my Aunt Betty every time I use it.

Here are some safety tips to use if you decide to dive  into the world of pressure canning.

  • READ THE INSTRUCTIONS CAREFULLY.
  • Familiarize yourself with the equipment to make sure that you know exactly how it works before using it to process food.  Be sure you know how much water is needed (a metal yardstick works well to measure the depth of the water) and how many jars should go in a batch.
  • Follow the recipe exactly, at least the first time you are making something new.  The herbs and spices used during the canning process develop as the product cools and is stored.  After opening it, you can decide whether you want to change the recipe for next year’s harvest.
  • Invest in good equipment and treat it with respect.  You don’t necessarily need new equipment.  Garage sales and thrift stores often have sturdy equipment for sale.  Watch for breaks, holes, scorch marks or cracks in the metal.  These are sure signs that the canner has been used for something other than its original purpose.
  • Replace the rubber seals regularly, if your canner uses them.
  • Replace the pressure valve if it is showing any sign of wear. It is important that this part of the canner be accurate.
  • Stay in the kitchen while the pot is cooking. In this case, a watched pot is a good thing. The canner will build up to pressure.  The stove must be adjusted to keep it at the right  pressure throughout the whole canning time.  If the pressure is under the required amount—the food won’t cook correctly.  If the pressure goes over—there is risk of breaking jars and messes in the kitchen.
  • FOLLOW THE INSTRUCTIONS for cooling down the canner.  Remember there are glass jars inside and they are very fragile in this state.
  • Do NOT open the canner until the pressure has naturally gone down to zero, according to the pressure gauge.  This part of the process cannot be hurried.
  • Remove the jars carefully and finish them according to the recipe.  Putting a towel on your table  or counter will keep the area drier and reduce the risk of the jars bumping together.
  • After the jars are cool, inspect them to make sure they have sealed properly.  If any fail to do so, put it in your refrigerator to use right away.
  • LABEL jars with contents and the year, before putting it into your pantry,

All in all, pressure canning is a great way to store your harvest,  You have control of exactly what is in your food.  Many recipes can be adapted for special diets. And, the jars  look so pretty in your pantry! If you have stories about your pressure canning experiences or any questions, please share them by adding your comment to this post or contacting John at [email protected].


Lessons Learned as a Child

Jars of canned goods in the pantry.
Colorful Jars of Home Canned Vegetables

Most of what I learned about self-sufficiency was done while I was hanging around my mom, aunts and uncles.  My grandmother was one of thirteen children.  My mother had ten brothers and sisters.  I have 4 sisters and three brothers. It’s a large family, but it’s a close family.  We have always spent lots of time together. As a kid, much of it was spent gathering, gleaning, cooking and eating.  I didn’t realize I was learning self-sufficiency, I just knew that if I wanted to be in the kitchen I needed to make myself useful.

The earliest lesson that I remember happened while my mom and her sisters were canning concord grapes.  My uncle had a neighbor with an overabundance of grapes.  My mom had teenage brothers who needed something to do on a Saturday afternoon. So she sent dad with the boys off to pick the grapes while the women got ready to make jelly and jams.

Since I was only 8 years old and my sister was 11, our job was washing the jars.  There were dozens of jars that had been brought up from the cellar.  We worked in a back room of the house with two tubs.  She washed and I rinsed.  It was also the job for both of us to feel the top edge of the jars to make sure there weren’t any nicks or cracks that would prevent the canning lids from sealing.  Once the jars passed our inspection, they were taken into the kitchen where they were boiled to sterilize them and filled by the adults.  It may seem like a lot of work for an 8 year old, but I still check my canning jars this way because of the lesson I have always remembered.

Getting kids involved early is key to teaching life long lessons.  Kids are naturally curious about what the grownups are doing.  Kids WANT to be included in grownup activities. There are oodles of ways to bring your kids along on the road to self sufficiency.  It’s never too early.

  • If your kids are the kind who enjoy water, set them up washing jars to prepare for canning.  Let them help wash the dog or the car.  It may end up in a water fight, but those are great fun in the summer!
  • If they like making mud pies, teach them that making bread or pie crust dough is similar, and let them try it out. Even a preschooler can help roll cookie balls (and unlike PlayDoh, you can bake and eat the results).
  • If they like picking flowers, give them a small plot or row of their own in your garden and let them take responsibility for the tending, watering and weeding.
  • If your kids who are the kind that like to read and figure out things, introduce them to recipe books and let them choose what is going to be made for supper.  It will help them practice reading as well as teach valuable math and science skills.
  • Do you have an animal lover at your house? Let them take charge of the pet care and update you on the health of the critters – keeping records like the veterinarian.

When you include kids in your activities, at their skill level  and with ample encouragement, you are opening up a whole new way of communicating with your child. They learn that adults sometimes make mistakes or have failures and have to figure things out differently.  You are creating an environment where your kids can try, succeed (or learn that failure isn’t fatal) and grow.

As the harvest progresses and the canning/freezing season is upon us, there is an opportunity to teach the value of starting early to make a great Christmas.  By canning and collecting the summer fruits and vegetables, you can fill your cupboards full of basic things like corn, peas, beans and jelly.  You can also  try special recipes for treats like  green and red colored pears, spiced apple rings, green tomato mincemeat and peach pie filling.  Then when it comes time to put together a gift basket for a teacher or putting on a Holiday dinner, your child can proudly say “I helped to make that!”

Is there any greater feeling than “real” accomplishment?  I don’t think so!

If you have stories about your self-sufficiency lessons or any questions, please share them by adding your comment to this post or contacting John at [email protected].


Preparing for Planting

It may seem a bit odd to talk about planting in the middle of winter, but this is actually the time that many avid gardeners, especially those interested in self-sufficiency, begin to think about the planting season. Of course, the planning process starts in the larder. Even though there is a catalog in your hand at the moment, the catalog doesn’t do any good until you know what to order and your larder contains that information.

As part of the preparation process, you should go through the larder, ensure all of the oldest items are in the front of the shelves, verify that all of the jars are still sealed, and wash the jars to keep them clean. Make sure all of the jars are properly marked with both food type and year canned as well. The process of organizing your larder and keeping it clean is important because doing so will make it a lot easier to determine what to plant. Once you complete this task, you can perform an inventory to determine what items are in short supply. These are the items that you need to order from the catalog.

Sometimes you can use your larder as a jumping off point for dreams of things you’d like to try in the future. For example, until last year, our larder lacked pickled asparagus—now I wouldn’t be without it. However, before we could pickle the asparagus, we had to grow enough to make the effort worthwhile, which meant planting more asparagus and waiting several years for it to get old enough to produce a decent crop. Yes, the larder was the start of our dream and the catalog provided us with ideas on how to achieve our dream, but in the end, the realization of our dream happened in the garden and in the kitchen.

Our larder also holds our canning supplies and equipment. This is the time of the year when you should perform an inventory of these items as well and ensure they’re in good shape. For example, the seal and pressure relief value on your pressure canner requires regular replacement—we simply make it a practice to replace these items before the start of the canning season because doing so is inexpensive and reduces the risk of mishap in the kitchen later. No matter where you store your canning supplies and equipment, now is the time to maintain them.

Writing your needs down as you discover them is a great idea. Check out the various catalogs you receive starting this time of year to determine which products will best suit your needs. It’s unlikely that you’ll completely fill your garden with just the items you need from the larder. The catalog will also supply ideas for new items you can try. Sometimes we try a new variety of vegetable or fruit just to see how it grows in this climate. Over the years we’ve discovered some items that grow exceptionally well for us (and also experienced more than a few failures).

Don’t just address your main garden, however. It’s also time to check into herbs and address any deficiencies in the orchard. This is the time for planning. Trying to figure everything out later, when you’re already engaged in preparing the garden, will prove difficult and you’ll make more mistakes than usual if you wait.

It’s also important to start ordering as soon as you know what you need. The catalog companies won’t send you product until it’s time to plant. However, they do use a first come, first served policy. Other gardeners are already order products. If you wait, you may not get your first choice of items and may have to reorder later.

Planning is an essential part of a successful year in the garden and orchard. However, I also enjoy starting the planning process this time of the year because it makes winter seem a little less severe. A little spring in winter is like a breath of fresh air. What sorts of things do you do to prepare for spring? Let me know at [email protected].


Choosing an Appropriate Stove

I’m not here to recommend a particular stove or brand of stove. I’ve found over the years that a stove that works for one person, doesn’t work at all for someone else. We all have different ideas of precisely what makes the perfect stove. For example, some people prefer white stoves, while others think that colors are the way to go. Some prefer stoves that run on gas whereas others are keen on getting the best induction hob instead. The selection of stoves is also limited by local availability and the size of your pocketbook. I’m sure that there are some people reading this who will merrily spend $5,000.00 or more on a stove and never think twice about it. So, I’m not here to tell you that a particular stove is the end all invention of stoves because it probably isn’t true in your case. Stoves used for self-sufficiency purposes, especially canning, do have some features in common though and that’s the point of this post.

Glass top stoves are completely out of the question if you want to can. Even the vendors will tell you that placing a heavy canner on a glass-topped stove is doomed to failure (or at least breakage of the top). That said, I know of at least one person who uses their glass topped stove for canning, quite successfully I might add. Still, it’s probably not a very good idea and forget about any warranty work if the vendor discovers that your stove top broke from canning.

We tried an electric stove that was specifically designed for canning. The vendor even talked about canning in the manual. This stove came with some high wattage burners designed to heat the water more quickly. The problem is that the electric stove doesn’t get enough air flow to cool the burners (as odd as that might sound) when a big canner is sitting on top of the elements. I ended up replacing the burners almost every year because the metal holding the elements together would sag and eventually the pot ended up resting right on top of the stove (with the resultant fire hazard). After the stove burst into flames the second time (and I was looking at rewiring it yet again), I decided that electric wasn’t going to make it for us. That said, I know of more than a few people who do successfully use electric stoves for canning. Almost every one of them has removed the vendor-supplied burners and provided heavier duty canning burners. AP Wagner is one place that sells these burners-be prepared to pay an arm and a leg for one (a burner that normally runs around $30.00 will cost nearly $80.00 in canning burner form), if you can even find one to fit your stove.

That leaves gas stoves. Even here you can make some serious mistakes. Look for a gas stove that specifically mentions canning in the manual. Check out reviews from other people who use the stove for canning purposes. The grates should be quite heavy if you plan to use the stove for canning because a canner is quite heavy (especially when working with a pressure canner). Make sure the grates aren’t so high that they actually prevent good heat transfer to your canner. It’s a good idea to obtain a gas stove that has at least one power burner (more is better). Unfortunately, the power burner will also trash any sort of sauce you try to make with it, so a simmer burner is also a good idea. The stove we finally purchased has one standard burner, two power burners, and a simmer burner. We’re finding that it works extremely well for every task.

No matter which stove type you choose, make sure it has a porcelain finish and not a painted finish. Some vendors will try to pawn a painted finish off on you and the paint is guaranteed to peel from the heat generated from canning. Unless you like the idea of repainting your stove with high temperature paint (nasty stuff) on a regular basis, porcelain is the only way to go.

Another issue to consider is the size of the back panel. Many stoves have back panels that jut out as a fashion statement. Unfortunately, the back panel design also makes it impossible to use the back burners with anything larger than a small pan. This sort of stove is unlikely to work well for canning purposes (Rebecca and I know, we’ve tried). If nothing else, take your pans to the store and test fit them on the stove before you buy. You really don’t want to discover that your pans won’t fit after the stove is already installed in your home.

If you’re using your stove for canning like we do, then you’ll find that it takes a lot of abuse. We bought one with as few gizmos as possible because gizmos tend to break easily when you use them a lot. Simpler is better when it comes to canning. To help make the stove even more reliable, make sure you read the manual that comes with it and perform all of the vendor-recommended maintenance, including the required cleaning. For example, we found out that ammonia really does work better for cleaning the stove than other cleaners. (We tried it as part of the vendor-recommended maintenance.) The ammonia fumes are quite nasty, so we run the hood on high speed during cleaning to remove them.

Our results may vary from yours, but we’re also finding that gas is less expensive to can with than electric. I’m still trying to figure out precisely how much less, but my preliminary estimate shows that you save about 17% using gas over electric. In order to come up with a precise number, I’m going to have to figure out how many BTUs are required to perform a typical canning operation on each device, and then compare the per BTU costs of each fuel source. We’ve also discovered that canning with gas takes less time because the water heats more quickly. You should know though that we’re using propane and that could change the economics of canning. Choose carefully if you value long term costs as part of your purchasing decision.

What sorts of things have you found important when choosing a stove? Let me know at [email protected].