An Update on the RunAs Command


This is an update of a post that originally appeared on 
May 14, 2014.

Recently I wrote the Simulating Users with the RunAs Command post that describes how to use the RunAs command to perform tasks that the user’s account can’t normally perform. (The basics of using the RunAs command appear in Windows Command-Line Administration Instant Reference.) A number of you have written to tell me that there is a problem with using the RunAs command with built-in commands—those that appear as part of CMD.EXE. For example, when you try the following command:

RunAs /User:Administrator "md \Temp"

you are asked for the Administrator password as normal. After you supply the password, you get two error messages:

RUNAS ERROR: Unable to run - md \Temp
2: The system cannot find the file specified.

In fact, you find that built-in commands as a whole won’t work as anticipated. One way to overcome this problem is to place the commands in a batch file and then run the batch file as an administrator. This solution works fine when you plan to execute the command regularly. However, it’s not optimal when you plan to execute the command just once or twice. In this case, you must execute a copy of the command processor and use it to execute the command as shown here:

RunAs /User:Administrator "cmd /c \"md \Temp""

This command looks pretty convoluted, but it’s straightforward if you take it apart a little at a time. At the heart of everything is the md \Temp part of the command. In order to make this a separate command, you must enclose it in double quotes. Remember to escape the double quote that appears within the command string by using a backslash (as in \").

To execute the command processor, you simply type cmd. However, you want the command processor to start, execute the command, and then terminate, so you also add the /c command line switch. The command processor string is also enclosed within double quotes to make it appear as a single command to RunAs.

Make sure you use forward slashes and backslashes as needed. Using the wrong slash will make the command fail.

The RunAs command can now proceed as you normally use it. In this case, the command only includes the username. You can also include the password, when necessary. Let me know if you find this workaround helpful at [email protected].

Simulating Users with the RunAs Command

This is an update of a post that originally appeared on April 26, 2011.

One of the problems with writing applications, administering any network, or understanding system issues is to ensure that you see things from the user’s perspective. It doesn’t matter what your forte might be (programmer, administrator, DBA, manager, or the like), getting the user view of things is essential or your efforts are doomed to failure. Of course, this means seeing what the user sees. Anyone can run an application at the administrator level with good success, but the user level is another story because the user might not have access to resources or rights to perform tasks correctly.

Most knowledgeable users know that you can simulate an administrator by right clicking the application and choosing Run As Administrator from the context menu. In fact, if you Shift+Right Click the application, you’ll see an entry for Run As A Different User on the context menu that allows you to start the application as any user on the system. However, the GUI has limitations, including an inability to use this approach for batch testing of an application. In addition, this approach uses the RunAs command defaults, such as loading the user’s profile, which could cause the application to react differently than it does on the user’s system because it can’t find the resources it needs on your system.

A more practical approach is to use the RunAs command directly to get the job done. You can see some basic coverage of this command on page 480 of Windows Command-Line Administration Instant Reference. To gain a basic appreciation of how the user views things, simply type RunAs /User:UserName Command and press Enter (where UserName is the user’s fully qualified logon name including domain and Command is the command you wish to test). For example, if you want to see how Notepad works for user John, you’d type RunAs /User:John Notepad and press Enter. At this point, the RunAs command will ask for the user’s password. You’ll need to ask the user to enter it for you, but at that point, you can work with the application precisely as the user works with it.

Note that I highly recommend that you create test user accounts with the rights that real users have, rather than use a real user’s account for testing. Otherwise, if something goes wrong (and it usually does), you’ve damaged a real user’s account. Make sure you follow all of the usual policies to create this test user account and that you have as many test user accounts as needed to meet your organization’s needs.

Of course, many commands require that you provide command line arguments. In order to use command line arguments, you must enclose the entire command in double quotes. For example, if you want to open a file named Output.TXT located in the C:\MyDocs folder using Notepad and see it in precisely the same way that the user sees it, you’d type RunAs /User:John “Notepad C:\MyDocs\Output.TXT” and press Enter.

In some cases, you need to test the application using the users credentials, but find that the user’s profile gets in the way. The user’s system probably isn’t set up the same as your system, so you need your profile so that the system can find things on your machine and not on the user’s machine. In this case, you add the /NoProfile command line switch to use your profile. It’s a good idea to try the command with the user’s profile first, just to get things as close as you can to what the user sees. The default is to load the user’s profile, so you don’t have to do anything special to obtain this effect.

An entire group of users might experience a problem with an application. In this case, you don’t necessarily want to test with a particular user’s account, but with a specific trust level. You can see the trust levels setup on your system by typing RunAs /ShowTrustLevels and pressing Enter. To run an application using a trust level, use the /TrustLevel command line switch. For example, to open Output.TXT as a basic user, you’d type RunAs /TrustLevel:0x20000 “Notepad C:\MyDocs\Output.TXT” and press Enter. The basic trust levels are:

  • 0x40000 – System
  • 0x30000 – Administrator
  • 0x20000 – Basic User
  • 0x10000 – Untrusted User

Many people are experiencing problems using the /ShowTrustLevels and /TrustLevel command line switches with newer versions of Windows. The consensus seems to be that Microsoft has changed things with the introduction of UAC and that you’ll need to work with the new Elevation Power Toys to get the job done. You may also want to review the article PowerToys running with administrator permissions because it provides some insights that may be helpful in this case as well. I’d be interested in hearing about people’s experiences. Contact me at [email protected].

Management Lessons from the Military

Having spent 10 years in the Navy, I know that military life can provide some benefits that translate well into civilian life. Enforced discipline, often described as training, does create an environment in which you can learn how to perform tasks more efficiently and with greater success. The training isn’t always comfortable, but the feeling of success when the training is over is always amazing. That’s why I went through the Ten Workplace Lessons From the Military slideshow on Baseline with great interest. It actually does help you understand how someone who has had military training can provide significant benefit to an organization of any sort.

From a personal perspective, I credit my military training with giving me drive and ambition required to write books and to also work through many of the issues in self-sufficiency that I have. The techniques that I learned in the service have translated well into creating an environment where I can work productively and ensure good results. The organizational and planning skills I gained in the service still serve me well today. I’m not saying that I succeed every time—far from it, but I have learned to keep trying until I find a way to succeed.

My service was quite some time ago, so I can’t speak to the training that the military receives today with any authority. However, judging from the content of the slideshow, I’d say that the military still values the kinds of things that helped me become the sort of person I did after I left the service. Things like learning to see what is important in a list of to do items, and what isn’t, is part of the military way of doing things. You never have enough time to complete a to do list in the service—prioritizing is a must.

The main reason I’m writing this post today is to support my fellow veterans. When you hire a vet, you’re getting someone with a broad range of experiences that you simply can’t get outside of the military. You get someone who had the drive to complete tasks under fire and will certainly have the same drive to complete tasks for your organization. Let me know your thoughts on the military method of management at [email protected].


Understanding the Maturing of the Command Line

A number of people have asked me why I’ve written several different command line reference books. The answer is that each book serves a different market. Serving reader needs is a quest of mine. As reader needs change, I also change my books to better meet those needs. The command line may seem static, but reader needs have changed over the years because of the way in which the command line is perceived and the new commands added to it.

The most popular of the set, Windows Command-Line Administration Instant Reference, provides the reader with quick access to the most commonly used commands. In addition, this book emphasize examples over documentation, so you see how to use a command, but don’t necessarily get every detail about it (only those that are used most often). This book is mainly designed to assist administrators. With this group in mind, the book also provides a good overview of batch files and scripting. The point is to provide something small that an administrator can easily carry around.

A second command line reference, Administering Windows Server 2008 Server Core, is designed to meet the needs of those who use Microsoft’s Spartan Server Core operating system. The book includes a number of special features for this audience, such as instructions on getting hard to install software to work in this environment. This is also the only book that discusses how to use Mono to overcome .NET Framework limitations in this environment. Even though the title specifies Windows Server 2008 Server Core, the book has also been tested with Windows Server 2012 Server Core. The point of this book is to allow you to get all of the speed, reliability, and security benefits of Server Core installations without all of the hassle that most administrators face.

My third command line reference, Windows Administration at the Command Line for Windows Vista, Windows 2003, Windows XP, and Windows 2000, serves the general needs of administrators and power users. This book is intended to help anyone use the command line more efficiently. It provides a little more hand holding and considerable more detail about all of the available commands than my other two books. This is also the only book that discusses PowerShell.

The PowerShell portion of this third book has received a lot more attention as of late. Microsoft is making a much stronger emphasis on this new version of the command line, so I’m glad I included it in my book. One of the strong suites of this book is that it not only discusses documented commands, but many undocumented commands as well (with the appropriate caveats, of course).

No matter which version of my command line reference you use, I’m always here to answer your questions about my books. How do you interact with the command line? Has PowerShell taken a more prominent role in the way you do your work? Let me know at [email protected].


Limitations of the FindStr Utility

Readers have noted that I use the FindStr utility quite often. This utility is documented in both Windows Command-Line Administration Instant Reference and Administering Windows Server 2008 Server Core (and also appears a host of my other books). At the time I wrote that documentation, I had no idea of how much comment this particular utility would generate. I’ve written a number of posts about it, including Accessing Sample Database Data (Part 3), Understanding Line-, Token-, and String-Based Command Line UtilitiesUsing the FindStr Utility to Locate Errors in Visual Studio, and Regular Expressions with FindStr. It might be possible that people think that this utility is infallible, but it most certainly has limits. Of course, the FindStr utility is line-based and I’ve already documented that limitation. However, it has other limitations as well.

The most important limitation you must consider is how FindStr works. This utility works with raw files. So, you can use it to look inside executable files and locate those produced by a specific organization as long as the file contains unencrypted data. When an executable relies on obfuscation or other techniques to render the content less viewable by competitors, the strings that you normally locate using FindStr might become mangled as well—making them invisible to the utility. In practice, this particular problem rarely happens, but you need to be aware that it does happen and very likely will happen when the executable file’s creator has something to hide (think virus).

Another problem is that FindStr can’t look inside archives or other processed data. For example, you can’t look inside a .ZIP file and hope to locate that missing file. You might initially think that there is a way around this problem by using the functionality provided in Windows 7 and newer versions of Windows to look inside archive files and treat them as folders. However, this functionality only exists within Windows Explorer. You can’t open a command prompt inside an archive file and use FindStr with it.

Recently, a reader had written me about his Office installation. Previously, he had used FindStr to locate specific files based on their content—sometimes using content that wasn’t searchable in other ways. This feature suddenly stopped working and the reader wondered why. It turns out that .DOC files are raw, while .DOCX files are archives. Change the extension of a .DOCX file to .ZIP and you’ll suddenly find that your ZIP file utilities work great with it. Old Office files work well with FindStr—new files only work if you save them in .DOC format.

Another reader wrote to ask about network drives. It seems that the reader was having a problem locating files on a network drive unless the drive was mapped. This actually isn’t a limitation, but you do have to think about what you want to do. Let’s say you’re looking for a series of .DOC files on the C drive (with a shared name of Drive C) of a server named WinServer in the WinWord folder that contain the word Java in them. The command would look like this: FindStr /m /s “Java” “\\WinServer\Drive C\WinWord\*.doc”. When using network drives, you must include the server name, the share name, the path, and the file specification as part of the command. Otherwise, FindStr won’t work. What I have found though is that FindStr works best with Windows servers. If you try to use it with another server type, you might experience problems because FindStr won’t know how to navigate the directory structure.

There is a real limit on the length of your search string. Another reader wrote with this immense search string and wondered why FindStr was complaining about it. The utility appears to have a search string length limit of 127 characters (found through experimentation and not documented—your experience may differ). The workaround is to find a shorter search string or to perform multiple searches (refining the search by creating a more detailed file specification). If you can’t use either workaround, then you need to write an application using something like VBScript to perform the task.

These are the questions that readers have asked most about. Of course, I want to hear your question about limitations as well. If you encounter some strange FindStr behavior that affects my book’s content in some way, please be sure to write at [email protected].


Saving Data to the Cloud

Cloud computing is here-no doubt about it. In fact, cloud computing offers the only viable way to perform certain tasks. For example, software such as Sage200 cloud assists businesses with their management, not just for accounting but for other cloud based needs too. Certainly, large organization can’t get by without using cloud computing to keep the disparate parts of their organization in communication. From the modular web services offered by Google Cloud to the CMMS Software provided by Axxerion, there really is a cloud-based solution for everything, making running a large business or organization easier. However, on a personal level, I’ve been unimpressed with saving data to the cloud for a number of reasons:

  • Someone could easily obtain access to confidential information.
  • The data is inaccessible if my Internet connection is down.
  • A cloud vendor can just as easily lose the data as I can.
  • The vendor doesn’t have a vested interest in protecting my data.
  • Just about anyone with the right connections could seize my data for just about any reason.


As a consequence, I’ve continued to back by system up to DVDs and store some of these DVDs off-site. It’s an imperfect solution and I’ve often considered using the cloud as a potential secondary backup. However, when I saw the news today about Megaupload and the fact that the data people have stored there is safe for possibly two more weeks, I started reconsidering any use of cloud backup.

Just look at what has happened. The federal government has seized data from the site and then shut it down, making the user’s data inaccessible to them. If someone who uses that service for backup is having a bad day with a downed system, it just got worse. Now their data has become inaccessible to them. There isn’t any means of recovering it until someone decides to make it accessible again.

If the data does become accessible again, the users have two weeks in which to download everything and find another place to store it. Losing the personal mementos is bad enough, but to lose confidential information on top of that (think accounting data) makes the loss terrifying indeed. There is also that federal possession of everyone’s data for use in court no less. Now everyone will potentially know everything that people have stored on Megauploadthe good, the bad, and the ugly.

Of course, everyone is talking about what this means, but personally, I go along with John Dvorak in thinking that this incident gives cloud storage the huge black that it rightfully deserves. These services promise much, but I can’t see how they can possibly deliver it all. Yes, there are advantages to using cloud backup, such as the benefits of off-site storage that is outside of your location so that if an extreme disaster strikes, you should theoretically have your data stored in a safe location. Of course, there is also the convenience factor, assuming that you have an Internet connection that’s fast enough to make such backup of an entire system practical.

Cloud computing is going to remain a part of the computing environment from now on, but I think cloud backup has a lot further to go before anyone should trust it as a primary means of data storage. What are your thoughts about cloud backup? Let me know at [email protected].

Using Assoc and FType to Create a New Type

On page 74 of Windows Command-Line Administration Instant Reference, I describe how to add an Open command to an existing file type, txtfile. The txtfile type already appears in the registry, so adding a new command to it is relatively straightforward. However, what happens if you want to create an entirely new type—one that doesn’t currently exist in the Registry?

Before you can do anything, you need to open an Administrator command prompt because Vista, Windows 7, and anything else newer won’t let you make the required registry changes with a standard account. Follow these steps in order to open an administrator command prompt.


  1. Choose Start > All Programs > Accessories.
  2. Right click the Command Prompt icon and choose Run As Administrator from the context menu. You’ll see a User Account Control dialog box.
  3. Click Yes. You’ll see a new command prompt open. However, instead of the usual title bar entry, you’ll see Administrator: Command Prompt. In addition, instead of opening to your personal user folder, the prompt will display C:\Windows\system32>. If you don’t see these differences, then you haven’t opened an administrator command prompt.


Let’s say you want to include a new file extension and it’s associated type. For example, you might want to create a .RIN file extension and associate it with a type of RINFile. Once you create this association, you may want to use Notepad to open the file. In order to perform this task, you need to use two different utilities as shown in the following steps.


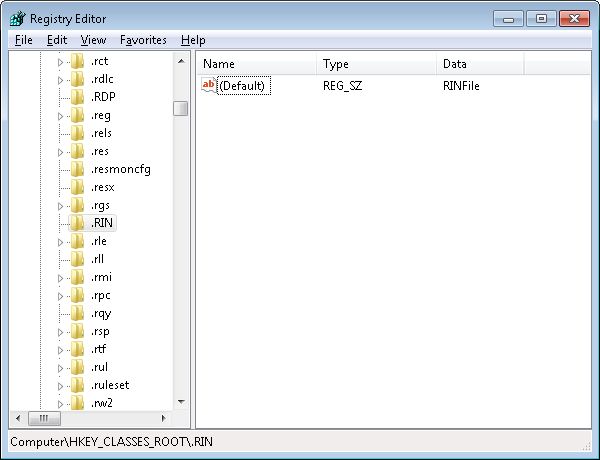
  1. Type Assoc .RIN=RINFile and press Enter. You’ll see, “.RIN=RINFile” appear at the command line. This command creates a .RIN file extension entry in the Registry as shown here.
    AssocFType01
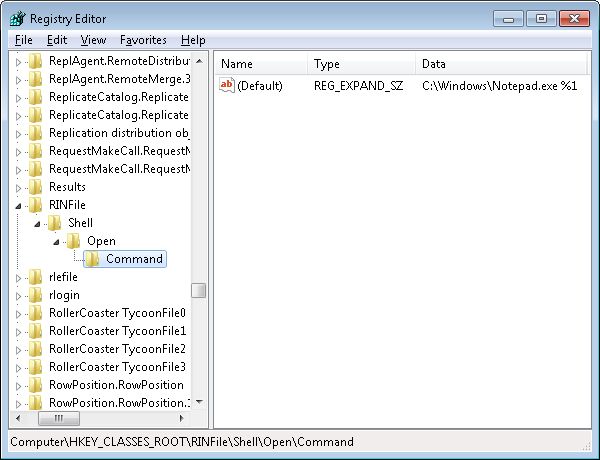
  2. Type FType RINFile=%SystemRoot%\Notepad.exe %1 and press Enter. Notice that you don’t enclose the command in double quotesit will fail if you do. You’ll see, “RINFile=C:\Windows\Notepad.exe %1” (or something similar) appear at the command line. This command creates the RINFile association in the Registry as shown here.
    AssocFType02
  3. Create a new .RIN file on your hard drive. You don’t have to do anything with it, just create the file.
  4. Double click the new .RIN file. Windows will open the file using Notepad.


This technique works with any file extension and association you want to create. In fact, you could easily create a batch file to patch user configurations where the file associations have become damaged in some way. The big thing to remember is that this is always a two-step process when the file extension doesn’t already exist or the association is new. Use the Assoc utility to create a link between any file extension and it’s association and the FType utility to create the association itself. Let me know if you have any questions about this technique at [email protected].


New RecImg Utility in Windows 8

Microsoft is constantly changing the command line, which is why books such as Windows Command-Line Administration Instant Reference get outdated. Every new version of Windows comes with new command line utilities. In most cases, these new utilities support new Windows features or allow some new level of maintenance or administration. The RecImg utility creates an image of the Windows 8 installation, including installed applications, to the location you specify. The purpose of this image is to allow a refresh of the Windows installation should something happen to it. A refresh installs a new copy of Windows, but preserves the data and application setup. In many respects, this feature sounds like a simplified version of products such as Norton Ghost. You can read about this new refresh functionality in the Refresh and reset your PC post on the Building Windows 8 site.

I find this new feature exciting because it provides the means for someone like me to recover a hard drive even if I have to support several configurations for a book. It should be possible to create as many images as needed and know that Windows will support them because the feature is built into the operating system. The basic command line for working with this utility is:

RecImg -CreateImage Location

where Location is the directory you want to use for the Windows image. As with any Windows 8 feature, the current version of the utility has problems that you can read about on the Computer Performance site. I’m assuming at this point that the utility will include additional command line switches. Otherwise, Microsoft wouldn’t have included a specific -CreateImage command line switch. Of course, the presence of this new utility means that administrators can perform image updates from a batch file or as part of automated maintenance.

I’ll keep you posted on this, and other, Windows 8 utilities as I have time to review and study them. In the meantime, let me know if you hear anything about interesting new Windows 8 utilities and utility changes. Also let me know if you hear about any utilities that Microsoft decides not to support. Often, you find out about these changes only after you’ve tried to use it in a batch file.

What is your take on this new Windows 8 feature? Let me know at [email protected].


Windows 7 and the PowerCfg Utility

On page 327 of Administering Windows Server 2008 Server Core, you find the PowerCfg utility and may not even find it all that interesting. Yes, this utility makes it possible to configure the power settings for a system from a remote location. An administrator can use it to ensure that everyone has a power saving setup by adding the command to the user’s login script. However, as utilities go, it isn’t all that interesting. For that reason, the command doesn’t even appear in Windows Command-Line Administration Instant Reference. A number of beta readers said they didn’t even use it.

Microsoft is showing an increasing interest in power management with each version of Windows. In fact, from what I’ve been reading about Windows 8, power management is going to take a relatively large leap forward (read about the changes in, “Building a power-smart general-purpose Windows“). With this in mind, the Windows 7 version of the PowerCfg utility has added four new command line switches:


  • /Requests: Enumerates the application and driver power requests. Applications and drivers make power requests to ensure that resources are available when needed. However, sometimes these requests can also become a problem when they’re abused. Power requests can also prevent the computer from automatically turning the display off or going into hibernate mode, which wastes power.
  • /RequestOverride: Forces the system to disregard an application or driver power request. The positive aspect of this command line switch is that you can enforce a power management strategy when you have applications and drivers that abuse power requests. However, by denying applications and drivers access to resources, you could also cause system instability or data loss when the application or driver crashes.
  • /Energy: Performs an energy survey of the system. This is probably the most important addition that Microsoft has made. Using this particular feature, you can detect system elements that are consuming a lot of power and reduce its energy footprint. Generally, you use this feature with just the system running to determine what the system uses. However, you can also use it with single applications open to detect the energy cost of using that application, which I think is actually the more revealing way to use this command line switch. Most people don’t associate an energy cost with using an application. This feature makes the energy cost significantly more apparent. Yes, every application you use has a cost, so keeping needless applications open is costing you money.
  • /WakeTimers: Displays a list of timers that are set to wake the system from sleep or hibernate states. Waking a system too often also costs you money. For example, it costs more to perform individual maintenance tasks at separate times than to perform them during a single time. An organization could use this command line switch to ensure that every system wakes at the same time, performs required maintenance, and then goes back into either the sleep or hibernate states.


As mentioned in the list, I consider the /Energy command line switch the most important PowerCfg addition to date. If you’re interested in self-sufficiency, as I am, then you begin to count even the pennies of energy usage. For example, in my CFLs for Free I discuss how I bought just one CFL and turned it into a complete setup for my entire home. This particular feature has allowed me to perform an energy survey of the applications I use. I found out, for example, that streaming audio using Firefox does indeed cost less than using a separate device for the purpose (such as a radio) and also delivers clearer audio. However, streaming impacts system performance and tacks a network bandwidth penalty onto other applications that rely on Internet connectivity, so there are times where using the separate device is actually better.

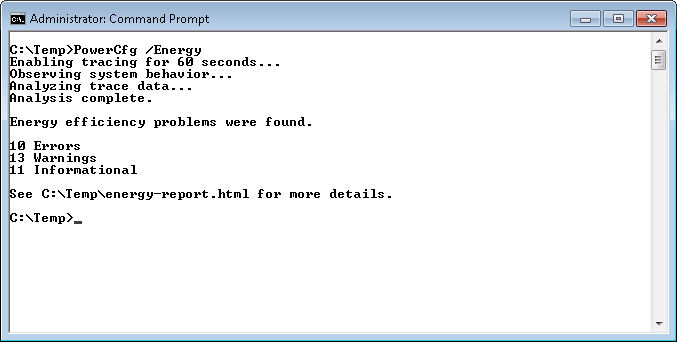
Let’s look at the /Energy command line switch in a little more detail. The easiest way to use this command is to open an Administrator command prompt, change directories to a directory you can write in (I’m using C:\Temp), and then type PowerCfg /Energy and press Enter. I purposely ran the command with a number of applications running and some misconfiguration in place to generate some errors, warnings, and informational messages as shown here.
PowerCfg01

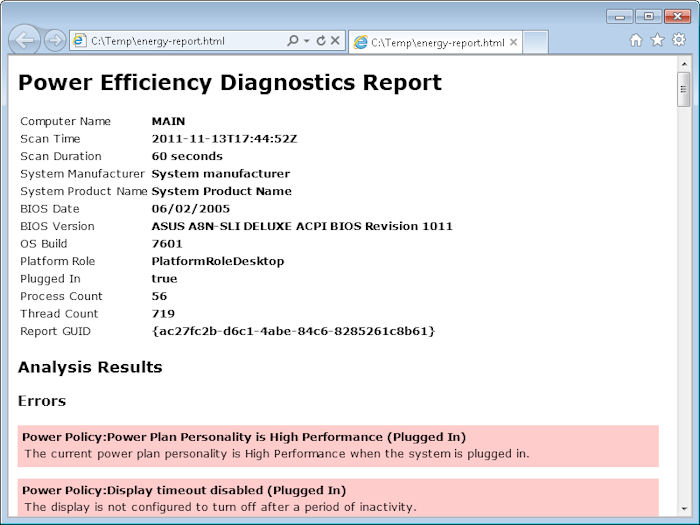
The report required a little over a minute to generate. You can see the results in the Energy-Report.HTML file. Here are the results I generated from this run.
PowerCfg02

The PowerCfg utility makes it possible to diagnose energy problems with a system and significantly reduce the cost of running it. The language of the report does require a little interpretation at times, but normally the language is plain enough for an administrator to figure out with little effort. By correcting every error and 12 out of the 13 warnings, I was able to reduce the power requirements of this system by about 15 percent (as measured by a watt meter). So, how does that equate in dollars? You use the equation: Cost = ((Watts / 1000) * Hours Used) * kWh rate, where kWh is the kilowatt hour rate provided by your power company on your electrical bill. This system was averaging a little over 520 watts before tuning it. For the sake of argument, let’s say you’re using it 60 hours per week and the electrical rate is $0.12. The weekly cost of running this system is:


((520 / 1000) * 60) * 0.12 or $3.74

After tuning this one system the power usage was only 442 watts on average. That means the weekly cost went down to:


((442 / 1000) * 60) * 0.12 or $3.18

a savings of $0.56 for this one system each week or a total of $29.12 for the year.  I have three systems that I tuned this way, so I’m hoping for a $87.36 savings from performing this tuning. Each system required about 30 minutes to tune, so I’ve made $58.24/hour from this activity. If you’ve read other posts, I do like to put a dollar figure on my time—you should too. Not many people can afford to throw away money like this and the PowerCfg utility, along with a watt meter, can help you better understand how your system uses (and abuses) power.

There are two additional command line switches you should know about when using the /Energy command line switch. The /Duration:Time command line switch changes the duration from 60 seconds to some other value. For example, if you want to change the duration to 120 minutes, you’d type /Duration:120. Longer testing times are often required when you’re trying to determine how an application is using energy. Take my advice and don’t set the duration lower than the default 60 secondsyou’ll be disappointed with the results.

The /XML command line switch outputs the data in XML format so that you can incorporate the information into a database. If you have a large setup, the XML format is absolutely essential. No one has time to look at individual HTML pages. Using XML output and a centralized database also makes it possible for you to look for organization-wide trends, which could produce even bigger savings.

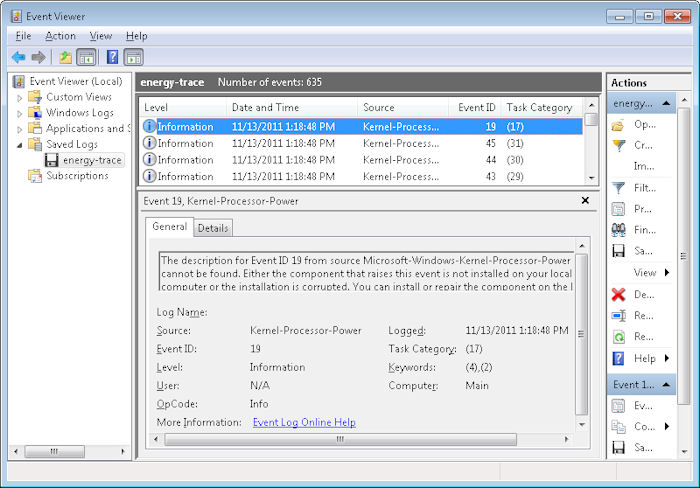
The /Energy command line switch can also be used with the /Trace command line switch to trace energy usage without performing any analysis. This output isn’t as helpful or as accessible as using the /Energy command line switch alone. The output is an Event Trace Log (.ETL) file. To view this file, open the Event Viewer console found in the Administrative Tools folder of the Control Panel. Right click the Event Viewer folder and choose Open Saved Log from the context menu. You’ll see a dialog box asking whether you want to convert the .ETL file into the new format used by Windows 7. Click Yes. You’ll see a list of energy events like the ones shown here.
PowerCfg03

By carefully reviewing the events, you can discern energy usage patterns, filter data about specific events, and perform other analysis. However, this raw data is a little hard to use and the administrator would be better off generating the report, unless your organization has an application designed to analyze the raw data in some way.

So, how do you save energy in your organization? Do you rely on specialized tools such as a watt meter and PowerCfg? If not, how do you tune your equipment to deliver optimum service and minimum cost? Let me know at [email protected]


Obtaining Command Line Help

Both Administering Windows Server 2008 Server Core and it’s more diminutive counterpart, Windows Command-Line Administration Instant Reference, are reference manuals that tell how to use the command line to perform specific tasks. The first book is more complete, in that it contains many uncommon commands and utilities. The second book is designed to provide more hands-on help by supplying a significant number of actual usage examples. In both cases, you get a significant amount of help about the commands. As long as you have one of these two books by your side, you’re in great shape for knowing how to use the commands at the command line. Unfortunately, the reality is that most of us don’t stuff a library full of books in our back pocket. Even with an e-Reader, such as the Kindle, you can be sure of having the device available every time you need it. So, how do you get at least some quick help when there aren’t any resources available?

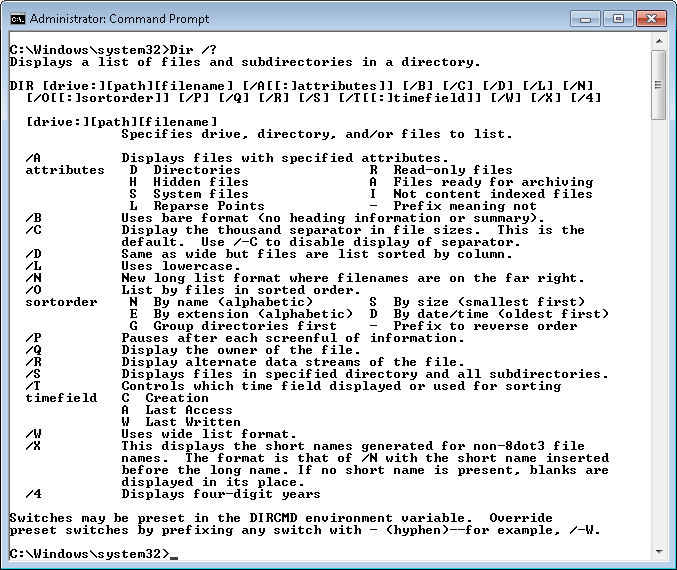
The first thing to remember is that you can get at least some useful information for any command or utility by using the /? or -? command line switches (some commands and utilities are peculiar in that they require either the /? or the -? command line switch, while many will allow you to use either). For example, when you want to discover how to use the Dir command, you type Dir /? and press Enter. Here’s typical output when using the /? command line switch.

GettingHelp01

This help screen is also typical in showing what you get. Help normally includes a short description of the command, the command line syntax, and a short description of each of the command line switches. You may also see usage examples for more complex commands. In rare cases, the help screen will provide an URL for additional help.

Some commands and utilities are complex enough that they require several help screens. For example, if you type WMIC /? and press Enter, you’ll see a list of help topics, not help of the sort provided for the Dir command. Let’s say you want to know more about the CPU topic. So, now you type WMIC CPU /? and press Enter. The help looks a little more normal now, but still isn’t very complete because you need to choose a subcommand. Perhaps you want just a list of CPUs on a system, so you request information about the List subcommand by typing WMIC CPU List /? and pressing Enter. Wow, now you see a number of listing formats. This time you add a listing format by typing WMIC CPU List Brief /? and pressing Enter. It turns out that you can also discover information about command line switches used with the Brief format. The final level in this case is to type WMIC CPU List Brief /Translate /? and press Enter. The WMIC utility is unique in providing so many levels of help, but other complex commands and utilities, such as Net, do provide multilevel help.

No matter how many help screens you see, sometimes it isn’t enough to give you the help you need. That’s when you need to find your copy of my book to get additional information. Of course, a single book can do only so much—some complex commands and utilities may require still more information. Technet is a good place to start. For example, you can find an excellent article on WMIC at http://technet.microsoft.com/library/bb742610.aspx. Knowledge base articles also provide useful information, especially when it comes to issues that Microsoft has solved for a given command or utility. For example, the Knowledge Base contains an article entitled, “How to find computer serial number” that relies on WMIC. Finally, make sure you look at third party articles, such as the one entitled, “WMIC: the best command line tool you’ve never used.”

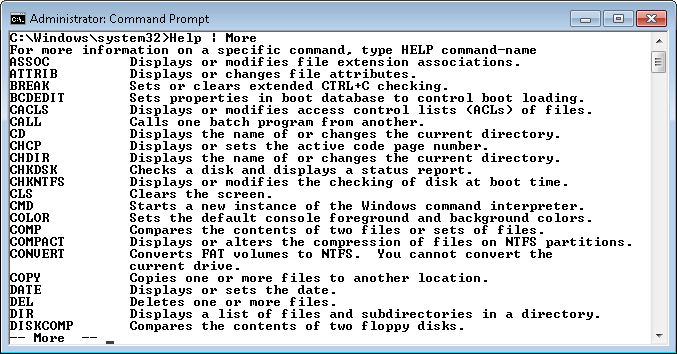
Many people complain about not being able to remember all of the commands and utilities, and this is a problem. After you use a command or utility often enough, you tend to remember it, but the memorization process can take time. Unfortunately, there isn’t any single quick method of finding every command or utility on a system. However, you should start by typing Help | More and pressing Enter. (Using the More command lets you see the information that a utility has to provide one screen at a time, rather than seeing the information scroll right past.) You’ll get a list of common commands like this one.

GettingHelp02

Not all of the commands appear on this list and none of the utilities do. Another way to obtain the information you need is to type Dir *.COM and press Enter in the \Windows\system32 directory. (You can type CD \Windows\System32 and press Enter to get to the appropriate directory.) Every directory entry you see is very likely a utility. However, many utilities are in .EXE form, so you also need to type Dir *.EXE | More and press Enter. You can eliminate files that contain more than eight letters in the filename from the list in most cases because command line utilities usually rely on the old 8.3 naming convention. Check filenames that look like they could be what you want by typing Filename /? and pressing Enter (where Filename is the name of the file you want to test). Useful command line utilities will generally display a help screen.

Now that you have a better idea of how to get command line help when you need it and where to obtain a list of useful commands and utilities, you should take some time to try it out for yourself. What techniques do you use to obtain the additional information you need at the command line? Let me know at [email protected].