IPython Magic Functions

This is an update of a post that originally appeared on April 25, 2016.

All of my current Python language books (and those I collaborated on with Luca Massaron): Machine Learning Security Principles, Algorithms for Dummies, 2nd Edition, Beginning Programming with Python For Dummies, 3rd Edition, Python for Data Science for Dummies, and Machine Learning for Dummies, 2nd Edition allow use of Jupyter Notebook (through Anaconda) or Google Colab to interact with the example code. Both of these IDEs extend the development environment in a number of ways, one of which is the use of magic functions. You see the magic functions in the code of these books as calls that begin with either one or two percent signs (% or %%). The most common of these magic functions is %matplotlib, which controls how IPython Notebook or Jupyter Notebook display plot output from the code.

You can find a listing of the most common magic functions in the Python for Data Science for Dummies Cheat Sheet. None of my books use any other magic functions, so this is also a complete list of magic functions that you can expect to find in our books. However, you might want to know more. Fortunately, the site at https://damontallen.github.io/IPython-quick-ref-sheets/ provides you with a complete listing of the magic commands (and a wealth of other information about Jupyter Notebook).

There are differences in magic function support between Jupyter Notebook and Google Colab, some of which are outlined in our books as needed. None of these differences will significantly affect your learning experience. However, it pays to know that Jupyter Notebook and Google Colab are only mostly the same, not precisely the same, and you’ll encounter differences. The screenshots in my books reflect the Jupyter Notebook version supported by that book, so what you might see on your screen when using magic functions in Google Colab may differ from the book.

Of course, you might choose to use another IDE—one that isn’t quite so magical as Jupyter Notebook or Google Colab. In this case, you need to remove those magic commands. Removing the commands generally won’t affect functionality of the code. The example will still work as explained in the book. However, the way that the IDE presents output could change. For example, instead of being inline, plots could appear in a separate window. Even though using a separate window is less convenient, either method works just fine. If you ever do encounter a magic function-related problem, please be sure to let me know at [email protected].

Getting a Good Anaconda Install

Some people may have misinterpreted the content at the beginning of Chapter 3 in Python for Data Science for Dummies. It isn’t necessary to install the products listed in the Considering the Off-the-Shelf Cross-Platform Scientific Distributions section starting on Page 39. These products are for those of you who would like to try a development environment other than the one used in the book, which is Anaconda 2.1.0. However, unless you’re an advanced user, it’s far better to install Anaconda 2.1.0 so that you can follow the exercises in the book without problem. Installing all of the products listed in Chapter 3 will result in a setup that won’t work at all because the various products will conflict with each other.

Because Continuum has upgraded Anaconda, you need to download the 2.1.0 version from the archive at https://repo.continuum.io/archive/.There are separate downloads for Windows, Mac OS X, and Linux.  The chapter tells you precisely which file to download.  For example, for Windows you’d download Anaconda-2.1.0-Windows-x86_64.exe. The point is to use the same version of Anaconda as you find in the book. You can find the installation instructions on Page 41 if you have a Windows system, Page 45 if you have a Linux system, or Page 46 if you have a Mac OS X system.  Make sure you download the databases for the book by using the procedures that start on page 47.

Following this process is the best way to ensure you get a good installation for Python for Data Science for Dummies. Luca and I want to make certain that you can use the book to discover the wonders of data science without having to jump through a lot of hoops to do it. Please feel free to contact me at [email protected] if you have any questions about the installation process.


Using Jupyter with Anaconda (Updated)

A few readers have recently written to me regarding the use of Jupyter with the downloadable source for Python for Data Science for Dummies. The version of Anaconda recommended for the book, 2.1.0, doesn’t rely on Jupyter, which is why the book doesn’t mention Jupyter. The book relies on IPython Notebook, which is what you should use to obtain the best reading experience. You can obtain the proper version from the Continuum archive. However, if you choose to download the current version of Anaconda, then using Jupyter becomes a possibility; although, many of the procedures found in the book will require tweaking and the screenshots won’t match precisely.

In order to use Jupyter, you must still import the downloaded files into your repository. The source code comes in an archive file that you extract to a location on your hard drive. The archive contains a list of .ipynb (IPython Notebook) files containing the source code for this book (see the Introduction for details on downloading the source code). The following steps tell how to import these files into your repository:

  1. Click Upload at the top of the page. What you see depends on your browser. In most cases, you see some type of File Upload dialog box that provides access to the files on your hard drive.
  2. Navigate to the directory containing the files you want to import into Notebook.
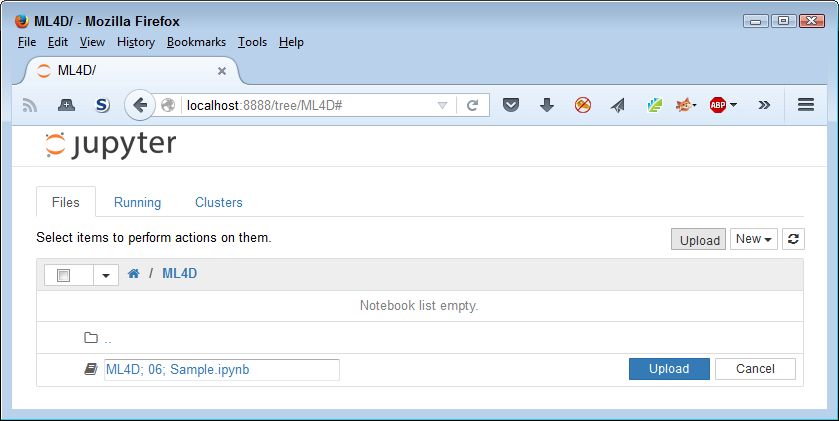
  3. Highlight one or more files to import and click the Open (or other, similar) button to begin the upload process. You see the file added to an upload list, as shown here. The file isn’t part of the repository yet—you’ve simply selected it for upload.

    Click Upload when you want to upload files to the repository.
    Upload Source Files to the Repository
  4. Click Upload. Notebook places the file in the repository so that you can begin using it.

It’s important to both Luca and me that you have the best possible learning experience with our book. This means using the right version of Anaconda for most people. Using the latest version shouldn’t cause problems, but we’d like to know if it does. Please feel free contact me at [email protected] with your book-specific questions.


Update

It has come to our attention since this post first published that using the latest version of Anaconda with Python for Data Science for Dummies is problematic. Some of the examples won’t work without rewriting because the Pandas Categorical class has changed. This is the only change we’ve confirmed so far, but there are no doubt other changes. In order to get the proper results from the examples in the book, you must use the correct version of Anaconda, version 2.1.0.

Please do keep those questions coming. It’s because a reader took time to write that Luca and I became aware of this problem. We truly do want you to have a great learning experience, so these questions are important!