Fighting Dry House Conditions

Anyone who knows me, knows I love my wood stove. It keeps my house toasty warm. The floors, walls, and ceilings are all warmed so that I can walk around barefoot in my 68 degree house if I want. Just try doing that in a house heated by a furnace! So, there is no doubt that I’ll continue to enjoy the benefits that radiant heat can provide.

There are down sides to everything and heating a house tends to produce really dry air. My furnace has an Aprilaire whole house humidifier attached to it. On those rare occasions that I do use the furnace, my Aprilaire adds much needed humidity to my really dry house. Of course, not everyone has such a device, so houses heated with furnaces can suffer from a lack of humidity too. Fortunately for us, a HVAC can give us the help we need to do deal with a humid home. A friend of mine had this issue and found that a local service similar to Complete Comfort Plumbing Heating & Air (completecomfort-hvac.com/areas-we-serve/aliso-viejo-ca/) could help him install a system into his home which dealt with the humidity.

Horridly dry air has a number of nasty side effects. For example, you might find that you literally can’t breath because your nose is so dry. Petting the cat becomes an experiment in shock therapy (and don’t even think about brushing the dog). You could see damage to your furniture as well. The glue joints tend to fail when the humidity is too low. So, there are both health and monetary issues to consider when it comes to winter heating. The issue that seems to elude most people though is that humid air is able to support more calories than dry air. This means that really dry air actually feels cooler than humid air heated to the same temperature. Humidity that causes you to sweat in summer keeps you warm in winter, so having a good HVAC system could not only regulate the air in your home but help to keep your family warm in the winter and cool in the summer. You can Read more here.

Over the years I’ve come to believe that keeping a house as humid as possible in the winter (within reason, you really don’t want the walls dripping either) is a good idea. But when it comes to the summer months, some people can’t think of anything worse than having a humid home. Who could blame them? You would literally be sweating all of the time. That’s when places similar to this Air Conditioning Repair Houston company come in useful. If your life-saving air conditioning system malfunctions, you won’t be receiving that cold air that helps to cool you down, so what happens? You’ll feel even hotter. If that happens, (just like it did to my friend last week), you should get it fixed as soon as possible. For me though, I welcome the feeling of humidity, especially in the winter months. When my hygrometer (a humidity measuring device) reports 60 percent, I’m quite happy. Even 50 percent is worthwhile achieving. The problem is that with wood heat, you don’t have an Aprilaire to help out.

Assuming that your wood stove provides a place to put one, the first course of action is to get a couple of inexpensive soup pots-big ones. Actually, you might be able to get one almost free at a thrift store or garage sale, so look around to see what you can find. Fill them with water and put them on the wood stove. The heat will evaporate the water inside and produce humidity for your home. If you want, you can add wood stove simmering spices to make you home smell nice as the water evaporates. The people living with you in your closed up house will appreciate the fragrance. My stove will accommodate two pots, so I have two really large pots going most of the time (one is removed when I want to heat water for tea, heat something up, or make soup).

Sometimes using the pots just doesn’t help enough, unfortunately. It’s during those times that I leave the bathroom door open when I shower and turn off the ceiling fan. The ceiling fan normally takes the humidity outside, which is a really good thing to do in summer when you don’t want things rotting inside the house. During the winter, it seems like a better idea to allow the steam to get out into the house. Of course, you’ll need to exercise more caution to ensure everyone keeps their privacy intact. We actually have a few Ceiling Fans in our home. I think that they are such classic pieces that never go out of style. Plus, they help to control the temperature in your rooms so they are incredibly useful.

Winter is also a dandy time to make soup. It’s possible for me to make soup on my wood stove when it’s completely fired up. However, there are a lot of times where I still need to use the stove. In those cases, I keep the stove’s vent fan off so that the steam from the soup stays in the house. Not only does the house get humidified, but it also helps build a healthy appetite.

I’m sure by now someone is wondering why I haven’t mentioned the obvious-a humidifier. Yes, a humidifier will do the job and yes you could use one, but all of the other techniques I’ve mentioned are free. A humidifier will cost money to purchase, maintain, and operate. In the long run, using every free technique at your disposal first is the best idea. Let me know your ideas on humidifying a home at [email protected].

Shoveling It!

There is nothing quite so pretty as the sun glinting on new-fallen snow. The landscape is whitewashed. The brown and dying leaves are covered over and hidden from view. There is even a crisp clean scent in the air that is impossible to reproduce at any other time of the year.

When you live in the north, it is important to prepare for less than ideal winter conditions. Because of the threat of ice underfoot and snow overhead, a walk from the house to an unattached garage or barn can be a major challenge. Over the years, we have adapted some tools and developed some strategies to help us stay safe. Here are some suggestions:

  • A good shovel is a good investment. Take the time to handle any shovel that you are going to purchase before you spend money on it. Test it out in the store to make sure that you are comfortable with how it feels and moves in your hands. Slide it along the floor. Lift your coat with it (to mimic the lifting of snow). Try before you buy it. There are some great ergonomic shovels out there, but there are also some gimmicky tools as well.
  • Spray the edge of the shovel with a product like Pam cooking spray or dry silicone spray to make the snow slide off easier. Wet silicone lubricants, such as WD40, don’t work for this purpose because they have alcohol or other solvents in them that can actually melt snow, making it stick to the shovel.
  • New fallen snow is easier to shovel. Getting out into the snow before it gets too deep will give you a better result when clearing driveways or sidewalks. Yes, you may have to shovel a couple of times, but for good traction, it is best to clear down to the surface. If the snow is removed before the first person steps on it, it clears much better.
  • Be ergonomic when shoveling. Start slowly. Use several different styles for moving the snow, rather than repetitive motions over the whole job. This will exercise different muscle groups. If the snow is wet and heavy, lift smaller loads with each shovelful.
  • If you aren’t able to get clear ground underfoot, install handholds. Adding handrails down the stairs and along the sidewalk can save you from a dangerous fall. Ski poles can be stored by the door and used to help you walk over icy and snowy ground.
  • If you are doing lots of outside chores, there are several styles of boot cleats that grip the icy ground very securely. They can be found in most sporting goods stores, usually in the ice fishing section.
  • Lastly, there are several different types of snow melting products to help with traction on your walks and driveways. Read the instructions carefully and follow instructions. Stay current with local ordinances for their usage in your location.

If the snow is light enough, you can use a leaf blower to remove it from the walks quite quickly and with little strain. Walking upright will also reduce the risk of falls. Always be sure to wear hearing protection when you use a leaf blower. Even if the sound is less noticeable on a snowy day, you can still damage your hearing. There are a few machines on the market which are great for noise pollution. For instance, if this was a concern to you, you may want to check out this Ryobi RY40402A Super Powerful Cordless Jet Fan Blower Review.

Waking in the morning to a bright shiny day is one of the benefits of living in the snowy north. Staying safe while walking and shoveling will give you the chance to “slide” when you have your sled or toboggan in hand.

If you have any tips or stories about making it through the winter, I would love to hear about them. Please leave a comment here, or email John at [email protected].

Stay Safe and Warm this Winter!


In Praise of the Humble Potato

You say Po-TAE-to and I say Po-TA-to.

Kennebec. Pontiac. Norland Red.

Burbank. Russet. Yukon Gold.

Even the names are beautiful, humble and poetic.

So useful. So nutritious. So versatile.  So comfortable and comforting.

Just in case you’re wondering, all Russet potatoes are Burbanks, but not all Burbank potatoes are russet. The Russet Burbank is described as a natural genetic variant of the Burbank potato. It has a russet-colored skin that visually identifies this potato type. The Russet is the world’s predominant potato used in food processing, so you have probably seen a lot of them and eaten even more.

I grew up in a meat and potatoes household. Although my mom grew a garden full of a wide variety of vegetables, my dad really only believed that there were 4 kinds of vegetables worth eating. Those were corn, peas, beans and potatoes.   As a result, most of our meals were created with those basics but there was always plenty! If we didn’t have enough production of potatoes from the garden, my dad would stop by a roadside stand in the fall and buy a bag of 100 pounds for about $4. That would last us through the winter and into the early spring.   In the fall, potatoes are at their least expensive and best quality compared to any other time of year. Buying them in bulk and storing them is as good an investment now as it was when my dad was doing it in the 60’s.

Storing potatoes is one of the earliest self-sufficiency skills I learned. We always lived in an old house with an unfinished cellar. We would put the potatoes down in the basement in a barrel and just go to collect what we needed when it was time to make supper. Once in awhile we would come in contact with a slimy potato that had to be tossed out. We were warned that we should always bring up anything that had been in contact with the bad potato so they could be used right away. As kids, the science wasn’t explained to us. It was just the rule. Now that I understand the science, it’s still a rule that I live by.

Here are some rules for successful potato storage:

  • Choose a potato variety that is appropriate for storage.  My favorite is Kennebec.  Some like Russet.  There are others.  The grocer or garden center should be able to tell you which potatoes are going to be good for storing.  You can also go online to find the attributes for most vegetables.
  • Raw potatoes should not be washed before storing. Remove the big chunks if you have been digging during a wet season.  However, a powdery coating of dry soil toughens the skin and helps them stay dry longer in storage.
  • Check all potatoes over for spade cuts or bad spots. If there are soft spots, cut away the bad section and use only the good one or discard the whole potato.
  • Do NOT store anything with a bad spot or spading fork cut.
  • After sorting, store the unwashed raw potatoes in any place that is dry, cool (but not cold) and dark. Exposure to sunlight will cause the skin to go green, get bitter and can cause illness if you eat a large quantity.
  • Frequently check your stored potatoes for any that have developed soft spots and discard them immediately when you find them.
  • Wash and dry any potatoes that are in contact with a bad one during storage.  Keep it apart so it can be used soon.

With smaller houses and less storage space, it is still possible to find good storage for potatoes. One way is to store them in milk crates in a pantry, cool closet or heated garage alongside an outer wall. If the area has a window, drape a heavy cloth over the whole stack. With the coolness  of the wall, the airflow created by the construction of the milk crates and the dark provided by the cloth, it works beautifully. As the potatoes at the top are used, take the crates out to store and start on the crate below it.

Also, if you have a rarely used, cool bedroom; a layer of crunched up paper under potatoes in an under-the-bed container is the perfect place for storing them. Winter squash and pumpkins can be stored there also!  The main idea is to keep them dry, dark and cool but not frozen.

Another favorite way to store potatoes is simply to put your pressure canner into play.  

As with other vegetables, canning potatoes is a great way to control the salt level and quality of the food as well as customizing the cut of the finished product.

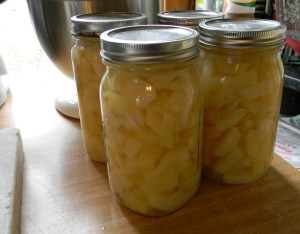
Quart Jars of White Potatoes cut into cubes
Fast Food at its Finest!
  • For best results, the potatoes should be washed and peeled before cutting into your favorite shapes – slices, cubes, shreds or small whole potatoes.
  • A mandolin is a useful tool when cutting potatoes into thin, even slices. Be very careful when using a mandolin because it has an extremely sharp edge. 
  • A French fry cutter is great for making cubes. Simply put the potato through the cutter and then cut the ‘fries’ into chunks. This cuts the potatoes into really nice sized cubes. 
  • Always follow the instructions for canning that came along with your pressure canner. 
  • Do NOT try to pressure can anything completely absent of salt.  A little salt is absolutely necessary for successful canning.

Once the potatoes are processed and cooled they are ready to eat! You can rinse them, cold and use them in potato salads. You can microwave them to have them warm. You can mash them with garlic and butter. You can drain them, dry them and fry them with your favorite seasonings for fantastic hash browns. In a pinch, you could eat them straight from the jar! 

The potato is the workhorse of the pantry. It is low in saturated fat and sugar.  It has no cholesterol or sodium unless you add it. It is also high in potassium and vitamin C as well as very high in vitamin B6, the vitamin that helps to improve moods. 

If you have stories or recipes using potatoes, I would love to hear from you. Please share them by adding your comment to this post or contacting John at [email protected].


A Little Pressure

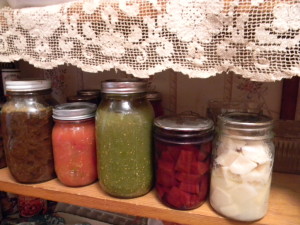
From Left to Right:  Beef, Carrots, Green Salsa, Beets, Potatoes All canned using a pressure Canner
From Left to Right: Beef, Carrots, Green Salsa, Beets, Potatoes
All canned using a pressure Canner

As I was growing up, I helped in the  kitchen quite a bit, especially during canning season.   We had several big blue (water bath) canners that were used for pints and quarts of all kinds of tomato products as well as jams and jellies.  I never saw my mom use a pressure canner.  One day I asked her—why? It turned out that before I  was born, she and her mother  were working with a pressure canner.  They went into the other room for something and forgot to check on it until they heard the pressure value and gasket blow off.  A jar had broken inside and the vegetables had clogged the pressure  valve. The content of canner spewed into the air, all over the kitchen!  Seeing this chaos—and cleaning up the mess afterward—convinced my mom never to can anything under pressure while there were kids around, just in case.

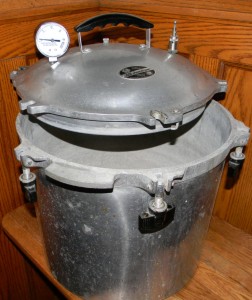
So it wasn’t until I was a young wife that I convinced my Aunt Betty to teach me about pressure canning.  After doing some research, we went together and bought a pretty expensive “All-American” brand  canner.

With a new pressure gauge and careful storing, this 30+  canner is still going strong.
With a new pressure gauge and careful storing, this 30+ canner is still going strong.

It has a metal to metal construction with 6 turn-screws to hold the lid in place.  It is extremely safe.  For the amount of food that I process, it was a wonderful investment.  I think of my Aunt Betty every time I use it.

Here are some safety tips to use if you decide to dive  into the world of pressure canning.

  • READ THE INSTRUCTIONS CAREFULLY.
  • Familiarize yourself with the equipment to make sure that you know exactly how it works before using it to process food.  Be sure you know how much water is needed (a metal yardstick works well to measure the depth of the water) and how many jars should go in a batch.
  • Follow the recipe exactly, at least the first time you are making something new.  The herbs and spices used during the canning process develop as the product cools and is stored.  After opening it, you can decide whether you want to change the recipe for next year’s harvest.
  • Invest in good equipment and treat it with respect.  You don’t necessarily need new equipment.  Garage sales and thrift stores often have sturdy equipment for sale.  Watch for breaks, holes, scorch marks or cracks in the metal.  These are sure signs that the canner has been used for something other than its original purpose.
  • Replace the rubber seals regularly, if your canner uses them.
  • Replace the pressure valve if it is showing any sign of wear. It is important that this part of the canner be accurate.
  • Stay in the kitchen while the pot is cooking. In this case, a watched pot is a good thing. The canner will build up to pressure.  The stove must be adjusted to keep it at the right  pressure throughout the whole canning time.  If the pressure is under the required amount—the food won’t cook correctly.  If the pressure goes over—there is risk of breaking jars and messes in the kitchen.
  • FOLLOW THE INSTRUCTIONS for cooling down the canner.  Remember there are glass jars inside and they are very fragile in this state.
  • Do NOT open the canner until the pressure has naturally gone down to zero, according to the pressure gauge.  This part of the process cannot be hurried.
  • Remove the jars carefully and finish them according to the recipe.  Putting a towel on your table  or counter will keep the area drier and reduce the risk of the jars bumping together.
  • After the jars are cool, inspect them to make sure they have sealed properly.  If any fail to do so, put it in your refrigerator to use right away.
  • LABEL jars with contents and the year, before putting it into your pantry,

All in all, pressure canning is a great way to store your harvest,  You have control of exactly what is in your food.  Many recipes can be adapted for special diets. And, the jars  look so pretty in your pantry! If you have stories about your pressure canning experiences or any questions, please share them by adding your comment to this post or contacting John at [email protected].


It’s All in the Engineering

A considerable amount of my time in fulfilling the self-sufficiency dreams Rebecca and I have is spent building new items and repairing existing items. Existing equipment of all types requires constant maintenance as well. If you leave a cage exposed to the elements long enough, it’ll simply rot away. Everything has a tendency to fail without some sort of maintenance. All of these efforts—everything from building to maintaining to tearing down when an item is no longer useful—relies on some sort of engineering principle. If you want to get water to your garden, but the hose diameter is too small, the resulting trickle will only serve to frustrate you. Building shelves that don’t rely on proper engineering principles are downright dangerous. Installing electrical elements without regard to the amount of current the circuit needs to handle will almost certainly result in a fire. In short, in order to know in advance just how well something will work and what you need to do to maintain it, you need to know the engineering behind it.

In the Building Larder Shelving post, you learned about the engineering behind building shelves that will hold up to the weight of canning jars, which is considerable. This is just one of many posts that I’ve created that define the math behind self-sufficiency. If you ever find an error in my calculations, please let me know so that I can provide an update with the correct information. It’s also important to realize that my calculations are for a specific project type and you need to use them with your project in mind (making any required changes).

Fortunately, there are other places where you can find interesting information about engineering principles. One of the best places I’ve found recently (as passed on by a friend) is Engineering Toolbox. This site provides all sorts of useful information about various engineering disciplines, including how to create the proper sort of concrete for a project that you have in mind. If you were to mix the concrete without using a recipe, you’d either end up spending way too much money for your project or you’d end up with a project that won’t hold up to any kind of abuse.

It’s incredibly dangerous to take on a building or maintenance tasks for which you lack the proper equipment or training. Always make sure you understand not only the engineering behind the task, but that you also adhere to any required building codes and obtain the proper permits and inspections, as required. More than a few people have gotten hurt by not taking the proper precautions, so always verify that every step of a process you perform is done correctly before you proceed to the next step. The care you take in performing self-sufficiency tasks will always pay dividends in your personal safety and the longevity of the project.

Finding the right site to discover just how to create, maintain, and tear down the equipment needed to be self-sufficient can be an adventure akin to the mysteries solved by Holmes. You need to exercise care in using the information you find and verify that information across several different sites to ensure it’s accurate. Of course, there always comes a time when you’re simply in deep water and need the help of a professional. Some professionals will mentor you in building your project (for a fee in most cases); others will let you help them perform the task so that you gain needed knowledge and experience.

Building and maintaining your equipment can be a lot of fun. However, doing it the wrong way can be a disaster. Let me know your thoughts about building and maintaining equipment at [email protected].


Preparing for Planting

It may seem a bit odd to talk about planting in the middle of winter, but this is actually the time that many avid gardeners, especially those interested in self-sufficiency, begin to think about the planting season. Of course, the planning process starts in the larder. Even though there is a catalog in your hand at the moment, the catalog doesn’t do any good until you know what to order and your larder contains that information.

As part of the preparation process, you should go through the larder, ensure all of the oldest items are in the front of the shelves, verify that all of the jars are still sealed, and wash the jars to keep them clean. Make sure all of the jars are properly marked with both food type and year canned as well. The process of organizing your larder and keeping it clean is important because doing so will make it a lot easier to determine what to plant. Once you complete this task, you can perform an inventory to determine what items are in short supply. These are the items that you need to order from the catalog.

Sometimes you can use your larder as a jumping off point for dreams of things you’d like to try in the future. For example, until last year, our larder lacked pickled asparagus—now I wouldn’t be without it. However, before we could pickle the asparagus, we had to grow enough to make the effort worthwhile, which meant planting more asparagus and waiting several years for it to get old enough to produce a decent crop. Yes, the larder was the start of our dream and the catalog provided us with ideas on how to achieve our dream, but in the end, the realization of our dream happened in the garden and in the kitchen.

Our larder also holds our canning supplies and equipment. This is the time of the year when you should perform an inventory of these items as well and ensure they’re in good shape. For example, the seal and pressure relief value on your pressure canner requires regular replacement—we simply make it a practice to replace these items before the start of the canning season because doing so is inexpensive and reduces the risk of mishap in the kitchen later. No matter where you store your canning supplies and equipment, now is the time to maintain them.

Writing your needs down as you discover them is a great idea. Check out the various catalogs you receive starting this time of year to determine which products will best suit your needs. It’s unlikely that you’ll completely fill your garden with just the items you need from the larder. The catalog will also supply ideas for new items you can try. Sometimes we try a new variety of vegetable or fruit just to see how it grows in this climate. Over the years we’ve discovered some items that grow exceptionally well for us (and also experienced more than a few failures).

Don’t just address your main garden, however. It’s also time to check into herbs and address any deficiencies in the orchard. This is the time for planning. Trying to figure everything out later, when you’re already engaged in preparing the garden, will prove difficult and you’ll make more mistakes than usual if you wait.

It’s also important to start ordering as soon as you know what you need. The catalog companies won’t send you product until it’s time to plant. However, they do use a first come, first served policy. Other gardeners are already order products. If you wait, you may not get your first choice of items and may have to reorder later.

Planning is an essential part of a successful year in the garden and orchard. However, I also enjoy starting the planning process this time of the year because it makes winter seem a little less severe. A little spring in winter is like a breath of fresh air. What sorts of things do you do to prepare for spring? Let me know at [email protected].


Preparing Eggs for Sale

It may not seem like a particularly important topic at first, but if you plan to sell some of your eggs, you must prepare them for sale properly. Otherwise, you’ll quickly lose your customer base. No one will say anything to you about the reasons for not buying your eggs—they simply won’t buy them. After a while, you’ll be left with a lot of eggs on your hands and no buyers.

When you get the eggs from the coop, make sure you wash them. This might seem like an obvious thing to do, but some people have actually tried to sell unwashed eggs, which is hazardous to a customer’s health, as well as unappealing. I normally use Dawn Antibacterial soap to wash the eggs and then rinse them thoroughly. The soap ensures that the outside of the egg is free of pathogens. Of course, you need to perform this process carefully or else you’ll end up with a lot of unsellable eggs.

After you allow the eggs to air dry (or dry them carefully with a towel), you need to inspect them carefully. Any flawed eggs go into my personal pack. Eggs with cracks are cooked thoroughly and fed either to the dogs or cats. There isn’t a good reason to waste good protein, but if the egg has any cracks at all, you can’t vouch for the integrity of the content. A mix of egg, rice, and leftover meat makes for a dandy addition to your pet’s daily food. Sometimes I throw in a few leftover vegetables as well.

We don’t have any roosters. If we did, we’d also need to candle the eggs to ensure there were no embryos inside. Because we buy our chicks from other places, we won’t ever have roosters for our laying hens. You need to decide on whether to keep roosters based on your particular egg laying needs. However, it’s still possible that our eggs could have a blood spot in them. We simply offer our customers a replacement egg should this happen. So far, it never has, but it could happen given that our chickens are free range. Theoretically, you can candle the eggs to find this sort of problem, but it’s still possible to miss it, so having a replacement policy is the best way to go.

At this point, you have a number of washed eggs that lack flaws. It’s time to weigh them using an egg scale. I generally keep small eggs for my personal use. Medium-sized eggs are sold at a discount, traded for something I need, or given to friends and neighbors. The large and jumbo eggs are placed into cartons and sold at full price.

Create an attractive display for your eggs. For example, I’ve set up kid friendly egg cartons. The cartons will contain an attractive mix of blue, green, brown, tan, and speckled eggs (the range of colors the hens lay). Placing the eggs in some sort of pattern also helps. Even though the inside of the egg is the same in all cases, the eye catching patterns really help to sell your eggs to the public. Of course, adults may prefer a less colorful display, which means grading the eggs by color and placing like colors in a carton. The point is to make your eggs look especially nice.

Preparing your eggs properly will help keep you in sales. In fact, a combination of high quality and classy presentation will usually net you more customers than you can accommodate as long as your prices are also in line with what the market will allow. Let me know your thoughts on egg preparation at [email protected].


Engaging in the Fall Cleanup

For many people, fall is a time when they cut the grass the last time, take their car to the mechanic for winterization, check for air leaks in the windows, and ensure the furnace will run. These common chores affect anyone involved in self-sufficiency as well. For example, you still need to get your car ready—assuming you have one.

However, fall cleanup requires a lot more from anyone engaged in self-sufficiency because there are more facets to their environment. For example, fall is the time when you need to ensure your animal cages are completely cleaned. (Yes, you also clean them at other times, but fall is when you take everything apart and really clean it up.) If some of your animals are outdoors, you need to ensure they’ll have sufficient cover for the winter months. For us, that means scrubbing down every one of the rabbit hutches and letting them dry before we put a rabbit back inside. In addition, we add any manure under the cages to the compost heap. The chicken coop needs to be cleaned completely, the old hay replaced, and the windows closed. I also make sure I wash the window so the chickens can see out. It turns out that chickens like a nice view too.

Of course, you take the garden down after picking any remaining goodies and plant your winter rye to prevent erosion. The fall is a good time to look for potential soil issues and possibly get a soil test so that you know how to deal with problems the following spring. Likewise, your herb and flower gardens require attention so that any perennial plants will make it through the winter. However, don’t put mulch on immediately. Wait until the garden is frozen and then put the mulch on. Doing so will ensure that the plants are properly prepared for the winter.

You may not have thought of it, but all of your equipment has taken a beating during the summer months, including all of the equipment used for canning. This is a good time to scrub your pots and pans up and ensure they’re in good shape before you put them up. Make sure your pressure canner receives particular attention. Check to see if the gasket is in good shape, along with the rubber plug used for emergency pressure relief. Your stove will need a thorough cleaning and may require maintenance as well. Make sure everything is put away correctly so that you don’t have to waste a lot of time trying to find it in the late spring when you begin using it again.

Don’t think you’re finished yet. Now is the time to start walking the grounds looking for problems in your orchard. For example, it’s relatively easy to find pests that hide on trees during this time of the year. Make sure you check trees for problems associated with stress. For example, pear trees are prone to crack at the joints. You might need to mark some areas for special pruning in the spring. If a problem seems especially serious, you may want to address it now, rather than later.

Being self-sufficient means ending as well as you began. During the spring there is an excitement that builds that makes it easy to prepare for the new gardening season, but by the end of the season, all you really want to do is flop down in front of the wood stove. The time you take to prepare now will pay significant dividends in the spring. Let me know about your fall preparations at [email protected].


Moving Heavier Tractors and Cages Safely

It’s important to chicken and rabbit health to move tractors and cages regularly. We don’t keep our chickens and rabbits in a barn because allowing them access to sunshine and fresh air is far healthier. However, it’s harder to keep the tractors and cages clean outside. The manure builds up and ammonia emissions can begin affecting animal health. So, the solution is to move the animal to a new location so it has a clean place to live. You can then allow the manure to compost in place or shovel it up for centralized decomposition. However, moving cages can be hard on the back and you need multiple people to perform the task in many cases. The solution to this problem is to build a dolly specifically designed for the purpose of moving cages.

One of the questions that you might have about the need for a dolly is whether it might be easier to simply add permanent wheels to the cages. There are a number of problems with this approach:


  • Cost: Good cage wheels cost quite a bit and duplicating them over twenty or so cages gets pricey.
  • Maintainability: Anything left outside for an extended period tends to get dirty and to corrode. Keeping permanently mounted wheels functional is difficult.
  • Practicality: Chicken tractors must sit completely on the ground because the open bottomed cages provide protection by keeping predators out.
  • Control: Although rabbit cages are normally raised above ground level, having them on wheels is impractical when your property lacks level land (as our does). The tractor or cage could literally run away with the animals in them if the wheels are permanently mounted.


A problem with most dollies is that they have four wheels. The idea is to keep whatever you’re moving level. However, this approach doesn’t work well with tractors, where you want to raise the cage only enough to move the chickens or cages where you want to transition the rabbits to a moveable state a little at a time. Using a four wheel dolly also places stress on the tractor or cage and can cause the wheels to dig into the soil.

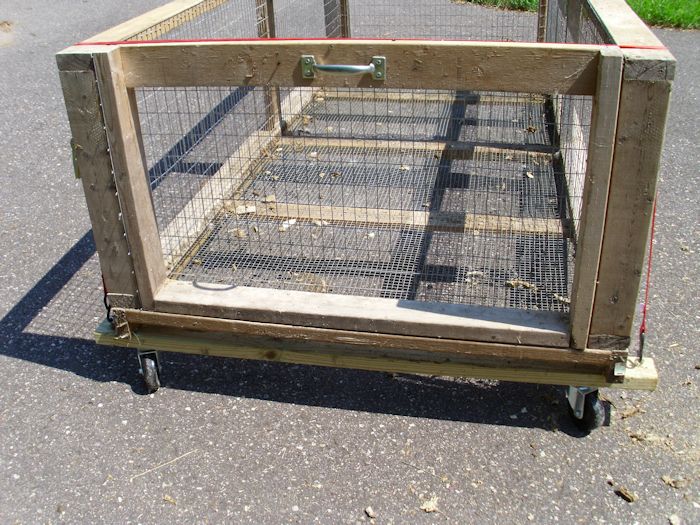
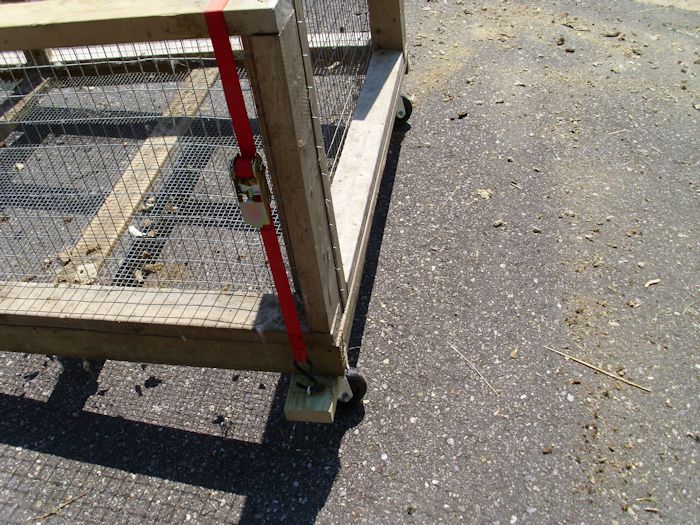
The dolly I created for moving the tractors and cages has only two wheels. The setup automatically adjusts for the current level of the tractor or cage and the wheels don’t dig in as a result. You raise the end of the cage up, slip the dolly underneath, tighten a strap to keep it in place, and you’re ready to go. Here’s how the dolly looks when attached.

Dolly01

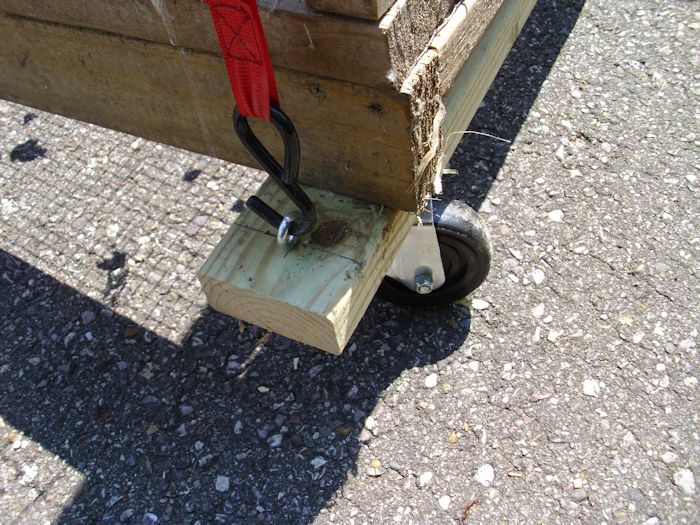
As shown in the picture, the dolly is made up of a 2 × 4 that is a little longer than the end of the tractor or cage. There is an eye bolt at each end of the dolly for attaching the strap. The strap is the ratcheting type that has a hook on each end to make for easy attachment. The wheels are 4″ in diameter and swivel in every direction. Here is a better look at the method used to strap the cage down.

Dolly02

Strapping the cage in place is essential and a bungee cord won’t do the trick. The cage will slip off the dolly and you’ll lose control. Make sure you get a good nylon strap with an attached ratcheting device. Otherwise, you risk losing the cage and possibly hurting the animals that you’re trying to move.

Make sure you purchase high quality wheels for your dolly. The wheels should offer four sturdy bolt positions for attaching the wheel to the dolly. In addition, the wheels should come apart for cleaning as shown in this picture.

Dolly03

Notice that the pin holding the wheel bolts in place. Removing the bolt makes it possible to take the wheel completely apart for cleaning so that you can continue to obtain good service from the dolly.

Building two dollies will make it easier for anyone to move a relatively large tractor or cage with ease without doing much lifting at all (except to attach the dolly initially). Let me know your thoughts about tractor and cage movement devices at [email protected].


Determining the Amount of Shelving You Need

I never anticipated receiving quite so many e-mails about larder shelving (including a few comments about the quaintness of the term). When determining the amount of larder shelving you need, you must consider the kinds of storage you use. We group our storage into four areas:

  • Ready Storage: Used to hold food short term. It includes the refrigerator, kitchen cabinets, and under worktable storage (five gallon buckets).
  • Deep Freeze: Used for moderate term food storage. Some foods don’t can well or they taste better when you freeze them. We have two freezers (one small and one large) for freezing fruit, vegetables, and meat items. Because we vacuum pack our foods, we store some items up to two years. The freezers are kept at 0 or less to ensure the food is thoroughly frozen. Each summer, before we begin storing the harvest, we take everything out of the freezers and use everything that has gotten old in some way (we sometimes put old food in the compost where it turns into dirt that will be used for new food).
  • Larder: Used for long term canned storage of food. Many items will last up to five years in the larder because of the canning techniques we use. Every spring every can is cleaned and inspected to ensure it remains safe. The larder is organized to present the oldest items up front so they’re used first.
  • Root Cellar: Used for winter fresh storage. As the name implies, we use our root cellar to store roots. However, we also use this area to store apples, pears, and squash. The root cellar sees use from September to around April each year. It’s never used during the summer months, mainly because our root cellar isn’t damp or cool enough during that time and the food would spoil.

It’s essential that you determine how each area will ultimately work into your food storage strategy. If you decide to expand your storage area by using an unused cabinet, make sure it is cleaned and sanitized well. Especially the kitchen cabinets ought to be thoroughly cleaned. If your cabinets are broken or needs refinishing, you can consider looking for cabinet refinishing companies in fairfax va (or where it is more local to you). Determining how large to make the larder then becomes a matter of portions. If you want to be fully self-sufficient, you need to decide where the food will come from for your meals in a general sense.

Let’s look at a specific example. We drink a 6 ounce glass of juice with breakfast four days a week on average. That’s a total of 6 ounces per glass * 2 people * 4 days a week * 52 weeks a year or 2,496 ounces per year. We follow a two year plan for juice because it’s easy to obtain from a number of sources, so that’s a total of 4,992 ounces for the two years. All of our juice is canned, so all of that juice has to be stored in the larder. Juice is canned in quart jars, so we need 156 jars (at 32 ounces per jar) to store that much juice. From last week’s post you know that each shelf segment can hold 42 quart jars, so we need 3.7 shelf segments for juice.

To fill out the remainder of breakfast, we usually have a grain product of some type. In addition, some meals include breakfast meat and/or eggs. Along with juice, we also drink milk and coffee. All of these items come from ready storage, so you don’t need to consider them in creating your larder.

Lunch is our main meal of the day. Normally we have meat four days a week. Most of the meat comes from the freezer. However, on busy days, we used canned meat from the larder. The canned meat is computed a bit differently. We normally can the smallest chickens and one chicken produces two quarts of canned meat. Each quart contains four pieces: half a breast, wing, leg, and thigh (see Cutting Up a Chicken for details). One quart serves as a main meal and a snack when eaten directly or as two main meals when eaten as part of a salad or casserole. Normally we process eight chickens at a time and the first two processing sessions produce the canned chicken, so there are 32 quarts of canned chicken produced each year, that require 0.8 shelf segments. We produce 1 ½ years worth of canned chicken each year for two years (and take off the third year), so the maximum shelf space used at the end of year 2 is 1.6 shelf segments.

Along with our meat, we normally have two kinds of vegetables, some of which come from the larder, but can also come from ready storage, the root cellar, or the freezer. This is where you need to keep records on how you use your various food storage areas. About 70 percent of our vegetables come from the larder. We eat one quart of vegetables when there is meat included in the meal and one and a half quarts on our vegetarian days. Vegetables are generally stored in pints, but there are times when we store vegetables in quarts as well. Because vegetables tend to have longer cycles between good yields we follow a three year plan. The calculation for vegetables becomes ((1 quart a day * 4 days) + (1.5 quarts a day * 3 days)) * 52 weeks a year * 3 years * .70 percentage stored in larder or 928 quarts or 22.1 shelf segments.

Our afternoon snack usually includes fruit, a grain product, and a dairy product. The fruit is the only item that comes from the larder. It can also come from ready storage, freezer, or root cellar. Our fruit portion is normally 1 pint per day when taken from the larder. Because fruit production can be incredibly unpredictable, we follow a four year plan. About 30 percent of our fruit comes from the larder. This means the calculation for fruit is 1 pint per day * 365 days a year * 4 years * .30 percentage stored in the larder or 5.2 shelf segments.

The evening snack can come from a variety of sources, but we normally have something quite small. This is the time of day we’ll have ice cream, leftover canned meats, fruit, cookies, or something else small such a dried fruit/vegetable slices (see Making Dehydrated Chips for details). I normally don’t include this snack in the calculations, but your eating habits might be different and you might need to include it. The new shelving does include space for four 5 gallon buckets worth of dried fruits and vegetables that don’t appear as part of the calculations that come later in this post.

We also make our own condiments, salsas, jellies, and other items that take up 3 shelf segments. Again, you need to consider your eating habits and make decisions based on those habits.

Now it’s time to add everything up to see how much space is required. Our total shelf segment usage (a shelf segment consists of 42 quarts or 84 pints) is 3.7 for juice, 1.6 for meat, 22.1 for vegetables, 5.2 for fruit, and 3 for condiments or a total of 35.6 shelf segments. Our two larder shelving units currently provide 39 shelf segments (not including the 5 gallon bucket/canning equipment storage in the new shelving unit). The remaining shelf segments are used for organizational purposes and for empty jars.

The calculations for determining how much shelf space you need can seem daunting, but if you address one meal at a time as I’ve done in this post, you should find it possible to do. What you need to do is focus on that meal and the portions you typically eat during that meal. Let me know if you have any additional questions on this topic at [email protected].