3D Printing – Fad or Practical Tool?

For a while, it seemed as if 3D printing would take the world by storm and that we’d all have 3D printers in our homes pumping out anything we needed. However, since my last article on the topic, 3D Printing Done Faster and Better, the number of articles about 3D technology have decreased noticeably. In fact, the trade press has been a lot quieter on the topic, which makes some people wonder whether 3D printing is actually a fad. The problem with much of the new technology that becomes available is that people initially think there are all sorts of uses for it, but then discover that those uses aren’t practical or that they’re too expensive, and they end up dropping the technology (rather than revise their vision).

You can still find some fanciful uses for 3D printers. For example, the Washington Post recently ran an article recently ran an article on how 3D printers can change the presentation of food. The idea is that you really can have the food presented in a manner that is both pleasing and unique. The idea is to make food in unusual shapes, sizes, and colors, so that it appeals to a larger group of people. However, the original vision was to combine ingredients to actually make the food—this application scales the idea down to a more practical level.

It also looks like 3D printing will see practical use for various higher end needs that aren’t quite professional, but are out of reach of the home owner. Think of printers like the da Vinci 1.0 Pro 3D as a middle ground for experimenters (see the ComputerWorld review). The price is out of reach for the general consumer, but definitely within the range for experimenters and early adapters. Again, the vision is scaled down, more practical, and infinitely more usable.

The military is also using 3D printers to perform practical tasks. Having been a sailor myself, I can tell you without reservation that I would have loved to have been able to print some of the items I needed. Waiting to get back to port before I could even order parts meant serious delays and downed equipment. Imagine having the ability to print a new drone or other needed items while out to sea, rather than waiting for a supply ship or in port visit.

Of course, the medical and other high end uses for 3D printing continue to evolve. For example, 3D printed hands are becoming ever more usable. Expect to see all sorts of new medical uses for 3D printing evolve because humans are notoriously difficult to fit. I envision a day when it becomes possible to print just about any body part needed in the right size, color, shape, and characteristics. New printing strategies may even make the use of organ replacement drugs a thing of the past.

The point is that 3D printing is expanding, growing better, becoming more practical, and still evolving. Yes, you might eventually have one in your own, but don’t expect it to happen anytime soon. Practical uses for 3D printing are becoming more common. Until 3D printing becomes a must have technology for industry, science, military, medical, and other industries, the price won’t come down enough for the home user. To answer my initial question, 3D printing is becoming more practical tool than an interesting new technology, which is why you hear a lot less about it today. Let me know your thoughts about 3D printing at [email protected].


Advantages of Making Your Own Extracts and Tinctures

It might be easy to initially dismiss someone who makes their own extracts and tinctures, but knowing how to make your own is an important skill. I commonly make many of my own extracts and tinctures because the products I create offer these benefits:

  • Cost: Even though you can get fake vanilla at a low cost, the flavor just isn’t the same as the real thing and buying the real thing is incredibly expensive. For example, buying the beans and making your own vanilla is significantly less expensive than buying it from someone else.
  • Customization: I don’t just make vanilla with vodka or some other relatively pure alcohol. Vanilla made with a moderately priced brandy or rum has a unique taste that is fuller than anything you could ever buy in the store. Sometimes adding vanilla to flavored alcohol, such as Grand Marnier, produces some amazing results.
  • Strength: It’s possible to make your extract or tincture to any strength desired. This feature means that your recipes end up tasting as you expect them to, rather than lack the pizzazz that you’d get with a store purchased product.
  • Characteristics: Many of the tinctures and extracts that you obtain from the store, even when pure, rely on the least expensive source of flavor. However, when making your own product, you can choose ingredients with specific characteristics. For example, the three kinds of vanilla bean you can commonly obtain are: Madagascar (traditional), Tahitian (a fruity flavor), and African/Ugandan (bold smoky flavor). Other sources are likewise robust. For example, a mint extract can combine the best characteristics of several kinds of mints.

Creating your own extract or tincture isn’t hard. The goal is to use some sort of solvent, normally an alcohol product, to extract the essential oils from an herb or spice. To create the extract or tincture, place the product you want to use, such as vanilla, into a glass jar. Fill the jar with the solvent, such as vodka, place the covered jar in a cool, dark place, and then wait. Just in case you’re wondering about the difference between an extract and a tincture:

  • Extract: A solvent containing the essential oils of an herb or spice. The solvents can include glycerine, vinegar, alcohol, and water. The product can be heated to induce more rapid extraction of the oils from the herb or spice (with some subsequent loss of strength). The herb or spice isn’t normally macerated. You can use some extracts the same day you start them (such as when steaming mint to make mint jelly).
  • Tincture: An extract that is always made with alcohol and no other solvent. The extracted item is normally macerated for maximum penetration. Tinctures are typically stronger than extracts and require more time to make.

Making your own extracts and tinctures is a lot of fun and experimenting with different formulations can produce surprising results. Most importantly, you know precisely what your extract or tincture contains, unlike the products you obtain from the store. Let me know your thoughts on making extracts and tinctures at [email protected].


Python for Data Science for Dummies Errata on Page 221

The downloadable source for Python for Data Science for Dummies contains a problem that doesn’t actually appear in the book. If you look at page 221, the code block in the middle of the page contains a line saying import numpy as np. This line is essential because the code won’t run without it. The downloadable source for Chapter 12 is missing this line so the example doesn’t run. This P4DS4D; 12; Stretching Pythons Capabilities link provides you with a .ZIP file that contains the replacement source code. Simple remove the P4DS4D; 12; Stretching Pythons Capabilities.ipynb file from the archive and use it in place of your existing file.

Luca and I always want you to have a great experience with our book, so keep those emails coming. Please let me know if you have any questions about source code file update at [email protected]. I’m sorry about any errors that appear in the downloadable source and appreciate the readers who have pointed them out.


Python for Data Science for Dummies Errata on Page 145

Python for Data Science for Dummies contains two errors on page 145. The first error appears in the second paragraph on that page. You can safely disregard the sentence that reads, “The use_idf controls the use of inverse-document-frequency reweighting, which is turned off in this case.” The code doesn’t contain a reference to the use_idf parameter. However, you can read about it on the Scikit-Learn site. This parameter defaults to being turned on, which is how it’s used for the example.

The second error is also in the second paragraph. The discussion references the tf_transformer.transform() method call. The actual method call is tfidf.transform(), which does appear in the sample code. The discussion about how the method works is correct, just the name of the object is wrong.

Please let me know if you have any questions about either of these changes at [email protected]. I’m sorry about any errors that appear in the book and appreciate the readers who have pointed them out.


Adding Vinegar to the Chicken Water

It’s winter in Wisconsin and the chicken coop isn’t heated. In fact, the chicken coop lacks an electrical connection as well, so except for taking pots of heated water in on the coldest days, trying to heat the coop must come from other sources. The slant of the roof and placement of the window ensure that the coop receives maximum winter heat. The tree that normally shields the coop from the sun during the summer months is bare, letting the sun come through. Even with all these measures, the coop is cold enough to let the chicken’s water freeze.

My goals for various activities on my small farm include doing things in a manner that makes my carbon footprint small and keeps costs low. Consequently, I always look for solutions that don’t involve much in the way of high technology, such as obtaining heated chicken waterers. I did seriously look at a solar powered unit for a while, but decided that the chickens would probably destroy it in short order. The better solution turned out to be adding vinegar to the chicken water.

It turns out that vinegar has both a lower freezing temperature and higher boiling point than water. The freezing temperature of vinegar is 28 degrees, but that level increases when you add more water. I tried various levels of vinegar in the chicken water and found that ½ cup per gallon seems to keep the water from freezing for about an hour longer when the outside temperature is in the 15 to 30 degree range. Above 30 degrees, it kept the water from freezing at all.

Adding vinegar to the water also keeps anything from growing inside the waterer, which means that the water is better for the chickens longer. This feature of adding vinegar is especially important during the summer, when all kinds of green gunk grows inside the waterer and is quite hard to keep out.

If you look on other websites, you find that other people attribute all sorts of other benefits to using vinegar. Other websites warn against using vinegar. I haven’t personally tested any of these claims, so I’m not here to tell you that the chickens derive any benefit whatsoever from the vinegar in the water. However, I did try a simple experiment this past summer and found that given two buckets, precisely the same size, color, and make, one with vinegar and one without, the chickens always drank the vinegar water first. My feeling is that they seem to like it. So even if the chickens don’t gain any solid benefits from the vinegar, you can view it as a treat that helps keep the water from freezing longer and keeps their waterer cleaner. Let me know your thoughts on adding vinegar to the chicken water at [email protected].


Time to Check the Larder

The seed catalogs begin to arrive in the mail and you look upon them as a bit of pure heaven—the announcement that spring is on the way. Your eyes nearly pop out as you see the multicolored carrots, juicy tomatoes, and fragrant herbs. The new kinds of fruit trees immediately attract your attention, and what about that amazing new berry bush that will pack your freezer with sumptuous berries? You go into a mix of information and appetite overload and you consider just how those new offerings will satiate your cravings for all things fresh. However, before you go into a swoon over the latest delights, consider the fact that you probably don’t need them all. Your larder is craving things too! The items you’ve used up have created gaps in the deliciousness that your larder can provide during the winter months when fresh simply isn’t an option.

Of course, everyone loves to experiment. After all, that’s how I found kabocha squash this past summer—that delectable mix of sweet and savory that will likely find its way into a pie this upcoming fall. Had I known then what I know now, I would have planted more and canned the extra as an alternative to using pumpkin for pies. Lesson learned, more kabocha squash will find their way into the mix this year, alongside the butternut and acorn squash I love so well.

Back to the larder though. You probably don’t have any idea of where the holes are right now and you really do need to find out. That’s why you need to perform an inventory of your larder. The inventory will tell you about the items you need most. This year I’ve decided to try canning three bean salad, which means growing green, yellow wax, and kidney beans. However, I already have enough green beans in quarts in the larder, so I won’t make a big planting of green beans.

Your larder inventory should include more than a simple accounting. As you go through your larder, you should also perform these tasks:

  • Ensure all of the canned goods are still sealed
  • Wipe the jars down to remove the dust
  • Verify all of the oldest products are in the front
  • Make a list of products that are more than five years old so you can use them up
  • Place all the empty jars in one area
  • Sort the jars by type (both size and the kind of lid used)

Taking these extra steps will help you get a better handle on your larder. You should have a good idea of what your larder contains at all times and the only way to achieve that goal is to actually look at the containers. Let me know your thoughts about larder management at [email protected].


Using Jupyter with Anaconda (Updated)

A few readers have recently written to me regarding the use of Jupyter with the downloadable source for Python for Data Science for Dummies. The version of Anaconda recommended for the book, 2.1.0, doesn’t rely on Jupyter, which is why the book doesn’t mention Jupyter. The book relies on IPython Notebook, which is what you should use to obtain the best reading experience. You can obtain the proper version from the Continuum archive. However, if you choose to download the current version of Anaconda, then using Jupyter becomes a possibility; although, many of the procedures found in the book will require tweaking and the screenshots won’t match precisely.

In order to use Jupyter, you must still import the downloaded files into your repository. The source code comes in an archive file that you extract to a location on your hard drive. The archive contains a list of .ipynb (IPython Notebook) files containing the source code for this book (see the Introduction for details on downloading the source code). The following steps tell how to import these files into your repository:

  1. Click Upload at the top of the page. What you see depends on your browser. In most cases, you see some type of File Upload dialog box that provides access to the files on your hard drive.
  2. Navigate to the directory containing the files you want to import into Notebook.
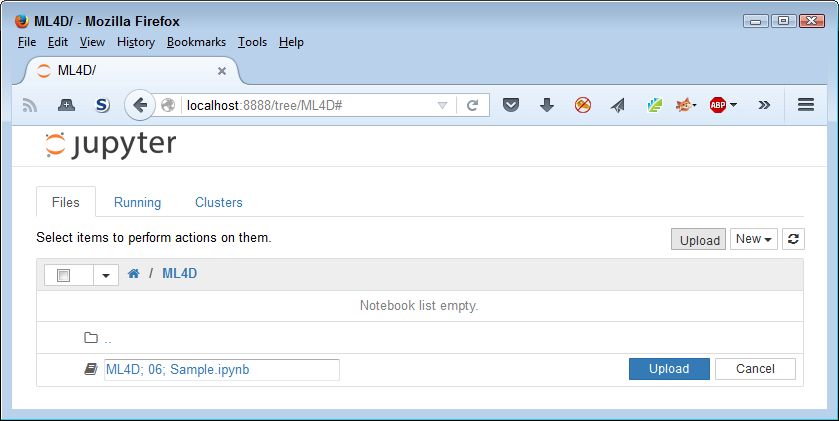
  3. Highlight one or more files to import and click the Open (or other, similar) button to begin the upload process. You see the file added to an upload list, as shown here. The file isn’t part of the repository yet—you’ve simply selected it for upload.

    Click Upload when you want to upload files to the repository.
    Upload Source Files to the Repository
  4. Click Upload. Notebook places the file in the repository so that you can begin using it.

It’s important to both Luca and me that you have the best possible learning experience with our book. This means using the right version of Anaconda for most people. Using the latest version shouldn’t cause problems, but we’d like to know if it does. Please feel free contact me at [email protected] with your book-specific questions.


Update

It has come to our attention since this post first published that using the latest version of Anaconda with Python for Data Science for Dummies is problematic. Some of the examples won’t work without rewriting because the Pandas Categorical class has changed. This is the only change we’ve confirmed so far, but there are no doubt other changes. In order to get the proper results from the examples in the book, you must use the correct version of Anaconda, version 2.1.0.

Please do keep those questions coming. It’s because a reader took time to write that Luca and I became aware of this problem. We truly do want you to have a great learning experience, so these questions are important!


Calcium Nodules on Eggs

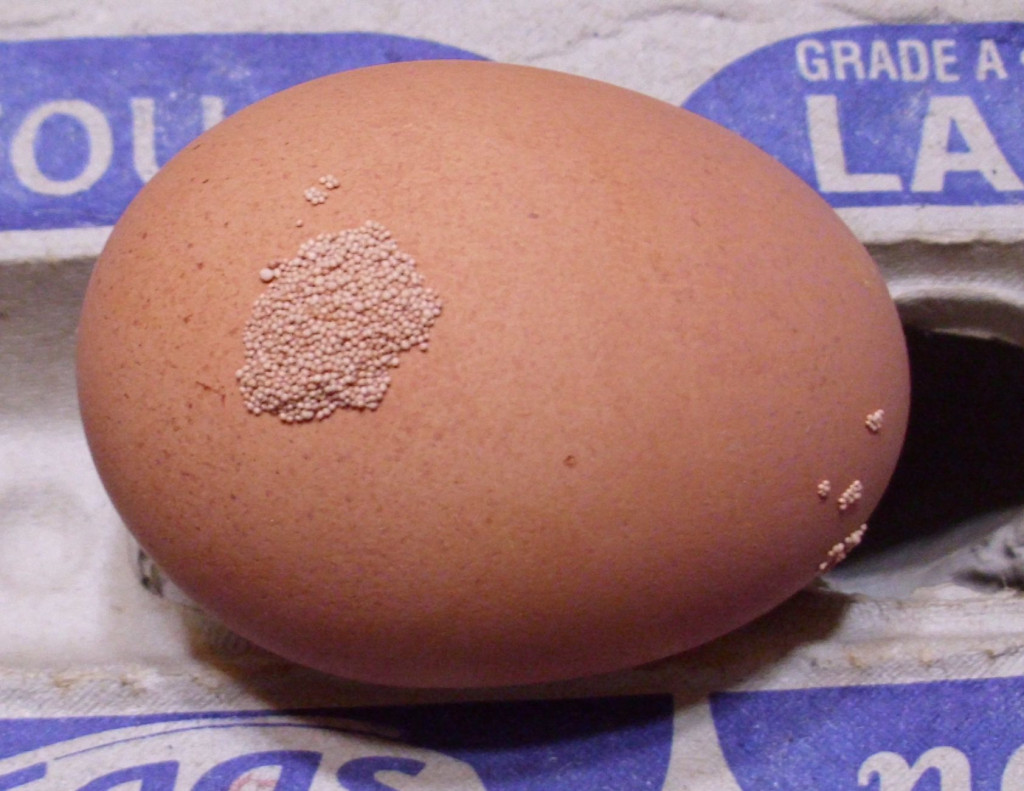
At some point during your time of working with chickens, you might encounter eggs that look like they have insect eggs on them. The view can be disquieting at first—all sorts of images could go through your mind. However, it’s more likely that what you’re actually seeing are calcium nodules that merely look like insect eggs. Here is an egg that has such nodules on it.

An egg may have harmless calcium nodules that look like insect eggs deposited on it.
Calcium nodules can look like insect eggs.

These nodules are completely harmless. In fact, you can wash them off the eggs quite easily. When crushed, the nodules feel gritty, much like crushed eggshell would feel. These nodules typically appear for two reasons:

The first reason is the one that occurs most often. Five of my hens are now four years old and one is five years old. The five year old hen (a Black Australorp) laid this egg, so the nodules aren’t unusual at all. (Most factory settings keep laying hens for one or two years after they start laying eggs, I’ve found that four years in optimal settings works well.) This spring I’ll replace two of the hens with new layers (the other four are pets and will die of old age). I also had one hen eaten by hawks and another died of an impacted egg, so I’ll actually get four new layers this spring.

I’m thinking of trying Barred Rocks (a kind of Plymouth Rock) because I’ve never had them before and they’re quite pretty. According Henderson’s Chicken Chart, they’re cold hard and produce large eggs. A friend of mine has them in her flock and feels that they’re a good investment. The point is that when you start seeing these nodules on one or two eggs and not on the eggs of your flock as a whole, you may need to start thinking about replacing the bird that laid it. Let me know your thoughts about keeping a healthy flock at [email protected].


Python for Data Science for Dummies Errata on Page 124

Python for Data Science for Dummies contains an error in the example that appears on the top half of page 124. In the first of the two grey boxes, the code computes the results of four print statements. The bottom-most print statement, print x[1:2, 1:2], is supposed to compute a result based on rows 1 and 2 of columns 1 and 2, and the bottom grey box seems to confirm that interpretation by the showing the result as [[[14 15 16] [17 18 19]] [[24 25 26] [27 28 29]]]. However, the answer provided for this example in the downloadable source code is [[[14 15 16]]], which doesn’t agree with that in the text.

The good news is that the downloadable source contains the correct code. The error appears only in the book. The last print statement in the book is wrong. Here is the correct code (with output) for this example:

x = np.array([[[1, 2, 3], [4, 5, 6], [7, 8, 9],],
 [[11,12,13], [14,15,16], [17,18,19],],
 [[21,22,23], [24,25,26], [27,28,29]]])

print x[1,1]
print x[:,1,1]
print x[1,:,1]
print
print x[1:3, 1:3]
[14 15 16]
[ 5 15 25]
[12 15 18]

[[[14 15 16]
 [17 18 19]]

[[24 25 26]
 [27 28 29]]]

Please let me know if you have any questions about this example at [email protected]. I’m sorry about the error that appears in the book and appreciate the readers who have pointed it out.


Getting the Fastest Question Response

I always want to be sure that you get fast, courteous responses to your book-specific questions. Even though I don’t check my e-mail every day, I do check it most days of the week, so that’s the fastest way to contact me regarding issues that you have with my books. Of course, you can make the response even faster by doing a few simple things when sending your email:

  • Be sure to include the name of the book and the book edition in the message subject line.
  • Tell me which page, figure, or listing number to look at in the book.
  • Document the steps you took.
  • Provide me with the exact error message you’re seeing.
  • Tell me about your platform (operating system, the version of any software you’re using, and so on).

If you provide these basic pieces of information, I can usually answer your questions much faster—often without asking for additional information. E-mail communication can be difficult at times because it lacks that in person body language element and you can’t show me what you’re seeing on your machine. Remote diagnostics are harder than you might think.

It’s also important that you understand that I focus on book-specific questions. I’ve discussed this issue before in Sending Comments on My Books and Sending Comments and Asking Questions. The bottom line is that I want you to be happy with your book experience, but I also don’t have time to provide free consulting. Please let me know if you have any questions or concerns about contacting me at [email protected].