More on CFL Usage

Readers came back with a few questions about CFLs after reading my CFLs for Free post. The one thing I want to get across clearly is that the article is emphasizing that you can buy new CFLs using the savings from previous purchases. You need to make the investment in the first CFL to get started and then use the savings from that investment to buy future CFLs. No one is going to mysteriously pay you to buy CFLs, but if you buy smart, you can indeed get future CFLs for free after making the initial purchase. Eventually, you’ll pay off the initial purchase using the savings as well.


A number of people asked about the startup surge (also known as inrush current). The startup surge is something that occurs when you first apply power to the light. This surge is extra electricity that’s required to get the bulb started. The amount of power the bulb requires decreases as it gets to operating temperature, which isn’t very long in most cases. Of course, some people are worried about this electricity surge as some people often think they are experiencing a power surge. Luckily, these two things are quite different. If a homeowner did experience a power surge, it would be worth them contacting a company like Safe and Sound Electric to install some surge protection to prevent this happening again. However, this bulb requires that extra surge, so don’t be concerned if you notice a quick surge. I’ve read a number of conflicting opinions about the startup surge of CFLs. My take on everything I’ve read is that the startup surge will vary by bulb vendor and type of light. A tube light has a smaller startup surge for a significantly smaller time than the twisted bulbs. Vendors who meet Energy Star requirements tend to produce bulbs that have a smaller startup surge than the less expensive bulbs.

A few readers also asked about long term efficiency of CFLs. From personal experience Rebecca and I have found that CFLs do provide an efficiency advantage if you use them for one long interval, rather than several short intervals. In other words, if you burn the light for four hours solid instead of two, two hour intervals, you’ll gain an efficiency advantage. In addition, turning the light on and off reduces its life expectancy.

Efficient energy use is why Rebecca and I tune our work schedule to follow the sun. We get up at 5:30 am (sometimes a bit earlier) during the summer months to make maximum use of the daylight hours, but we get up at 7:00 am during the winter months to ensure we won’t have to turn the lights on in the morning. The actual difference between summer and winter work times is 2½ hours due to the effect of daylight saving time. We do work later into the evening during the winter months to make up for the later start time, so everything evens out. Using this approach has had both health and monetary benefits, but we also understand that it’s not a solution that most people can use.

There are a lot of myths, misconceptions, and outright controversies about CFLs online. In addition, I’m finding that people have individual experiences based on how they use lighting in their home. However, after researching this topic intensively, I’m finding that the following tips about CFLs seem to be true for just about everyone:

  • Buying CFLs with the Energy Star label tends to pay dividends in reduced operating costs and longer life, but you must weigh these benefits against the increased initial cost. In general, buying Energy Star products save you money.
  • If you must use a CFL in a socket controlled by a dimmer, buy a CFL designed for that purpose. Using a standard CFL in a dimmer-controlled socket greatly reduces bulb life and could damage the dimmer.
  • CFLs require more air to work properly. They’re more heat sensitive, so putting one in a can or recessed fixture will result in a reduced life expectancy. The exception is that there are CFLs specially designed to work in recessed fixtures, but you’ll also pay a premium price for them.
  • CFLs also don’t like
    damp or wet conditions. If you need to use a CFL in a damp or wet
    condition, make sure you get one rated for that purpose.

  • Standard CFLs don’t work well in fixtures that vibrate, such as the lighting kits for fans. If you want to use a CFL with a fan or other fixture that will vibrate, you need to get a CFL designed for the purpose. (I finally gave up using a CFL in my garage door opener light socket because even the CFLs designed for use in vibration don’t last long in that particular application.)
  • Excessive on and off cycles in a given day will most definitely reduce the life expectancy of your CFL. I researched this one a lot and didn’t get a definitive answer for you. The most common guidelines say that you should strive to keep on/off cycles below 20 for any given CFL during one day. It’s commonly said that CFLs have a life expectancy of 7,000 on/off cycles if you observe the 20 on/off cycle per day limit. The source of problems in this case is the electronic ballast that CFLs use, which aren’t designed for heavy on/off cycles.
  • Faulty wiring affects CFLs considerably more than incandescent bulbs. If your wiring is such that it causes flickers or flashing with an incandescent bulb, it might be a cause for concern and you should probably look to get more info from an emergency electrician. Your CFL also won’t last very long in this instance. Even if you can’t see the flickering, small dips in power can cause early CFL failure. If you find that your bulbs aren’t lasting very long, have the power checked and bring in an electrical repair company similar to https://electricalsynergies.com/ to fix it. Faulty wiring also affects the cost savings from a CFL in a big way because the bulb never quite gets to its operating range.
  • Line noise will also affect CFLs. For example, if you have a heavy duty motor (such as a refrigerator) on the same line as a CFL, the drop in line current when the motor starts can affect the life expectancy of the CFL. Line noise will also affect the cost savings you see from a CFL because the bulb isn’t operating properly.

Some readers have pointed out that CFLs are overrated. I’m not quite sure how to respond to this question other than to say that there isn’t any free lunch. Just about every solution we now have for fixing the planet’s carbon problem is flawed. Even if we were to all go back to burning candles, there would be problems. However, I did spend some time online looking for something a bit less hysterical and a little more scientific than something that says CFLs and other modern technologies are bad. You should embrace CFLs and other good for the planet technologies with open eyes. The best post I found on these issues is one entitled, “Directory:Compact Fluorescent Lighting (CFL) Downsides.” If someone else has a non-hysterical source of additional information, I’d be happy to address it in another post.

I’d welcome verifiable tips from other people. I verified each of these tips against three sources (including government sites when available). That doesn’t mean that every tip will work for you personally, but most people find that these tips work for them. Let me know about any additional thoughts you have about CFLs at [email protected]

Review of Real Steel

Real Steel (starring Hugh Jackman and Evangeline Lilly) is a combination of two movie types I really like—science fiction and boxing. The synopsis of the movie sounds unique and in many respects, the movie is unique. However, once you see the movie, the first thing that comes to mind is that it’s faintly reminiscent of the Rocky movies. The movie is actually loosely based on a The Twilight Zone episode entitled, “Steel” (1963) penned by Richard Matheson (1956). Being a fan of the old television series (still being shown in some locations), I can see a faint resemblance to the way the show would have been put together, but don’t expect to see Rod Serling appear on screen.

Let’s get the required glitz review out of the way. The graphics in this movie are nothing less than spectacular in the fact that they look completely normal. There is a certain amount of flashing lights, explosions, and the like, but for the most part, this movie could happen in your neighborhood today. It’s this lack of over-stimulation that draws you into the movie. You find yourself believing that someone you know could be boxing robots. Whoever put the graphics together and came up with the creative ideas for this movie is amazing. I had expected eye popping effects and instead got normal, which actually suits this movie quite well.

The value of this movie is in the plot. Emotions run high because the plot is quite good and well acted. You find yourself wanting to cheer, cry, and yell all in a matter of minutes. Charlie Kelton (Jackman) ends up taking care of his little boy, Max (Dakota Goyo), after literally ignoring him all of his life and then selling him to his sister-in-law. Max is understandably upset at first, but then something happenshe gets interested in his own robot boxer. Even though Charlie is a complete loser on his own, when coupled with Max he becomes a winner. I don’t want to ruin the plot of this extraordinary film, but you can imagine what happens next.

Most of the performances in this movie are a little over the top, but well acted. The only actor that didn’t quite do the job was Evangeline Lilly (Bailey Tallet in the film). I found her performance a bit weak. It was almost as if she was overawed by Jackman. She did play an important part, but the performance could have been bettermore believable. It wasn’t until the end of the movie that I felt a bit for her character, but by that time I was almost too busy cheering Charlie and Max to really notice. It was a case of too little, too late.

If you like science fiction, boxing, or simply a well-acted emotional movie, you’ll like Real Steel. It has few warts and a lot to recommend it. I just hope that they don’t ruin this movie by coming out with a sequel.


Security Implications of the AT Command

I read the security post provided by Roger Grimes with interest this morning because I’ve always felt that the Task Scheduler is just another entry point for viruses and the like on any system. As he mentions, it’s an avenue that many administrators fail to check because they don’t really think about it. As Roger points out, there are three ways to add new entries, but this post focuses on the oldest of the three, the AT command.

Before you can interact with the Task Scheduler, you must have its service started. This is a given on Vista and Windows 7, where Windows relies heavily on the Task Scheduler. However, you’ll want to read my Interacting with the Task Scheduler Service for details about this service. It’s important to have the service setup correctly in order to work with it error free.

The AT command is the oldest way of working with the Task Scheduler. At one time you could access it from the command prompt even if you weren’t an administrator. This meant that any virus or other piece of nasty software could cause woe without notice on your part. However, if you try to use the AT command at a normal command prompt in Windows 7, you’ll receive an Access Denied error message, which is at least a start in the right direction.

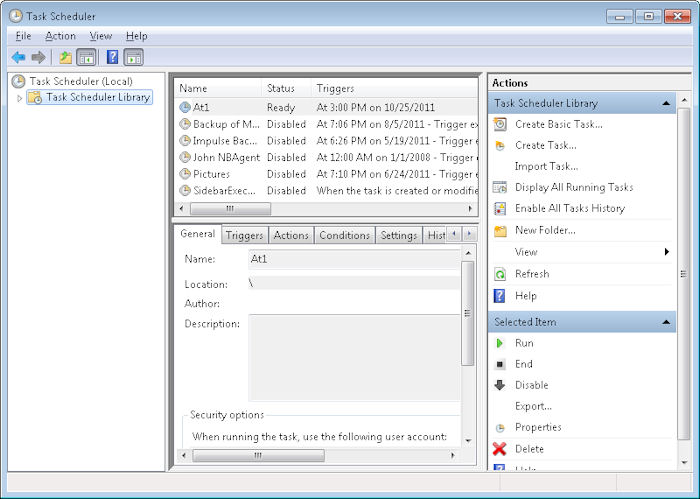
To use the AT command to create a new entry, you must provide a time and command as a minimum. For example, if you type AT 15:00 “Dir C:\” and press Enter, you’ll create a new task that starts at 3:00 pm on the current day. You’ll receive a numeric identifier for the task. The entry also shows up in the Task Scheduler console (found in the Administrative Tools folder of the Control Panel) as At plus the identifier, such as At1 as shown here.

TaskSchedulerEntries01

If you want to list the jobs created by the AT command, you type AT and press Enter. The AT command only lists those jobs that it creates—you won’t see any jobs created using other Task Scheduler techniques.

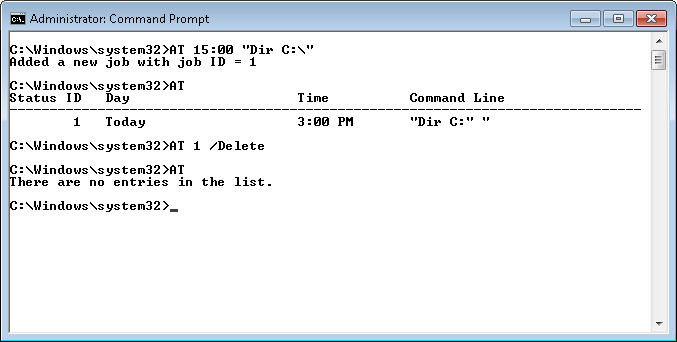
Likewise, to delete jobs using the AT command, you provide the identifier you received when you created the job along with the /Delete command line switch. For example, if the identifier for the task you created earlier in this post is 1, then you’d type AT 1 /Delete and press Enter. In this case, the AT command doesn’t provide any output. In order to verify that the job is actually gone, you must type AT and press Enter. Here’s what the command output from this session looks like.

TaskSchedulerEntries02

The true power of AT lies in remote access. For example, if you have an Administrator command line open, have a server named WinServer on your network, and possess administrator privileges on that server, you can type AT \\WinServer 15:00 “Dir C:\” and press Enter to create a command that starts at 3:00 p.m. (local time) on WinServer. It’s important to realize that the command will execute when it’s 3:00 p.m. on the server, not 3:00 p.m. on your system. You can likewise list and delete remote entries using the same commands you’d use for local entries. Again, the Task Scheduler console will display these entries, but only on the host machine (so you’d need to access that system remotely to see it from your local computer).

Windows 7 does make it harder to use the AT command, but not impossible. If an outsider should gain access to an account with administrator privileges, it wouldn’t take long for a virus to add all sorts of nasty commands to every machine on the network. As Roger comments in his post, administrators need to exercise vigilance in order to catch potential security issues such as this one. Let me know if you have any questions at [email protected].


Cutting Up a Chicken

When you raise your own chickens, you eventually end up with a lot of whole chickens in your freezer and will need to cut at least a few of them up for use. Most people are used to seeing chickens already cut up for use in the store. If you do get a whole chicken, it’s usually with the idea that you’re going to roast it whole. In many cases, people don’t know where to begin cutting a chicken up for use because the butcher has done it for them for so many years. Following the chickens you find in the store as an example won’t work very well either because they’re cut up using a meat saw (think of a band saw specifically designed for cutting meat). Unless you also have a meat saw, you probably won’t be able to follow the butcher’s example. This post describes how to cut up a chicken using nothing more than a standard utility knife.

I recommend using a 6-inch knife with a fairly stiff blade. A boning knife will be too flexible and something small, such as a pairing knife, won’t give you enough leverage. Don’t use a knife with a serrated edge—the serrations will make for a poor cut and you won’t be able to split the breastbone with such a knife. The knife you use should be sharpthe sharper the better. A dull knife is dangerous to use.

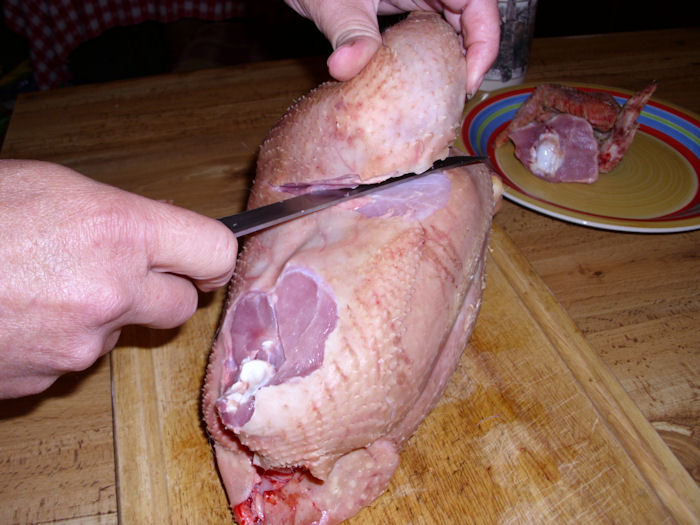
Start with the wings. Your cut should begin behind the joint area. When you lift the wing up, you’ll actually see a bit of the flesh come up with it. Start your cut immediately behind this fleshy area and angle toward the joint as shown here.

CuttingChicken01

Cutting the wings in this way has the advantage of making them a bit meatier. After you cut off both wings, it’s time to cut off the combination of the leg and thigh. Start by lifting the thigh and cutting toward the joint from the front of the chicken as shown here.

CuttingChicken02

Once you get to the joint from the front, you’ll need to cut to the joint from the back as well. When this cut is finished, you’ll be able to rotate the leg/thigh combination downward and see the joint pop from the socket as shown here.

CuttingChicken03

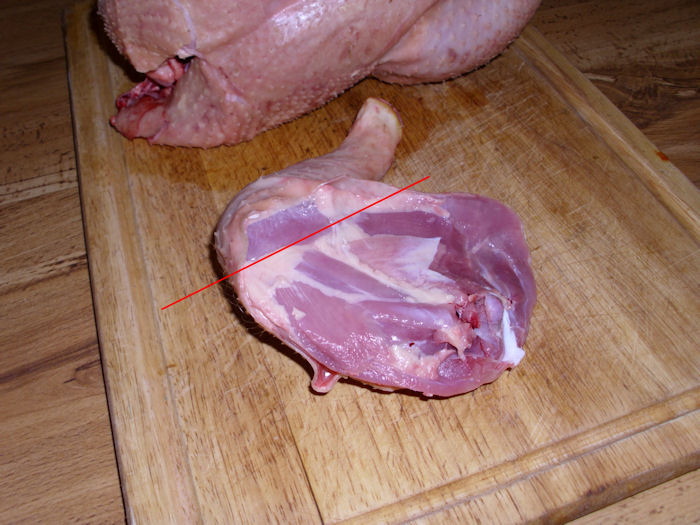
You can finish the cut at this point. Remove both leg/thigh combinations using the same approach. Now you can separate the leg from the thigh. There is a natural division between the leg and the thigh. If you look carefully, you can actually see where the two separate because the meat goes in two directions. Look carefully at the following picture and you’ll see that the line shows this separation.

CuttingChicken04

Cut straight down through this point and you’ll find, with practice, that the knife will neatly separate the meat at the joint. At this point, you’ve cut off the wings, legs, and thighs. It’s time to remove the lower back (the part with the tail).

Look inside your chicken. You’ll see that there is a fleshy part between the rib cage and the lower back. The fleshy part extends on both sides of the chicken. You’ll cut through this fleshy part to separate the lower back starting midway at the opening as shown here.

CuttingChicken05

Cut through the fleshy part. You should then be able to flex the lower back and see the backbone separate from the rib cage as shown here.

CuttingChicken06

You can then cut through the spinal cord to separate the lower back from the rib cage. Cut straight down.

The hardest cut to make is to separate the two breast halves. However, like many things in life, there is a trick to it. Look at the center of the breastbone and you’ll see a line runs through it. Now, look at the first complete rib and trace it around to where it meets with the breastbone. You’ll see a second line of a sort that forms a cross as shown here.

CuttingChicken071

Put the tip of the knife through this point and you’ll find that the breastbone cracks easily. Now, draw the knife down much as you would with a paper cutter. You’ll find that the knife easily slices through the majority of the breastbone and the cartridge as shown here.

CuttingChicken08

After you make this cut, move your knife higher up. Don’t put it through the hole where the neck is, but do place it higher into the cavity. Use the point to finish breaking the breastbone apart. At this point, you should also be able to break the wishbone in half. Now you can separate the two halves of the breast like this because there is cartilage separating the breast from the upper back.

CuttingChicken09

Cut the cartilage holding the upper back to the breast halves. You’ll reach another joint after you cut the ribs. Separate the joint and the cut through it as shown here.

CuttingChicken10

You should now have ten pieces of chicken as shown here:

CuttingChicken11

These pieces are: left and right wing, left and right leg, left and right thigh, lower back, upper back, and left and right breast. Although this combination doesn’t look quite like the chicken you get in the store, it’s the most effective means of cutting a chicken up using just a utility knife. In addition, using this approach makes more of the pieces a usable size. Let me know if you have any questions at [email protected].


Creating Raw Juice for Wine Making

Earlier this year I created a series of posts about making wine using the cubicontainer technique that relies on a single container, rather than using two containers for primary and secondary fermentation. This approach requires that you use juice, and not raw fruit/vegetables, as the source for the wine. Most people think that you can make juice only from a raw source, such as crushing grapes. However, wine makers know that you can use both raw and cooked juice. This post shows how to work with raw juice—pears in this case. If you haven’t read the wine making series of posts, you can find them at:


When working with any fruit for raw juice, you need to pick the fruit at the peak of ripeness. In the case of pears, this means smelling the fruit for the distinctive pear odor. The fruit should still be firm, but crush easily in the hand. Taste the fruit and you should smell a strong pear odor, along with a high sugar content. Check the inside for an off white appearance. If the fruit seems starchy, the inside has yellowed or browned a bit, or seems mushy to the touch, it’s overripe and won’t make good wine. Likewise, if the fruit is still greenish in color, seems a bit too firm, or lacks the strong pear odor, it  isn’t ripe enough. Every fruit has its peak time for picking that typically last one or two days. That’s rightyou must check the fruit absolutely every day or you’ll miss the perfect time to pick it.

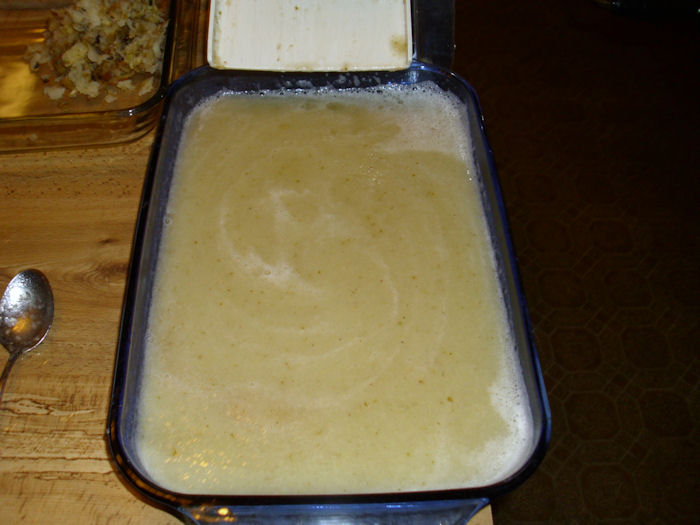
In order to create the juice, you begin by running the raw pears through a Victorio Strainer. You need to be absolutely certain that the pears are ready for use in wine. Pears that aren’t ripe could damage your strainer. Normally, the juice turns a bit brown as you strain it due to oxidation and the presence of bacteria. In this case, you’ll prevent that from occurring by adding a campden tablet to the output of the Victorio Strainer and stirring the juice from time-to-time as you strain the juice. The result should be a slightly greenish yellow juice as shown here.

RawJuice01

However, this juice isn’t ready for wine making yet. It still contains a substantial amount of pulp. You need to make at least 2 quarts of strained pear juice to obtain 1 quart of juice ready for wine making. The next step is to place a jelly bag over a 1 quart measuring cup like this:

RawJuice02

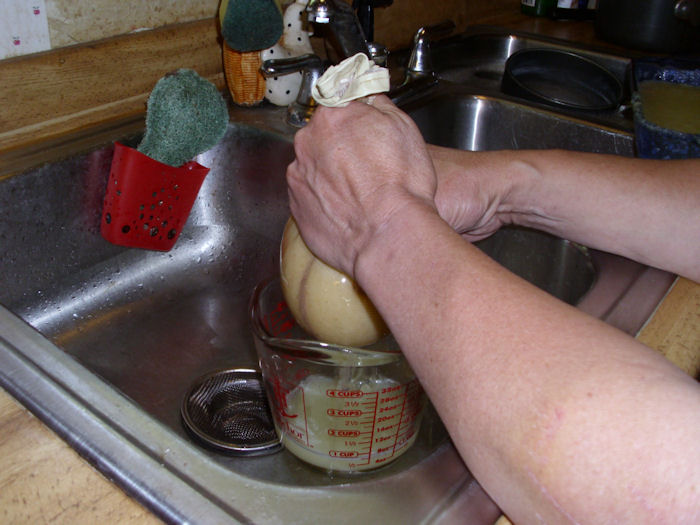
Pour as much of the strained juice into the jelly bag as possible. Now you’ll squeeze the bag to separate the pulp from the juice like this:

RawJuice03

Once you have a quart of juice, you can use it immediately to make wine or freeze it for later use. A quart of pear juice will make one gallon of wine using the wine making techniques I discussed earlier. If you decide to freeze the juice, make absolutely certain that you mark it for wine use only because the juice already has the campden tablet in it.

This same technique works fine for any fruit that gets soft enough when ripe to put through the Victorio Strainer. For example, it works great with berries. However, I haven’t ever gotten this technique to work properly with applesmost apples are still too crisp when picked to get through the Victorio Strainer successfully. Apple wine requires the use of a cider press or the cooked juice method. Other fruits, such as rhubarb, require the cooked juice method. You can use this technique for some vegetables as well. This is the technique I use to make tomato wine. If you want to work with a harder vegetable, such as beets, then you need to use the cooked juice method. (I’ll describe the cooked juice method in a future post.) Let me know if you have any questions about this technique at [email protected].


Exercising Personal Privacy

In my post, “Is Privacy a Right?,” I tell developers that they really need to consider the right of the user to a certain amount of privacy. Books such as C# Design and Development will need to include sections on privacy as part of any update. In fact, privacy is a topic not covered to any extent in any development book on my shelf. The few mentions of privacy appear in older books I’ve written, along with a few moldy references to old books by other authors. If you really want to get a modern treatment of privacy as a question of what the individual requires, you need to look at a non-development book such as “Alone Together: Why We Expect More from Technology and Less from Each Other.” Unfortunately, this book discusses social ramifications—not the techniques a developer uses to ensure privacy. Of course, no matter what the developer does, the user can always thwart any effort to provide privacy, which is the topic of this post.

I find it amazing that people willingly give up their privacy for apparently little or no reason. I read John Dvorak’s post, “I’m Not Home Right Now. Please Come In.” with great interest this morning (after having read the news report that he discusses). The idea that a husband would be able to check up on his cheating wife through an iPhone application is amazing to me. The private detective industry should take note that they’ve been replaced by a phone. It won’t be long before someone comes up with an application to surreptitiously take pictures of the dupe who loads one or more of these applications on their cellphone.

After thinking about this issue for a long time, I’ve come to the conclusion that some people have watched one too many episodes of CSI (and shows of that ilk). There is a sense that someone is going to reach out and grab each of us, and that our cellphones are the only way anyone will find us again. It’s also human nature not to be left out. If people don’t know where we are, we might miss out on something that we think is important at the time, but turns out not to be much of an issue at all in hindsight. I’m sure that little Jerry can find his sock just fine without dad’s intervention over the telephone (a little self-sufficiency does everyone good). The announcement that Maggie has a new tooth can easily wait until mom gets home from the store.

There should be alarm bells going off in the minds of every person who currently owns a cellphone, OnStar, or any other tracking technology. Do you really want someone to follow absolutely every move you make in the interest of providing some uncertain sense of security? Privacy, once lost, is incredibly hard to regain. People should learn how to disconnect in comfort, keep their privacy intact, and discover the wonderful world of being alone every once in a while. I think you’ll find that you’re a lot less stressed once you get used to it. Consider Remembering to Rest as not just beneficial to yourself, but those around you.

Most of all, it’s time that people learn to demand privacy from their technology. Whoever created the new tracking application in the iPhone wasn’t thinking and people should disable it sooner than later. It’s not necessary for vendors to track your every move online. No one gains anything by knowing you’ve gone to the store to buy this week’s groceries. All of the applications that are tracking you are stealing your privacy and making you a target for all of the things you fear most. Don’t give criminals (or marketers) an edge. What is your privacy worth to you? Let me know at [email protected].


Celebrating with Birthday Butter

Rebecca grows quite a few herbs. In fact, the majority of herbs used in our house come from Rebecca’s garden and not from the store. People have asked us in the past how to use these herbs. Of course, there are the mundane uses of savory herbs (such as sage) in meat dishes and sweet herbs (such as mint) in cakes and cookies. However, if you’re really interested in shaking things up, you mix the herbs in new and interesting combinations. That’s what I decided to do in making birthday butter.

Birthday butter was actually created for Rebecca’s birthday. I used it for her breakfast. I spread the birthday butter on a bagel, but it tastes just fine on toast, crumpets, English muffins, or any other sort of bread. In this case, I filled the holes in the center of the bagel halves with cherry tomatoes to dress it up a bit. The result is an interesting mix of savory and sweet that is a delight to the palette. Here’s the birthday butter recipe:

1/2 cup Butter, Smart Balance, or Margarine
2 tsp Sugar or Splenda
2 tsp Rubbed Sage
1 tsp Mint Leaves
1 tsp Lemon Juice

Cream the butter in a bowl. Place the remaining ingredients in the bowl. Mix together until blended. The lemon juice will have a tendency to separate from the rest of the mixture, so remixing is needed if you store the unused portion.

I found that butter works far better for this recipe than margarine does. We’ve actually tried something new, Smart Balance Buttery Sticks with Omega 3 Fatty Acids. This product is half butter and half margarine. It cooks extremely well and tastes much like butter does. However, it significantly reduces the amount of cholesterol you receive and the Omega 3 fatty acids are actually good for you.  I’m not sure how this recipe would work using other alternative sweeteners, but the results with Splenda are quite good.

The kind of mint you use has a big impact on the taste of birthday butter. Try various mint varieties out to see for yourself. The original version uses spearmint, but peppermint or even wintergreen would probably work just fine. For something unusual, try orange or lime mint.

The best way to get the ingredients to mix properly is to use a mixer. However, I’ve been able to get them to mix just fine using a fork. The point is, this butter blend has a wonderful taste and is a great way to start the day. How do you use your herbs? Let me know at [email protected].


Nature at Rest

The job is done,
summer is gone,
nature decides to rest.

Off comes the green garb of work,
displaying raiment of yellow and orange and red,
as nature presides over play.

Deer frolic in woods,
birds flutter in sky,
it’s time for a moment of joy.

As each bows its head,
sleep comes stealthily by,
nature succumbs to the calls of fall.

Winter comes soon,
some think doom,
but nature knows far better.

The promise of spring,
wells up within,
when nature will begin anew.

Copyright 2011, John Paul Mueller

Not Mere Words

A number of readers and editors have asked me about the pains I take in choosing words for my books and articles. Let’s say that it was a revelation that has prompted me to work so hard to create the right word combinations. It came to me one day while I was looking at samples in a paint store. I was looking at paint chips for just the right sort of white. The store must have had twenty or more versions of white—everything from antique white to Arizona white. The winter white intrigued me because it almost looked a bit blue in the store’s light. The idea is that each name is supposed to express the nuance of colorto create a picture in the viewer’s mind.

Many people see words as text. However, text is an abstraction of a wordthe presentation of that word on paper or on screen. Words are expressions of ideas. A word creates a picture of an idea or object in the viewer’s or hearer’s mind. Using the right word transfers an idea precisely from your mind to the mind of someone you want to share an idea with. Consequently, like the paint samples in the store, the nuance of words you choose is important if you want to maintain the clarity of the idea. Winter white isn’t the same as antique white, much as submitting to someone’s authority isn’t the same as acquiescing to someone’s authority. You’ll find both words on the same page in a thesaurus, but they’re different. There is a nuance of difference in the meaning.

There is another important lesson you can learn from paint chips. When you place a winter white chip next to a blue chip, the blue in winter white stands out clearly. However, place the same winter white chip next to a red chip and suddenly winter white looks more white than blue. The context of the paint chip has changed. Likewise, the subtle meaning of a word changes in relation to the words around it. You must consider the context of the word in order to understand its true meaning. In fact, most dictionaries include multiple meanings for a word in order to convey this sense of context.

However, a word is an expression of an idea and not the idea itself. Both the writer and the reader must understand the word in order for the transference of an idea to take place. When the writer and reader have the same understanding of the word, the transference is clear, but it become less clear as the understanding of the two diverge. When a reader doesn’t understand a word, there isn’t any transference at all. Consequently, a well-read author could use terms that a reader doesn’t understand, with the result that reader is confused, not educated or entertained. So, better authors define unusual terms in context, to help readers understand the term and still derive the nuance of meaning the author originally intended.

Technical writing is perhaps one of the more difficult mediums when it comes to word choice. An author needs to convey ideas precisely, which means that a significant range of word choice is both warranted and necessary. However, in order to educate the broadest range of readers, the author is necessarily limited by the need to simplify the text, so as many people as possible can understand it. This dichotomy presents the author with a serious dilemma that editors can sometimes make worse by insisting only on accuracy or only on simplicity, without considering the art behind the writing. (A good editor supplies alternative terms that the author can choose from in order to retain clarity without increasing complexity.) The need to convey ideas clearly in a form the reader can understand is one of the reasons I use beta readers to help refine the content of my books. Beta readers act as a sanity check by helping the author determine which words truly are beyond the average reader’s understanding.

All this leads to a practice that I’ve had since the day of my vision in the paint store. I learn a new word each day. In fact, I use two sources: A.Word.A.Day and Dictionary.com. Both sources send a new word to my e-mail each morning and I choose the word I want to learn that day from them. I may not use all of these words in a book, but the words do expose me to new ideas that will appear at some time in my books. Words are expressions of ideasthe more you learn, the more ideas you possess. What is one of your favorite words? Have you ever found yourself unable to convey an idea because you lack the appropriate word? Let me know at [email protected].


Dealing with Green Tomatoes

One of the advantages of growing your own tomatoes is that you can pick them when they’re ripe—when the taste and nutritional value is at its peak. During the summer months you avoid “strip mined” tomatoes by picking selectively from the vine. However, the end of the season arrives all too soon and you’re faced with a wealth of green tomatoes. You have to do something with these tomatoes before a major frost or risk losing them. Tomato plants can keep producing new tomatoes right up to harvest.

It’s possible to use green tomatoes directly. For example, fried green tomatoes is a favorite of mine (albeit, not particularly nutritious depending on which recipe you use). Pickled tomatoes also look very interesting; although, I must admit not fixing them personally. The pickled tomatoes that I’ve tried have been delicious. In fact, there are many more ways to fix green tomatoes than you might initially think. However, even with all of these recipes, green tomatoes aren’t the epicurean delight that some people want.

Fortunately, you can ripen the tomatoes even after they’ve left the vine. I’ve tried a number of methods and found most of them lacking. For example, some books recommend pulling the entire plant out of the ground and hanging it in your garage. This method assumes that your garage won’t get to the freezing point before the tomatoes are ripe. Using this method can also result in a lot of spoilage from mold. It does have the advantage of producing tomatoes that taste almost as good as if they were vine ripened outside.

There are also methods that rely on placing the tomatoes in a jar with a banana peel (a technique I haven’t tried) and placing them in a paper bag. My parents would often ripen a few remaining tomatoes by placing them in the window sill. Unfortunately, most modern homes lack window sills and the method does have problems in that the tomatoes can ripen unevenly. The best method I’ve found for ripening a lot of green tomatoes is to place them on newspaper as shown here.

GreenTomatoes

I use the regular newspaper pagesnot the shiny advertisement pages. The shiny pages have ink that could contain heavy metals. Regular newspaper pages tend to use soy ink today (although, you should check with your newspaper to be certain). Because the tomatoes sit on the newspaper for up to two weeks, you don’t want them to absorb any toxic chemicals. The newspaper emits ethylene gas, which is what ripens the tomatoes. The plant uses the same gas to ripen the tomatoes on the vine.

Make sure your tomatoes are out of the sunlight. Placing them in sunlight can cause uneven ripening and rot in some cases.

The tomatoes shouldn’t touch each other. Any place one tomato touches another is apt to start rotting before the tomato is ripe.

Check your tomatoes each morning. Tomatoes ripen mainly at night. If you wait until the end of the day, you could miss that peak of tomato ripeness that you desire. (There is strong evidence to suggest that night temperatures affect how a tomato reacts. For example, plants mainly set fruit when the nighttime temperature is in the 59° to 68°F range.)

When you ripen your tomatoes using this technique, they tend to ripen evenly and you’ll lose fewer of them to rot. The tomatoes don’t quite have that fresh picked taste (they still taste better than the strip mined tomatoes from the store), but they’ll work great for canning purposes where the taste difference isn’t quite as noticeable.

So, how do you prefer your tomatoesred or green? Do you have other tricks you use to get a good result from ripening your tomatoes? Let me know at [email protected].