Understanding the Connection Between Application Output and ErrorLevel

Many readers have a disconnect between application output and the ErrorLevel variable found in batch files. I’ve received more than a few e-mails where readers don’t quite understand the whole concept behind the ErrorLevel variable. They think it actually signifies some sort of mystical operating system derived error, when it isn’t anything of the sort.

A large part of the problem is that those readers who commonly work with batch files aren’t developers and many developers don’t work with batch files. In fact, even though many administrators are moving back to command line utilities because working with the GUI is time consuming and inefficient, many developers have decided to eschew the console application in favor of GUIs with fancier user interfaces.

Another problem is that ErrorLevel is inappropriately named. It should really be named ApplicationOutput. I’m sure that at one time the intention truly was to convey some sort of error information, but even Microsoft uses ErrorLevel for other purposes.

Let’s take a practical look at the whole concept of ErrorLevel beginning with a simple C# application to generate the codes. When working with C#, you’ll find that the output is now called an ExitCode as shown here.

using System;
using System.Collections.Generic;
using System.Linq;
using System.Text;
 
namespace GenerateOutput
{
    class ExitCode
    {
        static void Main(string[] args)
        {
            // Create a variable to hold the exit
            // value.
            Int32 Value;
 
            // Make sure there is a variable provided as input.
            if (args.Count() > 0)
            {
 
                // Determine whether the input is actually a number.
                if (Int32.TryParse(args[0], out Value))
 
                    // If it is, then exit using that number.
                    Environment.Exit(Value);
                else
 
                    // Otherwise, exit with an error value of -2.
                    Environment.Exit(-2);
            }
            else
 
                // Exit with an error value of -1
                Environment.Exit(-1);
        }
    }
}

The only purpose of this application is to generate exit codes given certain circumstances. The first check determines whether the user has supplied any sort of input at all. If not, if the user simply types GenerateOutput without any arguments at all, then the application exits with a value of -1 to indicate an error. Likewise, if the user types something other than a number, such as GenerateOutput Hello, the application exits with a value of -2 to indicate a different sort of error. Only when the user supplies a number does the application exit with a numeric value.

The batch file used to test this application is equally simple. All it does is call GenerateOutput with the value (if any) that the user provides to the batch file, TestOutput.bat. Here’s the batch file code.

@Echo Off
 
REM Run the application.
GenerateOutput %1
 
REM Most application output are status indicators.
If ERRORLEVEL 2 GOTO HighOutput
 
REM You can perform specific actions for a specific status.
If ERRORLEVEL 1 GOTO ValueOne
 
REM Applications can also provide a success indicator.
If ERRORLEVEL 0 GOTO Success
 
REM Errors are normally negative numbers, but can be anything.
If ERRORLEVEL -1 GOTO Error1
If ERRORLEVEL -2 GOTO Error2
 
:HighOutput
ECHO The value you provided is higher than 1.
GOTO End
 
:ValueOne
ECHO You provided an input of precisely 1.
GOTO End
 
:Success
ECHO An output value of 0 indicates success!
GOTO End
 
REM Here is the beginning of the various messages.
:Error1
ECHO You must supply a number as an argument!
GOTO End
 
:Error2
ECHO You must supply a number and not text or special characters!
GOTO End
 
REM Here is the ending point.
:End

As you can see, the tests check for errors, success messages, and non-error application output. Any combination of console application and batch file can do the same thing provided the developer and administrator get together to work out the details or the developer at least documents the exit codes.

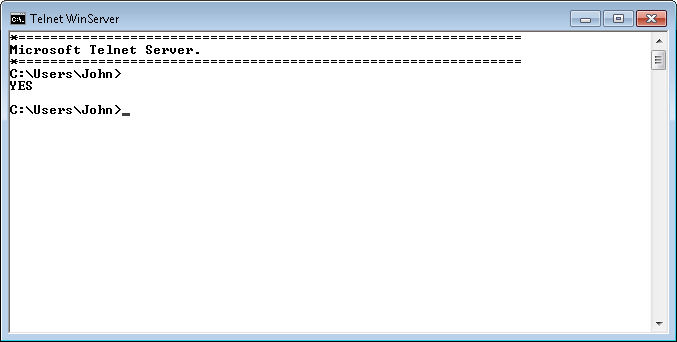
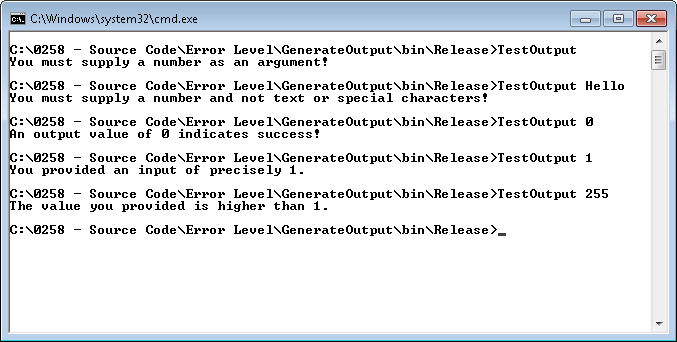
The process is the same each time. Test for an ErrorLevel value, then go to the label specified, execute the directions, and then go to the end of the batch file. The ErrorLevel values must appear in order from greatest to least in order to work correctly. Here is some test output from this test application and batch file pair.

ErrorLevel01

The point of this exercise is to ensure that developer and administrator alike realize the importance of the exit code (ErrorLevel). The application should use it to provide some sort of status information that the administrator can then use to track how well the application works in an automated setting. Let me know if you have any questions at [email protected].


Automating Your Configuration with a Daily Batch

Batch files are still an important part of your system, especially if you find that you need to perform certain configuration tasks every day. Both Administering Windows Server 2008 Server Core and Windows Command-Line Administration Instant Reference discuss batch files, but this post is about a practical example of a batch file in daily use.

My system has a daily batch file. It runs every morning when I start the system up. (To save electricity, I do turn off my system every night and find that things also run better because I do.) The main reason for using a daily batch file is to configure my system so I don’t end up performing the same repetitive tasks every day. I tell the computer what to do and it performs the required configuration for me. After I get my cup of coffee, my system is ready to go—fully configured for my use.

The daily batch file appears as an entry in the Startup folder on my system. Placing the file in the Startup folder means that it runs automatically, but that I can also easily disable the batch file should I wish to do so. Use these instructions to add a daily batch file to your Startup folder:


  1. Choose Start > All Programs. You see a list of entries including Startup.
  2. Right click Startup and choose Open from the context menu. (Unless you want everyone to use the same automatic batch file, you don’t want to choose Open All Users.) You see a copy of Windows Explorer open for the Startup folder.
  3. Right click anywhere in the right Windows Explorer pane and choose New > Text Document from the context menu. Windows will create a new text document named New Text Document.txthowever, only the New Text Document part of the filename is highlighted.
  4. Highlight the entire filename and type Daily Tasks.bat. Make absolutely certain that you also overwrite the .txt part of the filenameDaily Tasks.bat.txt won’t do anything for you.
  5. Press Enter. You see a Rename dialog box that asks whether you’re sure that you want to change the extension of the file.
  6. Click Yes. Windows renames the file.

Of course, the file is empty at this point. Right click Daily Tasks.bat and choose Edit from the context menu. Windows will open a copy of Notepad with the empty batch file loaded. At this point, you can start typing commands for Windows to execute automatically when you start up in the morning. It’s possible to execute many commands directlyespecially those that are meant to execute at the command line, such as W32Tm /Resync, which forces an update of the system clock. Other commands require that you use the Start command to execute them. For example, you might want to tell Firefox to automatically open the Astronomy Picture of the Day site using this command:


Start “C:\Program Files\Mozilla Firefox\Firefox” http://antwrp.gsfc.nasa.gov/apod/

<font<> <font<>The Start command starts Firefox in this case. It passes the URL you provide to Firefox as a command line parameter. Obviously, the application must support command line parameters for this technique to work. More applications than you might think do support command line parameters (many undocumented), so a little research can provide a lot in automation.

Any command that you can execute in any other batch file is also available when you’re starting Windows. There is one special consideration. You’ll likely find that executing one command immediately after another causes timing problems when Windows is initially starting. For example, if you try to open several Web sites, you’ll find that Windows actually misses opening a few unless you provide some sort of wait period between commands. Fortunately, the Choice command fulfills this task perfectly. For example, the following command provides a 15 second delay that you can insert between commands:


@CHOICE /C:N /N /T:15 /D:N


Using this command the user won’t even be aware of the delay. The @ symbol makes the Choice command invisible. The /C command line switch provides the available choices (which consists solely of N in this case). The /N command line switch hides the list of choices from view. You create the actual timeout value using the /T command line switch, which is set for 15 seconds in this example. However, the /D command line switch actuates the delay by automatically choosing N after the 15 seconds. In short, this entire command line is a wait statement.

If you want your batch to run more or less invisibly, make sure you start it with an @Echo Off command. Otherwise, every command appears in the window. It’s helpful to check for errors when you first put the batch file together and when you make changes. Adding an @Pause at the end of the batch file keeps the command window visible so you can check for errors.

After you finish the batch file, you can execute it as you would any other batch file. The only difference in this situation is that this batch file executes automatically each day because it resides in the Startup folder. When you need to make changes to this file you can choose Start > All Programs > Startup, then right click Daily Tasks.bat, and choose Edit from the context menu. The file will open in Notepad for you.

This is one of the more interesting and useful ways to employ batch files. What are your favorite batch processing techniques? Let me know at [email protected].


Is the Virtual Office Doable?

I’ve been talking with a long time friend and an ardent reader about the future of the physical officethe place where people go to work with computers managed by an organization using an IT staff and connected to a centralized server setupthe sort of place that nearly everyone works at today. The physical office costs tons of money to run, is incredibly inefficient, uses a lot of resources, and has a huge carbon footprint. After talking about this topic for a while, I’m becoming convinced that the physical office served a purpose at one time, but now it has become the domain of the control freak boss who has to know precisely what everyone is doing at precisely every minute. (There are no economic or technical reasons to maintain the physical office that I’ve been able to come up with.) Given all of the events that are going on in the world today, I think the virtual officean office where you report to work by logging into your computer at homewill eventually become the norm.

There are many scenarios where a virtual office won’t work and this post doesn’t include them. For example, I can’t imagine a virtual hospital working with today’s technologyyou’ll still need to visit the doctor in his office. Services which require personal contact will still require some sort of centralized facility for the time being. However, even with government offices, it’s becoming quite possible to do everything needed online without actually visiting a physical office, so the virtual office is possible even in this environment. All they’d need is a reliable web host to make sure the office is never offline when needed – someone like hostiserver.com perhaps – and it’d be solid.


Physical offices require infrastructure that is duplicated by the home. You have the physical building, the resources required for human needs, and so on. In short, you’re using two buildings to meet requirements that could be addressed by one. Because physical offices are built to meet industrial requirements, they also cost more to build and maintain than the home. In short, physical offices are a money pit that drag down the bottom line of any company using them.

Now, consider for a moment that everyone has to drive to a physical office. They face energy zapping traffic for some amount of time each day. According to an ABC report, Americans spend 100 minutes on average behind the wheel commuting to work. That’s 100 minutes that the employee could be working instead of driving. At least half of this commuting time comes off the top of the employee’s energy reserve, so organizations are wasting an employee’s best energy on traffic. In addition, in order to accommodate the formal office environment, the employee must conform to the business’ schedule, rather than working when it’s easiest to work, making it quite likely that the business isn’t even receiving the employee’s best effort when they’re on the job. The virtual office promotes efficiency by making it possible for an employee to perform work when energy reserves are the highest and it’s possible to devote dedicated time to the needs of the business. Sick days are also less common because the employee can work at least part of a day in most cases.

Resource usage is higher per person in a physical office than at a home for a number of reasonsthe most important of which is the perception is that someone else is paying for all of the waste that occurs in this environment. For example, all the lights are left on all of the time in most cases. In a virtual office environment, where each employee is responsible for paying the cost of things like electricity, you can be certain that less is wasted. In addition, consider the waste of unnecessary print jobs (or the need to print anything at all in this digital age). There is also all of the duplication that occurs between home and officeplacing the office in the home negates this duplication.

Global warming has become a topic of much discussion. Whether you believe in global warming or not, there is one thing that you must realizethe energy sources used by most people on the planet today are finite, so using fewer of them is better. However, consider the carbon footprint of a physical office for a moment. There is the carbon footprint of the office itself, which probably won’t be reduced much by the virtual office, but it will be reduced at least a little through increased efficiencies and reduced waste. In addition, there is a carbon footprint of all of those drivers going to work. The physical office also consumes land space that could be used for trees or other natural elements that would work to reduce the planet’s carbon footprint. Physical offices are an ecological disaster.

Virtual offices are actually possible today. As an example of what it is and what it can provide, check out this Virtual Office in Melbourne. I know of at least a few companies that have no physical presence at all. They rely on electronic communications, use the cloud or a hosting service for data storage, data backup, and services, and outsource their IT needs in many cases (or have their IT person remote into the systems as needed for updates and repairs). A properly configured virtual office makes it possible for companies to hire the best employees, even if that employee is in some other location than the boss. Software makes it possible to monitor employee activity (so the control freak can ensure the employee is delivering value for the money paid). Some businesses that operate in a virtual office decide to apply for a registered office, so that the employees have a place to meet up if they need to discuss work-related matters in person. This is just one of the many benefits of a company registered office can bring to your business if you are required to meet the standards of a physical office.

All of this makes me wonder just how long the physical office will remain. If nothing else, I see companies adopting the virtual office to remain competitive. The physical office is an artifact of the industrial revolution, where workers had to be in a central location to make widgets of various types. Today, changes in how widgets are made, may eventually make it possible for people to control factories completely from a remote location, which means that going to the factory won’t even be necessary in many casesrobots will do the actual work and maintain the systems. Humans will monitor the robots (something that is already increasingly happening today). What is your take on the virtual office? Will the need to conserve resources and reduce the planet’s carbon footprint win out in the end? Can the need to reduce costs drive control freak bosses to embrace the virtual office? Let me know what you think at [email protected].

Writing a Helpful Review

Reviews are a special kind of opinion, but they’re still an opinion. People often forget this fact as they read a review and accept as factual anything the reviewer has to say. However, even the best review is the opinion of the reviewermaking reviews extremely hard nuts to crack in determining their value to the reader. The best reviews do contain facts and the best reviewers do try to focus their opinion of the product from several perspectives. A good review takes time to write because the author must overcome biases to an extent and try to provide material that will appeal to a larger audience. Good reviews require critical thinkinga type of thinking that’s in short supply in our politically correct society.

Of course, examples of poor reviews abound. John Dvorak recently wrote a post about the potentially corrupt reviews on Amazon (something I’ve suspected for a long time). Short, single paragraph (or sometimes sentence) reviews aren’t all that helpful. Reviews that gush over a product without saying why the product is so great aren’t helpful either. Equally useless are reviews that decry a product as shoddy without explaining what makes it so terrible. In fact, there are few (if any) perfect or completely useless products out therereviews often become a question of balance between the two extremes. Unfortunately, some organizations that request reviews try to artificially balance the review by asking for the three best and three worst features (even when a product lacks sufficient good or bad features to fill the blanks).

So, how do you write a helpful review? First, you begin by actually using the product. If you’re reviewing a movie, watch the entire movie before you start writing anything. Likewise, read the entire book you’re reviewing or test other products in a real world environment, rather than in a lab. In some cases, you see reviews based on the beginning of a movie, a chapter of a book, or the reviewer’s impression after opening the package. Such reviews are useless because they don’t consider the product as a whole.

After you’ve examined the product completely, it’s time to start writing the review. Explore what you feel about the product. Does it work as intended? Is it helpful? Write down your impressions as they come to you. Take time to think about the product critically. Could someone other than you have a use for this product? After all, you already know how you feel about the producta review is meant to help someone else understand the product better, so you’re writing for them, not for yourself.

Verify your impressions by going back to the product. Does the book really contain 101 secrets to making a million dollars by age 10? Is the movie truly presenting a hidden agenda in a candy-coated package? The act of verifying your impressions is important because we all remember things that aren’t actually there. Checking your facts is the mark of a superior reviewer.

Put your impressions into some sort of comprehensible order. Nothing is worse than reading a review composed of seemingly unrelated thoughts. A review should flow in some sort of order. A movie or book often lends itself to a chronological flowfrom beginning to end. However, some reviews work best if you can provide an overview, the good parts, the bad parts, any special features, and then a bottom line that answers the question, “Is this a good product?” or “Why should you buy this product.”

Set the review aside for a day. Go back and read it again. Does the review still ring true? Do you still feel the words you’ve written or have things changed now that you’ve had time to think about the product more? A review is an opinionit’s biased in some respects. However, even with the opinion, even with the bias, a good review still conveys useful information about the product, especially when you back your opinions and biases up with facts.

Not many people want to take the time to write a helpful review. The best reviews require time and skill to write. A helpful review isn’t written in the heat of the moment and it doesn’t lash out at anyone. When you write a good review, it reflects your honest opinion about the product and doesn’t attack the product’s creator. After all, you know about the product, but know nothing about the product’s creator and there is nothing you can tell anyone about the product’s creator, so why go in that direction?

What else would you add to the skills of a good reviewer? Are there any special features you look for in reviews? Let me know at [email protected].


A Visual Studio Quick Guide to Accessibility (Part 2)

In my previous post, A Visual Studio Quick Guide to Accessibility (Part 1), I discussed one particularly important accessibility feature. The use of keyboard accelerators is essential because many people use them to improve productivity. Making them visible is important because you can’t use a feature you can’t see. This post won’t cover all of the ideas and concepts for Visual Studio developers found in Accessibility for Everybody: Understanding the Section 508 Accessibility Requirements. However, it does provide an overview of the most essential accessibility featuresthose that every application should have.

The first feature is the tooltip. Every application should include a ToolTip control. You can then provide a description of every user-accessible control in the ToolTip property for that control. It’s important to stress user-accessible in this case. For example, you won’t provide a ToolTip property value for a Label in most cases because the Label simply marks a user-accessible control such as a TextBox. When the user hovers the mouse over the control, the application displays a helpful bit of information about that control. Screen readers used by those with visual needs also read each of the tooltips to describe the controls to the user. A few rules for using the ToolTip control are:


  • Keep the ToolTip text short. Imagine trying to listen to long diatribes about control functionality when working with a screen reader.
  • Make the ToolTip text specific. Tell the user precisely what the control is designed to do.
  • Emphasize the user’s interaction. Tell the user how to interact with the control, such as “Type the message you want displayed.” or “Click to display a message on screen.”


In addition to the ToolTip control, every control has three special accessibility properties as shown here.

Accessibility0201

These properties have specific purposes:


  • AccessibleDescription: A description of how the user should interact with the control. In fact, I normally use the same text as the ToolTip property for this entry and rely on the same rules for creating it.
  • AccessibleName: The name that will be reported to accessibility aids. I normally provide the same text that appears on the control’s caption, minus the ampersand used for the keyboard accelerator.
  • AccessibleRole: The task that the control performs. In most cases, Default works just fine. However, when your control performs an unusual task, you should choose one of the more specific entries so that the accessibility aid can help the user interact with the control.


Make sure you fill out each of the properties so that accessibility aids have the best chance of making your application useful to those who have special needs. In fact, it shouldn’t surprise you to discover that AccessibleRole is already filled out for most controls, so you really only need to fill out two properties in most cases.

The final two changes appear on the form itself. Whenever possible, assign controls to the AcceptButton and CancelButton properties. The AcceptButton provides a means of accepting the content of a dialog box or form by pressing Enter. On the other hand, the CancelButton property makes it possible to reject changes to the form or dialog box by pressing Esc. It’s true that you’ll find situations where you can’t assign a control to one or both properties because there isn’t a default acceptance or cancellation control, but this limitation applies to very few applications.

Accessible applications are significantly easier for everyone to use. Less experienced users can benefit from the inclusion of tooltips. Keyboardists benefit from the presence of keyboard accelerators. Adding these features isn’t difficult or time consuming, so all developers should be adding them.  Let me know your thoughts about accessibility and whether you’d like to see additional accessibility posts at [email protected].


A Visual Studio Quick Guide to Accessibility (Part 1)

One of the most important accessibility aids that also applies to common users is the keyboard accelerator (or keyboard shortcut). In fact, this issue figures prominently in both C# Design and Development and Accessibility for Everybody: Understanding the Section 508 Accessibility Requirements. Just why Microsoft decided to turn this feature off in Windows 7 is a complete mystery to me. All of the pertinent examples in Professional Windows 7 Development Guide include keyboard accelerators, but you can’t see them. I’ve received a number of queries about this problem and decided that this two-part post on accessibility for Visual Studio developers is really necessary.

First, let’s discuss the keyboard accelerator from a programming perspective. A keyboard accelerator is the underline you see on a button, label, menu, or other control. You press Alt+Letter to perform the equivalent of a click or selection with the associated control. For example, most people know that you press Alt+F to access the File menu in an application that has keyboard accelerators properly implemented.

To create a keyboard accelerator, the developer precedes the letter or number with an ampersand (the & character). For example, to make the File menu respond to Alt+F, the developer would type &File in the development environment. I’ve always strongly encouraged the use of keyboard accelerators as a must have for any application because many keyboardists are seriously hindered by an application that lacks them. In fact, you’ll find the keyboard accelerators used in the vast majority of my books, even for examples that aren’t related to programming in any way.

Second, some developers who feel as I do about keyboard accelerators are upset that adding them to applications no longer works (apparently). Windows 7 hides the keyboard accelerators for some odd reason known only to Microsoft. The Ribbon interface provides an equivalent when the developer provides it, but we’re talking about all of the applications (the vast majority) that don’t use the Ribbon interface. It turns out that you must manually turn the keyboard accelerator support back on. Follow this steps to accomplish the task manually:


  1. Open the Control Panel, followed by the Ease of Access applet. Click the Ease of Access Enter link. You’ll see the list of options shown here:Accessibility0101
  2. Click Make the Keyboard Easier to Use. You’ll see a list of options for making the keyboard easier to use. Near the bottom of the list you’ll see the Underline Keyboard Shortcuts and Access Keys option shown here.
    Accessibility0102
  3. Check this option and then click OK. The system will now display the underlines as before.

One of the biggest questions I had while working through this is whether there is a method for turning this feature on or off at the command line. There isn’t any WMIC command that I’ve found to make the change (nor any other command for that matter), so I’m currently trying to discover the associated registry keys. I’ve found one so far. The On value in the HKEY_CURRENT_USER\Control Panel\Accessibility\Keyboard Preference key must be changed to 1. However, that value alone doesn’t make the change work, so there are more keys and values to find. If anyone has some clues to provide me about this particular need, please let me know at [email protected]. In the meantime, I’ll continue looking for the elusive registry updates required to automate this change.


Interacting with the Remote System Using Telnet

Today marks the last post in my Telnet series unless someone writes with additional ideas on issues they’d like me to cover. So far, I haven’t received any requests for Telnet scripting topics, so I’ve decided that perhaps there isn’t a lot of interest in this topic. I discussed basic Telnet connectivity in the Using Telnet to Perform Tasks post. The last post, entitled “Sniffing Telnet Using Wireshark,” covered Telnet security issues. Today’s topic is a natural extension of the topics discussed so farnow that you have an interactive session with a remote system (router, server, or workstation, it doesn’t matter), what can you do with it?

My book, Administering Windows Server 2008 Server Core,” provides a few ideas on the topic, but not very many. I’m thinking now that perhaps I should have discussed this topic in “Windows Command-Line Administration Instant Reference,” but then there is always the question of the cost to other topics and I had no idea when I wrote that book that Telnet was still so popular with some administrators. The short answer is that you have a fully functional command prompt.

The problem is that you’re working with a remote command prompt, not the local command prompt. So, the command prompt you’re accessing is the one on the remote system, with all its attendant resources and limitations. As a consequence, unless you’re working with that system every day, you’ll want to type Ver and press Enter to see which version of the command prompt you’re using. It seems like a simple thing to do, but some administrators don’t and later discover that problems at the command line had nothing to do with the session, but the version of the command line. If you’re working with Windows, you can find a complete list of Windows OS Version numbers on MSDN.

Knowing the version number and the associated operating system name lets you look for commands for that OS in either of my books or you can look them up online. For example, you can use the search phrase, “Windows XP Command Line” on Google (or any other search service) to obtain quick access to sites such as Technet where you can find a listing of associated commands from A to Z. Obviously, these sites will only tell you which commands are available, not how to use them, but knowing what’s available does help.

Another problem that many administrators encounter is that they don’t consider the environment. Again, the environment focuses on the remote system, not your local machine. So, that favorite path might not be part of the Path environment variable and typing a much beloved command won’t work at all. Consequently, it pays to type Set | More and press Enter so that you can look through the environment variables to ensure everything you need is available. This command also provides some essential cues about the remote system configuration. For example, if the Set command reveals a ProgramFiles(x86) environment variable, then you know you’re working with a 64-bit system and some older commands may not work as anticipated. Use the Set command to add or modify any environment variables required to get your work done.

At this point, you know which commands you can execute and you know that the environment is configured for use. What you don’t know is whether you have the rights required to accomplish the task. You can use commands such as ICACLS to verify your rights or you can simply try the command to see whether it completes successfully. The important thing to keep in mind is that newer versions of Windows employ the UAC, even at the command line, so you might find your efforts thwarted.

Even when everything is working properly and you have all of the required rights, you should avoid using certain commands in a remote session. For example, you definitely don’t want to start another copy of Telnet from the remote session (assuming the remote session will even allow it). Using the WinRS command probably won’t work well either. However, Terminal Server commands such as QWinSta appear to work just fine. Let me know your thoughts about Telnet at [email protected].


Sniffing Telnet Using Wireshark

In my previous post about Telnet entitled, “Using Telnet to Perform Tasks” you discovered how to use Telnet to work interactively. Now you have enough information to view some of the security issues with Telnet. It’s incredibly easy for someone to monitor your Telnet session. The only protection you have is firewalls and other security you might have in placeTelnet is completely open and offers nothing in the way of security. Lack of security is one of the reasons I didn’t cover this utility in the Windows Command-Line Administration Instant Reference.” (Telnet is covered from a command line perspective in Administering Windows Server 2008 Server Core.”) However, the lack of security isn’t a problem in some situations and many administrators prefer to use Telnet to manage some network hardware such as switches and routers. Consequently, the main emphasis of this post is building an awareness of the security issues behind using Telnet so that you can make a good decision about using it to meet your needs.

Before you can see the security issues for yourself, you need to download a utility to sniff packets on your network. This post will rely on a free utility named Wireshark because it does the job admirably and is supported on a number of platforms. Because I’m using the 64-bit version of Windows 7, I downloaded the 64-bit Windows installer for the 1.4.7 version of Wireshark. To make things simple, I performed a full install. Part of the Wireshark setup will also install WinPcap, so you don’t need to install this product separately. If you’re using some other version or configuration of Wireshark, your screen may not look precisely like mine.


Using a sniffer is somewhat dangerous and you need administrator privileges to do it. This post isn’t designed to make you an expert in protocol sniffing. In fact, this post is exceptionally simple and is designed only to make you aware of deficiencies in Telnet security. The nefarious individual who gains access to your network to sniff about will have significantly more skills and be able to learn considerably more than you’ll learn using the simple directions in this post.


After you complete the installation, you’ll be able to start Wireshark. Choose Start > All Programs > Wireshark and you’ll see the initial Wireshark display shown here.

Wireshark01

Wireshark isn’t configured to work with Telnet at the outset, so you need to tell it what to sniff. Click Capture Options and you’ll see what looks like an incredibly complex Capture Options dialog box like the one shown here.

Wireshark02

We’re not going to worry about the vast majority of these options. In fact, you only need to set two options to sniff out Telnet packets. Look first at the Interface field. Make sure it’s set to Local. Select your network adapter from the drop down list box. The network adapter will normally have a human readable name, not something odd as shown in the screenshot.

Next you need to tell Wireshark what to sniff on the interface you’ve selected. Click Capture Filter. Type Telnet in the Filter Name field and port 23 in the Filter String field. Click New. Your dialog box should look like the one shown here.

Wireshark03

Click OK. You’ll see the filter criterion entered in the Capture Filter field. More importantly, Wireshark is now configured to offer a Telnet filter anytime you need one. Click Start. The Wireshark display will change, but you won’t see anything on itthe display will be blank.

Open a command prompt and start a copy of Telnet in interactive mode. Make sure you open a command prompt with administrator privileges. The act of starting Telnet won’t create any packets as you can see in Wireshark. In fact, type ? and press Enter. You’ll see that Telnet is still perfectly safeit isn’t generating any packets.

Use the Open command to open a connection to your server. Simply typing O ServerName and pressing Enter generates packets. You can see them in Wireshark like this:

Wireshark04

Notice that some of these entries are labeled Telnet Data. In addition, the Source and Destination columns tell you which direction the information is flowing (the client is 192.168.137.131 in this case). Click on the first of these entries and you’ll see that the middle panel contains some information about the Telnet Data. Open the Telnet entry and you’ll see some interesting information as shown in the figure. For example, the packet information tells the viewer that Telnet is set to use the authentication option.

Go back to the command prompt now. Type y and press Enter to send your password information to the server. Of course, one of the big questions you probably have is whether Telnet is exposing your username and password. Near the end of the packets, you’ll find one that contains an Suboption Begin: Authentication Option entry like the one shown here.

Wireshark05

In this case, the option entry tells the server that the client won’t forward the authentication credentials. The option works because I’m already signed onto the server and the server already has my credentials. This is one of the items you’ll want to check for your own Telnet setup, however.

Unfortunately, this session isn’t safe by a long shot. Type just a single letter, a D, at the command prompt. You’ll find that typing this single letter generates a packet that you can see with Wireshark like the one shown here.

Wireshark06

In fact, you’ll find that every action on your part creates more packetseach of which is easily sniffed by anyone with Wireshark or any other application of the sort. Finish the command by typing ir and pressing Enter. You’ll see the expected response at the command line.

At this point, you can also see the response from the server in Wireshark. The text isn’t as readable because it contains all of the control characters normally used to format the text. However, here’s an example of the response as it appears on my system.

Wireshark07

Look at this response carefully and you’ll see that anyone can learn precisely what you’re doing. If you have to enter passwords to perform a particular task, the viewer will get them too. Telnet isn’t a secure method to manage anythingyou need to provide a secure environment in which Telnet can run. This post only touches on the tip of the iceberg, of course. Let me know if you have any questions about it at [email protected].


Using Telnet to Perform Tasks

The previous post in this series, Configuring Telnet, helped you get Telnet set up on a system. Now that you have Telnet installed, you can use all of the command line and interactive features described in Administering Windows Server 2008 Server Core to access it. For example, you can simply type Telnet <Name of Server> and press Enter to start a session with that server. Because of the way Telnet works and the commands that you’ll issue, it’s always a good idea to use an Administrator command line when working in either Vista or Windows 7. To open such a command line, you choose Start > All Programs > Accessories, right click the Command Prompt entry, and choose Run As Administrator from the context menu. You may have to supply a password to gain administrator access.

When you plan to work with Telnet for an extended period, you might find the interactive environment more suited to your needs. To enter the interactive terminal, you simply type Telnet and press Enter. This action places you at the Microsoft Telnet prompt, but doesn’t open a connection for you. Type ? and press Enter to see a list of available commands as shown here.

TelnetUsage01

One of the advantages of using the interactive prompt is that you’ll find it easier to configure Telnet options. To see these options, type Set ? and press Enter. For example, if you want to make your Telnet session a little more secure (and the emphasis is on little), type Set NTLM and press Enter. Some settings are a toggle. For example, if you want to remove NTLM authentication, you type Unset NTLM and press Enter. Type Unset ? and press Enter to see a list of toggled settings. Here is a list of the settings available when using the Windows 7 version of Telnet (your version of Telnet might vary).

TelnetUsage02

The ability to set or reset settings is nice, but it would also be nice to know how Telnet is configured. To obtain this information, you type D (for display) and press Enter. You’ll see a list of configured settings. The default settings depend on your version of Windows and how you configured Telnet in the past. If you don’t see a particular setting, it means that the setting either isn’t configured or is toggled off (unset).


Simply configuring a setting doesn’t guarantee that Telnet will use it. The server determines whether a particular setting is valid. For example, you can request NTLM authentication, but the authentication won’t occur if the server doesn’t support it. Likewise, your choice of terminal is sent to the server, but the server ultimately chooses the terminal type, which is going to be ANSI in most cases.


To create a connection in interactive mode, you type O <Name of Server> and press Enter. You may see a warning message about sending your password in the clear. Type Y and press Enter. At this point, you’ll see the standard Telnet prompt at the server. To regain access to the client side prompt, you press a control key combination. The default is Ctrl+]. This will take you back to the client Telnet prompt where you can enter additional commands. When you want to go back to the server side, simply press Enter twice.

To check your connection, type St and press Enter. You can also ask the server questions, such as “are you there” using the Sen command. To see all of the send options, type Sen ? and press Enter. The help list shows those commands that Telnet definitely supports. However, the Knowledge Base article entitled, “The TELNET Protocol” seems to tell a different story (I’ll check out these additional commands for a future post). For the sake of doing something interesting, try typing Sen AYT (for are you there) and press Enter. Here is typical output from this command.

TelnetUsage03

Now that you’ve asked for information, press Enter twice to see the server’s response. In most cases, you’ll see YES as shown here.

TelnetUsage04

You have several ways to close a connection. However, for this session, press Ctrl+] to return to the Telnet client session. Type C and press Enter. The connection is now closed. To verify this fact, type St and press Enter. Type Q and press Enter to leave the Telnet interactive environment. Now, here’s the interesting part of all this. You can also script this sort of behavior to make many tasks automatic. A future post will also pursue this topic in more detail. For now, let me know if you have any questions about the basic interactive session at [email protected].


Configuring Telnet

Readers have written in to tell me that they’d really like to see more about Telnet after reading my Telnet Not Included post. Of course, there was the usual disagreement as to where I should begin the discussion, so I decided to start at the beginning. As previously mentioned, I do cover this command in my book Administering Windows Server 2008 Server Core,” but don’t cover it in “Windows Command-Line Administration Instant Reference.”


Adding the Telnet Server feature to a server will likely require a restart. Consequently, you should only take this task on when you know that you can reboot the server afterward.

Neither books tells you how to configure Telnet, which is a necessary first step because Microsoft doesn’t install this application automatically any longer due to some serious security considerations. The purpose of this post then is to help you configure a Telnet setup that consists of a server (WinServer for the purpose of these posts) and a client (Main). You’ll need to substitute the names of your systems when working through the commands on your system.


It’s important to note that you can perform this task on a single machine by configuring both client and server.

WinServer is a Windows 2008 R2 Server. If you have some other version of Windows, the instructions I’m providing here might not work precisely.


  1. Choose Start > Control Panel. You’ll see the Control Panel window shown here.
    TelnetConfig01
  2. Click Turn Windows Features On or Off. You’ll see the Server Manager window.
  3. Choose the Features folder in the left pane. You’ll see a list of installed features like the ones shown here.
    TelnetConfig02
  4. Click Add Features. You’ll see the Add Features Wizard.
  5. Check the Telnet Server entry as shown here.
    TelnetConfig03
  6. Click Next. You’ll see a message about the server needing to be restarted after you complete the installation.
  7. Click Install. Windows installs the Telnet Server feature.
  8. At some point, you’ll see an Installation Succeeded message. Click Close to close the Add Features Wizard.
  9. If necessary, reboot your system (Windows will tell you when it’s necessary to reboot). Unfortunately, your Telnet installation isn’t active yet.
  10. Open the Services console found in the Administrative Tools folder of the Control Panel (depending on how your configure your server, you might actually find this folder right on the Start menumy recommended placement for such an important feature).
  11. Locate the Telnet entry. You’ll notice that the service is not only stopped, but it’s also disabled as shown here.
    TelnetConfig04
  12. Double click the Telnet entry. You see a Telnet Properties dialog box like the one shown here.
    TelnetConfig05
  13. Choose Automatic (Delayed Start) in the Startup Type field and click Apply. Using a delayed start seems to ensure fewer problems when working with Telnet.
  14. Click Start. Telnet should now be accessible on the system.

You can also configure the Telnet server from the command line. To set the server startup configuration type, SC Config TlntSvr Start= Delayed-Auto and press Enter. To start the server, type SC Start TlntSvr and press Enter.

Once you have Telnet installed on the server, you also need to install it on your workstation. The following steps get you started.


  1. Choose Start > Control Panel. You’ll see the Control Panel window.
  2. Click Programs. You’ll see the list of Programs options.
  3. Click Turn Windows Features On or Off. You’ll see the Windows Features dialog box.
  4. Check the Telnet Client option and click OK. Windows will install the Telnet Client.

Of course, you don’t know whether your setup will even work. So, it’s time to check your setup.


  1. Choose Start > All Programs > Accessories to display the Command Prompt link.
  2. Right click Command Prompt and choose Run As Administrator from the context menu. You’ll see a User Account Control dialog box where you click Yes. At this point, you’ll have an administrator level command prompt to use.
  3. Type Telnet WinServer (or whatever the name of your server is) and press Enter. You’ll see a message warning you about sending your password to the server. The password is sent in the clear and this is extremely dangerous from a security perspective.
  4. Type Y and press Enter. Telnet will create a command prompt session on the server for you.
  5. Type Echo %ComputerName% and press Enter. You’ll see that the name of the system matches your server, so you really do have a connection to it.
  6. Type Exit and press Enter. Telnet ends the session with the server.
  7. Type Echo %ComputerName% and press Enter. The output now corresponds to your local workstation.


At this point, you have a Telnet configuration to use for future posts. Of course, you can start experimenting with it now. Any command you can normally type at the command prompt, you can likely type at the Telnet prompt as well (as long as there are no graphics involved with executing the command). Now I need to know what sorts of topics you’d like me to cover. Send me e-mail at [email protected] with your requests.