It’s All in the Engineering

A considerable amount of my time in fulfilling the self-sufficiency dreams Rebecca and I have is spent building new items and repairing existing items. Existing equipment of all types requires constant maintenance as well. If you leave a cage exposed to the elements long enough, it’ll simply rot away. Everything has a tendency to fail without some sort of maintenance. All of these efforts—everything from building to maintaining to tearing down when an item is no longer useful—relies on some sort of engineering principle. If you want to get water to your garden, but the hose diameter is too small, the resulting trickle will only serve to frustrate you. Building shelves that don’t rely on proper engineering principles are downright dangerous. Installing electrical elements without regard to the amount of current the circuit needs to handle will almost certainly result in a fire. In short, in order to know in advance just how well something will work and what you need to do to maintain it, you need to know the engineering behind it.

In the Building Larder Shelving post, you learned about the engineering behind building shelves that will hold up to the weight of canning jars, which is considerable. This is just one of many posts that I’ve created that define the math behind self-sufficiency. If you ever find an error in my calculations, please let me know so that I can provide an update with the correct information. It’s also important to realize that my calculations are for a specific project type and you need to use them with your project in mind (making any required changes).

Fortunately, there are other places where you can find interesting information about engineering principles. One of the best places I’ve found recently (as passed on by a friend) is Engineering Toolbox. This site provides all sorts of useful information about various engineering disciplines, including how to create the proper sort of concrete for a project that you have in mind. If you were to mix the concrete without using a recipe, you’d either end up spending way too much money for your project or you’d end up with a project that won’t hold up to any kind of abuse.

It’s incredibly dangerous to take on a building or maintenance tasks for which you lack the proper equipment or training. Always make sure you understand not only the engineering behind the task, but that you also adhere to any required building codes and obtain the proper permits and inspections, as required. More than a few people have gotten hurt by not taking the proper precautions, so always verify that every step of a process you perform is done correctly before you proceed to the next step. The care you take in performing self-sufficiency tasks will always pay dividends in your personal safety and the longevity of the project.

Finding the right site to discover just how to create, maintain, and tear down the equipment needed to be self-sufficient can be an adventure akin to the mysteries solved by Holmes. You need to exercise care in using the information you find and verify that information across several different sites to ensure it’s accurate. Of course, there always comes a time when you’re simply in deep water and need the help of a professional. Some professionals will mentor you in building your project (for a fee in most cases); others will let you help them perform the task so that you gain needed knowledge and experience.

Building and maintaining your equipment can be a lot of fun. However, doing it the wrong way can be a disaster. Let me know your thoughts about building and maintaining equipment at [email protected].


Determining the Amount of Shelving You Need

I never anticipated receiving quite so many e-mails about larder shelving (including a few comments about the quaintness of the term). When determining the amount of larder shelving you need, you must consider the kinds of storage you use. We group our storage into four areas:

  • Ready Storage: Used to hold food short term. It includes the refrigerator, kitchen cabinets, and under worktable storage (five gallon buckets).
  • Deep Freeze: Used for moderate term food storage. Some foods don’t can well or they taste better when you freeze them. We have two freezers (one small and one large) for freezing fruit, vegetables, and meat items. Because we vacuum pack our foods, we store some items up to two years. The freezers are kept at 0 or less to ensure the food is thoroughly frozen. Each summer, before we begin storing the harvest, we take everything out of the freezers and use everything that has gotten old in some way (we sometimes put old food in the compost where it turns into dirt that will be used for new food).
  • Larder: Used for long term canned storage of food. Many items will last up to five years in the larder because of the canning techniques we use. Every spring every can is cleaned and inspected to ensure it remains safe. The larder is organized to present the oldest items up front so they’re used first.
  • Root Cellar: Used for winter fresh storage. As the name implies, we use our root cellar to store roots. However, we also use this area to store apples, pears, and squash. The root cellar sees use from September to around April each year. It’s never used during the summer months, mainly because our root cellar isn’t damp or cool enough during that time and the food would spoil.

It’s essential that you determine how each area will ultimately work into your food storage strategy. If you decide to expand your storage area by using an unused cabinet, make sure it is cleaned and sanitized well. Especially the kitchen cabinets ought to be thoroughly cleaned. If your cabinets are broken or needs refinishing, you can consider looking for cabinet refinishing companies in fairfax va (or where it is more local to you). Determining how large to make the larder then becomes a matter of portions. If you want to be fully self-sufficient, you need to decide where the food will come from for your meals in a general sense.

Let’s look at a specific example. We drink a 6 ounce glass of juice with breakfast four days a week on average. That’s a total of 6 ounces per glass * 2 people * 4 days a week * 52 weeks a year or 2,496 ounces per year. We follow a two year plan for juice because it’s easy to obtain from a number of sources, so that’s a total of 4,992 ounces for the two years. All of our juice is canned, so all of that juice has to be stored in the larder. Juice is canned in quart jars, so we need 156 jars (at 32 ounces per jar) to store that much juice. From last week’s post you know that each shelf segment can hold 42 quart jars, so we need 3.7 shelf segments for juice.

To fill out the remainder of breakfast, we usually have a grain product of some type. In addition, some meals include breakfast meat and/or eggs. Along with juice, we also drink milk and coffee. All of these items come from ready storage, so you don’t need to consider them in creating your larder.

Lunch is our main meal of the day. Normally we have meat four days a week. Most of the meat comes from the freezer. However, on busy days, we used canned meat from the larder. The canned meat is computed a bit differently. We normally can the smallest chickens and one chicken produces two quarts of canned meat. Each quart contains four pieces: half a breast, wing, leg, and thigh (see Cutting Up a Chicken for details). One quart serves as a main meal and a snack when eaten directly or as two main meals when eaten as part of a salad or casserole. Normally we process eight chickens at a time and the first two processing sessions produce the canned chicken, so there are 32 quarts of canned chicken produced each year, that require 0.8 shelf segments. We produce 1 ½ years worth of canned chicken each year for two years (and take off the third year), so the maximum shelf space used at the end of year 2 is 1.6 shelf segments.

Along with our meat, we normally have two kinds of vegetables, some of which come from the larder, but can also come from ready storage, the root cellar, or the freezer. This is where you need to keep records on how you use your various food storage areas. About 70 percent of our vegetables come from the larder. We eat one quart of vegetables when there is meat included in the meal and one and a half quarts on our vegetarian days. Vegetables are generally stored in pints, but there are times when we store vegetables in quarts as well. Because vegetables tend to have longer cycles between good yields we follow a three year plan. The calculation for vegetables becomes ((1 quart a day * 4 days) + (1.5 quarts a day * 3 days)) * 52 weeks a year * 3 years * .70 percentage stored in larder or 928 quarts or 22.1 shelf segments.

Our afternoon snack usually includes fruit, a grain product, and a dairy product. The fruit is the only item that comes from the larder. It can also come from ready storage, freezer, or root cellar. Our fruit portion is normally 1 pint per day when taken from the larder. Because fruit production can be incredibly unpredictable, we follow a four year plan. About 30 percent of our fruit comes from the larder. This means the calculation for fruit is 1 pint per day * 365 days a year * 4 years * .30 percentage stored in the larder or 5.2 shelf segments.

The evening snack can come from a variety of sources, but we normally have something quite small. This is the time of day we’ll have ice cream, leftover canned meats, fruit, cookies, or something else small such a dried fruit/vegetable slices (see Making Dehydrated Chips for details). I normally don’t include this snack in the calculations, but your eating habits might be different and you might need to include it. The new shelving does include space for four 5 gallon buckets worth of dried fruits and vegetables that don’t appear as part of the calculations that come later in this post.

We also make our own condiments, salsas, jellies, and other items that take up 3 shelf segments. Again, you need to consider your eating habits and make decisions based on those habits.

Now it’s time to add everything up to see how much space is required. Our total shelf segment usage (a shelf segment consists of 42 quarts or 84 pints) is 3.7 for juice, 1.6 for meat, 22.1 for vegetables, 5.2 for fruit, and 3 for condiments or a total of 35.6 shelf segments. Our two larder shelving units currently provide 39 shelf segments (not including the 5 gallon bucket/canning equipment storage in the new shelving unit). The remaining shelf segments are used for organizational purposes and for empty jars.

The calculations for determining how much shelf space you need can seem daunting, but if you address one meal at a time as I’ve done in this post, you should find it possible to do. What you need to do is focus on that meal and the portions you typically eat during that meal. Let me know if you have any additional questions on this topic at [email protected].


Building Larder Shelving

Creating a place to store your canned goods is an essential part of making self-sufficiency work. In Fun is Where You Find It! (Part 3) you see one view of the larder shelving we use to store our canned goods in the basement. The shelving has to be built to withstand the weight of the canned goods without sagging. In addition, you want to be able to support part of someone’s weight when they need to regain their footing. If you are looking for supplies to help with your building project, you may want to visit a trade supplier website similar to Tradefix Direct, where you may be able to find the supplies you need for your building needs.

In order to create our shelving, I played with some wood and actually weighted it down to see when it would sag. I then used those assumptions to start designing the shelving and to feed the numbers into the Sagulator. The maximum amount of sag you should be willing to tolerate is 0.01 inch per foot. You need an engineering margin to ensure the shelves will hold up.

Of course, the problem is getting the numbers the Sagulator requires. A typical quart jar of canned goods filled with a liquid weighs 3 pounds. If you make the shelves 24 inches deep using three 1 × 8 boards and create spans of 25 inches, you can store 42 jars per span for a total weight of 126 pounds. Using #2 Douglas fir, you get a sag of 0.01 inch. You must consider the kind of wood that you’re using as part of your calculation and keep refining the measurements until you obtain a setup that works.

You also need to consider the shelf spacing. It’s important to allow finger spacing between the shelves so that someone can reach all the way into the back to retrieve a jar without problem. After a lot of experimentation, I came up with the following shelf spacing:

  • 8 inches for quart jars stacked one high
  • 10 inches for pint jars stacked two high
  • 16 ¾ inches for 5 gallon buckets and canning equipment

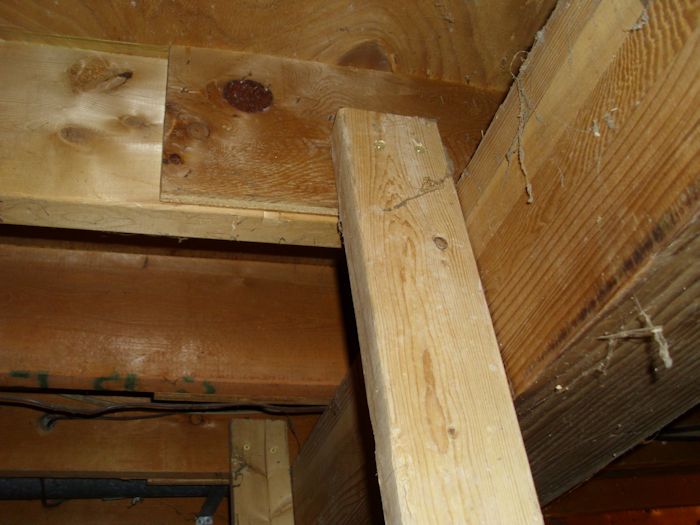
To create our new larder shelving, I started with four 2 × 4 supports tied into the ceiling joists. You absolutely don’t want the shelves falling on you, so make sure you use sturdy screws. I relied on 5-inch heavy decking screws that went completely through both the 2 × 4 support and the joist as shown here.

LarderShelving01

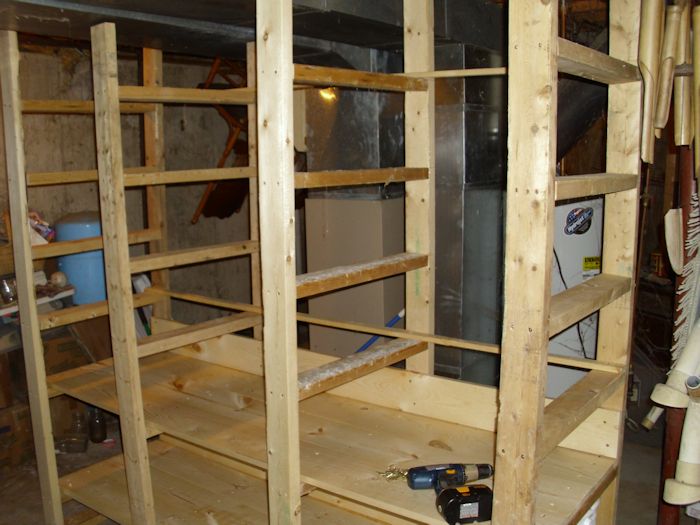
Make sure you use at least two sturdy screws to hold each framing member for the shelves for each shelf you create. My shelving ended up being 75 inches long, 24 inches deep, and 84 inches high. The shelving arrangement includes one shelf for five gallon buckets, two shelves for quart jars, and three shelves for pint jars as shown here.

LarderShelving02

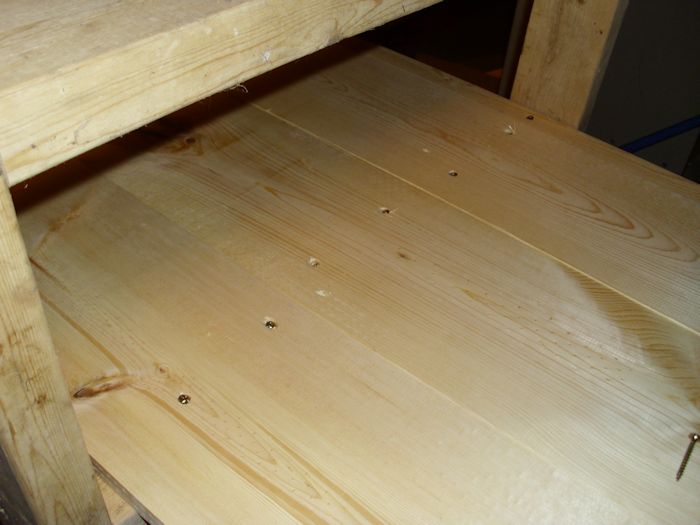
Make absolutely certain you keep everything square and level as you build because any deviation will lower the amount of weight the shelving can carry. Each shelf should be tied into every framing member with at least two screws. In this case, that means eight screws per board or 24 screws for each shelf (because there are three 1 × 8 boards used for each shelf).

Because of the shelf heights, you’ll find that you have to insert the screws at an angle. Actually, this is a good way to add the shelving anyway because the screws gain greater purchase in the wood. However, make sure you alternate the direction you screw the screws so that you don’t end up racking the shelving (making it out of square or level). Of course, you may be able to insert the screws at a better angle if you had access to the best crossover ladder that you can find. My friend was telling me about them once, as he is required to use them whilst he is working in a warehouse. They can help you to reach things at a certain height, as well as keeping you safe at the same time, as otherwise, you could face some serious injuries. Even though the ladder is a good idea in this scenario, I think they are primarily used for things at a greater height. So, adjusting is key. Here is how your screw pattern should look.

LarderShelving03

In this case, the first and third shelves have screws coming in from the right, while the second (center) shelf has them coming in from the left. In the next section, I reversed the direction so that the first and second shelves came in from the left, while the second shelf came in from the right. Alternating directions like this helps make the shelves stronger.

Every shelf should also have a backer board to keep the canned goods from simply falling out the back of the shelf. In this case, I used 1 × 6 boards secured with two screws in each section. The backer boards also provide added strength to the entire unit.

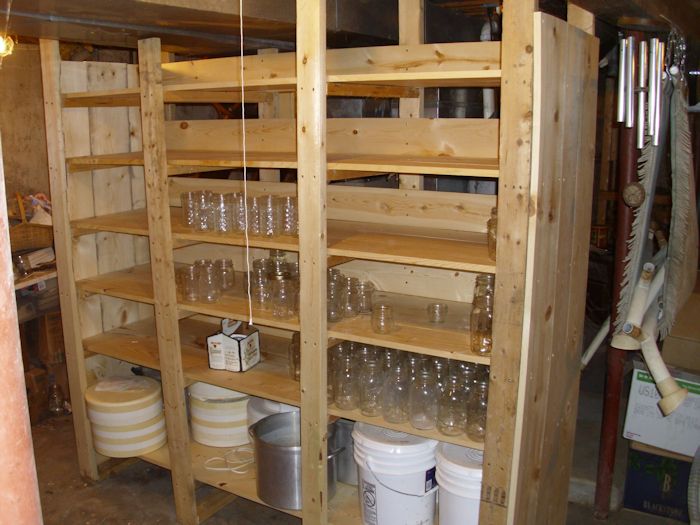
Finally, to keep things from sliding out of either side and to also provide places to put hooks for items we wish to hang, I added end pieces. These end pieces are made from two 1 × 10 and one 1 × 8 boards. Here is how the shelving looked after I finished it (with some items already in place).

LarderShelving04

When building shelving, make sure you take time to ensure that the shelving will actually hold the items you want to put on it. The essential issue is to control sag so that the shelving doesn’t fail in the long term. Let me know your thoughts about larder shelving at [email protected].