Using Assoc and FType to Create a New Type

On page 74 of Windows Command-Line Administration Instant Reference, I describe how to add an Open command to an existing file type, txtfile. The txtfile type already appears in the registry, so adding a new command to it is relatively straightforward. However, what happens if you want to create an entirely new type—one that doesn’t currently exist in the Registry?

Before you can do anything, you need to open an Administrator command prompt because Vista, Windows 7, and anything else newer won’t let you make the required registry changes with a standard account. Follow these steps in order to open an administrator command prompt.


  1. Choose Start > All Programs > Accessories.
  2. Right click the Command Prompt icon and choose Run As Administrator from the context menu. You’ll see a User Account Control dialog box.
  3. Click Yes. You’ll see a new command prompt open. However, instead of the usual title bar entry, you’ll see Administrator: Command Prompt. In addition, instead of opening to your personal user folder, the prompt will display C:\Windows\system32>. If you don’t see these differences, then you haven’t opened an administrator command prompt.


Let’s say you want to include a new file extension and it’s associated type. For example, you might want to create a .RIN file extension and associate it with a type of RINFile. Once you create this association, you may want to use Notepad to open the file. In order to perform this task, you need to use two different utilities as shown in the following steps.


  1. Type Assoc .RIN=RINFile and press Enter. You’ll see, “.RIN=RINFile” appear at the command line. This command creates a .RIN file extension entry in the Registry as shown here.
    AssocFType01
  2. Type FType RINFile=%SystemRoot%\Notepad.exe %1 and press Enter. Notice that you don’t enclose the command in double quotesit will fail if you do. You’ll see, “RINFile=C:\Windows\Notepad.exe %1” (or something similar) appear at the command line. This command creates the RINFile association in the Registry as shown here.
    AssocFType02
  3. Create a new .RIN file on your hard drive. You don’t have to do anything with it, just create the file.
  4. Double click the new .RIN file. Windows will open the file using Notepad.


This technique works with any file extension and association you want to create. In fact, you could easily create a batch file to patch user configurations where the file associations have become damaged in some way. The big thing to remember is that this is always a two-step process when the file extension doesn’t already exist or the association is new. Use the Assoc utility to create a link between any file extension and it’s association and the FType utility to create the association itself. Let me know if you have any questions about this technique at [email protected].


New RecImg Utility in Windows 8

Microsoft is constantly changing the command line, which is why books such as Windows Command-Line Administration Instant Reference get outdated. Every new version of Windows comes with new command line utilities. In most cases, these new utilities support new Windows features or allow some new level of maintenance or administration. The RecImg utility creates an image of the Windows 8 installation, including installed applications, to the location you specify. The purpose of this image is to allow a refresh of the Windows installation should something happen to it. A refresh installs a new copy of Windows, but preserves the data and application setup. In many respects, this feature sounds like a simplified version of products such as Norton Ghost. You can read about this new refresh functionality in the Refresh and reset your PC post on the Building Windows 8 site.

I find this new feature exciting because it provides the means for someone like me to recover a hard drive even if I have to support several configurations for a book. It should be possible to create as many images as needed and know that Windows will support them because the feature is built into the operating system. The basic command line for working with this utility is:

RecImg -CreateImage Location

where Location is the directory you want to use for the Windows image. As with any Windows 8 feature, the current version of the utility has problems that you can read about on the Computer Performance site. I’m assuming at this point that the utility will include additional command line switches. Otherwise, Microsoft wouldn’t have included a specific -CreateImage command line switch. Of course, the presence of this new utility means that administrators can perform image updates from a batch file or as part of automated maintenance.

I’ll keep you posted on this, and other, Windows 8 utilities as I have time to review and study them. In the meantime, let me know if you hear anything about interesting new Windows 8 utilities and utility changes. Also let me know if you hear about any utilities that Microsoft decides not to support. Often, you find out about these changes only after you’ve tried to use it in a batch file.

What is your take on this new Windows 8 feature? Let me know at [email protected].


Windows 7 and the PowerCfg Utility

On page 327 of Administering Windows Server 2008 Server Core, you find the PowerCfg utility and may not even find it all that interesting. Yes, this utility makes it possible to configure the power settings for a system from a remote location. An administrator can use it to ensure that everyone has a power saving setup by adding the command to the user’s login script. However, as utilities go, it isn’t all that interesting. For that reason, the command doesn’t even appear in Windows Command-Line Administration Instant Reference. A number of beta readers said they didn’t even use it.

Microsoft is showing an increasing interest in power management with each version of Windows. In fact, from what I’ve been reading about Windows 8, power management is going to take a relatively large leap forward (read about the changes in, “Building a power-smart general-purpose Windows“). With this in mind, the Windows 7 version of the PowerCfg utility has added four new command line switches:


  • /Requests: Enumerates the application and driver power requests. Applications and drivers make power requests to ensure that resources are available when needed. However, sometimes these requests can also become a problem when they’re abused. Power requests can also prevent the computer from automatically turning the display off or going into hibernate mode, which wastes power.
  • /RequestOverride: Forces the system to disregard an application or driver power request. The positive aspect of this command line switch is that you can enforce a power management strategy when you have applications and drivers that abuse power requests. However, by denying applications and drivers access to resources, you could also cause system instability or data loss when the application or driver crashes.
  • /Energy: Performs an energy survey of the system. This is probably the most important addition that Microsoft has made. Using this particular feature, you can detect system elements that are consuming a lot of power and reduce its energy footprint. Generally, you use this feature with just the system running to determine what the system uses. However, you can also use it with single applications open to detect the energy cost of using that application, which I think is actually the more revealing way to use this command line switch. Most people don’t associate an energy cost with using an application. This feature makes the energy cost significantly more apparent. Yes, every application you use has a cost, so keeping needless applications open is costing you money.
  • /WakeTimers: Displays a list of timers that are set to wake the system from sleep or hibernate states. Waking a system too often also costs you money. For example, it costs more to perform individual maintenance tasks at separate times than to perform them during a single time. An organization could use this command line switch to ensure that every system wakes at the same time, performs required maintenance, and then goes back into either the sleep or hibernate states.


As mentioned in the list, I consider the /Energy command line switch the most important PowerCfg addition to date. If you’re interested in self-sufficiency, as I am, then you begin to count even the pennies of energy usage. For example, in my CFLs for Free I discuss how I bought just one CFL and turned it into a complete setup for my entire home. This particular feature has allowed me to perform an energy survey of the applications I use. I found out, for example, that streaming audio using Firefox does indeed cost less than using a separate device for the purpose (such as a radio) and also delivers clearer audio. However, streaming impacts system performance and tacks a network bandwidth penalty onto other applications that rely on Internet connectivity, so there are times where using the separate device is actually better.

Let’s look at the /Energy command line switch in a little more detail. The easiest way to use this command is to open an Administrator command prompt, change directories to a directory you can write in (I’m using C:\Temp), and then type PowerCfg /Energy and press Enter. I purposely ran the command with a number of applications running and some misconfiguration in place to generate some errors, warnings, and informational messages as shown here.

PowerCfg01

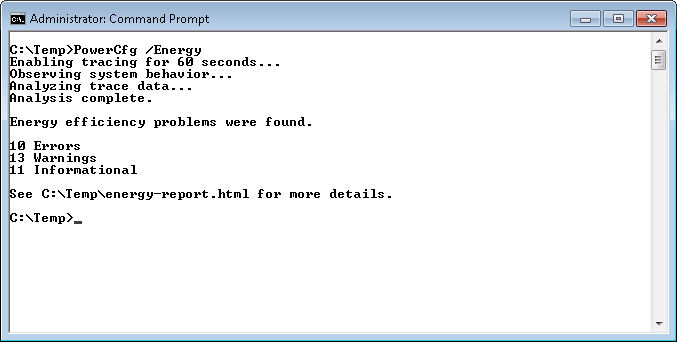
The report required a little over a minute to generate. You can see the results in the Energy-Report.HTML file. Here are the results I generated from this run.

PowerCfg02

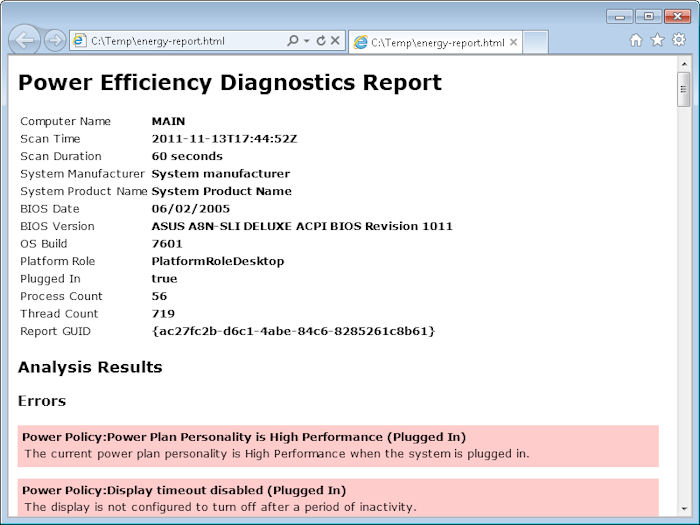
The PowerCfg utility makes it possible to diagnose energy problems with a system and significantly reduce the cost of running it. The language of the report does require a little interpretation at times, but normally the language is plain enough for an administrator to figure out with little effort. By correcting every error and 12 out of the 13 warnings, I was able to reduce the power requirements of this system by about 15 percent (as measured by a watt meter). So, how does that equate in dollars? You use the equation: Cost = ((Watts / 1000) * Hours Used) * kWh rate, where kWh is the kilowatt hour rate provided by your power company on your electrical bill. This system was averaging a little over 520 watts before tuning it. For the sake of argument, let’s say you’re using it 60 hours per week and the electrical rate is $0.12. The weekly cost of running this system is:


((520 / 1000) * 60) * 0.12 or $3.74

After tuning this one system the power usage was only 442 watts on average. That means the weekly cost went down to:


((442 / 1000) * 60) * 0.12 or $3.18

a savings of $0.56 for this one system each week or a total of $29.12 for the year.  I have three systems that I tuned this way, so I’m hoping for a $87.36 savings from performing this tuning. Each system required about 30 minutes to tune, so I’ve made $58.24/hour from this activity. If you’ve read other posts, I do like to put a dollar figure on my time—you should too. Not many people can afford to throw away money like this and the PowerCfg utility, along with a watt meter, can help you better understand how your system uses (and abuses) power.

There are two additional command line switches you should know about when using the /Energy command line switch. The /Duration:Time command line switch changes the duration from 60 seconds to some other value. For example, if you want to change the duration to 120 minutes, you’d type /Duration:120. Longer testing times are often required when you’re trying to determine how an application is using energy. Take my advice and don’t set the duration lower than the default 60 secondsyou’ll be disappointed with the results.

The /XML command line switch outputs the data in XML format so that you can incorporate the information into a database. If you have a large setup, the XML format is absolutely essential. No one has time to look at individual HTML pages. Using XML output and a centralized database also makes it possible for you to look for organization-wide trends, which could produce even bigger savings.

The /Energy command line switch can also be used with the /Trace command line switch to trace energy usage without performing any analysis. This output isn’t as helpful or as accessible as using the /Energy command line switch alone. The output is an Event Trace Log (.ETL) file. To view this file, open the Event Viewer console found in the Administrative Tools folder of the Control Panel. Right click the Event Viewer folder and choose Open Saved Log from the context menu. You’ll see a dialog box asking whether you want to convert the .ETL file into the new format used by Windows 7. Click Yes. You’ll see a list of energy events like the ones shown here.

PowerCfg03

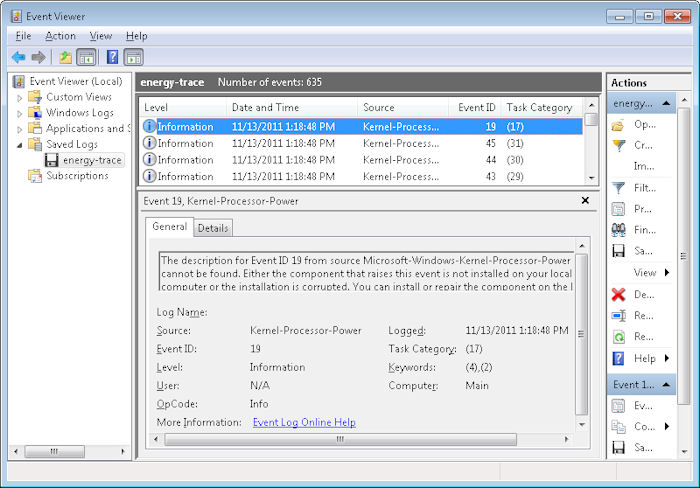
By carefully reviewing the events, you can discern energy usage patterns, filter data about specific events, and perform other analysis. However, this raw data is a little hard to use and the administrator would be better off generating the report, unless your organization has an application designed to analyze the raw data in some way.

So, how do you save energy in your organization? Do you rely on specialized tools such as a watt meter and PowerCfg? If not, how do you tune your equipment to deliver optimum service and minimum cost? Let me know at [email protected]


Security Implications of the AT Command

I read the security post provided by Roger Grimes with interest this morning because I’ve always felt that the Task Scheduler is just another entry point for viruses and the like on any system. As he mentions, it’s an avenue that many administrators fail to check because they don’t really think about it. As Roger points out, there are three ways to add new entries, but this post focuses on the oldest of the three, the AT command.

Before you can interact with the Task Scheduler, you must have its service started. This is a given on Vista and Windows 7, where Windows relies heavily on the Task Scheduler. However, you’ll want to read my Interacting with the Task Scheduler Service for details about this service. It’s important to have the service setup correctly in order to work with it error free.

The AT command is the oldest way of working with the Task Scheduler. At one time you could access it from the command prompt even if you weren’t an administrator. This meant that any virus or other piece of nasty software could cause woe without notice on your part. However, if you try to use the AT command at a normal command prompt in Windows 7, you’ll receive an Access Denied error message, which is at least a start in the right direction.

To use the AT command to create a new entry, you must provide a time and command as a minimum. For example, if you type AT 15:00 “Dir C:\” and press Enter, you’ll create a new task that starts at 3:00 pm on the current day. You’ll receive a numeric identifier for the task. The entry also shows up in the Task Scheduler console (found in the Administrative Tools folder of the Control Panel) as At plus the identifier, such as At1 as shown here.

TaskSchedulerEntries01

If you want to list the jobs created by the AT command, you type AT and press Enter. The AT command only lists those jobs that it creates—you won’t see any jobs created using other Task Scheduler techniques.

Likewise, to delete jobs using the AT command, you provide the identifier you received when you created the job along with the /Delete command line switch. For example, if the identifier for the task you created earlier in this post is 1, then you’d type AT 1 /Delete and press Enter. In this case, the AT command doesn’t provide any output. In order to verify that the job is actually gone, you must type AT and press Enter. Here’s what the command output from this session looks like.

TaskSchedulerEntries02

The true power of AT lies in remote access. For example, if you have an Administrator command line open, have a server named WinServer on your network, and possess administrator privileges on that server, you can type AT \\WinServer 15:00 “Dir C:\” and press Enter to create a command that starts at 3:00 p.m. (local time) on WinServer. It’s important to realize that the command will execute when it’s 3:00 p.m. on the server, not 3:00 p.m. on your system. You can likewise list and delete remote entries using the same commands you’d use for local entries. Again, the Task Scheduler console will display these entries, but only on the host machine (so you’d need to access that system remotely to see it from your local computer).

Windows 7 does make it harder to use the AT command, but not impossible. If an outsider should gain access to an account with administrator privileges, it wouldn’t take long for a virus to add all sorts of nasty commands to every machine on the network. As Roger comments in his post, administrators need to exercise vigilance in order to catch potential security issues such as this one. Let me know if you have any questions at [email protected].


Windows XP and Advanced Command Line Utilities

Both Windows Command-Line Administration Instant Reference and Administering Windows Server 2008 Server Core contain a number of advanced commands, such as SetX, that don’t come with the operating system. A number of readers have written to ask about these commands and where they can get them. Fortunately, Microsoft makes it easy to get what you need by downloading and installing the Windows XP Service Pack 2 Support Tools.

The Support Tools site contains a list of the commands and utilities you get. Included in this list are two important MMC console configuration files (ADSIEdit.msc and SIDWalk.msc) that make management tasks considerably easier. There is an executable form of ADSIEdit, but Support Tools doesn’t include it and you can’t use ADSIEdit as a command line tool anyway. The SIDWalk utility comes in executable (.exe) form as well so that you can use it in batch files.

In order to install the Support Tools, you must provide 5 MB hard drive space. Of course, coming up with that small amount of space isn’t the problem it once was. You must also have Windows XP Service Pack 2 (or higher) installed.


Something that Microsoft doesn’t emphasize is that these tools don’t work with the 64-bit version of Windows XP. Unfortunately, I haven’t found a workaround for the problem. Utilities created for newer 64-bit versions of Windows, such as Windows 7, don’t appear to work with Windows XP. If someone has a solution to this problem, please let me know.

After you download Support Tools, you may have to add a new path to your Windows setup. You perform this task using the Environment Variables dialog box. Simply open the System Properties applet, select the Advanced tab, and click Environment Variables to access it. Make sure you add the path to your installation to the existing Path and don’t overwrite the existing path with the new information. (Highlight the Path entry in the System Variables list and click Edit to display the Edit System Variable dialog box.) In most cases, the Support Tools install to the %Program Files%\Support Tools folder, which means you’d type ;%Program Files%\Support Tools at the end of the existing Path environment variable.

I’ll provide updates to this post as needed. If you have any questions, please contact me at [email protected].


Understanding Line-, Token-, and String-Based Command Line Utilities

My books, Windows Command-Line Administration Instant Reference and Administering Windows Server 2008 Server Core, both contain batch file sections that answer basic needs, but sometimes you need more than basic information to perform a task. A reader asked me how to perform a task using the FindStr utility the other day based on my Regular Expressions with FindStr post. The problem is that FindStr is a line-based utility, and the reader was trying to obtain a token-based result. Using FindStr alone won’t solve the problem. Here is the original reader comment:


If I have lines like below in a file called Sum.txt :

Total001 abcdefg
Total002 hijklmn
Total099 opqrstuv

and I use a regular expression to get all the results like “findstr Total[000-099] Sum.txt” the result printed is :

Total001 abcdefg
Total002 hijklmn
Total099 opqrstuv

But I want it to print only the matches to the regular expression like

Total001
Total002
Total099

How can this be done?


And my response:


The FindStr
utility is line oriented, which means you obtain an entire line as
output, not individual tokens. In order to accomplish what you want to
do, you need to create a For loop. Using a For
loop would allow you to process the individual tokens in the line. The
following command will do what I think you want to accomplish:


For /F “UseBackQ” %1 In (`FindStr Total[000-099] Sum.txt`) Do @Echo %1


There are two important things to notice here. First, you must provide the “UseBackQ”
option or the command won’t work. The command itself must appear in
back-quotes—not regular quotes. The back-quote normally appears above
the Tab button and to the left of the 1 on a keyboard. It usually
appears with the tilde (~) character.


Using For makes it possible to create a token-based output from the line-based FindStr output. The default For setting relies on the space and tab characters as delimiters, but you can use the Delimiters= option to change the default behavior. However, sometimes a token-based result isn’t enough. You may not want an entire word (or whatever element the delimiters define). In this case, you need a string-based output.

One of the undocumented features of the command line is to create substrings from variables. For example, let’s say you define the following variable:


Set MyVariable=Hello World


Now, you want to obtain just a piece of that variable to use somewhere in your batch file. To obtain the substring, you use the tilde (~) operator. This operator uses a 0-based offset. So, let’s say you issue the following command:


Echo %MyVariable:~3%


The output of this command is: lo World. The output begins with the forth character, which is an l and displays the remainder of the string. However, let’s say you don’t need the rest of the string. Well, in this case, you can add a second number to define the characters you do need. If you issue this command:


Echo %MyVariable:~3,6%


the output is: lo Wor. The output begins with the fourth character and proceeds to the ninth character. The output contains the six characters you requested. In short, it’s possible to perform some fancy string manipulation in batch files as long as you keep the short of output you need in mind. Let me know how you use batch files to perform various sorts of string manipulation at [email protected].

Interacting with the Task Scheduler Service

The Task Scheduler service has become an essential part of Windows. With that in mind, Microsoft has made a change in the way this service works. You can no longer stop it and the service automatically starts when you start Windows. The idea is to ensure that the service is available to meet Windows needs. The change quietly occurred during a Vista update and is automatically part of Windows 7. Consequently, when you try to interact with the service, you get an error message of [SC] OpenService FAILED 5: Access is denied. To see this for yourself, try typing SC Config Schedule Start= Demand and pressing Enter on an update Vista or any Windows 7 system.

The reason I mention this particular issue is that on page 43 of Windows Command-Line Administration Instant Reference, you see instructions for interacting with the Task Scheduler service. You can still query the service and perform some other tasks with it, but you can’t stop it or configure the method used to start it. When you look at this service using the Services console of the Administrative Tools folder, you see that you can’t even change how the service starts as shown here (everything is grayed out).

TaskScheduler01

There are a number of other services that fall into this same category. You can’t stop, start, or reconfigure them. Here is a list of the most common services that you can’t control using the SC utility (you can still query all of them):

  • DCOM Server Process Launcher
  • Group Policy Client
  • Plug and Play
  • Remote Procedure Call (RPC)
  • RPC Endpoint Mapper

Microsoft hasn’t documented the reason why you can’t configure any of these services. However, the reason that Microsoft has made it impossible to change the Task Scheduler service is that Windows 7 uses it extensively. For example, a number of applications rely on the Task Scheduler:

  • System Restore
  • Reliability History
  • Windows Update
  • Other Program Updates

In addition, Windows 7 uses Task Scheduler to perform a number of checks. These checks affect system reliability and stability:

  • TCP/IP Conflicts
  • Disk Diagnosis
  • Network Information
  • System Sound Service
  • Power Controls
  • WinSAT

Even so, you may find that you need to stop the service for some reason. The common technique that you’ll find for overcoming this problem is to perform the task from the registry. Open RegEdit and locate the HKEY_LOCAL_MACHINE\SYSTEM\CurrentControlSet\services\Schedule key. The Start value controls how the Task Scheduler starts. Double click this value and change the entry to 4 as shown here to disable the service, or 3 to set it to manual.

TaskScheduler02

Reboot the system. You still won’t be able to make any changes using the SC utility or the GUI, but the status of the service will change to either disabled or manual as you requested. When the service is in manual mode, you can start it manually. Change the Start value back to 2 to re-enable the service. The problem with changing these services is that you don’t know how the change will affect system stability. This is a change at your own risk scenario. Please let me know if you have any questions at [email protected].

Obtaining Command Line Help

Both Administering Windows Server 2008 Server Core and it’s more diminutive counterpart, Windows Command-Line Administration Instant Reference, are reference manuals that tell how to use the command line to perform specific tasks. The first book is more complete, in that it contains many uncommon commands and utilities. The second book is designed to provide more hands-on help by supplying a significant number of actual usage examples. In both cases, you get a significant amount of help about the commands. As long as you have one of these two books by your side, you’re in great shape for knowing how to use the commands at the command line. Unfortunately, the reality is that most of us don’t stuff a library full of books in our back pocket. Even with an e-Reader, such as the Kindle, you can be sure of having the device available every time you need it. So, how do you get at least some quick help when there aren’t any resources available?

The first thing to remember is that you can get at least some useful information for any command or utility by using the /? or -? command line switches (some commands and utilities are peculiar in that they require either the /? or the -? command line switch, while many will allow you to use either). For example, when you want to discover how to use the Dir command, you type Dir /? and press Enter. Here’s typical output when using the /? command line switch.

GettingHelp01

This help screen is also typical in showing what you get. Help normally includes a short description of the command, the command line syntax, and a short description of each of the command line switches. You may also see usage examples for more complex commands. In rare cases, the help screen will provide an URL for additional help.

Some commands and utilities are complex enough that they require several help screens. For example, if you type WMIC /? and press Enter, you’ll see a list of help topics, not help of the sort provided for the Dir command. Let’s say you want to know more about the CPU topic. So, now you type WMIC CPU /? and press Enter. The help looks a little more normal now, but still isn’t very complete because you need to choose a subcommand. Perhaps you want just a list of CPUs on a system, so you request information about the List subcommand by typing WMIC CPU List /? and pressing Enter. Wow, now you see a number of listing formats. This time you add a listing format by typing WMIC CPU List Brief /? and pressing Enter. It turns out that you can also discover information about command line switches used with the Brief format. The final level in this case is to type WMIC CPU List Brief /Translate /? and press Enter. The WMIC utility is unique in providing so many levels of help, but other complex commands and utilities, such as Net, do provide multilevel help.

No matter how many help screens you see, sometimes it isn’t enough to give you the help you need. That’s when you need to find your copy of my book to get additional information. Of course, a single book can do only so much—some complex commands and utilities may require still more information. Technet is a good place to start. For example, you can find an excellent article on WMIC at http://technet.microsoft.com/library/bb742610.aspx. Knowledge base articles also provide useful information, especially when it comes to issues that Microsoft has solved for a given command or utility. For example, the Knowledge Base contains an article entitled, “How to find computer serial number” that relies on WMIC. Finally, make sure you look at third party articles, such as the one entitled, “WMIC: the best command line tool you’ve never used.”

Many people complain about not being able to remember all of the commands and utilities, and this is a problem. After you use a command or utility often enough, you tend to remember it, but the memorization process can take time. Unfortunately, there isn’t any single quick method of finding every command or utility on a system. However, you should start by typing Help | More and pressing Enter. (Using the More command lets you see the information that a utility has to provide one screen at a time, rather than seeing the information scroll right past.) You’ll get a list of common commands like this one.

GettingHelp02

Not all of the commands appear on this list and none of the utilities do. Another way to obtain the information you need is to type Dir *.COM and press Enter in the \Windows\system32 directory. (You can type CD \Windows\System32 and press Enter to get to the appropriate directory.) Every directory entry you see is very likely a utility. However, many utilities are in .EXE form, so you also need to type Dir *.EXE | More and press Enter. You can eliminate files that contain more than eight letters in the filename from the list in most cases because command line utilities usually rely on the old 8.3 naming convention. Check filenames that look like they could be what you want by typing Filename /? and pressing Enter (where Filename is the name of the file you want to test). Useful command line utilities will generally display a help screen.

Now that you have a better idea of how to get command line help when you need it and where to obtain a list of useful commands and utilities, you should take some time to try it out for yourself. What techniques do you use to obtain the additional information you need at the command line? Let me know at [email protected].


Automating Your Configuration with a Daily Batch

Batch files are still an important part of your system, especially if you find that you need to perform certain configuration tasks every day. Both Administering Windows Server 2008 Server Core and Windows Command-Line Administration Instant Reference discuss batch files, but this post is about a practical example of a batch file in daily use.

My system has a daily batch file. It runs every morning when I start the system up. (To save electricity, I do turn off my system every night and find that things also run better because I do.) The main reason for using a daily batch file is to configure my system so I don’t end up performing the same repetitive tasks every day. I tell the computer what to do and it performs the required configuration for me. After I get my cup of coffee, my system is ready to go—fully configured for my use.

The daily batch file appears as an entry in the Startup folder on my system. Placing the file in the Startup folder means that it runs automatically, but that I can also easily disable the batch file should I wish to do so. Use these instructions to add a daily batch file to your Startup folder:


  1. Choose Start > All Programs. You see a list of entries including Startup.
  2. Right click Startup and choose Open from the context menu. (Unless you want everyone to use the same automatic batch file, you don’t want to choose Open All Users.) You see a copy of Windows Explorer open for the Startup folder.
  3. Right click anywhere in the right Windows Explorer pane and choose New > Text Document from the context menu. Windows will create a new text document named New Text Document.txthowever, only the New Text Document part of the filename is highlighted.
  4. Highlight the entire filename and type Daily Tasks.bat. Make absolutely certain that you also overwrite the .txt part of the filenameDaily Tasks.bat.txt won’t do anything for you.
  5. Press Enter. You see a Rename dialog box that asks whether you’re sure that you want to change the extension of the file.
  6. Click Yes. Windows renames the file.

Of course, the file is empty at this point. Right click Daily Tasks.bat and choose Edit from the context menu. Windows will open a copy of Notepad with the empty batch file loaded. At this point, you can start typing commands for Windows to execute automatically when you start up in the morning. It’s possible to execute many commands directlyespecially those that are meant to execute at the command line, such as W32Tm /Resync, which forces an update of the system clock. Other commands require that you use the Start command to execute them. For example, you might want to tell Firefox to automatically open the Astronomy Picture of the Day site using this command:


Start “C:\Program Files\Mozilla Firefox\Firefox” http://antwrp.gsfc.nasa.gov/apod/

<font<> <font<>The Start command starts Firefox in this case. It passes the URL you provide to Firefox as a command line parameter. Obviously, the application must support command line parameters for this technique to work. More applications than you might think do support command line parameters (many undocumented), so a little research can provide a lot in automation.

Any command that you can execute in any other batch file is also available when you’re starting Windows. There is one special consideration. You’ll likely find that executing one command immediately after another causes timing problems when Windows is initially starting. For example, if you try to open several Web sites, you’ll find that Windows actually misses opening a few unless you provide some sort of wait period between commands. Fortunately, the Choice command fulfills this task perfectly. For example, the following command provides a 15 second delay that you can insert between commands:


@CHOICE /C:N /N /T:15 /D:N


Using this command the user won’t even be aware of the delay. The @ symbol makes the Choice command invisible. The /C command line switch provides the available choices (which consists solely of N in this case). The /N command line switch hides the list of choices from view. You create the actual timeout value using the /T command line switch, which is set for 15 seconds in this example. However, the /D command line switch actuates the delay by automatically choosing N after the 15 seconds. In short, this entire command line is a wait statement.

If you want your batch to run more or less invisibly, make sure you start it with an @Echo Off command. Otherwise, every command appears in the window. It’s helpful to check for errors when you first put the batch file together and when you make changes. Adding an @Pause at the end of the batch file keeps the command window visible so you can check for errors.

After you finish the batch file, you can execute it as you would any other batch file. The only difference in this situation is that this batch file executes automatically each day because it resides in the Startup folder. When you need to make changes to this file you can choose Start > All Programs > Startup, then right click Daily Tasks.bat, and choose Edit from the context menu. The file will open in Notepad for you.

This is one of the more interesting and useful ways to employ batch files. What are your favorite batch processing techniques? Let me know at [email protected].


A Visual Studio Quick Guide to Accessibility (Part 1)

One of the most important accessibility aids that also applies to common users is the keyboard accelerator (or keyboard shortcut). In fact, this issue figures prominently in both C# Design and Development and Accessibility for Everybody: Understanding the Section 508 Accessibility Requirements. Just why Microsoft decided to turn this feature off in Windows 7 is a complete mystery to me. All of the pertinent examples in Professional Windows 7 Development Guide include keyboard accelerators, but you can’t see them. I’ve received a number of queries about this problem and decided that this two-part post on accessibility for Visual Studio developers is really necessary.

First, let’s discuss the keyboard accelerator from a programming perspective. A keyboard accelerator is the underline you see on a button, label, menu, or other control. You press Alt+Letter to perform the equivalent of a click or selection with the associated control. For example, most people know that you press Alt+F to access the File menu in an application that has keyboard accelerators properly implemented.

To create a keyboard accelerator, the developer precedes the letter or number with an ampersand (the & character). For example, to make the File menu respond to Alt+F, the developer would type &File in the development environment. I’ve always strongly encouraged the use of keyboard accelerators as a must have for any application because many keyboardists are seriously hindered by an application that lacks them. In fact, you’ll find the keyboard accelerators used in the vast majority of my books, even for examples that aren’t related to programming in any way.

Second, some developers who feel as I do about keyboard accelerators are upset that adding them to applications no longer works (apparently). Windows 7 hides the keyboard accelerators for some odd reason known only to Microsoft. The Ribbon interface provides an equivalent when the developer provides it, but we’re talking about all of the applications (the vast majority) that don’t use the Ribbon interface. It turns out that you must manually turn the keyboard accelerator support back on. Follow this steps to accomplish the task manually:


  1. Open the Control Panel, followed by the Ease of Access applet. Click the Ease of Access Enter link. You’ll see the list of options shown here:Accessibility0101
  2. Click Make the Keyboard Easier to Use. You’ll see a list of options for making the keyboard easier to use. Near the bottom of the list you’ll see the Underline Keyboard Shortcuts and Access Keys option shown here.
    Accessibility0102
  3. Check this option and then click OK. The system will now display the underlines as before.

One of the biggest questions I had while working through this is whether there is a method for turning this feature on or off at the command line. There isn’t any WMIC command that I’ve found to make the change (nor any other command for that matter), so I’m currently trying to discover the associated registry keys. I’ve found one so far. The On value in the HKEY_CURRENT_USER\Control Panel\Accessibility\Keyboard Preference key must be changed to 1. However, that value alone doesn’t make the change work, so there are more keys and values to find. If anyone has some clues to provide me about this particular need, please let me know at [email protected]. In the meantime, I’ll continue looking for the elusive registry updates required to automate this change.