Adding Walls to the Chicken Coop

Last week saw the completion of the chicken coop foundation (see Building the Chicken Coop Foundation). Of course, the logical next stop is to add some walls to the foundation. As with the foundation, we built the walls in place for the most part and then carried them to the chicken coop. Kevin decided to build the only wall with a window first, the front wall. Adding a window to the front wall, the one that faces south, will help heat the chicken coop in the winter because the sun will be able to shine on the inside almost all day long. During the summer months, the window will allow the breeze that comes up from our valley to move air around on the inside of the chicken coop.

ChickenCoop0401

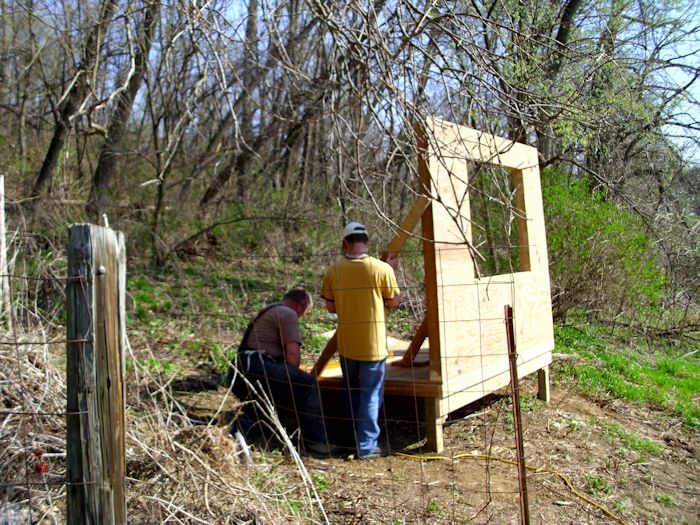
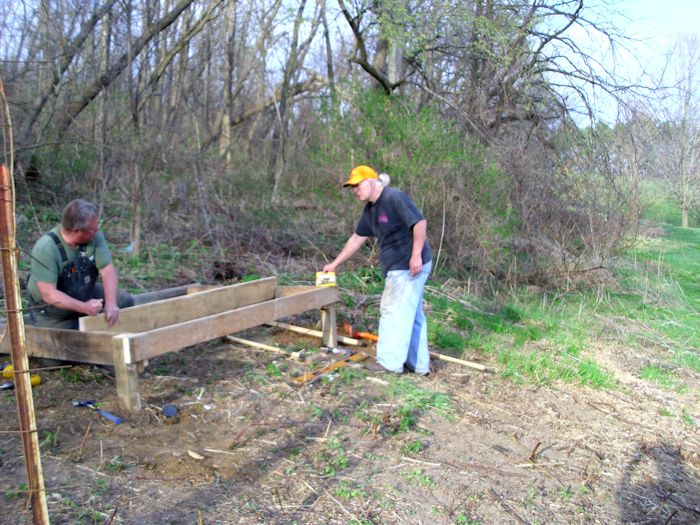
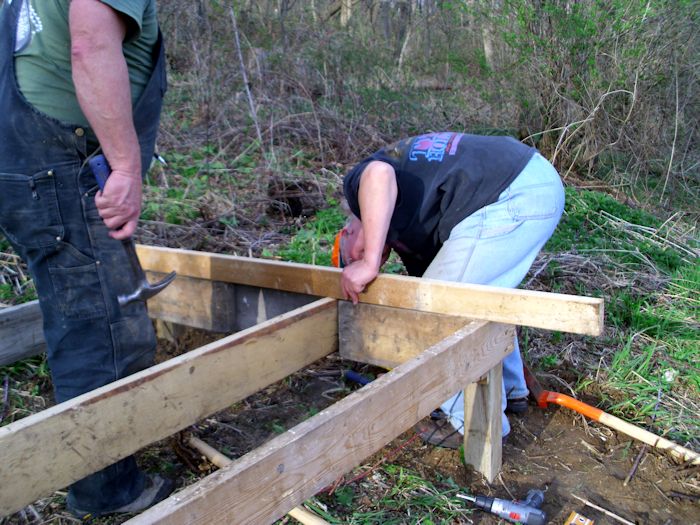
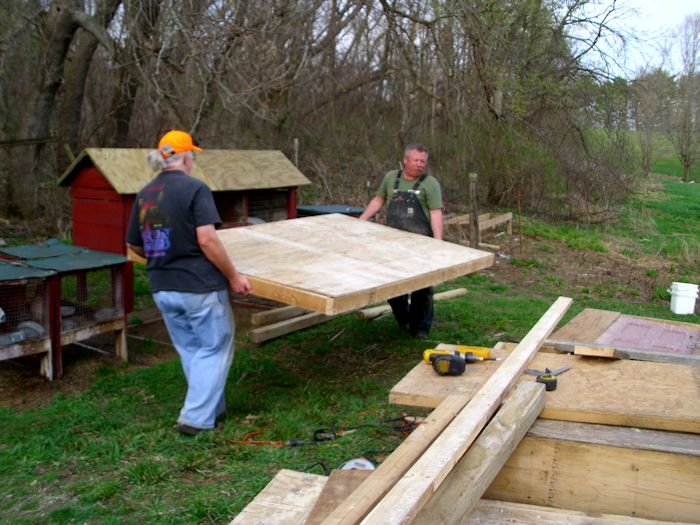
In this picture, Kevin and Cody are just finishing up on the braces to support the wall during the building process. I’m off the shot doing some work on the next wall to go up.

The second wall faces toward the east and it contains the door the chickens will use to access their run outside of the coop. We did this wall next to provide a square corner on which to build the rest of the coop structure.

ChickenCoop0402

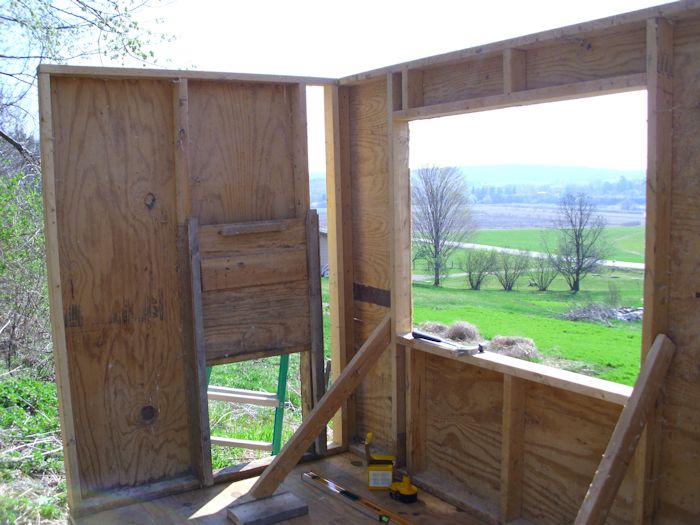
We’ll use a piece of plywood to close in the right side of the second wall later. The most important part now is to get the structure in place. The door you see simply slides up to let the chickens out. At night we’ll close the door to keep predators out. You can’t see it easily in the picture, but there is a little latch that holds the door up. We can swing the latch to keep the door closed as well.

The third wall to go up is on the north side. It will eventually have a window in it near the top to provide ventilation in summer. This wind will blow straight through the coop to keep things cool. The trees from the woods will provide shade during the summer months as well.

ChickenCoop0403

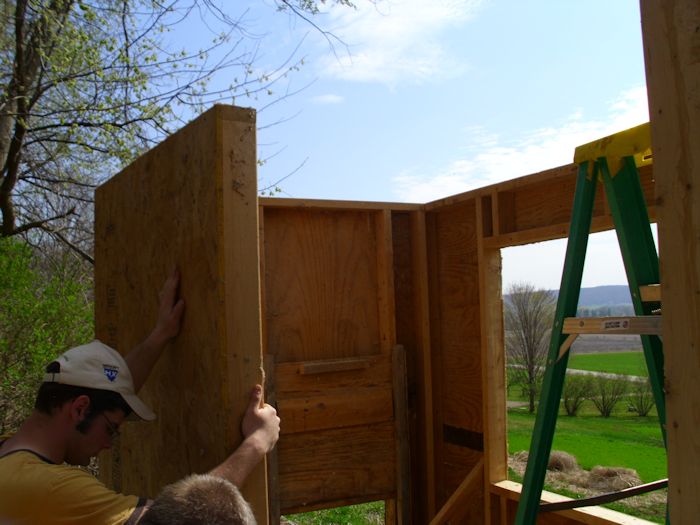
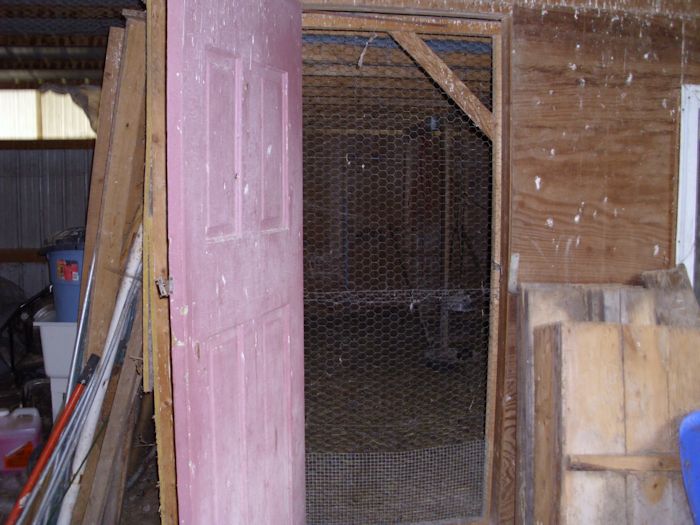
The fourth wall, the one facing west, contains the coop door. After this wall is added, we’ll take out the bracing from inside of the coop since all of the walls are now supporting each other.

ChickenCoop0404

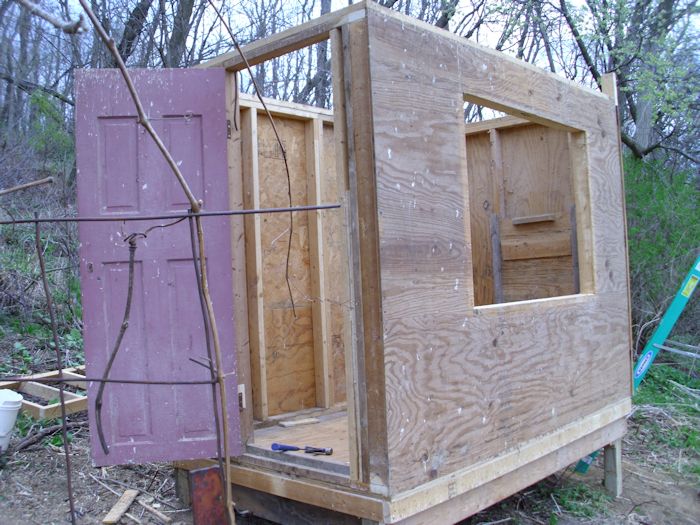
The door is simply an old door from a house. Eventually, the door will be double hung. The screen door will go on the inside of the coop to keep the chickens from simply running out through it during the summer months when the main door will be kept open during the day to provide ventilation.

The walls are bolted into the floor and into each other at this point, so we have a solid framework for the roof. That’s what I’ll talk about next week. In the meantime, let me know if you have any questions at [email protected].


Building the Chicken Coop Foundation

At the end of my post about the chicken coop last week (see Moving the Chicken Coop Parts), we had moved all of the required components to our house from wherever they were stored at the time. After we found a few discount chicken coops, it was time to start putting the chicken coop together, which meant clearing a spot for it and building a foundation.

The place where Rebecca and I live is absolutely gorgeous, but also completely devoid of anything approach flat. So, finding a place to put the chicken coop was less a matter of space and more a matter of finding something flat enough to use. In addition, the place had to be close enough to the house to feed the chickens in winter (putting it out in the middle of the orchard would have been a bad idea) and also close enough to the compost heap to make clearing the chicken coop of waste matter easy. With all of these factors in mind, I cleared as much brush as possible from the location next to the compost heap. The chicken coop is now on the right of the compost heap, while the rabbit cages are to the left.

To keep the chicken coop from sliding off into oblivion, we started by digging two post holes and adding a board between them.

ChickenCoop0301

After making sure this starting point was completely level (despite the fact that things looked quite uneven due to the unevenness of the terrain), we added two more posts, one at a time. All four posts were tied together with boards and made level. After that, we started adding two additional boards in the center to reinforce everything as shown here.

ChickenCoop0302

Make sure everything is even and well-secured is important. We took the time to check and double check everything at this point.

ChickenCoop0303

The posts we’re using are pressure treated 4 X 4 stock. The joists and other framing members are 2 X 6 stock. All of this lumber was recovered from the old chicken coop. In a few cases, we not only had to remove old screws or other hardware, but also clean the stock before we could use it.

We had actually built the floor from a piece of existing wall used in the old chicken coop. Keven made a few changes to the wall design and strengthened it, but the floor was moved intact from the existing site to its new home. Floor space is important for good chicken health. The chicken coop will eventually hold ten chickens and we allowed 4 square feet per chicken inside the coop. (The chicken run allocates an additional 20 square feet per chicken.) Because the floor will take a lot of abuse, we used a double layer of 1/2 inch exterior grade plywood for the floor. The second layer was screwed on at 90 degrees to the first layer right before we moved it to the foundation.

ChickenCoop0304

The floor framing is 2 X 4 stock, but it’s heavily reinforced. Once the floor was ready, we moved it to the platform we had built earlier.

ChickenCoop0305

With the floor in place, we secured it to the platform. Of course, the final check was to make sure everything was still level.

ChickenCoop0306

The next step is to start putting up walls. We’re going to build them in place and move them in whole sections as well. You’ll learn the details in next week’s post. In the meantime, let me know if you have any questions about this phase of building the chicken coop at [email protected].


Moving the Chicken Coop Parts

In my previous post about the chicken coop, Starting a Chicken Coop, I talked about some of the requirements I had looked at when getting the parts for the chicken coop I wanted to build. Three of us worked together to start taking the chicken coop at my friend’s house apart. We worked carefully because some of the parts really didn’t require any deconstruction. Here we are sitting in front of the car used to transport one of the walls intact:

ChickenCoop0201

Cody, our intern, is standing on the left. Kevin, an ex-Seabee and also the brains of this operation, is standing in the middle. I’m on the right. The car was most definitely overloaded with that piece of wall on its back:

ChickenCoop0202

You can’t see it very well in the picture, but the car is definitely riding low. We also loaded up my Explorer and eventually we used my uncle’s truck. It took us a day and a half to break down the chicken coop and move it over to the house. We also obtained some corrugated roofing material from another friend. He had removed it from his house and saved the better looking pieces. By the time we were finished, we ended up with three distinct piles of parts:

ChickenCoop0203

This pile contains some walls we thought we could use intact, the nesting box, some sheet goods, and a bit of fencing. There are also some other bits and pieces that we probably won’t use. For example, the feeding trough it way too long. I’ll deconstruct it and use the wood for another project-absolutely nothing goes to waste around here.

ChickenCoop0204

This pile contains an additional wall that we thought we might need, but weren’t sure about. It also contains some bricks (we probably won’t need them) and the 2 X 4 stock used to put everything together. In addition to 2 X 4 stock, we were able to salvage some 4 X 4s, 2 x 2s, 2 X 6s, and a number of other sizes of lumber.

ChickenCoop0205

This pile contains some fencing parts and the corrugated metal roofing. Actually, we’ll use that metal to surround the entire chicken coop, making it quite durable. The only new materials that the chicken coop will have are some screws (we’re reusing as many as possible) and some tar paper. Otherwise, this chicken coop is made up of pieces salvaged from everywhere, including my own basement (pieces from other projects). This is how recycling should work. Nothing will end up in a landfill anywhere-every component you see in these pictures will be used for something (even if it isn’t in this particular project).

Now that the pieces are assembled, we can start building the new chicken coop. I’ll fill you in on the details in a future post. In the meantime, let me know if you have any questions about the process we’re using at [email protected].


Starting a Chicken Coop

Sometimes life throws an opportunity your way and taking it is the only logical choice. Normally, we could never afford to buy all of the parts for a chicken coop at a price that would actually provide a payoff. Normally I try to get a five year payoff plan for anything we add to our property and a chicken coop simply requires too many parts to provide such a payoff when used in a self-sufficient manner.

A friend of ours is selling her house, which actually sits on a small farm. In her pole shed is a chicken coop that she’s willing to sell for a reasonable price—a price that should provide us with that five year payoff plan we need. It’s not meant for outside use, but it does have many of the items that an outside chicken coop would require. Of course, that begins with a double door with the screen on the inside, rather than the outside, so that the chickens can get some fresh air during the summer months.

ChickenCoop0101

Inside the existing chicken coop, there is a roost and nest boxes. The roost provides a place for the chickens to sleep above floor level. The nest boxes provide a place to lay eggs.

ChickenCoop0102

At one end of the existing chicken coop is a chicken-sized door. It leads outside to a ramp where the chicken can go into a fenced area for exercise and fresh air. We plan to make the fenced area large enough to ensure the chickens can get plenty of safe exercise (we’ve seen a few chickens get hit by passing cars when they’re not fenced in, not to mention foxes, weasels, racoons, hawks, and other predators).

ChickenCoop0103

The existing chicken coop even includes a window so the birds get sunshine during the winter months. Given that we’re on a south facing slope, the window will allow not only sunshine, but a certain amount of heat during the winter months. Of course, we’ll need to include a heat lamp for really cold winter nights.

ChickenCoop0104

Of course, the first task is to take the chicken coop down and move it from its current location to our house. We’ll have to use the components we obtain to rebuild the chicken coop in a form that will work better outside (including the addition of a roof). I’ll keep you updated on our progress. In the meantime, let me know if you have any questions about our project at [email protected].


Cutting Up a Chicken

When you raise your own chickens, you eventually end up with a lot of whole chickens in your freezer and will need to cut at least a few of them up for use. Most people are used to seeing chickens already cut up for use in the store. If you do get a whole chicken, it’s usually with the idea that you’re going to roast it whole. In many cases, people don’t know where to begin cutting a chicken up for use because the butcher has done it for them for so many years. Following the chickens you find in the store as an example won’t work very well either because they’re cut up using a meat saw (think of a band saw specifically designed for cutting meat). Unless you also have a meat saw, you probably won’t be able to follow the butcher’s example. This post describes how to cut up a chicken using nothing more than a standard utility knife.

I recommend using a 6-inch knife with a fairly stiff blade. A boning knife will be too flexible and something small, such as a pairing knife, won’t give you enough leverage. Don’t use a knife with a serrated edge—the serrations will make for a poor cut and you won’t be able to split the breastbone with such a knife. The knife you use should be sharpthe sharper the better. A dull knife is dangerous to use.

Start with the wings. Your cut should begin behind the joint area. When you lift the wing up, you’ll actually see a bit of the flesh come up with it. Start your cut immediately behind this fleshy area and angle toward the joint as shown here.

CuttingChicken01

Cutting the wings in this way has the advantage of making them a bit meatier. After you cut off both wings, it’s time to cut off the combination of the leg and thigh. Start by lifting the thigh and cutting toward the joint from the front of the chicken as shown here.

CuttingChicken02

Once you get to the joint from the front, you’ll need to cut to the joint from the back as well. When this cut is finished, you’ll be able to rotate the leg/thigh combination downward and see the joint pop from the socket as shown here.

CuttingChicken03

You can finish the cut at this point. Remove both leg/thigh combinations using the same approach. Now you can separate the leg from the thigh. There is a natural division between the leg and the thigh. If you look carefully, you can actually see where the two separate because the meat goes in two directions. Look carefully at the following picture and you’ll see that the line shows this separation.

CuttingChicken04

Cut straight down through this point and you’ll find, with practice, that the knife will neatly separate the meat at the joint. At this point, you’ve cut off the wings, legs, and thighs. It’s time to remove the lower back (the part with the tail).

Look inside your chicken. You’ll see that there is a fleshy part between the rib cage and the lower back. The fleshy part extends on both sides of the chicken. You’ll cut through this fleshy part to separate the lower back starting midway at the opening as shown here.

CuttingChicken05

Cut through the fleshy part. You should then be able to flex the lower back and see the backbone separate from the rib cage as shown here.

CuttingChicken06

You can then cut through the spinal cord to separate the lower back from the rib cage. Cut straight down.

The hardest cut to make is to separate the two breast halves. However, like many things in life, there is a trick to it. Look at the center of the breastbone and you’ll see a line runs through it. Now, look at the first complete rib and trace it around to where it meets with the breastbone. You’ll see a second line of a sort that forms a cross as shown here.

CuttingChicken071

Put the tip of the knife through this point and you’ll find that the breastbone cracks easily. Now, draw the knife down much as you would with a paper cutter. You’ll find that the knife easily slices through the majority of the breastbone and the cartridge as shown here.

CuttingChicken08

After you make this cut, move your knife higher up. Don’t put it through the hole where the neck is, but do place it higher into the cavity. Use the point to finish breaking the breastbone apart. At this point, you should also be able to break the wishbone in half. Now you can separate the two halves of the breast like this because there is cartilage separating the breast from the upper back.

CuttingChicken09

Cut the cartilage holding the upper back to the breast halves. You’ll reach another joint after you cut the ribs. Separate the joint and the cut through it as shown here.

CuttingChicken10

You should now have ten pieces of chicken as shown here:

CuttingChicken11

These pieces are: left and right wing, left and right leg, left and right thigh, lower back, upper back, and left and right breast. Although this combination doesn’t look quite like the chicken you get in the store, it’s the most effective means of cutting a chicken up using just a utility knife. In addition, using this approach makes more of the pieces a usable size. Let me know if you have any questions at [email protected].


Considering Chicken Size

If you’re raising chickens for meat purposes, you’ll eventually need to start processing them. A number of schools of thought exist about this process. For example, after eight or nine weeks, some people will gather family and friends together and process all of their chickens in one fell swoop. This is the approach used by the factory farms. The chickens are raised for a specific amount of time and processed at the same time to reduce costs and to obtain a profit on the entire group immediately. That’s why you commonly see chickens in a specific size range at the store. Gone are the days when you could ask for a chicken of a particular size to meet a specific need.


It’s important to note that chickens are usually processed at six or seven weeks in a factory setting. The chickens are force fed as much as they can possibly eat and restricted from moving about too much, which results in a fatty chicken with a poor density. The watery, flabby chicken you get in the store isn’t how chicken is actually supposed to look, but it’s what we’ve gotten used to seeing.

Rebecca and I take an entirely different approach-one that gives us a variety of sizes and reduces the workload on any given day. The two of us can comfortably process eight to ten chickens in a single day. (The largest number we ever processed was 23 chickens at a definitely uncomfortable pace.) We normally start processing chickens at week nine for the purpose of canning them (canned chicken is absolutely amazing stuff and it lasts up to five years without any electricity required). The following table shows the live weight, processed weight, and amount of time required to obtain various sorts of chickens. There is also a description of each kind of chicken.

Type

Time

Live Weight

Processed Weight

Description

Cornish Game Hen

3 to 5 weeks

1.2 to 3.25 pounds

0.72 to 2.0 pounds

A small chicken that’s used for individual servings. This size is usually available in stores.

Fryer

8 to 9 weeks

4.0 to 5.75 pounds

2.5 to 4.0 pounds

The store-sized chicken that’s good for canning and outstanding for low-fat soups when raised correctly.

Broiler

9 to 11 weeks

5.75 to 7.5 pounds

4.0 to 5.5 pounds

A little larger than a store-sized chicken that’s excellent for barbecuing in pieces or fried chicken. This size is also good for a robust soup. Some larger stores and most butcher shops sell this size.

Roaster

11 to 14 weeks

7.5 to 11 pounds

5.5 to 8.5 pounds

Usually unavailable in stores (you can get them at a butcher shop in some cases), but excellent for roasting in an oven or on a barbecue rotisserie.

Small Turkey

14 weeks+

11 to 18 pounds

8.5 to 12 pounds

A great replacement for a small turkey. Generally, you can’t grow any chicken larger than 12 pounds (and we’ve never achieved more than 11.5 pounds). You can sometimes get these birds in a rural butcher shop for a premium price.

Stewing

3 to 5 years

Varies

Varies

A stewing chicken is generally a laying hen that’s past her prime and is only useful for soup or broth. This option is unavailable anywhere today.


This table is based on our own experiences and those of people we’ve talked with. It reflects what you should expect for home grown chickens, not for chickens raised in a factory setting, which can produce chickens at a faster pace. We’ve kept records for five years worth of chicken processing. Your results may vary according to a wide range of factors, such as what you feed your chickens and how often. (We feed our chickens a combination of broiler mix chicken feed, grass, kitchen scraps, and insects.) When you raise animals outside, they’re subject to variations in the weather that will affect their weight. Even the place you buy your chicks from can make a difference. I’m also assuming that you plan to raise Cornish Rock chickens as described in the Getting Started with Chickens post.

Remember that if you plan to process a large number of chickens it can be worth investing in some machines to help you with the process. You can find second hand or discounted former factory models usually for cheap, and by contacting someone who makes replacement parts (National Band Saw makes berkel slicers parts and sells online is one example) you can make your life a lot easier in the long run.

It’s also important to remember that chickens today are typically sold without the organ meats and sometimes without the neck. The neck, heart, gizzard, and liver normally weigh in at a combined 4.0 to 6.0 ounces. We keep all of these parts because the small amount in each chicken really adds up. Some people also keep the feet, which could add another couple of ounces to the total. The feet are great for broth, but you need to ensure that they’re completely cleaned before you use them and you also remove the yellow outer skin before boiling them. We don’t keep the feet because we feel that the amount of work required to clean them properly isn’t worth the resulting broth.

Although the table seems to indicate that you can multiply the live weight by 0.67 in most cases to obtain the processed weight, we generally multiply by 0.5 to ensure we actually get chickens of the size we want. There is some weight variation between birds and you don’t want to have to weigh each one individually, so the lower multiplier adds a little insurance. Please let me know if you have any questions at [email protected].


Protecting Your Investment

Many people disregard the benefit of having good working animals. We currently have two dogs and three cats. Every one of them has work to do. Over the years I’ve found that working animals actually live longer and lead happier lives. It seems that everyone benefits from having work to keep them happy.

The two dogs work during the evening hours. We’re out and about enough during the daylight hours that we’ve never had a problem with the wildlife during the day. It’s at night that the wildlife comes out and causes us woe. So the dogs work all night and sleep all day. One of us takes them to work each evening and brings them into the house early each morning.

Shelby earns her keep by guarding the chickens. Everyone likes a chicken dinner. The way we have the chicken tractors constructed keeps hawks at bay. However, weasels and racoons will dig under the chicken tractors to get inside if they can’t get in any other way. The hardware cloth will delay them, but not permanently bar them. Weasels are the worst of the lot. They’ll make a small incision in the chicken’s neck, drain it of blood, and then move onto the next chicken without touching the meat of the one it has just killed. What a waste! We’ve had problems with other wildlife getting into the chicken tractors as wellI’m pretty sure a fox got into the chicken tractors at least once.

Shelby

Shelby also helps catch any chickens that get out of the chicken tractors. She’ll carefully move them toward me. I can usually catch the chicken without any problem and put it back inside. We chose a border collie because of the herding instinct.

Reese guards the apple orchard. We have two orchardsone for apples and another for everything else (pears, plums, and cherries). For some reason, none of the wildlife bothers the other orchard, but they absolutely love our apples. One season I had a wonderful harvest when I went to bedthe next morning I got up to find stems, which was all that the deer left behind after eating every apple. Rebecca says that there is still a dark cloud hanging over the orchard from the unfortunate language I used to express my discomfort with the deer’s choice of delicacy. Since we’ve had a dog out there, no one has touched the apples (or at least, not enough to matter). We chose a beagle/rat terrier mix for the no nonsense attitude toward guarding territory. Besides, she doesn’t dig (at least, not often) and she cuddles nicely in the winter.

Reese

During the late fall and most of the winter months, we store goods in the basement. It acts as our root cellar. There are usually some apples, potatoes, and squash down there. Given that the basement keeps at a nice 40 degrees, things last quite a while. We eat the last squash sometime in March in most years, along with the last of the potatoes (the apples never last past the holidays). Mice just love root cellars. Given a chance, they’ll bore through squash just enough to ruin it. Apples and potatoes make wonderful treats as well.

Two of our cats, Bubba and Smucker, patrol the root cellar. We don’t stick them down there at any given time. They ask to go down for a while, then they ask to come back up. It’s a nice arrangement for everyone. Since we’ve had Bubba and Smucker patrolling the root cellar, there hasn’t been any damage to our goods from mice. Sure, we could have used traps, but cats work significantly better.

SmuckerandBubba

Sugar Plum is Rebecca’s cuddle cat. Her main job is to keep Rebecca happy. During the daytime, that means staying with Rebecca in the kitchen or wherever else Rebecca might be at the time. It’s an important job.

All of our “kids” know how to do some simple tricks. The dogs each have their own way of asking for their breakfast and they play a mean game of fetch. They’re also trained to perform the usual commandssit, lay down, kennel, and quiet. The cats can also perform tricks. In this case, Sugar Plum is sitting up to ask for a treat.

SugarPlum

Having animals is an important part of self-sufficiency. Without these work animals, we’d never be able to hold onto the investment we’ve made. How do you work with your animals? Let me know at [email protected].


Working with Chicken Tractors

In the previous post, Working with Young Chickens, the chickens were just starting to get big enough to put outside. We were hardening them off so that they’d survive the elements. The chickens are most definitely large enough now to go outside (and have been for about two weeks). Each chicken has about 2 square feet of space in a chicken tractor. However, the chicken only lives in that space for a few days. During the time the chickens are living in the chicken tractors, they’ll actually use a 24-foot × 80-foot area (or about 25.6-feet per chicken).

Of course, the question is, “What is a chicken tractor?” Our version of the chicken tractor is a square bottomless cage with a roof that allows the chickens to access bugs, grass, dirt, and other items that a chicken would normally want to access, but in a safe environment. Here’s one of our older chicken tractors.

ChickenTractor01

This particular chicken tractor is 4-feet wide and 8-feet long. It has handles at either end for moving it from place-to-place. Chicken tractors come a wide variety of forms, but the idea in all cases is to provide a movable cage that lacks a bottom. When the birds are young, we move our chicken tractors once a week. As they get older, we move them progressively more often until we’re moving them every three days before we process the last of them.

We build our chicken tractors from standard pine or fir boards and 24-inch high ¼-inch hardware cloth. Each chicken tractor requires about 40-feet of hardware cloth (24-feet for the sides and 16-feet across the top), so a single roll will build two chicken tractors that can house a total of 32 full grown birds comfortably. (Initially, you can put up to 64 birds in the two chicken tractors if you plan to cull the smaller ones for use in canned chicken, which requires three to four pound chickens, but larger birds require a minimum of 2 square feet each to be comfortable and to grow well.)

You shouldn’t use pressure treated lumber for your chicken tractor because the chickens peck at the wood. Anything the chickens eat, you also eat. That’s the same reason you don’t want to paint the lumber unless you want to invest in non-toxic paint. The only exception that you can reasonably make is to use ½-inch CDX plywood for the roofs because the chickens don’t get anywhere near them. Unfortunately, the use of non-treated wood means that we have to perform repairs on the chicken tractors each spring, but so far, the repairs have been minimal.

It looks like each chicken tractor will last six to eight years (perhaps longer as I gain experience). At that point, you need to build an entirely new wooden frame because the old one will rot enough to require replacement, but the hardware cloth, handles, and hinges are still perfectly good, so you can recycle them. In fact, it’s possible that you can even reuse some of the staples used to hold the hardware cloth in place. The cost to build a chicken tractor is about $240.00 with the hardware cloth, so you need to factor $30.00 to $40.00 into your costs each year to account for wear and tear on them.

As with any building enterprise, I made mistakes with the first few chicken tractors. For one thing, I tried using chicken wire the first time. The racoons demonstrated that they can easily overcome chicken wire and had a good chicken dinner as a result. Another thought I had was to build the chicken tractors with hinged joints so I could take them down each winter for storage. The solution proved problematic and the rotting was actually worse than if I had left the cages up all winter. I also made the door on the top of the cage too large the first time and the chickens demonstrated an unswerving ability to get out of the chicken tractor while I was trying to feed themleading to Keystone Cop episodes of chicken catching. I’m sure I’ll continue to learn new tricks as I build new chicken tractors.

The chickens require boards to roost on inside the chicken tractor. Otherwise, they’ll get diseased easily and their breast feathers will become almost useless to them. Chickens also need exercise and a place to get their feet off the ground from time-to-time. Our chicken tractors have 2×4 roost like the ones shown here:

ChickenTractor02

We supply two roosts to divide the cage into thirds. The left side contains their water dish and the right contains the food dish. The center is completely free of any encumbrance so the chickens have a free space in which to roam. The roosts are 2-inches above the ground so that they aren’t too high to reach, yet provide complete protection from the ground, even when it rains.

A lot of people use specialized feeders for their chickens. It’s actually better to use a short pan so that the chickens have good access to food and water. The water pan also serves as a bath, so we change the water at least twice a day (more often after a storm because the birds want to get any mud off). Here are the pans that we use:

ChickenTractor03

As you can see, it’s nothing fancy. A pan like this will last around five years. It holds 3 gallons of water, which is more than enough for the chickens in the chicken tractor. If you have any questions about these chicken tractors, let me know at [email protected].


Working with Young Chickens

You’ll remember from the Getting Started with Chickens post that we’re raising chickens this year. The chickens when the first five days with the heat lamp, after which we turned it off. After the first seven days, we started giving them food only during the first 12 hours of the day. In a factory setting, the chickens continually receive food, but we prefer that the chickens grow more slowly so they can develop strong bones and have a better survival rate. Of course, they get water whenever they want it.

Each morning now at 5:30, the young chickens wake up and immediately start chirping. Along with the birds outside our windows, it sounds a bit like “The Birds” or perhaps “Wild Kingdom.” There is no sleeping in our house after 5:30. All during the day the young chickens peck away at their food. Between 7:00 and 8:30 at night, the birds all nestle down and go to sleep.

Our chickens are growing slowly, but steadily. You remember that they were mere puffs of yellow at one point. Here’s how they look today (about five times the size they started):

Chickens0201

Naturally, with all of this growth, the chickens need more space. They’re now in five boxes the same size of the original one. We can keep them in boxes for another week or two, but that’s about it. At that time, we’ll move them out to the chicken tractors, where each chicken will have two square feet of space in which to move about. That’s more space than you might imagine because they tend to clump together. You’ll hear more about the chicken tractors in my next post.

The young chickens are still eating chick starter, but they’ll move onto broiler mash soon. They’re also getting kitchen scraps and other more natural food (including bugs) now. We’re “hardening them off” at this point. What that means is that we dutifully take the boxes outside to a semi-shaded area each day. The chickens can hang out in the shade or move into the sun as desired. This stage helps the chickens adjust to the outdoors before we put them in the chicken tractors. If you suddenly move the chickens from an environment, such as your garage, to the outside, the shock could kill them.

Yes, you read correctly, we keep our chickens in the garage. One of our poultry farmer friends recommended the concept. It’s a wide-open space with an easy to clean floor. It could be the perfect place for you to raise your chickens too, with a bit of consideration. One of the biggest ones being the garage door, it can feel great to open that big door and watch the hens run out, it’s getting them back in that might be a problem. With the extra moisture and dirt generated from the chickens the door will also need more maintenance as well unless you’re keen on hiring your local garage door repair in Etobicoke that is. There is nothing more frustrating than a garage door that does not work properly after all. That farmer friend of ours recently had his garage doors repaired by a company that specializes in fixing local garage doors in Crownsville Maryland. He maintains his coop quite well, but it happened anyway. It’s just one of those that can occur, with or without chickens.

Each evening (about 4:00 or 5:00) we take them back into the garage for safety. At this point, they’re interesting enough that weasels, racoons, and even other birds would just love to have them for dinner. In fact, this is probably the most dangerous point in their growth because we still need to have them in the garagejust in case it gets cold (unlikely, but it can happen). Plus they’re still just a bit too small for the chicken tractors.

Heat is also a problem at this point. Young chicks require quite a bit of heat, but even they have limits. We’ve had a couple of extremely hot days and lost a couple of our charges due to the heat. Fans, time outside, and extra water just weren’t enough. The young chickens don’t need the heat of chicks anymore, but they haven’t developed fully enough to tolerate the heat swings of summer. So, you have to watch them carefully to ensure they’re staying comfortable.

We also lost a few of the chicks to other causes. One day the chicks managed to peck a hole in the box. We came home from town with more boxes, opened the garage door, and all the chicks came charging out. They looked quite determined to go on an adventure. So, we had to rush about gathering them up into the new boxes. It looked like one of those scenes you see on America’s Funniest Home Video, but this was real life. Unfortunately, we didn’t find all of them and other animals ate them.

We can tell that the young chickens are starting to make the transition between chicks and chickens. Their cheeps are becoming lower and a bit more like a cackle. No, it’s not the cackle of a chicken yet, but it’s getting there. They’re also starting to develop feathers. They haven’t quite gotten a case of the raging uglies yet, but they soon will as the hairy feathers they have now are replaced by a full set of real feathers. Let me know if you have any questions at [email protected].

Getting Started with Chickens

Rebecca and I don’t raise chickens every year. We raise chickens for two years, then give the land a rest on the third year. This cycle ensures we meet a number of goals, including the reduction of disease risks that could occur if we raised chickens every year. We normally start with 75 Cornish Rock chicks because that provides us with about 1½ year’s worth of meat. The chicks arrive in a box like this one:

Chickens0101

The baby chicks are packed pretty closely together so they stay warm. Chicks require a considerable amount of warmth or they’ll die. If you get chicks at some point, don’t be surprised at just how tightly they’re packed:

Chickens0102

Of course, you’ll want to get them out of there as quickly as possible (the chicks will tend to want to run all over the place if you let them). However, the chicks don’t know how to drink when you first get them. The safest way to teach them to drink is to dip their beaks in a water solution as shown here.

Chickens0103

The solution shown here is actually Gatorade. It contains a number of things the chicks need to get started. We provide them with watered down Gatorade for the first few days and find that it reduces the number of chick deaths (in most cases, we lose 2 or 3 chicks during this first stage, but we’ve had years where we didn’t lose any).

At this point, you put the chick into some type of container (we use a large cardboard box) with a pan of chick starter. We don’t believe in using many chemicals with our chickens, but we do use a chick starter that has medications in it to prevent diseases such as coccidia.

The chicks are kept under heat lamps until their full feathers grow in. We use disposable tin plates and replace their paper daily to ensure the chicks remain in the healthiest possible environment as shown here:

Chickens0104

As the chicks grow, we’ll move them to non-medicated food. In fact, they’ll often eat garden scraps, plenty of grass, and have access to various other items that chickens would normally eat (such as worms) because we raise them in chicken tractors. We also move our chicks outdoors to chicken tractors so they can get plenty of fresh air and sunshine. I’ll talk about this next stage in a later post. For now, the chicks are snug under the heat lamps.

Chickens0105

It’s important to provide the chicks with enough space, but not too much space. If you provide too much space, the more aggressive chicks will trample and kill the less aggressive chicks. At this point we supply 9 square inches of space for each chick. As the chicks grow, we increase the allotted area to 1 square foot per chicken.  The full grown chickens will have 2 square feet or more of space. (Full grown chickens normally receive 1/2 square foot of space in factory conditions.)

We’ll start out by making food available to them 24 hours a day.  After the first five days, we’ll withdraw food at night to prevent health problems. The chicks will have clean water available 24 hours a day. Overfeeding chicks (as is done in factory conditions) can result in a condition known as flip (the chick dies of a heart attack). We prefer to let our chickens grow slowly.