Building a Brooder Box/Rabbit Cage Combination

It’s important to provide any animals you care for with comfortable surroundings. In past years we always placed our chicks in cardboard boxes and then recycled the cardboard box when we placed the young chickens in chicken tractors (see the Getting Started with Chickens post for details). There are a number of problems with using a cardboard box for your chicks:


  • The box sits on the floor so the chicks are exposed to some level of cold.
  • The box traps moisture, making it hard to keep the chicks completely dry.
  • Chicks can become crowded as they grow.
  • Keeping the box clean is difficult because the cardboard isn’t very tough.
  • Chicks can escape when they peck through the side of the box.


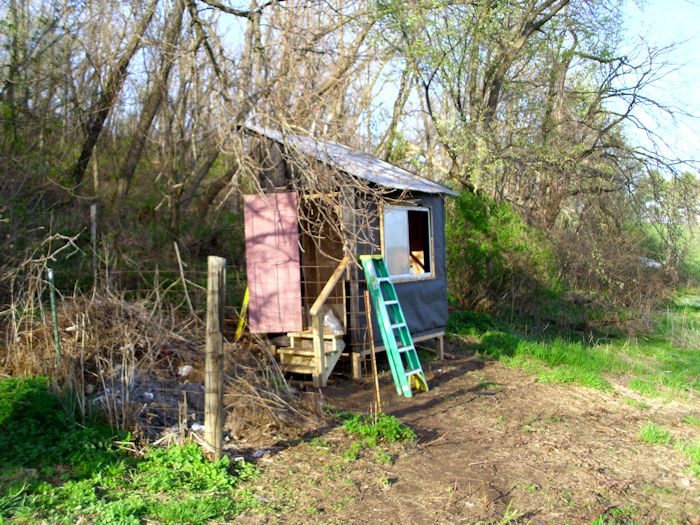
With this in mind, I decided to build a brooder box this year. I wanted a permanent place to grow our chicks that would be easy to keep clean, provide a dry environment, and keep the chicks secure so nothing would eat them. The box also needed to provide plenty of space. The only problem is that a box used strictly to raise chicks would sit idle for most of the year. Normally, the chicks stay in the cardboard box between four and six weeks, so building a brooder box just for that purpose would be a waste of time.

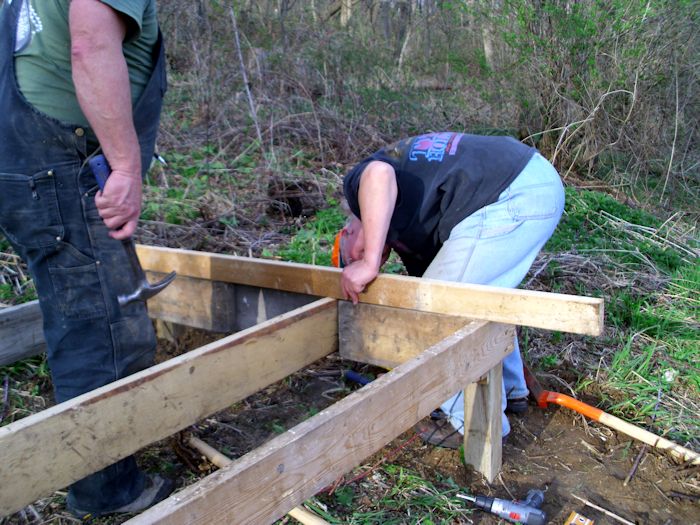
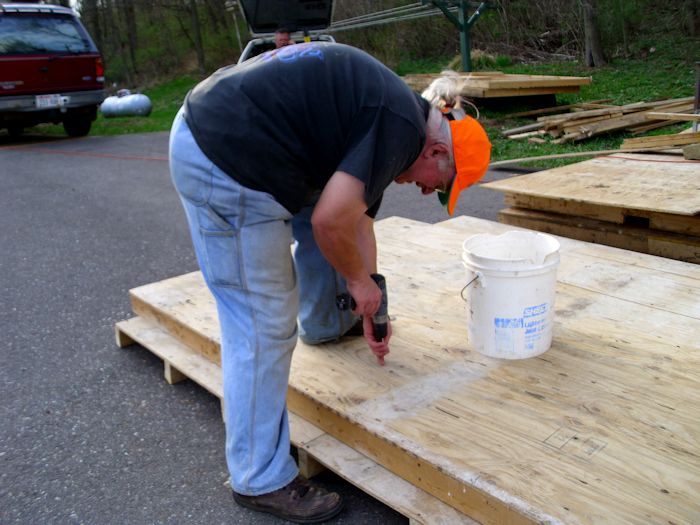
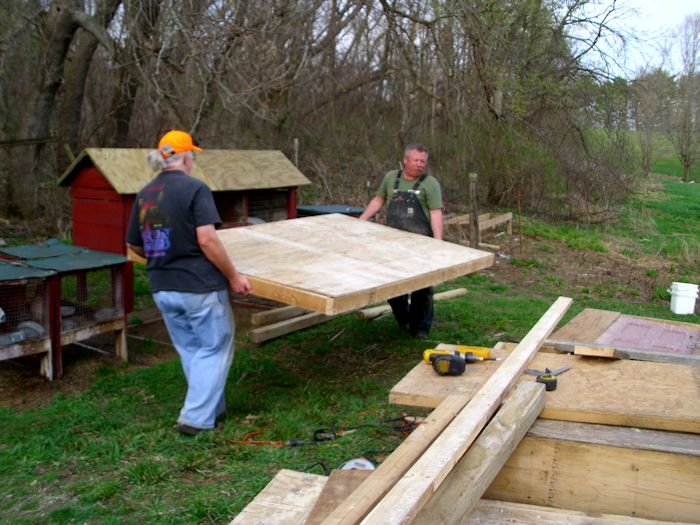
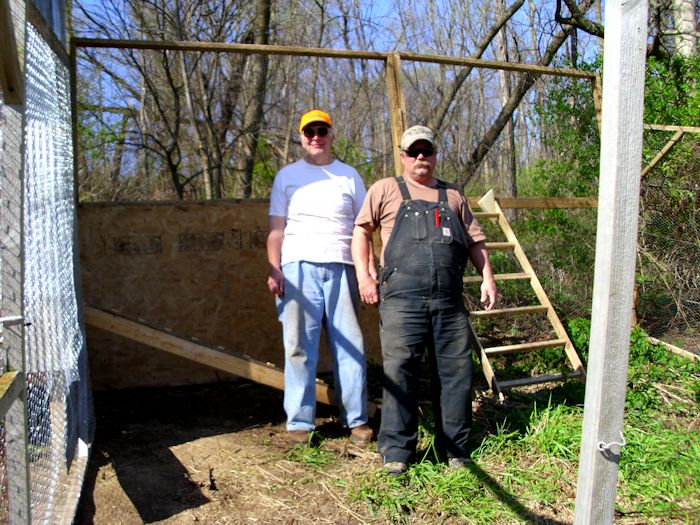
I got the idea to build a combination box. Our rabbits are normally weened from their mothers about the same time as the chicks go to the chicken tractors. So, I created a combination box—one that would support both chicks and rabbits so that the box would remain in use for most of the year. With this in mind, the bottom of the box would have to use hardware cloth so that the rabbit droppings would drop through. When the box is used for chicks, a plywood insert provides a solid bottom that is easy to clean. So, I build a 4′ × 8′ bottom.

BrooderBox01

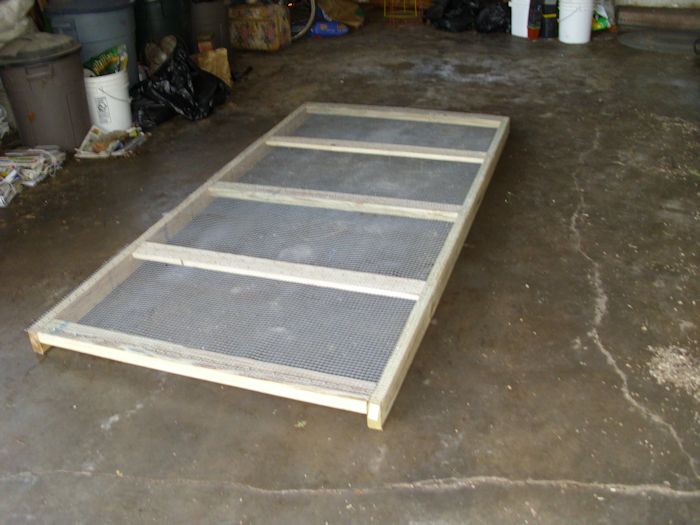
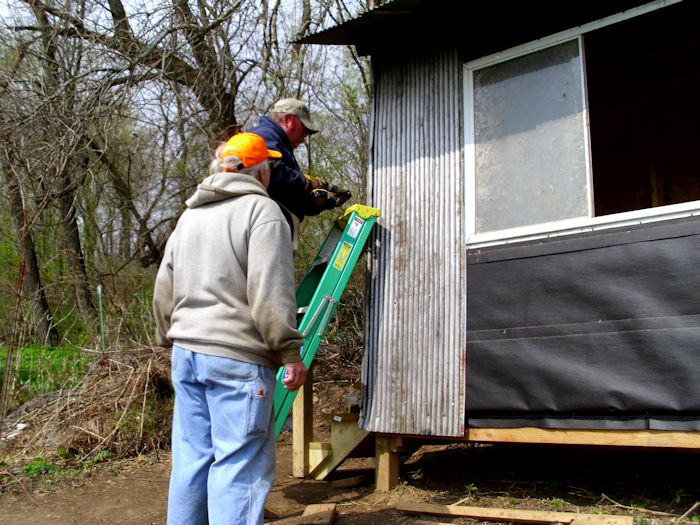
Notice how the 2 × 4’s are put together. They act as runners to make the cage easy to move around, yet provide stability. I had thought about putting the cage on wheels, but adding wheels would have been expensive and would have kept the cage too far off the ground for the rabbits to grab grass that pokes up through the bottom. In addition, given that we have no flat ground on our property, the cage would have a tendency to move around on its own. The bottom is covered with 1/4″ hardware cloth that I salvaged from the chicken coop some friends helped me tear down (see the Starting a Chicken Coop post for details). Keeping the bottom this high also keeps the chicks warmer because they aren’t feeling the effects of the cold floor. Any dampness also goes through the hardware cloth to drain off away from the chicks.

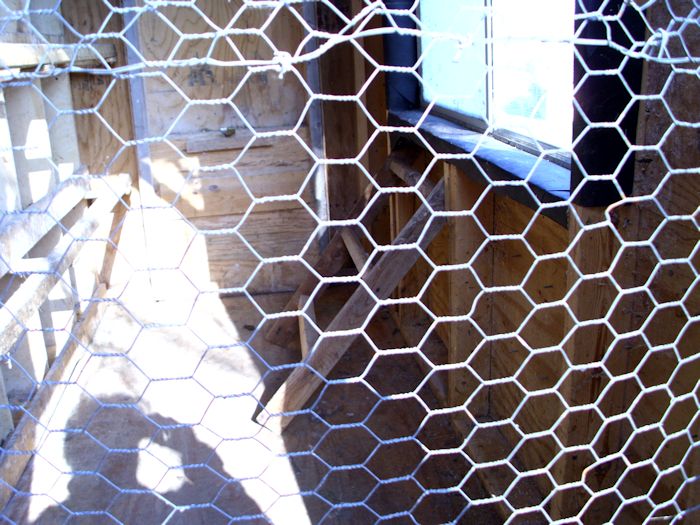
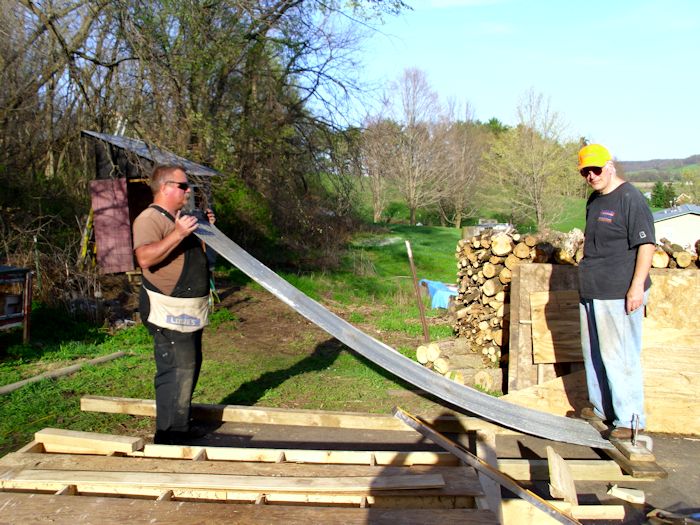
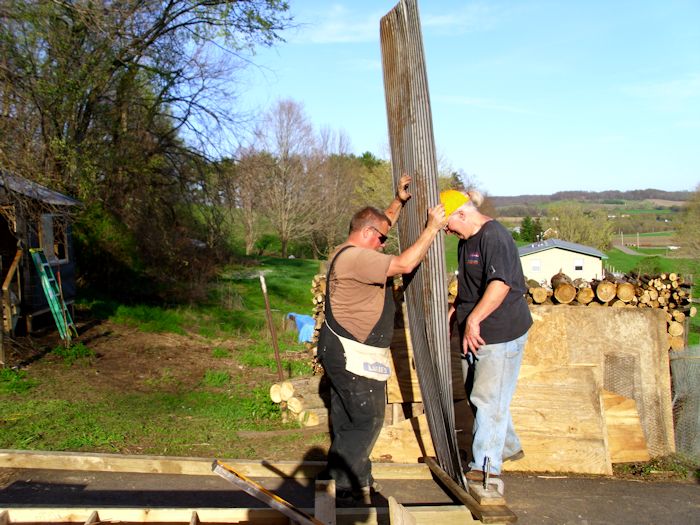
The sides are built using 2 × 4’s and are covered with 1″ × 2″ hardware cloth. I chose to make the sides 30″ high to ensure that the chicks couldn’t fly out too easily without having to cover them too early. In addition, the high sides would keep drafts off of the chicks during their early development. The high sides also make it less likely that predators will easily access the rabbits we put into the cage later.

BrooderBox02

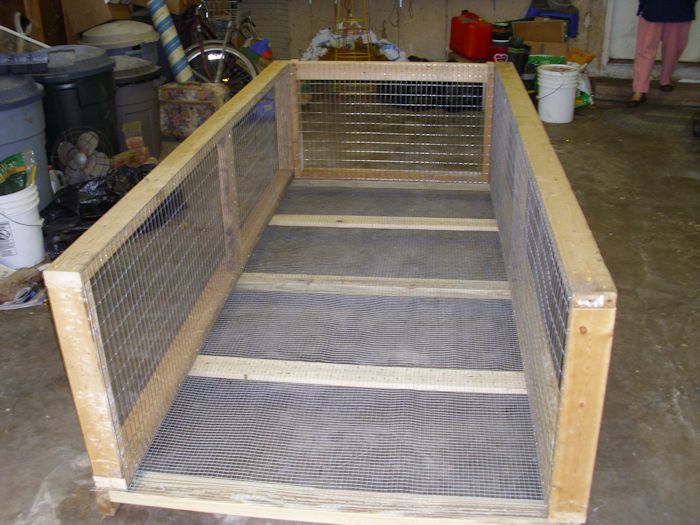
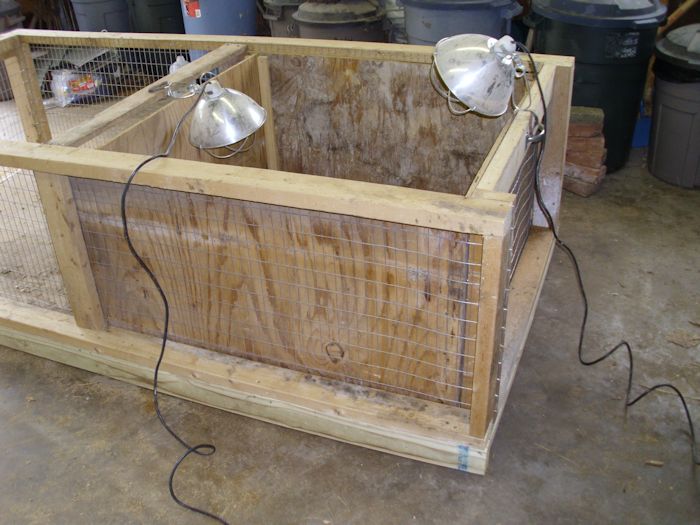
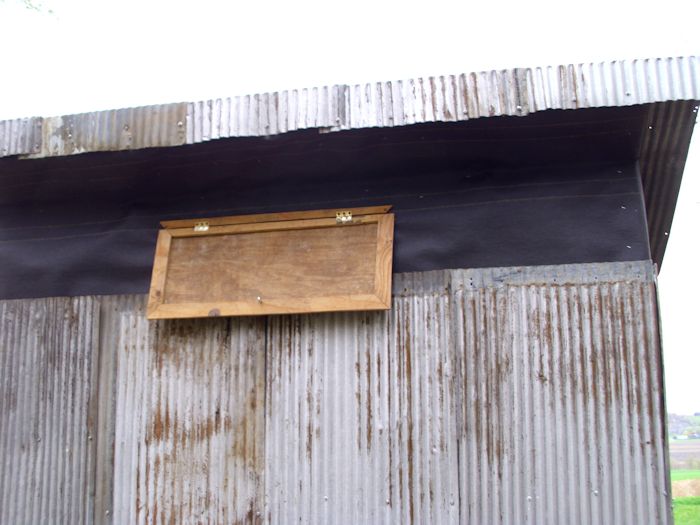
Once I had all four sides put onto the cage, I started creating the inserts. Young chicks are incredibly susceptible to drafts. You have to keep them warm. In addition, the young chicks would actually do better in a smaller space. So, I added the 1/2″ plywood floor first, and then created four inserts for the sides so that the chicks would start with a 4′ × 4′ area like this:

BrooderBox03

After the chicks grow large enough that they no longer need the heat lamps, we can remove the four inserts and let them roam around in the full 4′ × 8′ cage.

BrooderBox04

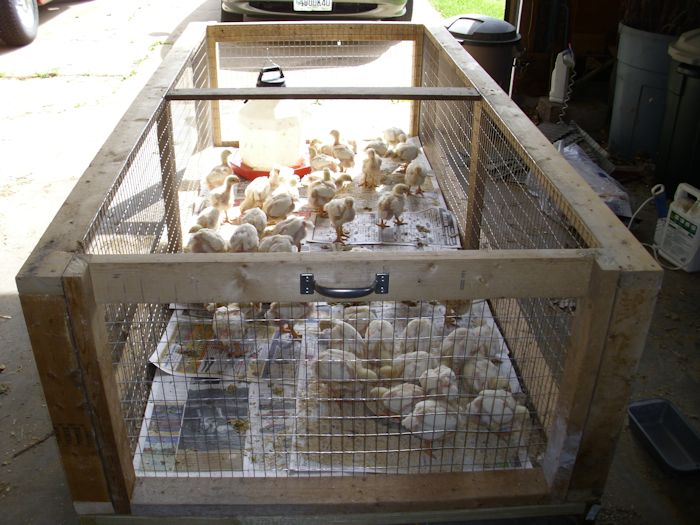
The box is large enough that I can simply shovel out the newspaper once it’s no longer useful and put in new. The birds remain completely dry and their environment lets them get plenty of exercise. We keep about half the cage in sunlight during the morning hours so that the birds can choose to bask in the sun or relax in the shade.

An interesting thing happened with this new brooder box. Our chicks grew significantly faster and didn’t even go through the usual “ugly” stage as their feathers came in. The new brooder box has performed well beyond expectations and we expect to get many useful years out of it.

My next post will show how the cage is used for rabbits. It’ll have a removable roof in place and the plywood floor will be gone. In the meantime, let know if you have any questions about the chick (brooder box) configuration of the cage at [email protected].


Covering and Completing the Chicken Coop

In the previous post, Bending Corrugated Roofing, you saw how to bend the corrugated roofing material. We’re actually using this material to cover every part of the chicken coop because its strong and, in this case, free. The material will eventually require painting, but for the moment, it provides a durable covering that should withstand just about anything. The covering process begins with the roof as shown here.

ChickenCoop0801

The roof sections overlap by one ridge and valley pair to provide continuous protection. You use special corrugated roofing screws to secure the corrugated roofing in place. Each screw is self-tapping. In addition, there is a rubber washer to seal the hole made by the screw. It’s important to put the screws into the ridges, not the valleys, of the corrugated roofing to allow unimpeded water flow. Notice that the roof part overhangs. This addition provides some protection for the window, just in case it’s left open during a storm.

The back section pieces are all bent to provide coverage for the fascia. They provide a slight overhang as well because they need to cover the soffit pieces that are installed later. Here’s how the back looks. Notice the window that I mentioned earlier. It’s near the top of the coop to provide good ventilation during the summer months. The window seals tightly to keep the heat in during the winter months.

ChickenCoop0802

We worked on the sides next. When it came time to complete a corner, we made the piece a bit long and bent it around the corner. That way, the two pieces of corrugated roofing overlap and provide good protection as shown here.

ChickenCoop0803

We worked around the building, overlapping the roofing material on the sides and then we realized that all sides were also in need of corrugated roof sheets to prevent the water from getting inside the building. Besides general hardware stores, these roof sheets can also be purchased online from Foregale or other related e-shops. .

The bottom pieces came first, and then those above, so that water flowing down the sides won’t get under the roofing. The soffit pieces came last. Working around the windows was time consuming, but we eventually got the task done.

ChickenCoop0804

The next step was to install the nest box assembly. It’s the same nest box assembly used in the original coop. There are 15 nest boxes. Outside each nest box is a roost for the chickens to get in and out of the nest box easily.

ChickenCoop0805

On the other side of the coop are places to put the feeder, waterer, and oyster shell feeder, along with a small roost. Your chickens will need the oyster shells or some other source of calcium carbonate, especially if you plan to let them forage outside, as we will. Chickens don’t naturally eat layer mash; they naturally eat bugs, grass, and other odd assorted natural items that don’t contain the calcium carbonate they need. Because we want to let the chickens eat as many natural items as they’d like, we provided space for both layer mash and calcium carbonate, which gives the chickens choice of what they want to eat. The result should be better quality eggs (with dark orange yolks) with strong shells.

ChickenCoop0806

Notice the door at the side of the coop. This door leads to the chicken run outside. The last part of the building process is to fence in the chicken run. The chicken run has a ramp to make it easy for the chickens to get out of and into the coop as needed. There is also a large roost outside so that the chickens can rest off of the ground and still enjoy the sunshine. The ramp has little bars on it to provide a foothold for the chickens.

ChickenCoop0807

In order to make the chickens comfortable and ensure they have plenty of interesting things to eat, we allocated 20 square feet per chicken in the run. That may not prove large enough. I’ll track how the ground cover does after a month or two and may increase that to 30 square feet per chicken. The point is that the chickens will have plenty of space in which to run around. We’ll keep the run shoveled in the winter so that the chickens can come out unless the weather truly is horrible.

The coop is finally finished and ready for occupancy. We were originally going to raise all of our layers from chicks. However, I decided to surprise my wife with a couple of hens so we can start enjoying the fruits of our labors now. Next week we’ll talk about the inhabitants and the chicks that will arrive on June 25th to complete our coop. In the meantime, let me know if you have any questions at [email protected].


Bending Corrugated Roofing

This post continues the series on building a chicken coop. The previous post, Finishing the Chicken Coop Structure, shows how the coop looks with tar paper in place. The outside of the coop will be covered in corrugated tin roofing recycled from a friend’s house. We picked some of the better pieces (those without holes or serious bends) from the selection. There are a little rust and a few holes, but we reused holes whenever possible and cut out any major blemishes.

To work with corrugated tin roofing, you
need a circular saw blade designed to cut metal and also need a face shield. Make sure you wear long sleeves (the metal bits are quite hot and will burn you) and gloves are a good idea as well.
Unfortunately, all of this equipment won’t solve one problem, bending
the corrugated tin roofing over corners to provide better coverage. If it’s a particularly large piece of metal then safety concerns take precedent. Instead of a saw, you will need to use a lathe such as a CNC lathe which does the work for you.

We tried all sorts of methods to bend the corrugated tin. How anything
manages to accidentally bend the stuff (such as a hailstorm) is beyond me. The answer to the problem turns
out to be one of leverage and careful weakening of the area targeted for
bending. Start with the longest piece of corrugated tin roofing that you can.

To begin the bending process, we created a jig using two 8′ 4 X 4 posts that are
screwed together with a 2 X 8 support. A combination of a 2 X 6 top
piece two heavy C-clamps holds the corrugated tin in place as shown
here.

ChickenCoop0701

Once the corrugated tin roofing is secured, use a piece of wood with an
angled end and a hammer to create a flattened line across the bend. You
won’t be able to flatten the corrugated tin roofing completely. All you
really want is a weak spot in order to control the bend. The reason
you’re using a stake to perform this task is that metal tends to punch
holes in the corrugated tin roofing. If you’re not keen on doing the work yourself. You may want to go ahead and get a professional. There are plenty roofing austin texas firms about which are able to complete the work.

ChickenCoop0702

With the weak area in place, one person grabs the long end and gently starts toward the bend, while the other person stands on the 2 X 6 holding the corrugated tin roofing in place.

ChickenCoop0703

It’s important that the person doing the bending maintain equal tension across the bend and not to move too quickly. Take your time and keep moving toward the other person. Eventually, the bender will meet up with the person standing on the bender and the person standing on the bender can step off.

ChickenCoop0704

At this point, you can cut the bent piece to length. Make sure to take the proper safety precautions when cutting the corrugated tin roofing. The saw will definitely buck a little, so use two hands. Bits of metal are going to hit you and they’ll be hot when they do. Wear a face mask and long sleeves. If you follow this procedure, you won’t have any problem getting the results you want from the corrugated tin roofing, despite a lack of roofer’s tools . Let me know if you have any questions at [email protected]. Next week we’ll look at how to attach the corrugated roofing material to the chicken coop.

Finishing the Chicken Coop Structure

Last week you saw the roof raised on the chicken coop (see Raising the Chicken Coop Roof). There are still a number of steps to accomplish before the chicken coop is ready for occupancy. This week, you’ll see some of the finishing steps performed to make the chicken coop more habitable before adding the exterior treatment.

Of course, one of the more important tasks is to create a set of stairs to get into the coop. As things stand now, you need mighty long legs to get into the coop. Kevin puzzled over the dimensions of the stairs for a while and then came up with steps with a 7-inch rise.

ChickenCoop0601

This is one of the only places where we used new wood, partly because we didn’t have any wood the right size. The stringer (the part that goes from the top of the coop to the ground and holds the treads) has to be strong enough to hold up under the conditions in which it will be used. We relied on pressure treated lumber in this case because it’s the best option available in this case. The stairs rely on 8″ treads. As you can see from the picture, there is a back support for strength.There aren’t any risers in this case because they would probably get in the way during the winter when trying to clear the treads of snow. After the steps were finished, we put them in place.

ChickenCoop0602

To make things safer, Kevin also added a handrail and post. In order to get the steps to fit properly, I needed to level the ground out, which required a bit of digging. The black earth shown in the picture will be added to the garden. At some point, I’ll even things out more and add some gravel to create a non-slip pathway for the winter and wet days. The stairs will receive a coat of primer, and then a coat of non-skid paint. To then make the whole thing look a little nicer for the future we’ll probably end up looking at metal trim colors to trim the different wood components with. Once the project has been completed, it shouldn’t really be looking the same as what we started with at all!

Remember that the roof is at an angle and the ceiling joists are flat. So, there is currently no way to nail any sort of cladding to the exterior of the coop. In order to provide a nailing surface, Kevin and I both built triangles to fit into the space between the ceiling joist and the roof like this one here (Kevin’s is much better than the one I created, but he also has a lot more experience than I do).

ChickenCoop0603

We each added a couple of studs to the triangle to make it easier to nail things in place. The coop also requires a window. The coop we took down had three windows, so we chose the best looking of the three and used it for the new coop. The window required a little work, but it now slides as it should and will provide both light and ventilation for the chickens.

ChickenCoop0604

Kevin had also gotten up early this particular morning and put the tar paper on the roof. Actually, the coop isn’t quite ready for tar paper yet. We’re still putting the cladding in place. Most of the cladding is plywood that we obtained from the old coop. In a few places, we also used oriented-strand board (OSB) because the old coop had plenty of it as well.

One of the items that I managed not to get a picture of is the window in the back of the coop. We put on up near the top of the coop in the extension used to hold the roof in place. You’ll see a couple different pictures of this addition later in the process. For now, just keep in mind that we built a window back there to allow cross flow during the summer months. The window seals tightly during the winter months to help keep things warmer in the coop.

Once we got all of the cladding in place, it was time to complete the tar paper. We used staples to hold the tar paper in place. When putting the tar paper on, you start at the bottom and move up. That way, the overlaps work with gravity to keep water from getting under the tar paper. The completed coop looks like this:

ChickenCoop0605

Next week we’ll take a bit of a sidetrack. The coop is eventually going to be completely covered with corrugated metal, similar to the best metal buildings maryland has to offer. Who knows, as my collection of chickens grows, I might just have to buy a much bigger space for them! The long lasting covering will never require replacement and will help keep the coop daft free. Unfortunately, we needed to bend the corrugated metal, which is easier said than done. You’ll learn the technique we used to accomplish the task. In the meantime, let me know if you have any questions about this stage of the coop building process at [email protected].

Raising the Chicken Coop Roof

If you’ve been following along with this series of posts, you saw the walls go up in last week’s post, “Adding Walls to the Chicken Coop.” This week, you’ll see how we put a roof on the chicken coop.

Getting a roof put on was a bit of a challenge because we had no heavy equipment with which to work. We couldn’t exactly bring in the likes of Pennsylvania roofers because, well, they work on homes, not coops. In addition, the chicken coop isn’t on flat ground-in fact, the slope in the front of the coop is significant. So, with a lack of flat ground and no heavy equipment, trying to get the roof in place was an experiment in leverage and ingenuity.

To begin with, we built the roof section on the ground. One end, the end that will rest directly on the ceiling joists, is closed off. The other end, the one that will eventually rest on an extension, has been cut at an angle and is open.

The roof section is two feet wider than the floor to account for the roof slope. In addition, the roof is sloped toward the south so that the sun will hit it full force during the winter months and keep the snow off. In addition, sloping the roof toward the south, the same direction as the slope of the hill on which the chicken coop is built, keeps the water from any rains from flowing under the chicken coop and possibly washing out the supports.

To begin the process of raising the roof, we tilted it against the back of the building. Three of us raised the back end at that point.

ChickenCoop0501

After the roof was in place, the three of us worked at squaring the front of the roof with the front of the chicken coop. Notice the 2 X 4 sticking out of the top of the right side of the front of the roof.

ChickenCoop0502

When the roof was squared, we added another 2 X 4 to the other end of the front of the coop and then moved the roof out the amount of space required for the overhang. The two 2 X 4 pieces are then attached to the roof using a single screw so that the entire assembly acts as a hinge we can use to keep the roof in place while creating the slope at the back of the roof.

ChickenCoop0503

At this point, we attached two long 2 X 4s to each end of the back of the roof. The 2 X 4s are precisely the same length. We used them to raise the back of the roof up and then hold it in place.

ChickenCoop0504

With the roof raised, Kevin added an extension to the back wall of the chicken coop. We secured the extension to the ceiling joist of the back wall and then lowered the roof onto it. The back of the roof was then secured to the extension and then we secured the front of the roof to the ceiling joist of the front of the chicken coop. The result looks like this:

ChickenCoop0505

At this point, the roof is in place. Next week I’ll talk about a number of items required to finish the basic coop structure. In the meantime, please let me know if you have any questions at [email protected].


Adding Walls to the Chicken Coop

Last week saw the completion of the chicken coop foundation (see Building the Chicken Coop Foundation). Of course, the logical next stop is to add some walls to the foundation. As with the foundation, we built the walls in place for the most part and then carried them to the chicken coop. Kevin decided to build the only wall with a window first, the front wall. Adding a window to the front wall, the one that faces south, will help heat the chicken coop in the winter because the sun will be able to shine on the inside almost all day long. During the summer months, the window will allow the breeze that comes up from our valley to move air around on the inside of the chicken coop.

ChickenCoop0401

In this picture, Kevin and Cody are just finishing up on the braces to support the wall during the building process. I’m off the shot doing some work on the next wall to go up.

The second wall faces toward the east and it contains the door the chickens will use to access their run outside of the coop. We did this wall next to provide a square corner on which to build the rest of the coop structure.

ChickenCoop0402

We’ll use a piece of plywood to close in the right side of the second wall later. The most important part now is to get the structure in place. The door you see simply slides up to let the chickens out. At night we’ll close the door to keep predators out. You can’t see it easily in the picture, but there is a little latch that holds the door up. We can swing the latch to keep the door closed as well.

The third wall to go up is on the north side. It will eventually have a window in it near the top to provide ventilation in summer. This wind will blow straight through the coop to keep things cool. The trees from the woods will provide shade during the summer months as well.

ChickenCoop0403

The fourth wall, the one facing west, contains the coop door. After this wall is added, we’ll take out the bracing from inside of the coop since all of the walls are now supporting each other.

ChickenCoop0404

The door is simply an old door from a house. Eventually, the door will be double hung. The screen door will go on the inside of the coop to keep the chickens from simply running out through it during the summer months when the main door will be kept open during the day to provide ventilation.

The walls are bolted into the floor and into each other at this point, so we have a solid framework for the roof. That’s what I’ll talk about next week. In the meantime, let me know if you have any questions at [email protected].


Building the Chicken Coop Foundation

At the end of my post about the chicken coop last week (see Moving the Chicken Coop Parts), we had moved all of the required components to our house from wherever they were stored at the time. After we found a few discount chicken coops, it was time to start putting the chicken coop together, which meant clearing a spot for it and building a foundation.

The place where Rebecca and I live is absolutely gorgeous, but also completely devoid of anything approach flat. So, finding a place to put the chicken coop was less a matter of space and more a matter of finding something flat enough to use. In addition, the place had to be close enough to the house to feed the chickens in winter (putting it out in the middle of the orchard would have been a bad idea) and also close enough to the compost heap to make clearing the chicken coop of waste matter easy. With all of these factors in mind, I cleared as much brush as possible from the location next to the compost heap. The chicken coop is now on the right of the compost heap, while the rabbit cages are to the left.

To keep the chicken coop from sliding off into oblivion, we started by digging two post holes and adding a board between them.

ChickenCoop0301

After making sure this starting point was completely level (despite the fact that things looked quite uneven due to the unevenness of the terrain), we added two more posts, one at a time. All four posts were tied together with boards and made level. After that, we started adding two additional boards in the center to reinforce everything as shown here.

ChickenCoop0302

Make sure everything is even and well-secured is important. We took the time to check and double check everything at this point.

ChickenCoop0303

The posts we’re using are pressure treated 4 X 4 stock. The joists and other framing members are 2 X 6 stock. All of this lumber was recovered from the old chicken coop. In a few cases, we not only had to remove old screws or other hardware, but also clean the stock before we could use it.

We had actually built the floor from a piece of existing wall used in the old chicken coop. Keven made a few changes to the wall design and strengthened it, but the floor was moved intact from the existing site to its new home. Floor space is important for good chicken health. The chicken coop will eventually hold ten chickens and we allowed 4 square feet per chicken inside the coop. (The chicken run allocates an additional 20 square feet per chicken.) Because the floor will take a lot of abuse, we used a double layer of 1/2 inch exterior grade plywood for the floor. The second layer was screwed on at 90 degrees to the first layer right before we moved it to the foundation.

ChickenCoop0304

The floor framing is 2 X 4 stock, but it’s heavily reinforced. Once the floor was ready, we moved it to the platform we had built earlier.

ChickenCoop0305

With the floor in place, we secured it to the platform. Of course, the final check was to make sure everything was still level.

ChickenCoop0306

The next step is to start putting up walls. We’re going to build them in place and move them in whole sections as well. You’ll learn the details in next week’s post. In the meantime, let me know if you have any questions about this phase of building the chicken coop at [email protected].


Moving the Chicken Coop Parts

In my previous post about the chicken coop, Starting a Chicken Coop, I talked about some of the requirements I had looked at when getting the parts for the chicken coop I wanted to build. Three of us worked together to start taking the chicken coop at my friend’s house apart. We worked carefully because some of the parts really didn’t require any deconstruction. Here we are sitting in front of the car used to transport one of the walls intact:

ChickenCoop0201

Cody, our intern, is standing on the left. Kevin, an ex-Seabee and also the brains of this operation, is standing in the middle. I’m on the right. The car was most definitely overloaded with that piece of wall on its back:

ChickenCoop0202

You can’t see it very well in the picture, but the car is definitely riding low. We also loaded up my Explorer and eventually we used my uncle’s truck. It took us a day and a half to break down the chicken coop and move it over to the house. We also obtained some corrugated roofing material from another friend. He had removed it from his house and saved the better looking pieces. By the time we were finished, we ended up with three distinct piles of parts:

ChickenCoop0203

This pile contains some walls we thought we could use intact, the nesting box, some sheet goods, and a bit of fencing. There are also some other bits and pieces that we probably won’t use. For example, the feeding trough it way too long. I’ll deconstruct it and use the wood for another project-absolutely nothing goes to waste around here.

ChickenCoop0204

This pile contains an additional wall that we thought we might need, but weren’t sure about. It also contains some bricks (we probably won’t need them) and the 2 X 4 stock used to put everything together. In addition to 2 X 4 stock, we were able to salvage some 4 X 4s, 2 x 2s, 2 X 6s, and a number of other sizes of lumber.

ChickenCoop0205

This pile contains some fencing parts and the corrugated metal roofing. Actually, we’ll use that metal to surround the entire chicken coop, making it quite durable. The only new materials that the chicken coop will have are some screws (we’re reusing as many as possible) and some tar paper. Otherwise, this chicken coop is made up of pieces salvaged from everywhere, including my own basement (pieces from other projects). This is how recycling should work. Nothing will end up in a landfill anywhere-every component you see in these pictures will be used for something (even if it isn’t in this particular project).

Now that the pieces are assembled, we can start building the new chicken coop. I’ll fill you in on the details in a future post. In the meantime, let me know if you have any questions about the process we’re using at [email protected].


Starting a Chicken Coop

Sometimes life throws an opportunity your way and taking it is the only logical choice. Normally, we could never afford to buy all of the parts for a chicken coop at a price that would actually provide a payoff. Normally I try to get a five year payoff plan for anything we add to our property and a chicken coop simply requires too many parts to provide such a payoff when used in a self-sufficient manner.

A friend of ours is selling her house, which actually sits on a small farm. In her pole shed is a chicken coop that she’s willing to sell for a reasonable price—a price that should provide us with that five year payoff plan we need. It’s not meant for outside use, but it does have many of the items that an outside chicken coop would require. Of course, that begins with a double door with the screen on the inside, rather than the outside, so that the chickens can get some fresh air during the summer months.

ChickenCoop0101

Inside the existing chicken coop, there is a roost and nest boxes. The roost provides a place for the chickens to sleep above floor level. The nest boxes provide a place to lay eggs.

ChickenCoop0102

At one end of the existing chicken coop is a chicken-sized door. It leads outside to a ramp where the chicken can go into a fenced area for exercise and fresh air. We plan to make the fenced area large enough to ensure the chickens can get plenty of safe exercise (we’ve seen a few chickens get hit by passing cars when they’re not fenced in, not to mention foxes, weasels, racoons, hawks, and other predators).

ChickenCoop0103

The existing chicken coop even includes a window so the birds get sunshine during the winter months. Given that we’re on a south facing slope, the window will allow not only sunshine, but a certain amount of heat during the winter months. Of course, we’ll need to include a heat lamp for really cold winter nights.

ChickenCoop0104

Of course, the first task is to take the chicken coop down and move it from its current location to our house. We’ll have to use the components we obtain to rebuild the chicken coop in a form that will work better outside (including the addition of a roof). I’ll keep you updated on our progress. In the meantime, let me know if you have any questions about our project at [email protected].