Spring is on the Way

It would probably be hard for most people to accept the fact that spring is on the way, especially when they look outside on a snowbound day like this one:

SpringOnTheWay

However, the fact of the matter is that spring really is on the way. It’s going to be an early spring, in fact. There are several things that tell me this. First, and possibly most important, the tree sap is starting to run again. In fact, the people around here who tap maple trees to make syrup have already done so, which is extremely early. I noticed that the trees in the woods also have sap running in them—at least the ones in our woods. I’ve never seen the sap run this early. (My uncle, who has lived a few years more than I have, says he has seen spring arrive this early in the past, but he wasn’t quite sure when, which tells me it was quite some time ago.)

Anyone who lives in the north will tell you that the air takes on a different quality in the spring. It has a different odor to it, or perhaps a different texture. I have yet to find a good way to quantify the difference, but the difference is unmistakeable. You take a good deep whiff and the air simply doesn’t quite smell like winter anymore. Perhaps there is the faintest hint of fresh greenery or some other element that looms at the horizon of human perception—present, but hard to identify. I smell it every spring and every spring I fail to pin down precisely what has changed.

Of course, most people want something a little more substantial than tree sap and odd smells, so there is also  the birds to consider. When we were trimming the trees the other day, we definitely noticed the springtime songs of birds. No, it’s not the wild kingdom effect—the raucous early morning expenditure of energy that birds have later in the spring, but it’s a gentler prelude, as if the symphony is about to begin.

There are going to be other signs. None of my flowers have started bursting through the soil as of yet. The buds on the trees are still shut tightly as well. However, it won’t be long and I’ll start to see bud swell, and then, one day I’ll look at my flower bed and see just an inkling of the springtime flowers peaking through to see if the coast is clear. Spring is most definitely on the way—the signs are all around for anyone who wants to look. What are your favorite indicators of spring? Let me know at [email protected].


Trimming the Trees (Part 1)

There are many different theories about trimming fruit trees. Talk to five orchards and you’ll likely hear five completely different tales of the precise technique that someone should use for trimming fruit trees. My own personal theory is to trim the trees later in the winter or early spring, before the sap begins to run, but after the majority of the hard winter weather is gone. The idea is to have fresh cuts to encourage growth, but also to let the cuts heal before the sap runs so that the tree won’t “bleed” from the trimming. Other people get Greenleaf tree pruning in Austin to trim in the fall or at other times during the fall to winter season. One thing you never want to do is to trim your fruit trees after the sap begins to run because the tree will lose too many nutrients that way.

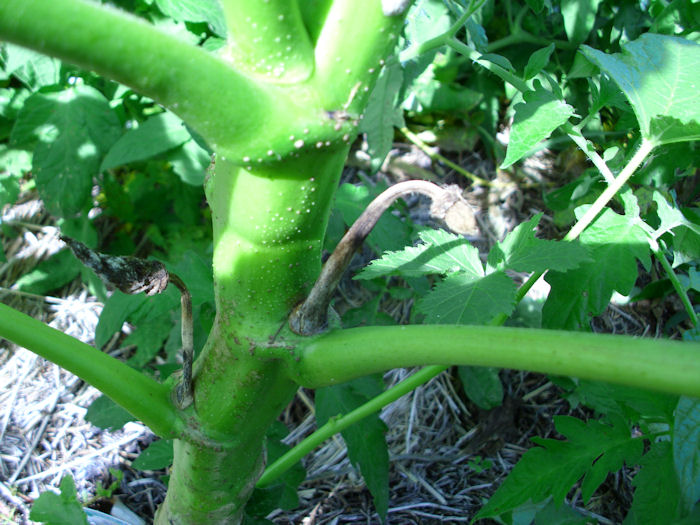
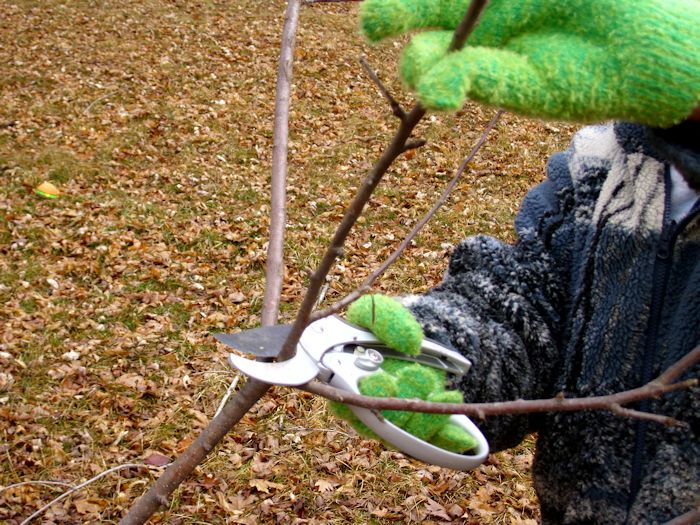
Rebecca normally does the majority of the lower cutting. It’s time consuming work because you have to decide just which twigs to cut. Every twig has the potential to bear fruit, so what you’re really doing is cutting off fruit before the tree even has a chance to produce flowers. We trim a little bit away from joints to help prevent disease as shown here:

TreeTrimming01

Rebecca prefers a ratcheted hand pruner. It helps amplify her hand strength so that trimming the tree isn’t quite so hard. In addition, you can generally prune larger branches using a ratcheted pruner than you can other hand pruner types. There are many different types of trimmers and you should choose the type that works best for you. I generally use an anvil-style hand pruner. It requires significantly greater hand strength to use, but in exchange, I get cleaner cuts, I can trim the tree faster, and the pruner itself wears longer. I strongly recommend against using bypass hand pruners on trees because the blades tend to bend and not produce a clean cut. A bypass pruner works much like a scissor and the tree branch can become wedged between the two blades.

In addition to hand pruners, your tree trimming kit should include a lopper, which is used to cut thicker branches. I highly recommend a long handled geared lopper because it will last longer, produce smoother cuts, and require less muscle to use. A good lopper will enable you to cut branches up to 2-1/2 inches in diameter in most cases. The idea is to use the lopper whenever possible because it produces a smooth cut that won’t bleed as much.

At some point, you’ll encounter branches that you can’t cut using a pruner or a lopper. In this case, you must resort to using a pruning saw. As with pruners and loppers, pruning saws come in all sorts of shapes and sizes. When working with fruit trees, you want to get a curved razor tooth saw so that the cuts are as smooth as possible and you have the fullest possible range of motion. Remember that when you cut with a saw, you start by making a counter cut on the opposite side of your final cut. Then you make the final cut. If you don’t provide a counter cut, the branch could break or the bark could end up peeled from the tree, inviting disease.

All of the tools mentioned so far will cut up to around five feet of the tree’s height, but even a short fruit tree is six or seven feet (most are more). In order to trim the rest of the tree, you need a tree pruner of the sort shown here:

TreeTrimming02

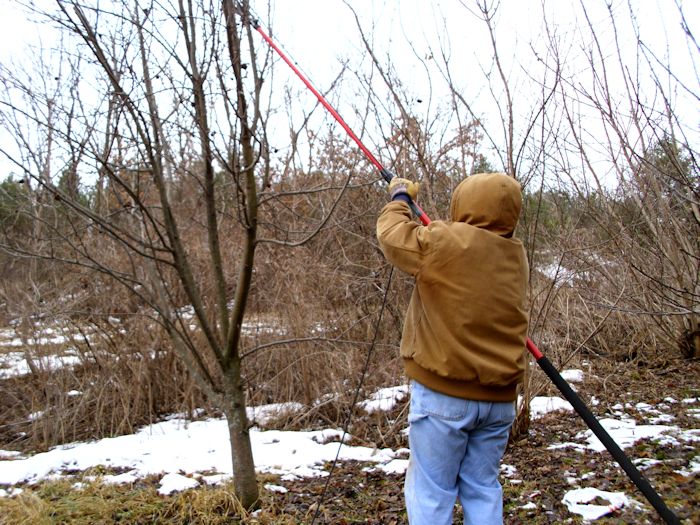
This particular tree pruner is 14 feet long. The pole telescopes so I can make it shorter or longer as needed. Believe me, the ability to adjust the length is essential. The longer the pole, the more strength required to hold it up. After a few hours of using this tool, your shoulders are guaranteed to ache. Unlike most tree pruners, this tree pruner relies on a chain for the clipper head, which means that it’s a lot less likely to become tangled in the branches or get twisted. The chain also reduces friction so you don’t use as much muscle to cut the branches.

The tree pruner also has a razor saw for cutting larger branches. You have to develop a technique for cutting the branches because when you get up this high, they tend to sway back and forth with the saw, rather than being cut by it. I find that moving my whole body in the correct rhythm (counter to the tree sway) does the trick.

If possible, get a fiberglass pole. Wooden poles tend to get heavy and can sometimes start getting weathered (making them splinter). This pole also includes a foam pad, which feels a lot more comfortable on the underarm when I’m cutting up higher than shown in the picture.

That’s the equipment needed for tree trimming: hand pruner, pruning saw, lopper, and tree pruner. If you want to be 100% safe to avoid any unwanted tree accidents, I would recommend hiring a tree service to remove/trim the trees for you, rather than attempting it yourself. Safety has to be a priority and hiring a tree service to cut your trees is a great way to prevent common tree accidents. If you want to have a go yourself, to keep from spreading disease between trees, make sure you wipe your equipment down with alcohol after cutting a diseased tree. However, the alcohol rub will cause your equipment to rust. To keep that from happening, make sure you apply oil after the alcohol rub. Let me know if you have any questions or thoughts about equipment at [email protected]. I’ll continue this post next week with some insights into pruning techniques and things you should look for as you prune.

Contemplating the Hardiness Zone Changes

Just in case you weren’t aware of it, the USDA has recently changes the hardiness zones for the United States. The hardiness zones help you understand what will grow in your area. Certain plants require warmer temperatures in order to grow and others require cooler temperatures. For example, if you want peaches, you need to be in a warmer zone. Our area has changed from 4B to 4A, which means that some types of trees that I couldn’t grow in the past will likely grow now. You can see an animation of how the hardiness zones have changed on the Arbor Day Foundation site.

Most people would agree that changes of this sort make global warming undeniable. Of course, it’s a misconception to strictly say that the effect is global warming, which is a misnomer. Yes, the planet has warmed up some, but a more correct assessment is that the weather is going to become increasingly chaotic. The point of this post is not to drag you into a discussion of precisely how global warming will affect the planet, what generalizations we can make about it, whether our scientists can define any long term trends about it, or anything of that sort. I’ll leave the discussion of how much man has contributed toward global warming to those with the credentials to make such statements. The point is that last year I was in Zone 4B and now I’m in Zone 4A. The long term weather changes have finally appeared in the form of new charts from the USDA, which after all, are only predictive and not infallible indicators of anything.

There are some practical considerations in all this and that’s what you need to think about when reading this post. The change in weather patterns means that you need to rethink your garden a bit. Not only do you need to consider the change in heat (the main emphasis of those hardiness zone charts), but also differences in moisture and even the effect on clouds. Little things are going to change as well. For example, have you considered the effect of increased lightning on the nitrogen levels in your soil? If not, you really should think about it. The weird science bandied about by those in the know has practical implications for those of us who raise food to eat after all.

Even if you aren’t into gardening at a very deep level, the changes in the hardiness zone chart has one practical implication that no one can escape. The literature on the back of those seed packets you buy from the store is going to be incorrect for this year as a minimum. The changes from the USDA came out after the seed packets were already printed. When everything else is said and done, the main reason for my post today is to help you understand that you can’t believe the seed package—at least, you can’t believe it this year. By next year the seed companies will have recovered and the documentation on your seed packets will be useful again.

Springtime is approaching. If you live anywhere near my area of the country, it seems as if we’re going to have an early spring indeed. I don’t normally need to trim the trees in the orchard until the end of March. This year I’ll trim my trees on March 1st, a lot earlier than normal and even then, I might be trimming a bit late. A few people in our area have already seen budding trees. So, if you’re used to waiting until April or May before you get out very much, it may be a good idea to take a walk around your property now to see if there are any changes that you need to know about.

Global warming is a reality. The effects it will have on your garden and orchard are also a reality. Just what those effects are and precisely what has caused them are still being debated by those in the know, but if you’re a gardener, you need to be aware that the garden you had last year may not work this year. Let me know about the global warning-related changes in your garden at [email protected].


Arrival of the Seed Catalogs

A special event takes place each year around this time—the seed catalogs arrive on our doorstep. Nothing says springtime like the arrival of these glimpses into the future. Rebecca and I wait for them each year with bated breath and eagerly anticipate what they’ll contain. The two major catalogs for us come from Jung’s and Gurney’s. We do receive other catalogs, but don’t look at them in detail quite as often as we do these two. The main reason is that these two catalogs generally contain everything we want to grow (and then some).

I’m sure that a few of you are already rolling your eyes and thinking, “Just how antiquated can you get? Why not look online?” I’ve been finding that online catalogs work great when you have some idea of what you want. If I want to buy a specific piece of software or computer hardware, a repair part for Rebecca’s vacuum, clothing, CDs, DVDs, and so on, then an online catalog works great. In fact, using one can save time. Growing a garden is a little different. Often, you don’t know that you’re going to grow something until you see it in a catalog. In short, viewing the catalog provides something online catalogs don’t provide as well—a glimpse of what you didn’t know you wanted.

Before someone places this sort of purchase in the impulse buying category, it’s good to consider how seeing new items can really help the gardener. The following list is my favorite reasons for looking at new items, rather than simply sticking with the old favorites:


  • Growing new items can help improve the nutrition the grower receives from the produce.
  • Different items take different nutrients from the soil, so growing new items can help keep the nutrients in your garden more balanced.
  • No one wants to get bored growing their own food.
  • The new items may have different resistance to pests, making use of pesticides less necessary.


These reasons won’t be enough for some people to consider going back to the paper catalog after establishing an affinity for the online version. There are other good reasons to get a paper catalog:


  • Some paper catalogs come with discount coupons that you don’t receive with the online version.
  • You can’t take a usable computer screen with you to show friends what you plan to buy (viewing gardening items on an iPad just doesn’t make it in my book).
  • It’s even hard for two people to view the catalog in the same way by sharing a computer display.
  • Using the online catalog often requires that you open your computer to potential virus attack in order to use JavaScript and those fancy multimedia features.
  • Catalogs make it easy to compare what you thought you were going to get with what you actually see in the garden.
  • The paper catalog is a handy reminder that you really do need to start thinking about your garden, even though winter still has a firm grasp.


Whether you get a paper catalog or not is up to you, of course. Some people will say that we’re wasting trees by continuing to get paper catalogs (we do recycle every last piece of paper that enters the house). Whether you use paper or online catalogs though, it’s time to start thinking about that garden. What will you plant this year? Let me know about your gardening ideas at [email protected].


The Garden in December

Most people don’t think about their garden after everything is harvested and cleaned up for the year-it just sits there, waiting for spring. However, your garden should actually be growing something this time of year, even if you do live in a colder climate like Wisconsin. You can look at getting mini greenhouses where you can grow things all year round, or find plants that are suited to the cooler weather. If your garden isn’t growing something, there is a good chance that you’ll lose some of your soil to erosion. I know that there are a lot of methods that can help, such as not tilling your garden, but the presence of a live root system holding the soil in place is a really tough act to follow.

Our garden currently has winter rye planted in it. Don’t confuse winter rye, the cereal, with perennial rye, the grass. Believe it or not, the winter rye will remain alive throughout the winter. I keep an eye on our winter rye (at least, until the snow flies), which is currently doing quite well.

WinterRye

It probably looks a bit sparse here, but this concentration of winter rye is more than sufficient. I plan to wait until the winter rye is about 12 inches tall in the spring, and then till it into the soil. Of course, this process seems a bit odd to anyone who doesn’t realize what I’m doing. Planting winter rye (or another ground cover like it) has some significant benefits and presents few problems.

  • The ground cover keeps erosion at bay.
  • Winter rye fixes nitrogen that will be released as the plant decomposes.
  • There are fewer weeds because the winter rye shades it out.
  • You can plant earlier because the winter rye soaks up excess water in the garden.
  • The tilled-in plants act as a natural fertilizer, which reduces your costs.

The biggest problem with winter rye is letting it get too big. You’ll have to work with winter rye for a while to know precisely when to till it in, but if you let it get too big, winter rye can quickly turn into a frustrating mess. The best advice I can provide is to mow the winter rye down and then till several times. Be prepared to work really hard with the tiller because once the roots grow to a certain size, they don’t till very easily. We only let it grow too big one timethe result was enough to ensure we didn’t let it grow too large ever again.

For now, the winter rye is doing its job of keeping the soil in place. The snow will fly soon (as early as tomorrow) and I’ll lose sight of it until next spring. When the snow melts, the winter rye will still be there doing its work. I’ll till it into the garden and then plant our vegetables. The results will be great. This particular change in my gardening technique was easy because the results are so good. For me, winter rye works really well, but it is quite labor-intensive. For those of you who may not have the time or ability to plant and mow and till, your best option is to look at some erosion control products such as jute or coir. You simply lie them over your soil, protecting it from heavy rain and meltwater. Many erosion control products are also made of natural fibers, so they conveniently compost down in the spring.

This year we are trying something new. Part of our small garden is planted in spinach. From what I’ve been told, the spinach will sprout extremely early next spring and be ready to pick long before I even have anything else planted. So, we’ll be having salads long before anyone else has even thought about planting their gardens. I’ll be sure to let you know how it works out.

One word of advice here. If you do decide to plant spinach, it doesn’t appear to act as a ground cover. You want to plant the spinach up hill of the winter rye so that the winter rye can still control any erosion. We planted our spinach in thin strips so that we could get to it easily, but the erosion wouldn’t be a problem. That’s one of the fun parts about gardeningtrying different things out to see how they work. Let me know if you have any questions at [email protected].

Dealing with Green Tomatoes

One of the advantages of growing your own tomatoes is that you can pick them when they’re ripe—when the taste and nutritional value is at its peak. During the summer months you avoid “strip mined” tomatoes by picking selectively from the vine. However, the end of the season arrives all too soon and you’re faced with a wealth of green tomatoes. You have to do something with these tomatoes before a major frost or risk losing them. Tomato plants can keep producing new tomatoes right up to harvest.

It’s possible to use green tomatoes directly. For example, fried green tomatoes is a favorite of mine (albeit, not particularly nutritious depending on which recipe you use). Pickled tomatoes also look very interesting; although, I must admit not fixing them personally. The pickled tomatoes that I’ve tried have been delicious. In fact, there are many more ways to fix green tomatoes than you might initially think. However, even with all of these recipes, green tomatoes aren’t the epicurean delight that some people want.

Fortunately, you can ripen the tomatoes even after they’ve left the vine. I’ve tried a number of methods and found most of them lacking. For example, some books recommend pulling the entire plant out of the ground and hanging it in your garage. This method assumes that your garage won’t get to the freezing point before the tomatoes are ripe. Using this method can also result in a lot of spoilage from mold. It does have the advantage of producing tomatoes that taste almost as good as if they were vine ripened outside.

There are also methods that rely on placing the tomatoes in a jar with a banana peel (a technique I haven’t tried) and placing them in a paper bag. My parents would often ripen a few remaining tomatoes by placing them in the window sill. Unfortunately, most modern homes lack window sills and the method does have problems in that the tomatoes can ripen unevenly. The best method I’ve found for ripening a lot of green tomatoes is to place them on newspaper as shown here.

GreenTomatoes

I use the regular newspaper pagesnot the shiny advertisement pages. The shiny pages have ink that could contain heavy metals. Regular newspaper pages tend to use soy ink today (although, you should check with your newspaper to be certain). Because the tomatoes sit on the newspaper for up to two weeks, you don’t want them to absorb any toxic chemicals. The newspaper emits ethylene gas, which is what ripens the tomatoes. The plant uses the same gas to ripen the tomatoes on the vine.

Make sure your tomatoes are out of the sunlight. Placing them in sunlight can cause uneven ripening and rot in some cases.

The tomatoes shouldn’t touch each other. Any place one tomato touches another is apt to start rotting before the tomato is ripe.

Check your tomatoes each morning. Tomatoes ripen mainly at night. If you wait until the end of the day, you could miss that peak of tomato ripeness that you desire. (There is strong evidence to suggest that night temperatures affect how a tomato reacts. For example, plants mainly set fruit when the nighttime temperature is in the 59° to 68°F range.)

When you ripen your tomatoes using this technique, they tend to ripen evenly and you’ll lose fewer of them to rot. The tomatoes don’t quite have that fresh picked taste (they still taste better than the strip mined tomatoes from the store), but they’ll work great for canning purposes where the taste difference isn’t quite as noticeable.

So, how do you prefer your tomatoesred or green? Do you have other tricks you use to get a good result from ripening your tomatoes? Let me know at [email protected].


Considering the Unexpected Harvest

A number of my posts deal with the unexpected or a way of viewing the garden in a way that puts things in perspective. For example, a recent post, Every Year is a Good and a Bad Year, discusses how each year can produce unexpected results in the garden. Planting a wide range of vegetables is your only way to deal with the potential yield differences from year-to-year. Of course, diversity is good for your health and the soil as well. This post looks at the same issue from the perspective of the orchard.

The orchard is different from the garden in that you plant an orchard for a long term yield. Our first pear trees were planted 11 years ago. When you make such a long term investment, you need to place an even stronger emphasis on biodiversity. For example, this year started extremely wet. A frost occurred while the trees were in bloom—killing many of the blossoms. To make things worse, we had golf ball-sized hail after the fruit had set. The hail actually knocked some of the fruit off of the trees. After spring, however, things got incredibly dry, making it even less likely that the fruit trees would do well. So, I had expected a very small harvest this year (and I wasn’t disappointed). The largest pear harvest we’ve had was 975 pounds. This year the trees produced 300 pounds of standard sized fruit, or so I thought.

Our Luscious pears are generally quite small. However, they’re so incredibly sweet and juicy that they’ve become a favorite of ours. Normally, we leave these pears on the trees for later use. In order to can a pear, you must pick it just a tiny bit green, when the pear is still hard enough to survive the canning process. Pears used for juice, as our Luscious pears are, generally need to wait until they’re almost overripeat the absolute peak of sugar and taste. Consequently, I didn’t pay as much attention to the Luscious pears as I should have. The interesting outcome is that we now have standard sized pears on a tree that isn’t supposed to have them. The pears are between two and four times larger than normal.

PearSizeDifference

The upper pear is representative of what the Luscious pear as produced this year. The lower pear is what we get on most years. Not only is the top pear larger, it weighs three times as much as the lower pear. The difference is enough that we’ll be able to can the Luscious pears that are still green enough. In addition, the Luscious pear trees normally produce around 80 pounds of fruit. This year they produced 120 pounds of fruit, so we have a lot more fruit than I had originally thoughta total of 420 pounds.

In addition to the Luscious pear anomaly, the Parker pears produced well this year. Normally, we have fire blight problems with the Parker pears, but there was almost no fire blight at all this year because it was so dry. Trees that normally produce well, such as the Moonglow and Clapps, didn’t do well this year because of the dryness. The point is that you need a variety of trees if you want a good harvest every year. The trees also have to be compatible. If you check the links I’ve provided in this article, you’ll see that all of these trees require a pollinator tree other than itself. The Luscious pear is a male tree, while the other pears in the orchard are all female. All of them produce fruit, but to get an optimal yield, you need to have pollinators of the right type.

The lesson I keep relearning is that it’s essential to check everything before making a judgement. If I had picked the Luscious pears earlier this year, we would have had more fruit for use in pear chunks (minted, plain, or spiced). As things stand now, we’ll probably end up with juice for wine and drinking, some pear jam, and some additional pear sauce because the fruit is too ripe to use for pear chunks (something that our larder was lacking). Let me know if you have any questions at [email protected].


Okra Pollination Problems

Every gardener faces the eventual problem that can’t be easily solved by talking with friends or looking online. This year presented one of those problems for us. We have big okra plants that aren’t producing any pods. Yes, there are a lot of flowers, but they aren’t producing anything. Instead, the flowers are opening, shriveling back up, and then dying as shown here.

Okra

You can see two flowers in this picture—both of which have dried up without producing fruit. All five of our okra plants are precisely in the same condition. They’re all nice big plants, but nothing to show for an entire summer’s worth of growth except some exceptionally beautiful leaves and dried flowers.

According to any number of sites, okra is self-pollinating in many cases. However, many of these sites also indicate that there hasn’t been any study done of the pollinators for okra and their effect on the plant. When I first noticed this problem, I spent time on a sunny day observing the plants carefully. A number of pollinators visited the plants, so it seemed at first that the issue isn’t one of pollinators.

However, I also noticed something else. On every other year, the okras in our garden are infested with ants. This year, there is not an ant to be found anywhere near our okra. A number of sites seem to indicate that the ants have no purpose for okra, but everyone complains about them. Now I’m starting to wonder whether the ants are pollinators or somehow help the plant in other ways. The okra certainly seems to put out a nectar that attracts ants like crazy.

The only other change in that particular part of the garden this year is that the patch has tomatoes in it. The okra is growing in row 4 of that patch and the tomatoes are growing in rows 1, 2, and part of 3. Last year, the okra was in row 1 of the same patch. Checking for relations between okra, tomatoes, and ants online proved fruitless. In short, there is no quick or easy answer for this particular problem except to say that it exists.

Our summer has been hot enough for the okra to grow quite large, so I’m sure it’s not a problem with heat. The okra has also been mulched and watered, so moisture isn’t a problem. Because the okra has been moved to a new row and that patch also received a nice layer of new mulch this past spring, it can’t be nutrients. I’ve checked the flowers and each one is producing the same amount of nectar as normal. I keep coming back to the lack of ants or some deleterious effect of putting tomatoes and okra in close proximity. If anyone else has a thought on this issue, please contact me at [email protected].


Every Year is a Good and a Bad Year

It’s easy to become discouraged in the garden sometimes. During the early spring you plant everything that you’ll hope will grow and produce plentifully. By August, you know which plants will fair the best and which didn’t survive at all. This year has been especially tough because I ended up getting gallbladder surgery first, and then, because we do everything together, Rebecca ended up getting gallbladder surgery as well. So, with both of us on our backs, our garden had a true test of being weed-bound. Unfortunately, that means that some plants didn’t live at all and some won’t produce well. Our corn was nice and tall, right before the wind blew it over. Many of our peas succumbed to the weeds.

Still, it’s a good year in many respects and that’s the aspect I choose to focus on. Good years fill larders with interesting vegetables and fruits. Apparently, this is a bean year. We planted the normal amount of green beans and Lima beans. However, the plants decided to grow twice as tall and twice as wide as normal. We’re now inundated with green beans and will soon have a bumper crop of Lima beans as well.

GardenEnough01

Not every year is a good year for every vegetable. In my Dealing with Overabundance post, I discussed how some years produce so much that you can hardly fathom what to do with it all. Last year and the year before were horrible blight-filled years for tomatoes. This year isn’t just good, it’s amazing. Our tomatoes have never looked quite this good.

GardenEnough02

Those are the same diminutive plants I wrote about in Mulching Your Garden. They’re over five feet tall now and loaded with so many tomatoes that we’re going to try pickling some green tomatoes this year. (Remember to try different preservation techniques whenever you can to discover new ways of dealing with overabundance.) The plants have obviously overgrown the tomato cages and are threatening the other plants in that plot. Unlike previous years, there is absolutely no sign of blight, even at the bottom of the plants (which are usually brown by now). Sometimes in this case it is better to buy things like new mulching heads for skid steers so we can effectively clean up the area for a more serious overgrowing problem.

Many of our plants are late, but will most definitely produce. The egg plants and okra are of sufficient size that we’ll get the normal amount from them, or perhaps just a bit more than usual. As in most years, the egg plants are constantly under attack from flea beetles, but the lacing of their leaves hasn’t reduce their vigor much and we expect the normal crop from them.

GardenEnough03

The beets and kohlrabi look good this year as well. We fully expect to harvest enough to replenish our larder and even provide a little extra for next year. So, many plants are producing enough that we’ll most definitely not starve. It’s best to avoid focusing on the lack of corn this winter in the larder or the fact that there won’t be much in the way of broccoli (we will have an abundance of Brussels sprouts though).

It’s important to remember diversity in gardening. Don’t plant just one or two items-plant a variety of items so that at least a few of them produce well. This is our year for tomatoes and beans. Next year might be a corn year or the year of the mutant squash (we’ve had one of those lately and are still eating squash from that year). Each year is a good year for something, and an equally bad year for something else.

There is actually a health benefit to all of this. If every year produced copious quantities of whatever you planted, there would be no incentive to try something new. Gardens force people to moderate what they eat and to try new things. As someone once said, “Variety is the spice of life!” So, what has grown well for you this year? Let me know at [email protected]

Squash and Pesticides

Rebecca and I avoid pesticide/insecticide use whenever we can. However, I regret my laissez-faire attitude towards pesticides when we allowed a large family of termites to move into our home. If you find yourself in a similar position, you should be aware that a service provider like this termite control can help you deal with your pests in a sustainable way. Pesticides cost money, are costly to apply, and tend to ruin our health. They also kill pollinators, which are already in short supply. In fact, we’re able to use other solutions for every pest in the garden other than the squash bug. There is a host of bugs that will attack your squash, but the squash bugs seem to be the worst in this area.

Most other bugs are easily picked off (such as the tent caterpillars we squash by hand in the spring), drown in standard dish washing soap, killed using an environmentally safe method, like searching “terminix iowa” on Google and finding the best and closest pest control to you! Mulching (see my Mulching Your Garden post) can also help control bugs, as will keeping your garden weeded. One of the few good reasons to mow your lawn is to keep all sorts of pests under control by reducing the places they can hide. If you read this guide on mole control, you’ll see that mowing the lawn is one of the ways to rid your garden of moles, so it’s worth making the effort to maintain your lawn. (That being said, I’m a strong advocate of mowing the lawn less often to reduce mower emissions and to make the grass a length usable for purposes other than filling the landfill.)

The squash bug will infest a squash or cucumber patch quickly in spring and will continue infesting it until every plant is completely destroyed. Adult squash bugs are incredibly difficult to kill. The pictures I’ve seen online don’t quite depict the monsters that we have in our area:

SquashBug01

I happen to catch this picture of one of our squash bugs. A single counting on one plant turned up 42 of themall breeding. As you can see, the picture here shows a bug considerably bigger than the bugs you’ll find on most sites online. I’m not sure why ours grow so large, but they are quite vigorous.

The eggs also aren’t limited to the underside of the leaf. The bugs seem quite happy to put them on both sides of the leaf and in large clusters. Here is just one cluster:

SquashBug02

As you can see, this cluster is on the top of the leaf and it isn’t in the V pattern discussed in online sources. The point is to examine the plant thoroughly for squash bugs because they’re determined to destroy your plants.

To keep pesticide use at a minimum, check the leaves regularly for these clusters. Trying to pick the eggs off won’t workyou’ll end up damaging the leaf and it’ll die. The eggs hatch in one to two weeks and get darker as they get nearer to hatching. These eggs are just about ready to hatch, so yesterday I applied Seven (Carbaryl) to the affected plants. I’ve been looking into some of the more environmentally friendly solutions, but so far Seven is the solution that works best. If you have a bug infestation, try some of these other solutions first, before you use Seven.

You can’t apply Seven three days before harvest (more if you want to be careful). In fact, once the plants start blossoming robustly, you don’t really want to use any sort of pesticide (it’s essential to look after pollinator health). The best idea is to look for the squash bugs early in the season and attack them vigorously so that you start with a strong vine. If you see eggs after the blooms start, try drowning them using a limited application of neem oil. Insecticidal soap is completely ineffective on hard bodied squash bugs. Smash adult bugs using your fingers if there aren’t too many of them.

There is a point each season where we lose the bug battle. The squash bugs simply overwhelm every defense we can mount. However, by that time our squash have grown quite large and produced well for us. The vines die too early, but not before they produce usable output for us. To ensure we get enough squash, we simply plant more plants knowing that they will die too early from the invading plague. Yes, we could keep them completely under control using Seven, but only at the cost of our own health and the health of our pollinators, so this approach represents a good compromise that ensures an adequate harvest. Let me know if you have any questions at [email protected].