Cutting Up a Chicken

When you raise your own chickens, you eventually end up with a lot of whole chickens in your freezer and will need to cut at least a few of them up for use. Most people are used to seeing chickens already cut up for use in the store. If you do get a whole chicken, it’s usually with the idea that you’re going to roast it whole. In many cases, people don’t know where to begin cutting a chicken up for use because the butcher has done it for them for so many years. Following the chickens you find in the store as an example won’t work very well either because they’re cut up using a meat saw (think of a band saw specifically designed for cutting meat). Unless you also have a meat saw, you probably won’t be able to follow the butcher’s example. This post describes how to cut up a chicken using nothing more than a standard utility knife.

I recommend using a 6-inch knife with a fairly stiff blade. A boning knife will be too flexible and something small, such as a pairing knife, won’t give you enough leverage. Don’t use a knife with a serrated edge—the serrations will make for a poor cut and you won’t be able to split the breastbone with such a knife. The knife you use should be sharpthe sharper the better. A dull knife is dangerous to use.

Start with the wings. Your cut should begin behind the joint area. When you lift the wing up, you’ll actually see a bit of the flesh come up with it. Start your cut immediately behind this fleshy area and angle toward the joint as shown here.

CuttingChicken01

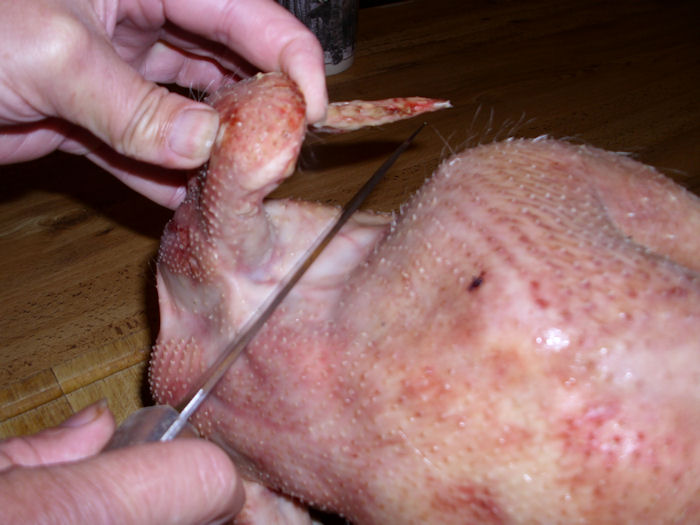
Cutting the wings in this way has the advantage of making them a bit meatier. After you cut off both wings, it’s time to cut off the combination of the leg and thigh. Start by lifting the thigh and cutting toward the joint from the front of the chicken as shown here.

CuttingChicken02

Once you get to the joint from the front, you’ll need to cut to the joint from the back as well. When this cut is finished, you’ll be able to rotate the leg/thigh combination downward and see the joint pop from the socket as shown here.

CuttingChicken03

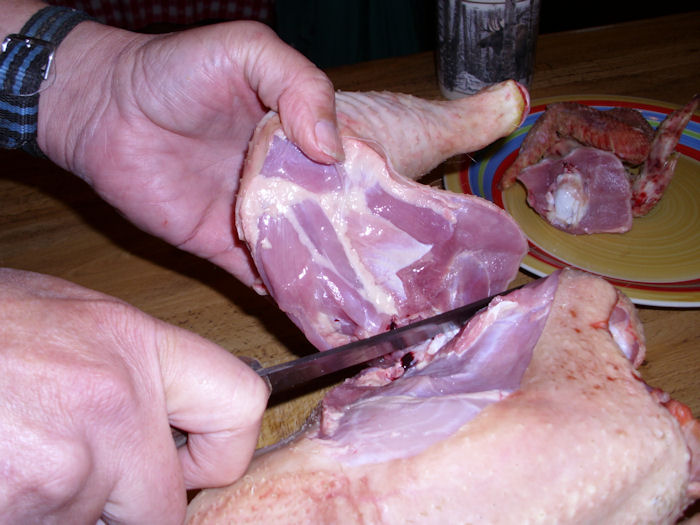
You can finish the cut at this point. Remove both leg/thigh combinations using the same approach. Now you can separate the leg from the thigh. There is a natural division between the leg and the thigh. If you look carefully, you can actually see where the two separate because the meat goes in two directions. Look carefully at the following picture and you’ll see that the line shows this separation.

CuttingChicken04

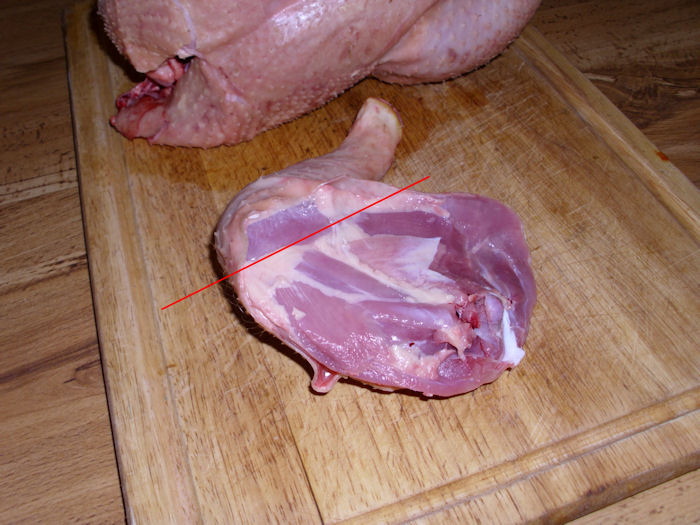
Cut straight down through this point and you’ll find, with practice, that the knife will neatly separate the meat at the joint. At this point, you’ve cut off the wings, legs, and thighs. It’s time to remove the lower back (the part with the tail).

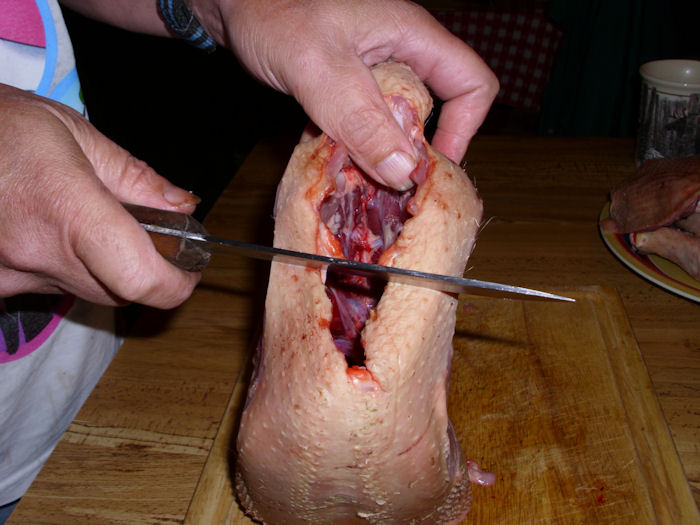
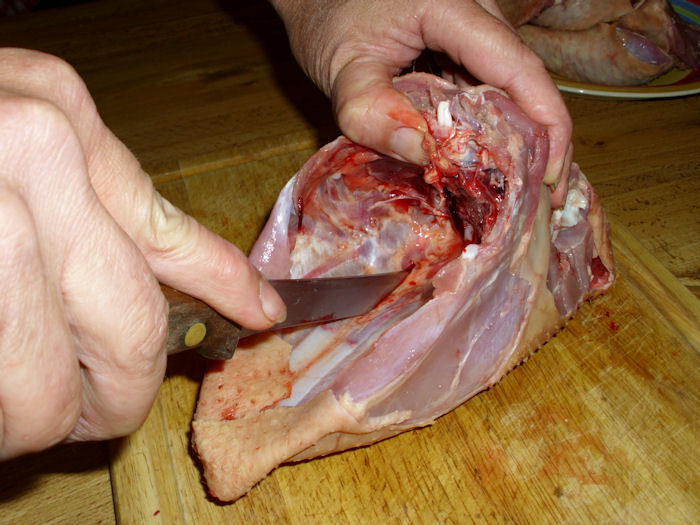
Look inside your chicken. You’ll see that there is a fleshy part between the rib cage and the lower back. The fleshy part extends on both sides of the chicken. You’ll cut through this fleshy part to separate the lower back starting midway at the opening as shown here.

CuttingChicken05

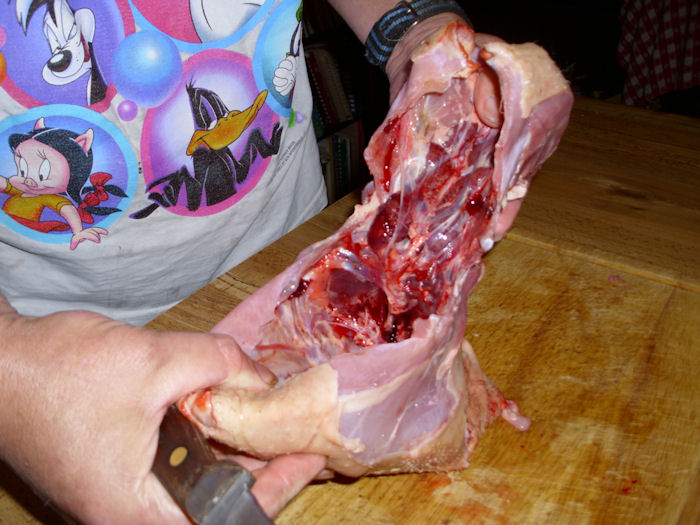
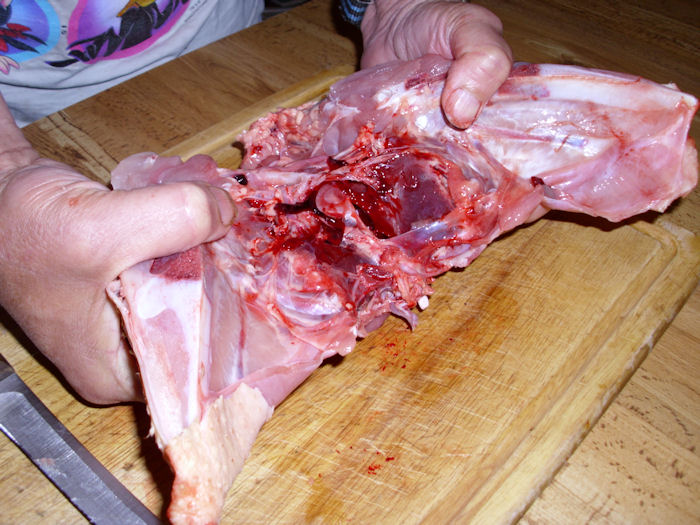
Cut through the fleshy part. You should then be able to flex the lower back and see the backbone separate from the rib cage as shown here.

CuttingChicken06

You can then cut through the spinal cord to separate the lower back from the rib cage. Cut straight down.

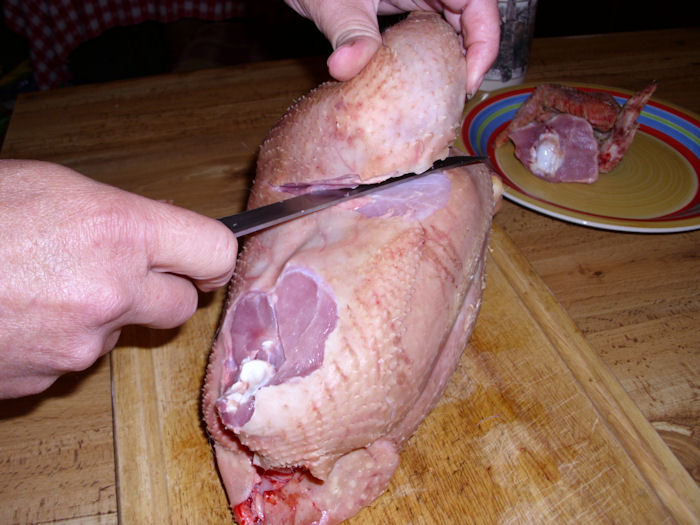
The hardest cut to make is to separate the two breast halves. However, like many things in life, there is a trick to it. Look at the center of the breastbone and you’ll see a line runs through it. Now, look at the first complete rib and trace it around to where it meets with the breastbone. You’ll see a second line of a sort that forms a cross as shown here.

CuttingChicken071

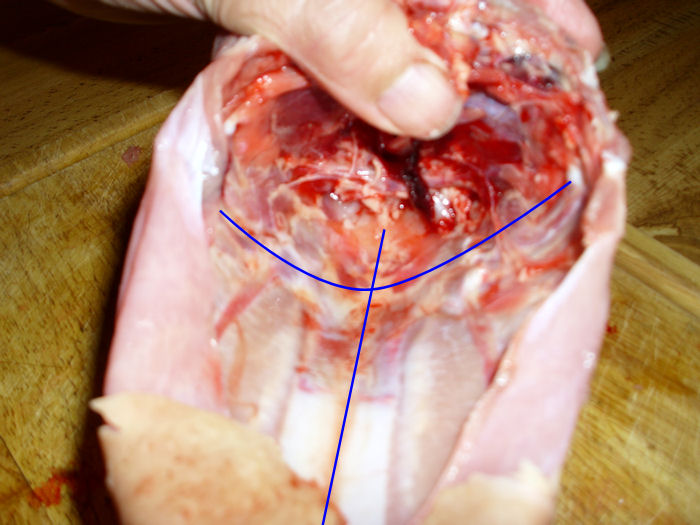
Put the tip of the knife through this point and you’ll find that the breastbone cracks easily. Now, draw the knife down much as you would with a paper cutter. You’ll find that the knife easily slices through the majority of the breastbone and the cartridge as shown here.

CuttingChicken08

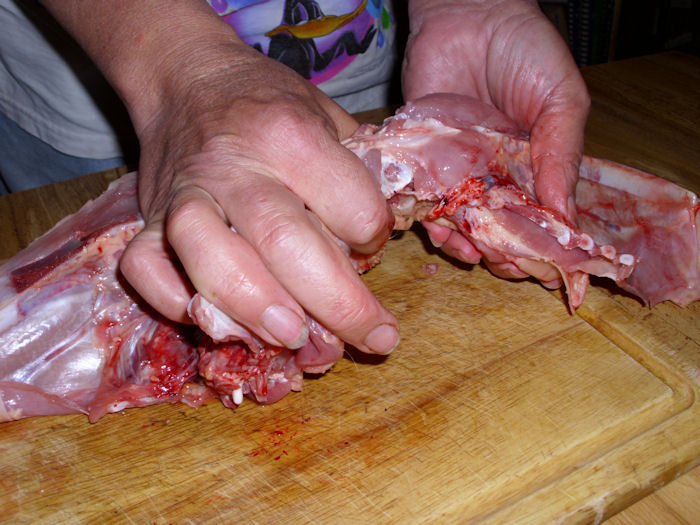
After you make this cut, move your knife higher up. Don’t put it through the hole where the neck is, but do place it higher into the cavity. Use the point to finish breaking the breastbone apart. At this point, you should also be able to break the wishbone in half. Now you can separate the two halves of the breast like this because there is cartilage separating the breast from the upper back.

CuttingChicken09

Cut the cartilage holding the upper back to the breast halves. You’ll reach another joint after you cut the ribs. Separate the joint and the cut through it as shown here.

CuttingChicken10

You should now have ten pieces of chicken as shown here:

CuttingChicken11

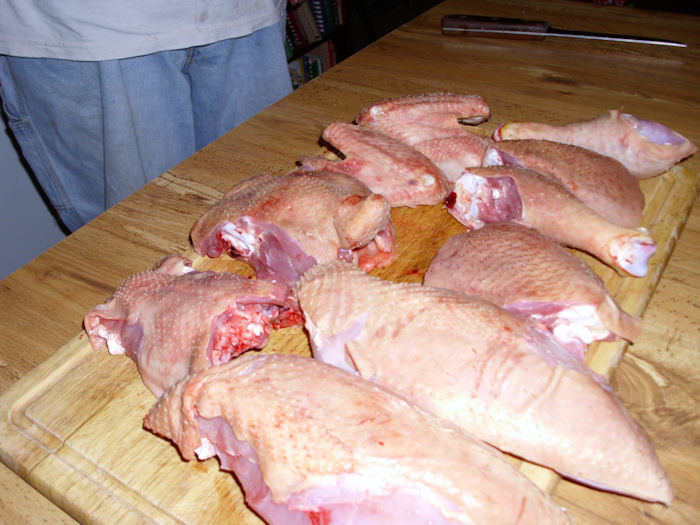
These pieces are: left and right wing, left and right leg, left and right thigh, lower back, upper back, and left and right breast. Although this combination doesn’t look quite like the chicken you get in the store, it’s the most effective means of cutting a chicken up using just a utility knife. In addition, using this approach makes more of the pieces a usable size. Let me know if you have any questions at [email protected].


Celebrating with Birthday Butter

Rebecca grows quite a few herbs. In fact, the majority of herbs used in our house come from Rebecca’s garden and not from the store. People have asked us in the past how to use these herbs. Of course, there are the mundane uses of savory herbs (such as sage) in meat dishes and sweet herbs (such as mint) in cakes and cookies. However, if you’re really interested in shaking things up, you mix the herbs in new and interesting combinations. That’s what I decided to do in making birthday butter.

Birthday butter was actually created for Rebecca’s birthday. I used it for her breakfast. I spread the birthday butter on a bagel, but it tastes just fine on toast, crumpets, English muffins, or any other sort of bread. In this case, I filled the holes in the center of the bagel halves with cherry tomatoes to dress it up a bit. The result is an interesting mix of savory and sweet that is a delight to the palette. Here’s the birthday butter recipe:

1/2 cup Butter, Smart Balance, or Margarine
2 tsp Sugar or Splenda
2 tsp Rubbed Sage
1 tsp Mint Leaves
1 tsp Lemon Juice

Cream the butter in a bowl. Place the remaining ingredients in the bowl. Mix together until blended. The lemon juice will have a tendency to separate from the rest of the mixture, so remixing is needed if you store the unused portion.

I found that butter works far better for this recipe than margarine does. We’ve actually tried something new, Smart Balance Buttery Sticks with Omega 3 Fatty Acids. This product is half butter and half margarine. It cooks extremely well and tastes much like butter does. However, it significantly reduces the amount of cholesterol you receive and the Omega 3 fatty acids are actually good for you.  I’m not sure how this recipe would work using other alternative sweeteners, but the results with Splenda are quite good.

The kind of mint you use has a big impact on the taste of birthday butter. Try various mint varieties out to see for yourself. The original version uses spearmint, but peppermint or even wintergreen would probably work just fine. For something unusual, try orange or lime mint.

The best way to get the ingredients to mix properly is to use a mixer. However, I’ve been able to get them to mix just fine using a fork. The point is, this butter blend has a wonderful taste and is a great way to start the day. How do you use your herbs? Let me know at [email protected].


The Wonders of Queen Anne’s Lace

Sometimes, the best herb or edible plant is the one you didn’t plant. Nature provides a number of edible plants that grow naturally where you live. I’ve shared about the berries that grow in our woods before. There are blackcaps, blackberries, gooseberries, wild grapes, wild plums, and choke cherries available to anyone who wants to pick them in the woods. You can also find any number of usable mushrooms and other useful plants out there. However, the wild grass area also has abundance to offer. One of the most useful plants is Queen Anne’s Lace, also known as wild carrot.

QueenAnnesLace01

It’s quite possible that you’ve passed this plant by in the past because it normally grows in with the rest of the weeds. The large taproot is edible. However, you don’t want to dig it up mid-summer. It’s better to dig up a second year plant early in the spring or a first year plant late in the fall. Wait until the plant is dormant or you’ll end up with something that’s akin to shoe leather without much value. Older plants develop a woody interior (xylem) that’s most definitely unpalatable.

Some people actually use a tea made from the root for a number of medicinal purposes. When the root is used for medicinal reasons, the common wisdom is to dig it up in July, which is the same time the plant flowers in profusion.

Wild carrot is an ancestor of the modern cultivated carrot, but they’re different plants. In other words, it would require a lot of work to change Queen Anne’s Lace into anything resembling a domesticated plant and you should focus on the usefulness of the wild plant instead.

One of the most delightful uses of Queen Anne’s Lace is to make jelly from the flowers. You must pick a lot of fresh flowersthe more the better. I normally provide Rebecca with at least two shopping bags full of flowers to make jelly and it takes quite a while to obtain that many flowers, but the effort is most definitely worth it. The Queen Anne’s Lace flower looks like this.

QueenAnnesLace02

In some cases, the center of the flower will contain a purple floret, but I’ve found that the purple floret is somewhat rare. Before you go out and pick a bunch of flowers that look just like this one though, be aware that many flowers have precisely the same coloration and similar appearance. For example, the hemlock flower and fool’s parsley are easy to confuse with this flower. Fortunately, it’s easy to avoid the mistake. Hemlock and fool’s parsley both tend to grow in wetter areas, while Queen Anne’s Lace prefers a drier spot to grow. In addition, Queen Anne’s Lace has a distinctive carrot leaf like the one shown here (the photograph is courtesy of my friend William Bridges):

OLYMPUS DIGITAL CAMERA

When picking Queen Anne’s Lace, look for the flower in July, check the flowers carefully, and verify that the leaves are correct. If necessarily dig a plant up to ensure you’re getting the right one. The root will have a distinctive carrot aroma. If you take these four precautions, you won’t ever have any trouble.

There is conflicting information about the use of the leaves. I’ve never personally eaten the leaves and based on the conflicting information, I’d recommend not eating them. Here’s the Queen Anne’s Lace jelly recipe (courtesy of Rebecca).

Queen Anne’s Lace Jelly

2 qts Flower Heads, Rinsed
  Boiling Water to Cover
2 Lemons, Juiced
2 packets Certo
6 cups Sugar
Dash Cinnamon or Nutmeg

Infuse flowers in boiling water for 4 to 5 hours. Strain the result to obtain 5 cups of liquid. Add lemon juice, sugar, and spices. Bring the mixture to a boil. Add Certo. Bring to a full boil for 1 minute. Prepare the jelly according to the instructions on the Certo package. Can using a boiling water bath for 10 minutes.

The jelly has a subtle taste. It really is hard to describe, but think of something with an almost honey-like taste, but a bit of spiciness too. Add some tea and an English muffin, and you have a wonderful breakfast. The jelly ends up with a wonderful amber appearance.

QueenAnnesLace04

So, what are your favorite wild plants? Do you use them regularly? Let me know at [email protected].

Making Brussels Sprouts Palatable

Rebecca and I grow a large assortment of vegetables. There are many reasons to grow a variety of vegetables, but you can distill them down into several important areas:


  • A balanced diet requires diversity because each vegetable has something different to offer.
  • Each grown year comes with different challenges and you can’t be assured that a particular vegetable will grow well in a given year.
  • Local nurseries will offer different choices in a given year, so unless you start absolutely every vegetable in your own greenhouse, you’re reliant on what the greenhouses have to offer.
  • Biodiversity ensures that your garden’s soil won’t be able to concentrate any particular pathogen.
  • Crop rotation is known to help garden soil by keeping any particular element from becoming depleted.

There are likely other reasons for growing a large variety of vegetables, but this list will suffice for the purpose of this post. I eat every vegetable we grow. In fact, I’ve never had a problem eating vegetables, having had insistent parents when I grew up who ensured I developed a taste for everythingeverything thing that is except Brussels sprouts. No matter how hard I tried, I just couldn’t convince myself that the little cabbages were good tasting. As a child, I’d swallow them whole to avoid tasting them at all (since eating them wasn’t an option).

Imagine my surprise then, when I got married and found that the one vegetable that my wife loved best was Brussels sprouts. Given a chance, she probably would have eaten them at every meal, leaving me wondering what to do next. So, I embarked on a quest to make the Brussels sprout more palatable while begging my wife’s indulgence in eating them only occasionally until I found a solution.

A good part of overcoming any vegetable dislike is to find a way to prepare them. Simply boiling Brussels sprouts in water and serving them with a bit of butter preserved the bitter taste all too well. My first discovery was that boiling Brussels sprouts (or any other vegetable for that matter) is simply a bad idea. Simmering tends to reduce the bitterness. I also discovered that lemon juice and garlic salt make the bitterness of many vegetables appear considerably less. So, here is my first Brussels sprouts recipe that made the vegetable at least sort of palatable.


Plain Brussels Sprouts


3 tsp

Garlic Salt

1/2 cup

Lemon Juice

3 tsp

Butter

2 cups

Brussels Sprouts

1/2 cup

Parmesan Cheese


Just
barely cover Brussels sprouts with water. Add lemon juice, garlic salt, and
butter. Simmer Brussels sprouts slowly until tender (don’t boil them). Remove
from heat and dish out into a bowl. Let cool for about 5 minutes. Coat top with
parmesan cheese. Serves 4.

Later I discovered that the method used to grow Brussels sprouts makes a huge difference. Most people pick them during the hot summer months. We found that by letting the Brussels sprouts continue to grow until late fall and only picking them after the second frost, that the Brussels sprouts were not only much larger, but also considerably sweeter. Since that time, we’ve found a few other vegetables that benefit (or at least survive) a light frost, including broccoli. (Most vegetables don’t like frost, so this technique does come with risks.) The combination of the new growing technique and my recipe made Brussels sprouts a somewhat regular visitor to the table, much to the happiness of my wife (who had waited patiently for many years for the day to arrive).

Recently I experimented with a new Brussels sprouts recipe that makes them taste even better. In fact, I’ll go so far as to say, I like them enough to eat them more often now. Here’s the fancier Brussels sprouts recipe.


Fancy Brussels Sprouts


1/2 tsp

Lemon Peel

3/4 tsp

Corriander

2 tsp

Garlic Salt

1/2 cup

Pomegranate Balsamic Vinegar

1/2 cup

Water

2 tsp

Butter

1/4 cup

Parmesan Cheese

2 cups

Brussels Spouts


Mix
the water, lemon peel, coriander, garlic salt, pomegranate balsamic vinegar,
and butter together in a pot. Bring the mixture near a boil, but not a full
boil. Add Brussels sprouts. Reduce heat to a simmer. Simmer Brussels sprouts
until tender. Remove from heat and dish out into a bowl. Let cool for about 5
minutes. Coat top with parmesan cheese. Serves 4.

Now you know my secret methods for dealing with Brussels sprouts. However, there are some important lessons here for the self-sufficient grower. First, make sure you pick your vegetables at the optimal time because timing is everything when it comes to taste. Second, the manner in which you choose to cook a vegetable is important. Taking time to make your vegetables taste good is an essential part of learning to like them. Let me know about your vegetables eating experiences at [email protected].