In my previous post about Telnet entitled, “Using Telnet to Perform Tasks” you discovered how to use Telnet to work interactively. Now you have enough information to view some of the security issues with Telnet. It’s incredibly easy for someone to monitor your Telnet session. The only protection you have is firewalls and other security you might have in place—Telnet is completely open and offers nothing in the way of security. Lack of security is one of the reasons I didn’t cover this utility in the “Windows Command-Line Administration Instant Reference.” (Telnet is covered from a command line perspective in “Administering Windows Server 2008 Server Core.”) However, the lack of security isn’t a problem in some situations and many administrators prefer to use Telnet to manage some network hardware such as switches and routers. Consequently, the main emphasis of this post is building an awareness of the security issues behind using Telnet so that you can make a good decision about using it to meet your needs.
Before you can see the security issues for yourself, you need to download a utility to sniff packets on your network. This post will rely on a free utility named Wireshark because it does the job admirably and is supported on a number of platforms. Because I’m using the 64-bit version of Windows 7, I downloaded the 64-bit Windows installer for the 1.4.7 version of Wireshark. To make things simple, I performed a full install. Part of the Wireshark setup will also install WinPcap, so you don’t need to install this product separately. If you’re using some other version or configuration of Wireshark, your screen may not look precisely like mine.
Using a sniffer is somewhat dangerous and you need administrator privileges to do it. This post isn’t designed to make you an expert in protocol sniffing. In fact, this post is exceptionally simple and is designed only to make you aware of deficiencies in Telnet security. The nefarious individual who gains access to your network to sniff about will have significantly more skills and be able to learn considerably more than you’ll learn using the simple directions in this post.
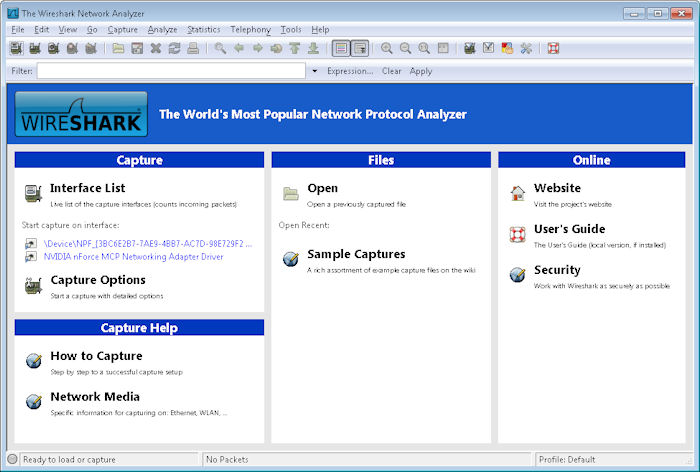
After you complete the installation, you’ll be able to start Wireshark. Choose Start > All Programs > Wireshark and you’ll see the initial Wireshark display shown here.
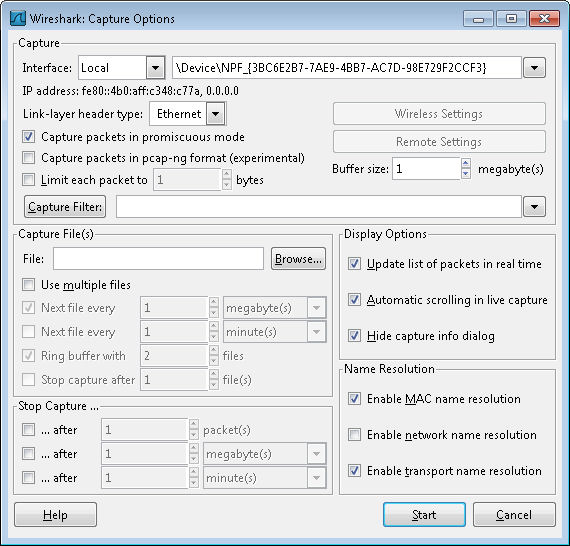
Wireshark isn’t configured to work with Telnet at the outset, so you need to tell it what to sniff. Click Capture Options and you’ll see what looks like an incredibly complex Capture Options dialog box like the one shown here.
We’re not going to worry about the vast majority of these options. In fact, you only need to set two options to sniff out Telnet packets. Look first at the Interface field. Make sure it’s set to Local. Select your network adapter from the drop down list box. The network adapter will normally have a human readable name, not something odd as shown in the screenshot.
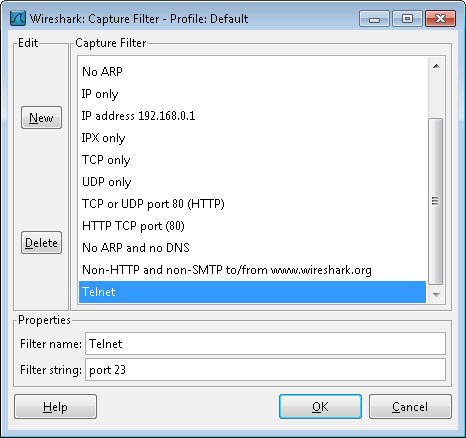
Next you need to tell Wireshark what to sniff on the interface you’ve selected. Click Capture Filter. Type Telnet in the Filter Name field and port 23 in the Filter String field. Click New. Your dialog box should look like the one shown here.
Click OK. You’ll see the filter criterion entered in the Capture Filter field. More importantly, Wireshark is now configured to offer a Telnet filter anytime you need one. Click Start. The Wireshark display will change, but you won’t see anything on it—the display will be blank.
Open a command prompt and start a copy of Telnet in interactive mode. Make sure you open a command prompt with administrator privileges. The act of starting Telnet won’t create any packets as you can see in Wireshark. In fact, type ? and press Enter. You’ll see that Telnet is still perfectly safe—it isn’t generating any packets.
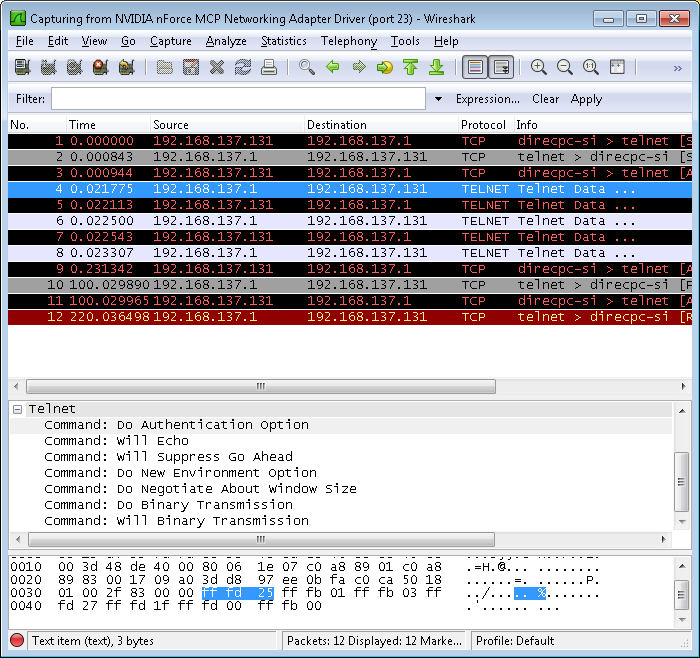
Use the Open command to open a connection to your server. Simply typing O ServerName and pressing Enter generates packets. You can see them in Wireshark like this:
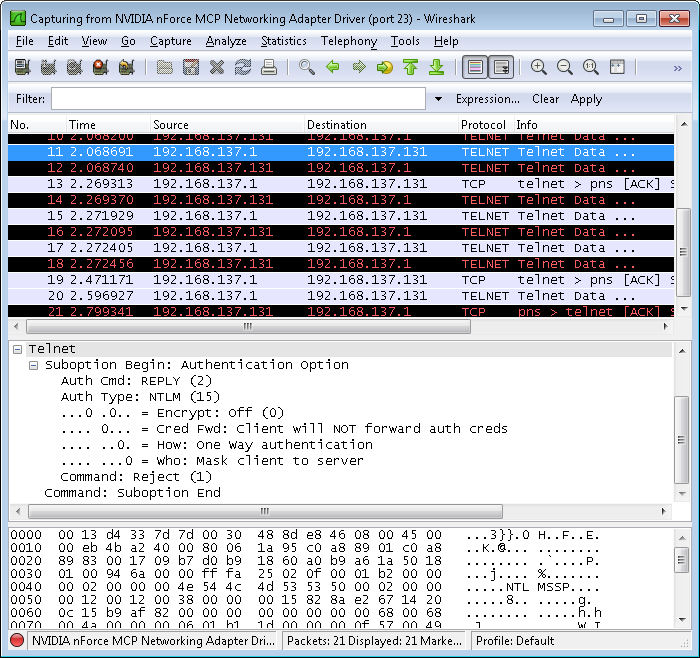
Notice that some of these entries are labeled Telnet Data. In addition, the Source and Destination columns tell you which direction the information is flowing (the client is 192.168.137.131 in this case). Click on the first of these entries and you’ll see that the middle panel contains some information about the Telnet Data. Open the Telnet entry and you’ll see some interesting information as shown in the figure. For example, the packet information tells the viewer that Telnet is set to use the authentication option.
Go back to the command prompt now. Type y and press Enter to send your password information to the server. Of course, one of the big questions you probably have is whether Telnet is exposing your username and password. Near the end of the packets, you’ll find one that contains an Suboption Begin: Authentication Option entry like the one shown here.
In this case, the option entry tells the server that the client won’t forward the authentication credentials. The option works because I’m already signed onto the server and the server already has my credentials. This is one of the items you’ll want to check for your own Telnet setup, however.
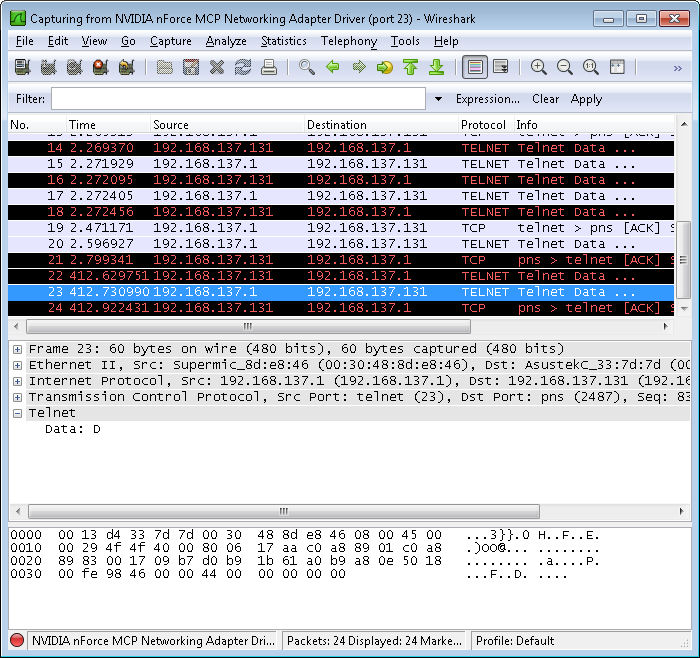
Unfortunately, this session isn’t safe by a long shot. Type just a single letter, a D, at the command prompt. You’ll find that typing this single letter generates a packet that you can see with Wireshark like the one shown here.
In fact, you’ll find that every action on your part creates more packets—each of which is easily sniffed by anyone with Wireshark or any other application of the sort. Finish the command by typing ir and pressing Enter. You’ll see the expected response at the command line.
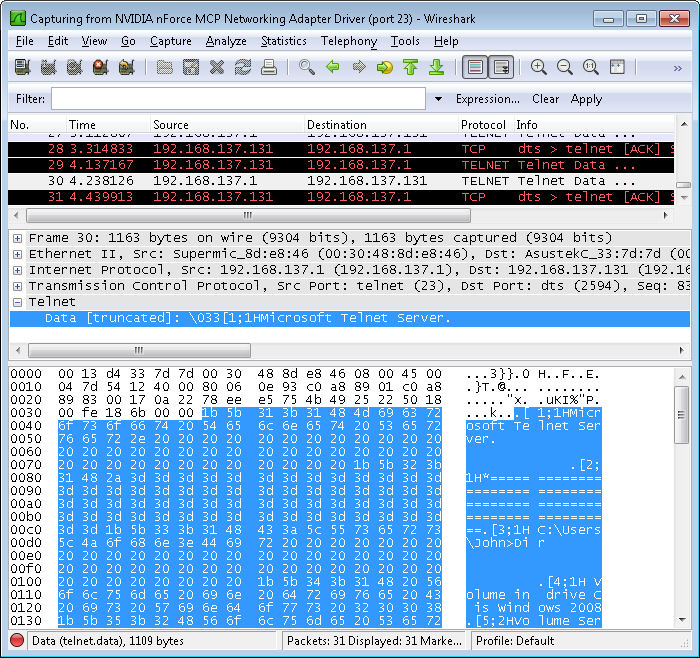
At this point, you can also see the response from the server in Wireshark. The text isn’t as readable because it contains all of the control characters normally used to format the text. However, here’s an example of the response as it appears on my system.
Look at this response carefully and you’ll see that anyone can learn precisely what you’re doing. If you have to enter passwords to perform a particular task, the viewer will get them too. Telnet isn’t a secure method to manage anything—you need to provide a secure environment in which Telnet can run. This post only touches on the tip of the iceberg, of course. Let me know if you have any questions about it at [email protected].

