
This post is the start of a series showing my particular technique for making wine. There are probably more ways of making wine than you can imagine–certainly more than I’ve seen. The technique I use produces highly repeatable results in small quantities (suitable for the home enthusiast) in 31 days. I don’t use a two-stage fermentation technique, nor do I rely on whole fruits/vegetables as a source of juice. This technique relies on pure juice and is extremely simple, but it does produce some nice tasting wine. If you are not partial to the whole wine making process, you might want to check out some GraysOnline wine online so you can cut out the middleman, but wouldn’t it be fun to make it, order some anyway and compare them? Another plus… you get more wine!
Many foods are preserved using fermentation. For example, we also make sauerkraut, a kind of fermented food. Wine is probably one of the earliest forms for food preservation through fermentation. In this case, yeast (species Saccharomyces cerevisiae) consumes sugar found in juice to produce carbon dioxide and alcohol. It’s the alcohol that preserves the juice.
This form of preservation was probably found by accident in early history. It turns out that the yeast required to produce wine occurs naturally on some fruit such as grapes. When you see that light dusty coating on grapes growing on the vine, part of that dust is the yeast. If you wanted, you could simply crush the grapes and let nature take its course, which is how some people still make wine. Certainly, there is nothing wrong with this approach. However, naturally occurring yeasts don’t always produce the best results and sometimes you can end up with vinegar when the alcohol is oxidized by acetic acid bacteria, AAB, instead of being stabilized to produce wine.
In order to produce wine, and not vinegar, the modern technique is to kill the microbes by adding a campden tablet to the juice. Later this year, I’ll show some techniques for producing and preserving juice for wine making. For now, just assume that you have the amount of prepared juice required for the wine you want to make.
The first day of wine making is the most time consuming, so you can’t become a reverse wine snob super quickly. It can be worth picking up something else to drink in the interim period. I normally set aside three hours to perform the steps required to start two, one gallon, batches of wine that will eventually produce eight bottles. In most cases, I’ll create wine from two different juices–no need to be boring when you’re doing something creative  .
.
To start the process, you gather all of your equipment and sterilize it using a one-step sterilizer designed for wine making. You need these basic pieces of equipment to make wine:
- Mixing container capable of holding the amount of wine you want to make (one gallon in my case)
- Four-cup measuring cup
- Measuring spoons
- Funnel (for pouring the wine mixture into the fermentation container)
- Fermentation container
- Air lock and adapter (you’ll see a picture of it later)
- Dairy thermometer
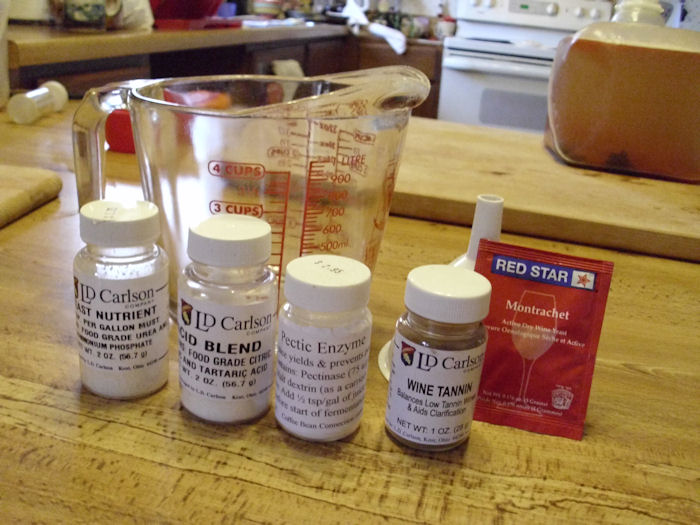
You want to gather all of the ingredients as well. The ingredients you use depend on the kind of wine you’re making, but generally you’ll need sugar (food for the yeast), yeast nutrient (helps the yeast to start growing), pectic enzyme (helps produce clear wine that lacks a pectic haze), and acid blend (improves the pH balance of the juice and the eventual taste of the wine). Some wines also require yeast energizer (works like yeast nutrient for some types of fruit) and tannin (helps the wine keep longer, promotes clearing, and improves taste).
Of course, the most important wine making ingredient is the yeast. I generally use a Montrachet wine yeast. It performs well in a wide temperature range, produces a somewhat drier wine (one that has less remaining sugar with a higher alcohol content), and tends not to stop working until the fermentation process is complete (a condition known as getting stuck). The yeast you choose makes a great deal of difference in the quality and taste of your wine. Never use bread yeast for wine–it tends to produce a low alcohol result and the wine won’t clear properly. After all, the purpose of bread yeast is to produce lots of carbon dioxide for fluffy bread.
There are a lot of sources for recipes and I’ll eventually share some of mine, but each recipe produces different results, so you’ll have to play around to see what produces the result you like best. That’s part of the fun of making wine. If winemaking turns out not to be your thing, you may instead want to buy a bottle from the best wine store denver so you can get an excellent quality wine without the difficulty of doing it yourself. Here’s a picture of my winemaking ingredients:
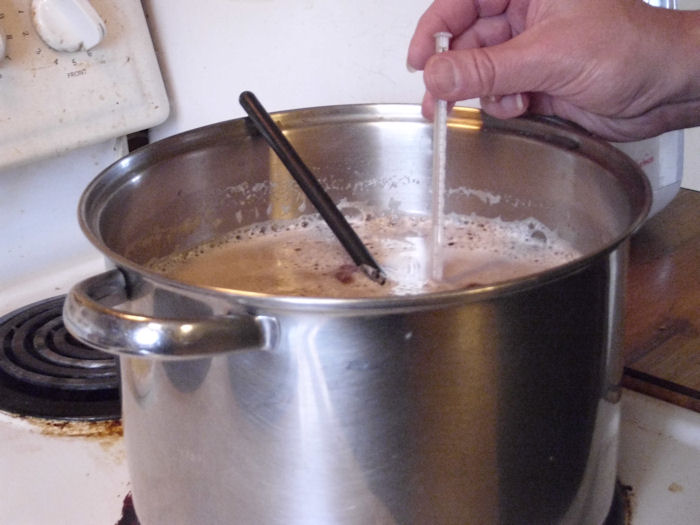
After you have everything gathered, mix the ingredients in the mixing container to produce the must (the name of the wine mixture), but don’t add the yeast. The next step for me is to gently warm the must to the optimal temperature for the yeast (105 degrees for Montrachet). Keep mixing the ingredients to make absolutely certain they’re mixed completely. Measure the temperature carefully–too cold and the yeast won’t start as quickly as it could–too hot and you’ll kill the yeast:
After the mixture is at the right temperature, pour it into the fermentation container. Sprinkle the yeast on top. Add water to the air lock and attach the air lock to the fermentation container as shown here:
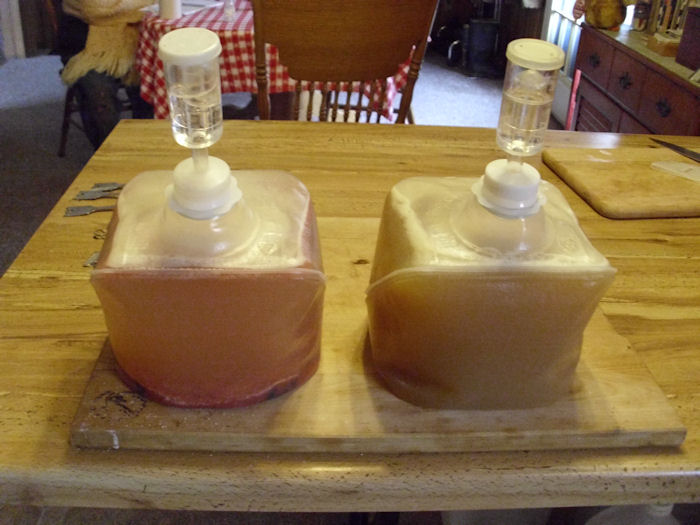
In this case, you’re seeing tomato wine on the left (delicious with a stronger tasting cheese) and apple wine on the right (a wonderful desert wine). The tomato wine has raisins added to it for taste. I’m using one gallon cubi-containers originally obtained as part wine making kits purchased a long time ago. Buying a kit is one of the better ways to get all of the equipment you need to make wine, but you can easily purchase the components separately. Notice I also put my containers on a cutting board. That makes it easy for me to move my fermentation containers around to more evenly heated rooms or simply to get them out of the way.
Keep an eye on your containers for a while. You want to be sure that the air locks are working properly to keep out foreign yeast and bacteria. Here’s a closeup of my air locks:
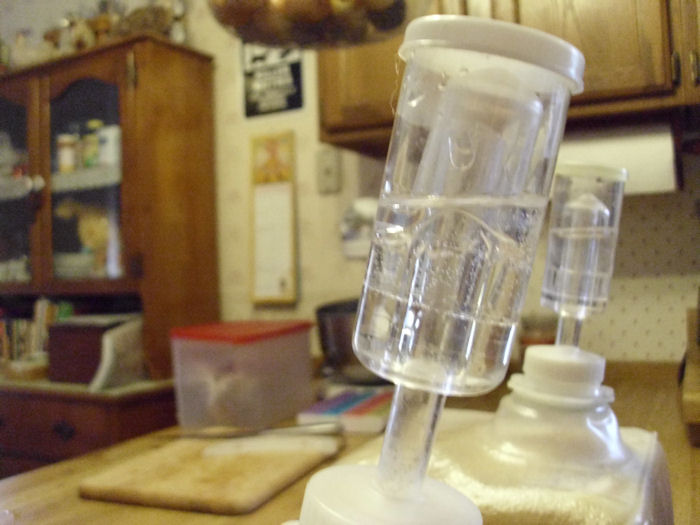
The one in the front is already in the right position. Carbon dioxide produced by the yeast has pushed the little cap up in the middle. In order to get out, the carbon dioxide will now need to go down through the water in the air trap and then out through holes in the top. In this way, the container maintains positive pressure–keeping out external sources of contamination. The air lock shown in the back isn’t in the right position yet because the yeast has just started working. Eventually, that cap will rise to the top as well. So, are there any questions about day one? Let me know at [email protected].