FSUtil and Quotas

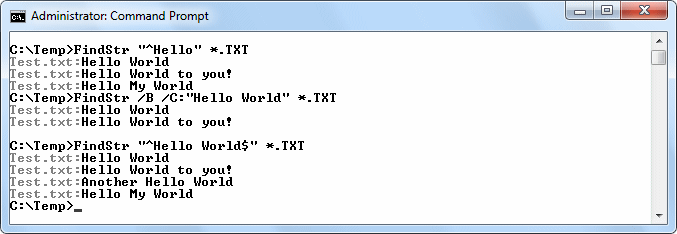
There is more than a little confusion about the use of FSUtil with quotas. For one thing, precisely why would someone use the FSUtil Quota Track command when it doesn’t enforce the quotas you set? I’m sure Microsoft has some scenario in mind for just tracking and not enforcing the quotas. I did talk with one of my administrator friends. She uses just the tracking option at her company. The reasoning is that she can then talk with the user when the user goes over a limit. In this particular organization, it’s bad form to limit the user’s access to the hard drive when in the midst of an important procedure (as it might have dire consequences). She says that she does see the event log entries when someone goes over their quota. So, that’s one potential scenario—you have an administrator that has to work with the users to maintain the hard drive but isn’t allowed to enforce those limits directly because doing so could impede work.

Of course, one of the problems with the tracking feature is that it doesn’t automatically set logging. In order to configure drive C on your system to track user activities and log them in the event, you must initially configure the drive using these three commands.

  1. FSUtil Quota Track C:
  2. WMIC QuotaSetting Where Caption=”C:” Set ExceededNotification=True
  3. WMIC QuotaSetting Where Caption=”C:” Set WarningExceededNotification=True

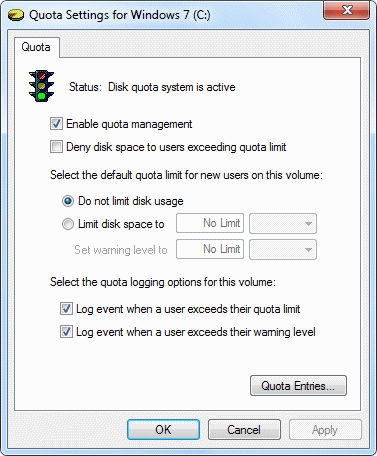
The two WMIC commands set the two logging options for you. What these commands do is set the quota exceeded and quota warning flags for drive C. After you issue these three commands, the Quota Settings dialog box will look like this:

Quota1

You can now add quotas using the FSUtil Quota Modify command as described in page 89 of my book, “Windows Command Line Administration: Instant Reference.” Generally speaking, you can add an overall quota for the entire drive or individual quotas for each person. The overall quota affects everyone who doesn’t have a specific individual quota.

OK, now you’ve configured the C drive to provide quota information in the form of event log entries. So, you create a test case to make sure everything works and that’s when you figure out that you can’t see any entries in the event log. In addition, it appears that the FSUtil Quota Violations command doesn’t work either. Well, that’s a little disappointing.

The problem is a lot simpler to correct than you might initially think. Microsoft hides the information you need in the Knowledge Base article at http://support.microsoft.com/kb/228812. The short story is that NTFS only scans the drive once an hour for violations, so you’ll have to wait a while to see any test violations. Of course, you might not have all day to wait around for NTFS to get around to scanning the drive. So, you can use the FSUtil Behavior Set QuotaNotify 60 command to set NTFS to scan the drive once a minute. In order to get this command to work, however, you must reboot the system. It seems that NTFS also loads its settings once during each boot cycle and then ignores the registry settings thereafter.

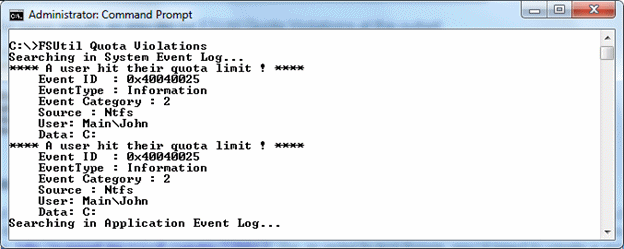
Once NTFS starts scanning the drive at a reasonable interval, you’ll begin seeing entries in the System event log. In addition, you can use the FSUtil Quota Violations command to look for violations as shown here:

Quota2

At this point, you’re ready to go. Your system is setup to monitor quotas in a critical environment, but not to enforce the quotas (thus preventing people from completing tasks). I’ve had at least one person tell me that the FSUtil Quota Violations command tends not to work if the System event log gets too full; I’d like to find out whether other people are having the same problem. Let me know how you use quotas on your system at [email protected].

Health Benefits of Self-Sufficiency

I remember the discussion well; my wife and I were on a short vacation in the mountains of California one day (Julian for those of you who know the little town in Southern California) and we were talking about gardening. It sounds like a topic that is a long way from self-sufficiency or health, but there is a connection; even we didn’t know it at the time though. That discussion happened over 15 years ago. Today, we’re living a different sort of reality, much of it stemming from that innocuous discussion.

At the time, I weighed in at a gargantuan 365 pounds (perhaps a little more) and had a 54 inch waist. It was hard to find time to exercise and even harder to find money for a gym membership. Exercise consisted of walks, when time allowed. Today, I’m much lighter, having lost 127 pounds (so far) and my 42 inch waist is much smaller. My blood pressure has gone way down, my heart rate as well. In addition, I take far less medication today than I did at one time and my diabetes is under control. The technique I’ve used has also naturally decreased my LDL cholesterol and increased my HDL cholesterol. The entire process has required a little over 12 years to complete; a long time granted, but the process has been slow and continuous.

You might wonder how much it cost to lose that much weight. That’s the interesting part. My wife and I now grow about 95% of our own food. We eat higher quality and fresher food and spend a whole lot less money in the store. In short, instead of paying for a gym membership, we exercise and earn money (in the form of store and medication savings) while doing it. You won’t find that sort of deal anywhere on TV.

The interesting thing about the approach I’ve taken is that my weight loss has been slow and continuous. The exercise I get by producing the things I need has actually increased my stamina and strength, while reducing my weight. I never get bored exercising this way because each day brings something new. One day I’m stretching while picking weeds in the garden, another day I’m lifting bushel baskets full of produce. Each day brings something new and the tasks I perform change by season. There is no falling off the cart because the change I’ve made is a part of my lifestyle now; I wouldn’t consider living any other way.

This entry has been short, but I wanted to introduce you to the idea behind self-sufficiency. It’s a method of producing what you need, gaining some substantial health benefits, and making money while you’re doing it. No, you won’t get a pile of cash from your garden, but wouldn’t you like to spend less at the store? What would you do with the money you save by reducing the groceries you buy in half? That’s what self-sufficiency is about; it’s about doing for yourself.

Keep your eyes peeled for additional posts in this category as I have time to write them. In the meantime, I’d like to hear your thoughts about self-sufficiency. Write me at [email protected].

Regular Expressions with FindStr

Regular expressions are a powerful feature of the FindStr utility. However, they can also prove frustrating to use in some cases because the documentation Microsoft provides is lacking in good examples and difficult to follow. You can see some usage instructions for FindStr starting on page 82 of the Windows Command-Line Administration Instant Reference .

A reader recently commented that there is a problem with the dollar sign ($) regular expression. It must actually appear after the search term to be useful. Of course, the problem is creating a test file to sufficiently check the use of the regular expressions, so I came up with this test file:

TestFile

Now, let’s perform some tests with it.  Here is the result of some tests
that I performed using this test file and FindStr regular expressions:

TestResults

The first test case shows what happens when you try
the command on page 82 of the book.  It appears to work, but you’ll see
in a moment that it actually doesn’t.  Let’s take the two parts of the
regular expression apart.  Using
FindStr “^Hello” *.TXT seems to work just fine.  However, the command FindStr “$World” *.TXT doesn’t produce any output.
Only when the $ appears after World does the command produce an
output.  Consequently, page 82 should show the rather counterintuitive
command, FindStr “^Hello World$” *.TXT to produce the correct output.

It’s also important to be careful about making generalizations when
using FindStr. For example, when working with the test file originally
shown in this example, the FindStr /B /C:”Hello World” *.TXT command produces the same output as FindStr “^Hello” *.TXT as shown here:

TestResults2

If you change the test file like this though:

TestFile2

you’ll see these results:

TestResults3

As you can see, you must exercise care when using FindStr to obtain the
desired results.  What other odd things have you noticed when using
regular expressions with FindStr?  Add a comment here or write me at [email protected] to let me know.